DC-10
Dual Counting Indicator
Operation Manual (Full Version)
PLEASE READ THIS MANUAL VERY CAREFULLY BEFORE OPERATING THIS INSTRUMENT
Specifications subject to change without prior notice
V264 January 2021
Page 1: ...C 10 Dual Counting Indicator Operation Manual Full Version PLEASE READ THIS MANUAL VERY CAREFULLY BEFORE OPERATING THIS INSTRUMENT Specifications subject to change without prior notice V264 January 2021 ...
Page 2: ...2 ...
Page 3: ...re Plugging in Power Adaptor to Electricity Grid 17 5 3 Before First Time Use 17 5 4 CR1220 Real Time Clock Backup Battery 17 5 5 Battery Voltage and Battery Operation Application 17 5 6 Battery Lo 17 5 7 Battery Charging Status 17 6 Internal Function Settings 18 6 1 About Internal Function Table 18 6 2 How to Enter Select Internal Function 18 6 3 Key Function during Internal Function Setting Oper...
Page 4: ...e tare 32 9 9 3 Preset tare 32 9 10 Auto Power Saving Auto Power off Time 32 9 11 Expiry Date 32 9 12 Print a Customer Product Code Entered 32 9 13 Inputting Numbers Letters Symbols by Keyboard 32 10 Count Function 33 10 1 Obtain Unit Weight 33 10 1 1 Direct unit weight entry method 33 10 1 2 Sampling method 33 10 1 3 Employ the last unit weight when power on 34 10 1 4 Recall unit weigh unit from ...
Page 5: ...lue Quick PLU 39 11 4 1 Create save preset tare value to quick PLU 39 11 4 2 Recall preset tare value from quick PLU 40 11 4 3 Clear preset tare value from quick PLU 40 11 5 Product Code and Product Description 40 11 5 1 Create save product code and product description to quick PLU 40 11 5 2 Recall product code and product description from quick PLU 40 11 5 3 Clear product code and product descrip...
Page 6: ...bi Memory Management Report 46 14 4 Totalization 46 15 Barcode Scanner 46 15 1 Using Barcode Scanner to Simulate Operation Key Input 46 15 2 Inputting Customer Product Code and Operator Number 46 15 2 Change to Different Input Target 47 15 3 More about Customer Product Code Description 47 16 Commands 47 17 System Message Error Code 48 17 1 System Message Table 48 17 2 Error Code Table 48 18 Daily ...
Page 7: ...er Driver Installation 66 J 3 Create Upload Label to Sbarco Printer 67 Appendix K Label Programming Illustration Samples 69 K 1 Label Prompt Command Table 69 K2 Label programming Illustration 71 K 2 1 Label Illustration for LP50 TSC 71 K 2 2 Label Illustration for Sbarco 71 K 3 Sample Labels 71 K 4 Quick Access to Label Settings 72 K 5 Repetitive Printout 72 Appendix L Keyboard Command 73 Appendix...
Page 8: ...1 Command Description Table 92 T 2 Parameter Description Table 93 Appendix U Customized Operation Settings PLU Reading Commands 95 U 1 Command Description Table 95 U 2 Parameter Output Description Table 96 ...
Page 9: ...technical assistance 1 2 Seal Serial Number This instrument is legal for trade only when it is sealed and or stamped and bearing a serial number Do not attempt to break the seal or stamp or serial number affixed to this instrument No warranty service will be provided if the seal or stamp or data plate affixed to this instrument is damaged or removed Always contact your dealer for after sales servi...
Page 10: ...15 mV Minimum input per d 0 05µV 24 bit Low Noise Delta to Sigma Δ Σ 3 200 000 Counts at 15 mV Minimum input per d 0 05µV AD Conversion Speed 15 30 60 120 times second Selectable Max Tare Range Max for Single Range Max1 Subtractive Tare for Range Interval Max for Single Range Max1 Subtractive Tare for Range Interval Calibration Methods 2 Span Points Calibration Linearity Calibration 1 Span Point C...
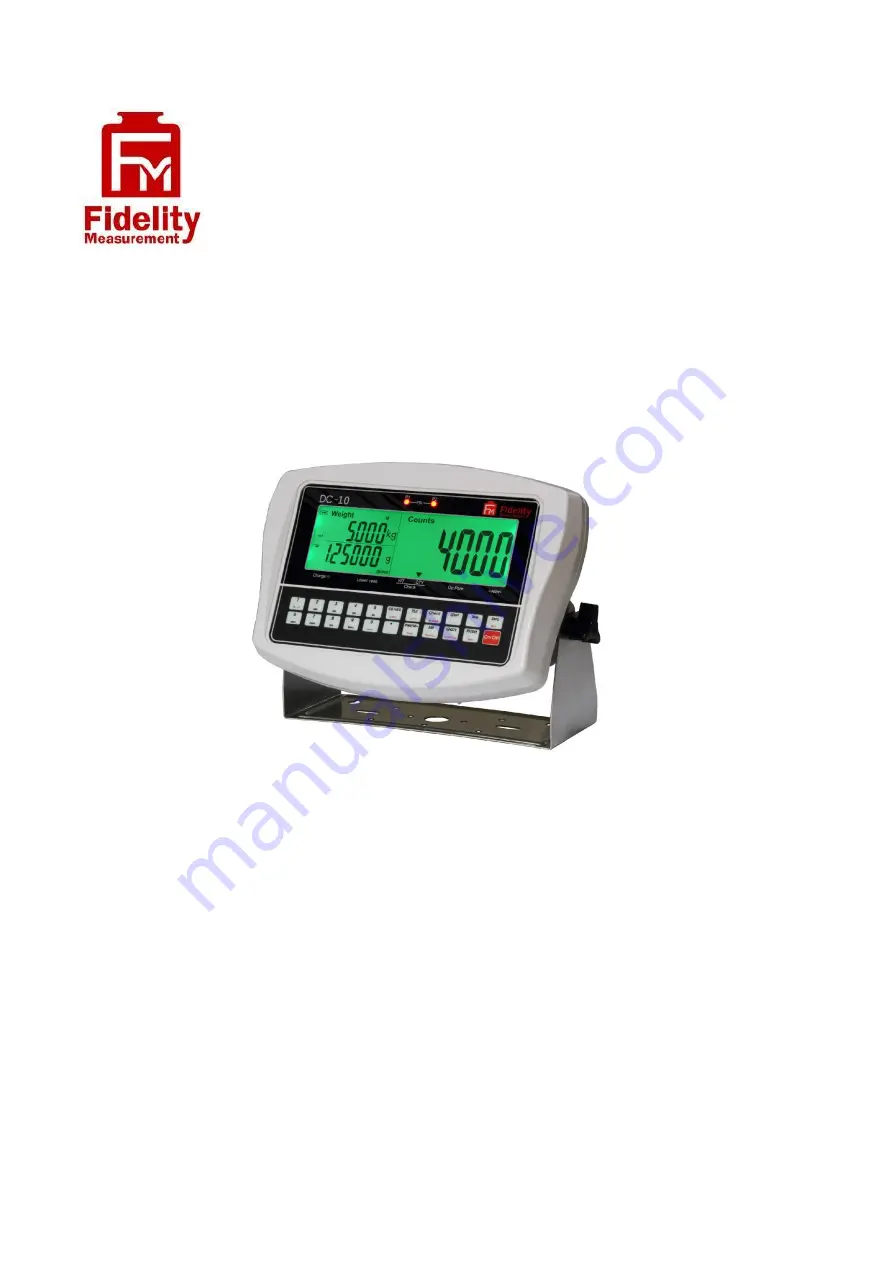
Page 11: ...11 3 Panel and Keys ...
Page 12: ...imit in terms of quantity Enter internal function during power on countdown process 4 MR Recall total stored transactions Go to previous parameter or previous internal function number 5 Print M Send print data out and or accumulate current value to memory Enter save and return 6 Decimal Decimal 7 Zero Set weight displayed to zero when unloaded Quit without saving 8 Tare To tare off the weight of a...
Page 13: ...access to label settings 11 PLU Save current operation parameters to Customized Setting PLU Recall operation parameter from Customized Setting PLU To shift between P1 and P2 12 CE x10 Clear value entered during setting process or Trigger the extended display mode Clear 13 0 9 Numeric keys Numeric letters and symbol keys Press 0 to go to F1 Press 1 to go to F10 Press 9 to go to F90 ...
Page 14: ...r Visible when instrument is running under customized settings 25 Qty Check Indicator Visible when current Hi Lo check function is in term of quantity 26 Weight Check Indicator Visible when current Hi Lo check function is in term of weight 27 Weight Unit Indicator kg kilogram g gram 28 Unit Weight Indicator Visible when unit weight value is being shown on LCD3 29 LCD3 LCD display panel 3 Unit weig...
Page 15: ...lugged in here Do not plug in any other power adaptor than the one which comes with this instrument B Reserved C P1 Load Cell Connector 7 Pin Refer to below 4 2 P1 Load Cell Connector Pin Assignment Table for details D Control Output Port Refer to below 4 3 Relay Pin Assignment and Connection Table for details E Comport 2 UART 2 RS232 Refer to below 4 4 RS232 Comports Pin Assignment for Uart0 and ...
Page 16: ...ay 4 Common 3 Relay 4 Normal Close 4 Relay 3 Normal Open Synchronized with OK Output 5 Relay 3 Common 6 Relay 3 Normal Close 8 Relay 2 Normal Open Synchronized with LO Output 9 Relay 2 Common 10 Relay 2 Normal Close 11 Relay 1 Normal Open Synchronized with Buzzar Output 12 Relay 1 Common 13 Relay 1 Normal Close Notes a In case control output is used always plug in the power adaptor which comes wit...
Page 17: ... and supports 5 5 Battery Voltage and Battery Operation Application Battery voltage is displayed during power on countdown process on LCD1 and also by means of internal function F2 Battery voltage below 6 0 is considered to be low and is not recommended for any battery operated application which lasts for longer than 60 minutes depends on actual system configuration 5 6 Battery Lo When Lo Bat mess...
Page 18: ...t and power on again During countdown process press QTY b If F31 is Set Press PF Set during normal operation status 1 Instrument displays F1 and is now in internal function mode 2 Press PF Set and MR to access the preferred internal function number 3 Quick access to a function number a Press 0 to go to F1 b Press 1 to go to F10 c Press 2 to go to F20 d Press 3 to go to F30 6 3 Key Function during ...
Page 19: ...n of W2 if set is shown on LCD3 Value displayed Max2 d2 F4 Date Format Date DD MM YY YY MM DD MM DD YY Press MR or PF Set to change date format and press Print M to confirm Then press Print M to check current date value To change date value press Print M then enter date value and then press Print M to confirm Instrument will then convert and display the month and date value entered into week and d...
Page 20: ...value remains unchanged for 5 seconds F9 Enable Totalization of P1 P2 Off Disabled On Enabled Notes Select On to enable results totalization of 2 platforms When F79 is set to Off this function is always Off and this internal function is not accessible F10 Filter Strength 1 2 3 4 5 6 7 8 9 Press MR or PF Set to select a 1 strongest filter for bad working environment where vibration wind flow etc af...
Page 21: ... when reading is out of range Hi Check Buzzer activates when reading more than Hi limit Lo Check Buzzer activates when reading lower than Lo limit Action on Negative Value Off Check Mode Disable when value is less than zero On Absolute value all negative values will be deemed and checked as positive ones F16 UART Comport Setting 4 UARTs UART 0 1 2 3 are available Refer to paragraph 8 for more sett...
Page 22: ...s a If a Product Customer Code is blank Product Customer Description will be ignored b Customer and Product code does not support print format 1 Lab 1 c Customer and product code entered will be carried out automatically on output formats Lab 2 Lab 5 d Customer and product description entered will be carried out automatically on output Lab 2 F20 Keyboard Lock Off Disable On Enable When keyboard lo...
Page 23: ...ion Setting when in Operation Status P F Shift between P1 and P2 Note When F79 is set to Off Mode Key is always Set and this internal function is not accessible F32 External Input Assignment in1 Input 1 in2 Input 2 in3 Input 3 1 of the below 7 input parameters can be assigned to each external input ZEro Zero tAre Tare Print Print M ACC Mr MR CLEAr CE x10 P F Shift among P1 P2 and PA Set Access int...
Page 24: ...he individual transaction o Tare weight of individual transaction o Gross weight of individual transaction If All is selected instrument returns to F33 In this case all contents will be outputted If Custom is selected follow the below procedures for report content detail settings 6 Press MR or PF Set until the preferred report content detail parameter appears on LCD3 then press Print M Below param...
Page 25: ...transaction recorded in specified month Period All transaction recorded within the specified period All All transaction recorded in Alibi Transaction Memory 6 Press MR or PF Set until the preferred output date duration parameter appears on LCD3 then press Print M If Day is selected enter the requested date value then press Print M to output If Month is selected enter the first date of the requeste...
Page 26: ...3 and make sure that capacity x division are correctly set 8 Go to F4 to check and set date format and value 9 Go to F5 to check and set time value 10 Go to F6 to do system initialization 11 Check and set all other operation parameters from F7 F8 F9 F36 according to numeric order of the internal function number 12 Conduct test runs to determine if the above settings best suit the application requi...
Page 27: ...er each UART Setting procedures4 1 Go to F16 then press Print M 2 Name of the current UART appears on LCD2 3 Press PF Set until the UART Uart 0 3 appears on LCD2 then press Print M 4 Press PF Set or MR until the preferred transmission type appears on LCD3 then press Print M to set data communication types 7 parameters are available Off Disabled Auto 1 Auto print when weight is stable Auto 2 The hi...
Page 28: ...e B Off On Default On 5 Check Control Note C Off On Default Off 6 Stability Control Note D Yes No Default Yes 7 Minimum Output Weight Note E 10 20d in 11 steps Default 20d 8 Output Format Note F Lab 1 Lab 5 LP 50 TSC and Sbarco Default Lab 2 9 Other Procedures Note H K Note A Transmission interval is the time interval in second between each output 0 continuous output Note B On Auto Memory accumula...
Page 29: ...ss Print M to save Setup is then completed Note K If LP50 TSC Sbarco is selected a Select number of copy 1 8 and press Print M to continue the below setting b Select label file number FL1 00 FL1 99 to print in label format group 1 and press Print M to continue the below setting FL1 00 current transaction label printing output disabled c Select label file number FL2 00 FL2 99 to print in label form...
Page 30: ...rough the power on countdown process and display the below information 1 Software number LCD1 and version LCD2 2 All display segments 3 Calibration count value LCD2 parameter set count value LCD3 and Battery voltage LCD1 4 Capacity division set of P1 LCD1 in the format of Max plus 1 division LCD2 Max1 e1 LCD2 Max2 d2 5 Capacity division set of P2 LCD1 in the format of Max plus 1 division LCD2 Max1...
Page 31: ...oads and Weighing Platform Always place an object onto platform gently Excessive force shock applied to platform may cause un recoverable damage to the weight sensor inside platform It is a good practice to remove all loads from platform after weighing It will prolong the life of the weight sensor 9 8 Manual Zero If zero weight cannot be obtained when unloaded press Zero Zero Indicator lights up w...
Page 32: ...et tare value can be cancelled by entering a zero preset tare value numeric 0 then press Print M 9 10 Auto Power Saving Auto Power off Time This instrument is equipped auto power saving and auto power off time function Refer to F7 on paragraph 6 5 for details 9 11 Expiry Date This instrument support expiry date output according to predetermined expiration period If expiry date is required for oper...
Page 33: ... is the basic of all piece count transaction process Average Piece Weight can be created and obtained through one of the below methods a Direct unit weight entry method b Sampling method c Employ last unit weight when power on d Recall from quick PLU 10 1 1 Direct unit weight entry method This method is used when unit weight is known Procedures 1 During normal operation status enter the unit weigh...
Page 34: ...tomatically when all of the below are met a Unit weight is obtained by sampling method as listed on 10 1 2 b 6 pieces quantity added 9999 pieces c 6 pieces quantity added 100 of last total quantity on weighing platform Note Auto Unit Weight Enhancement Function stops automatically when total quantity on weighing platform reaches 10000 pieces or more When all the above requirements are met a new un...
Page 35: ... power on Last check type and limits before powered off will be employed automatically when powered on again 10 4 1 3 Recall check type and limits from quick PLU For quantity check Refer to paragraph 11 2 2 for details For weight check Refer to paragraph 11 3 2 for details 10 4 2 Hints for entering Lo and Hi limits For normal comparison set both Lo and Hi limits To check only if result is lower th...
Page 36: ... Auto Accumulation to On in internal function number F16 To disable memory accumulation set Auto Accumulation to Off in internal function number F16 Refer to step 4 of paragraph 8 3 for setting details 10 5 2 Manual accumulation Press Print M to accumulate the current value to memory 10 5 3 Automatic accumulation13 Automatically memory accumulation of an Uart is activated automatically when Auto A...
Page 37: ... Indicator appears only transaction data of P2 will be accumulated and save MR and memory clearance refers to P2 only When both P1 and P2 indicators appear transaction data of both platforms will be accumulated and save MR and memory clearance refers to both platforms 10 5 6 2 Dual platform accumulation rules When dual platform PA operation is selected transaction data will only be accumulated to ...
Page 38: ...lays Done on LCD3 At this point unit weight is saved and in effect 11 1 2 Recall unit weight from quick PLU Procedures 1 During normal operation status press 0 then press WT 2 Instrument displays Recall on LCD1 3 Press the preferred quick PLU number 0 9 then press Print M 4 Instrument displays Done on LCD3 At this point selected unit weight is recalled and in effect 11 1 3 Clear unit weight from q...
Page 39: ...it to a preferred quick PLU by pressing the quick PLU number 0 9 then press Print M At this point weight check limit is saved and in effect 11 3 2 Recall weight check limit from quick PLU Procedures 1 If more than one weighing platform is used shift to the preferred platform by pressing PF Set 2 During normal operation status press WT then Check then PLU 3 Instrument displays Recall on LCD1 4 Pres...
Page 40: ...nfirm 5 Instrument displays L code followed by the 3rd 6 digits Enter the last 6 digits of the code here then press Print M to confirm 6 Instrument displays first 6 digits of description content 7 Enter description starting from H then M1 M2 M3 and finally L Press Print M to confirm and end editing after last digit has been input 8 Instrument displays PLU on LCD3 9 Save product code and product de...
Page 41: ...nter description starting from H then M1 M2 M3 and finally L Press Print M to confirm and end editing after last digit has been input 8 Instrument displays PLU on LCD3 9 Save customer code and customer description to a preferred quick PLU by entering the quick PLU number 01 99 and press Print M 10 Instrument displayed Done on LCD3 11 At this point customer code and customer description are saved a...
Page 42: ...more than one weighing platform is used shift to the preferred platform by pressing PF Set 2 Create and make sure that all the above mentioned 12 operation settings and parameters 2 13 are correctly set and entered 3 Long press PLU 4 Instrument displays Save on LCD1 5 Enter the preferred Customized Setting PLU number 01 99 through numeric key then press Print M 6 Instrument displays Done on LCD3 A...
Page 43: ...on status press PLU 2 Instrument displays Recall on LCD1 3 Enter 00 through numeric key then press Print M At this point Customized Setting Indicator disappears and instrument is running according to system setting 13 Data Output Protocols Formats This instrument supports various PC data output protocol and output formats Refer to below paragraphs and paragraph 8 for details and setting procedures...
Page 44: ...ased on data saved in transaction memory and Criteria set forth in F71 supervisor password is needed to access this internal function and Format set forth in F33 and Search criteria and time duration set forth in F34 Notes The Alibi memory is independent to those data obtained through memory accumulation e g manual memory accumulation by pressing Print M key and auto accumulation result by ACC On ...
Page 45: ...s from gross zero or minus is recorded by system automatically c Auto 2 The highest stable weight value of a weighing process is recorded by system automatically when all loads are removed and gross weight returns to zero or minus d Auto 3 The last stable weight value of a weighing process is recorded by system automatically when all loads are removed and gross weight returns to zero or minus e Ma...
Page 46: ...e 2 criteria will be outputted 14 4 Totalization Except date range All is selected instrument will automatically output the totalized data of below result at the end of the output Total number of transactions of the date range Total Net Weight Total Gross Weight Total Piece Count 15 Barcode Scanner To increase working efficiency this instrument supports serial and Bluetooth barcode scanner which u...
Page 47: ...ecute an action c System parameter operation entry setting commands are used to send system parameters and operation entries to this instrument d System parameter reading commands are used to read system parameters e Operation entry reading commands are used to read those operation information entered e g date time product and customer codes current and accumulated operation results f Operation re...
Page 48: ...f and then power on instrument again to reboot Negative Tare value exceeds display range 17 2 Error Code Table Error Code Description Err 1 Time value error Err 2 Date value error Err 3 Exceed manual zero Err 4 Offset out of range unstable during power on Err 5 No load cell detected Err 6 Tare operation error Err 7 Logic error Hi limit set is lower than Lo limit and Hi is not 0 Err 8 Logic error L...
Page 49: ...unicate with Bluetooth module Err 43 Cannot set Bluetooth module Err 44 Report output from RS485 port but Machine ID not blank Err 46 PLU recalled is blank 18 Daily Care Maintenance Clean the instrument with a soft damp cloth If necessary use a mild detergent in water Do not use any harsh abrasive material acetone volatile solvent thinner or alcohol for cleaning Verify the accuracy of this instrum...
Page 50: ...s Net NT Net weight GS Gross weight NET Net Weight S Status Code ST for Stable US for unstable R Revered 7 digits weight value including location of decimal point If there is no decimal point then the last character space SP Space SWA Status Word A SWB Status Word B U Weight Unit kg kilogram lb pound g space gram W 7 digits weight value including location of decimal point If there is no decimal po...
Page 51: ...Format Position 1 2 3 4 5 6 7 8 9 10 11 12 13 14 15 16 17 Data STX SWA SWB SP Field 1 Net Weight Field 2 Tare Weight CR Protocol 3 Output Format Position 1 2 3 4 5 6 7 8 9 10 11 12 13 14 15 16 17 18 19 Data SOH STX SP W W W W W W W SP U U SP SP SP SP CR Protocol 4 Output Format Position 1 2 3 4 5 6 7 8 9 Data R R R R R R R P Protocol 5 Output Format Position 1 2 3 4 5 6 7 8 9 10 11 12 13 14 15 16 ...
Page 52: ...R LF Protocol 7 Output Format Position 1 2 3 4 5 6 7 8 9 10 11 12 13 14 15 16 17 18 19 Data SOH STX SP W W W W W W W SP U U SP SP SP CR C Protocol 8 Output Format Position 1 2 3 4 5 6 7 8 9 10 Data STX W W W W W W W ETX Protocol 9 Output Format Position 1 2 3 4 5 6 7 8 9 10 11 12 Data STX SP W W W W W U U ETX ...
Page 53: ...a and is usually used by computer program to separate various data No data separator is inserted between in front or after control commands Separator in front and after a control code C1 C6 will not be surpassed For example STXdata data dataETX Exception of above is when control codes are in between 2 data For example data CR LF data 6 Instrument displays Item Number then followed by the content p...
Page 54: ... Data 2 ST Stable US Unstable OL Overload nT GS Net Gross Sign 2 NT Net GS Gross Date Date of Output 10 Time Time of Output 8 Net Net Weight 8 Numeric value only without weight unit Tare Tare Weight 8 Gross Gross Weight 8 Unit Weight Unit 2 kg Kilogram space g gram H ref Hi Limit 8 8 digital including decimal if any L ref Lo Limit 8 8 digital including decimal if any Ck res Comparison Result 2 Lo ...
Page 55: ...o of accumulated transaction 8 Blank none ACC Total Accumulated Weight Transaction Data 8 Blank none unit Wt Unit weight 8 8 digital including decimal if any in terms of gram Qty Number of piece 8 8 digital t _ Qty Total Accumulated Pieces 8 8 digital P F Platform 2 P1 PF1 P2 PF 2 PA Dual Platform t _GS Accumulated Gross Weight 8 8 digital including decimal t _Tare Accumulated Tare Weight 8 Expiry...
Page 56: ...kg 10 00kg 4999 2 00000g 45001 kg Accept 2018 8 19 11 54 58 8 PA 20 00kg 2 64kg 22 64kg 110 00kg 10000 2 00000g 55001 kg Below 2018 8 19 12 10 37 10 PA 20 00kg 2 64kg 22 64kg 130 00kg 10000 2 00000g 65001 pcs Accept Notes Date Date of Output Time Time of Output Seq Accumulate Sequence No Platform o P1 Platform 1 P2 Plarform 2 PA Dual platform Net Net Result Tare Tare Weight Gross Gross Weight Tota...
Page 57: ... Customer Code Line for Customer Description Customer Code Description Pcode Product Code Product Code Line for Product Description Product Code Description Net 10 00kg Net Weight Total_WT 120 00kg Total Accumulated Net Weight QTY 4999pcs Quantity WT 2 00000g Unit Weight Total_QTY 59990pcs Total Accumulated Quantity One Blank Line is inserted here High 20 00kg Hi Limit Low 10 00kg Lo Limit Result ...
Page 58: ...ht GroSS Gross weight unit Wt Unit weight Qty Number of piece HrEF Hi limit LrEF Lo limit ChrES Comparison result trAnS Transaction sequent number if this transaction is accumulated to memory ACC Total accumulated weight when accumulation function is in effect SiGn Signature PCode Product Code P Desc Product Description Id Machine ID GrouP Machine group number oPCodE Operator number CCode Customer...
Page 59: ...aragraph E 1 for details stored 4 Press Print M to confirm or select other variant or command by press PF Set or MR Then press Print M to confirm and save 5 This instrument displays Line 2 and the last variant or command stored 6 Repeat steps 4 and 5 for other lines 7 To finish editing select command End then press Print M to confirm 8 This instrument returns to and displays the current internal f...
Page 60: ...2 No of Accumulated Transaction Data 3 Platform Number Data 4 Machine ID Data 5 Machine Group Number Data 6 Date of Output Data 7 Time of Output Data 8 Customer Code Data 9 Product Code Data 10 Gross Weight Data 11 Tare Weight Data 12 Net Weight Data 13 Accumulated Weight Data 14 Weight Unit Data 15 Quantity Data 16 Unit Weight Data 17 Weight Unit of Unit weight Data 18 Lo limit Data 19 Hi limit D...
Page 61: ...ed Pcode Product Code Product Code if entered Opr 8888 Operator Code if entered Mac 11 Machine ID if entered MacGp 22 Machine Group Number if entered Date 2018 08 19 Date of 1st output Time 13 44 00 Time of 1st Output Seq QTY Net Accumulation No platform No quantity and net weight 0001 P1 4999 10 00kg 0002 P2 5000 10 00kg 0005 PA 10000 20 00kg 0005 PA Total accumulation No and platform No of last ...
Page 62: ...ode if entered Pcode Product Code Product Code if entered Opr 8888 Operator Code if entered Mac 11 Machine ID if entered MacGp 22 Machine Group Number if entered Date 2018 08 19 Date of 1st output Seq Time QTY 0002 PA 14 09 07 10000 Accumulation No platform No time and quantity 0004 PA 14 09 15 10000 0003 P1 14 09 25 4999 0003 P2 14 09 29 5001 0003 P2 Total 15003 Total accumulation No platform No ...
Page 63: ...propriate cable and then turn on the printer 2 If the printer supports Plug and Play and you have connected it using a USB or Parallel cable then the Windows Add Hardware Wizard will detect the printer and display a dialog that allows you to install a driver Click Cancel and do not install the driver using this wizard 3 Run the Driver Wizard utility from the Installation Directory where the driver...
Page 64: ...el software dealer for more details if in doubt 1 Set the label printer as the default printer of your computer 2 Create the foundation of a label by Bartender All information to be obtained from instrument should be added afterward 3 Once the label foundation has been completed a click on File and b select Export Printer Code Template 4 On Print System a select TSC KP 100 200 Flash and b select t...
Page 65: ...3 enter the appropriate command on the Prompt Box refer to paragraph K 1 for command detail 14 Select Auto on the Source box under Template Field 15 Repeat point 11 to 12 for all other data sources 16 Click OK 17 Click Export In case of Verification Messages appear select one of method on the dialogue box to fix and click Continue ...
Page 66: ...Drawer software is installation is done 3 Run BarDrawer software 4 Click Install Driver under Tools figure 1 below Then install printer driver according to the wizard 5 After printer driver installation click Printer Utility under Tools figure 2 below 6 Click Load from Printer figure 3 below 7 Check FW version If FW version 3 0 05 date 2020 12 18 or newer printer installation is done If FW version...
Page 67: ...t Single Variable c On Format section enter value of Maximum number of characters Refer to K 1 Suggested Length column for suggested value d On Input Data section select After send instructions Hex Then enter the Prompt Command listed on K 1 e Always select 0D 0A for Newline symbol Hex box f Click OK to save above settings for this variable g Repeat above a f for all other variables 6 Once the lab...
Page 68: ...68 7 On Save Form page a make sure that the Form name is correct then b Click Save 8 On Select Store Media page a select Printer then b select Printer s Flash ROM then c click OK ...
Page 69: ...6 OPER Operator No 4 64 MCID Machine ID 4 65 MCGP Machine Group 2 5A CCDE Customer Code 18 43 CCDD Customer Code Description 30 62 PCDE Product Code 18 44 PCDD Product Code Description 30 53 CHKL Low Limit 11 73 chkl6 Low Limit in 6 digit integer 6 52 CHKH High Limit 11 72 chkh6 High Limit in 6 digit integer 6 54 CHKR Check Result 11 51 CWGS Current Gross Weight 10 71 cwgs6 Current Gross Weight in...
Page 70: ...6D aseq6 Accumulation Sequence No in 6 digit integer 6 47 AWGS Accumulated Gross Weight 11 67 awgs6 Accumulated Gross Weight in 6 digit integer 6 4A AWTA Accumulated Tare Weight 11 6A awta6 Accumulated Tare Weight in 6 digit integer 6 4E AWNT Accumulated Net Weight 11 6E awnt6 Accumulated Net Weight in 6 digit integer 6 63 AQTY Accumulated Quantity 11 69 aqty6 Accumulated Quantity in 6 digit integ...
Page 71: ...1 Label Illustration for LP50 TSC K 2 2 Label Illustration for Sbarco K 3 Sample Labels Label files of the above samples size 50 x 80mm with prompt commands are available for download at https www fi measurement com resource driversnsoftwares ...
Page 72: ...int in label format group 2 Enter the preferred file number through numeric then press Print M to confirm 5 At this point label settings are completed K 5 Repetitive Printout This instrument supports repetitive output under Manual Print Mode Press Print M for additional output copies Conditions and criteria as below When Auto Accumulation is set to On Repetitive print is only possible when the act...
Page 73: ...lowed by c Letter shown on below illustration diagram keyboard commands are case sensitive followed by d End String number sign Hex code 23 Example to send manual Zero key command to instrument enter KBA Notes For RS485 communication add xx before start string xx machine ID number set in F18 Keyboard Command Illustration Diagram ...
Page 74: ...communication add xx before start string xx machine ID number set in F18 M 1 Command Description Table System Related Command Definition Command Format Start String Command Code End String System Reboot EX F000 All Segment Check EX F002 System F7 F34 Initialization EX F006 Reset WIFI Module to Default Setting EX F048 Reset Bluetooth Module BT 2 0 only EX F053 Reload Factory Settings to BT Module B...
Page 75: ... memory EX RPTM d1 d2 d3 d4 Output data of specific period in alibi memory EX RPTP d1 d2 d3 d4 d5 d 6 Search Criteria d1 Data starting date 6 digit according F4 setting d2 Data ending date 6 digit according F4 setting d3 Operator Code 0000 9999 Blank all d4 C Code 1 18 digit Customer Code Blank all d5 P Code 1 18 digit Product Code Blank all d6 Check Result LO Below OK Accept HI Above NG LO or HI ...
Page 76: ...mmand Definition Command Format Parameter Description Start String Command Code Note A Parameter End String Set Date Format Value and Output ST F004 d1 d2 d3 d1 Date Format 0 DD MM YY 1 YY MM DD 2 MM DD YY d2 8 digit date value as per above setting AA BB CC d3 Date Output Format 0 Normal Format 1 Week Format Set Time ST F005 d1 8 digit time value HH MM SS Set Auto Power Off ST F007 d1 0 Off 1 1 mi...
Page 77: ...tion on Negative Value ST F015 d1 d2 d1 Check Buzzer 0 Off 1 IN 2 Out 3 Hi 4 Lo d2 Action on Negative Value 0 Off 1 On Set Keyboard Lock ST F020 d1 0 Off 1 On Set Near Zero Value S1 or S2 F026 d1 Maximum 8 digits including decimal if any Set Ask for Operator Number when Power On ST F028 d1 0 No 1 Yes Set Allow Letters and Symbols for Customer Product Code Manual Entry ST F030 d1 0 No 1 Yes Set PF ...
Page 78: ...aracteristics Asterisk number sign and semi colon not accepted Blank Nothing d2 Product description Maximum 30 characteristics Asterisk number sign and semi colon not accepted Blank Nothing Set Weight Check Limits S1 or S2 CHKW d1 d2 d1 Lo limit Maximum 6 digit plus decimal if any d2 Hi limit Maximum 6 digit plus decimal if any Set Quantity Check Limits S1 or S2 CHKQ d1 d2 d1 Lo limit Maximum 6 di...
Page 79: ...set parameter for PF 2 ST command to set parameter for PA Note B If old preset tare value already exists in memory 2 command strings are necessary a 1st command string to clear this old preset tare value first b 2nd command string to set new preset tare value ...
Page 80: ...le Command Definition Command Format Parameter Output Parameter Description Start Strin g Command Code End String Read Internal AD value R1 or R2 F001 d1 8 digits AD value Read Capacity Division Default Weight Unit R1 or R2 F003 d1 d2 d1 Capacity x Division of MAX1 d2 Capacity x Division of MAX2 if set Read Date Format Value and Output Settings RD F004 d1 d2 d3 d1 Date Format 0 DD MM YY 1 YY MM DD...
Page 81: ...30 060 120 Read Auto Tare Function RD F012 d1 M Off A Auto 00 99 Continuous tare in term of 1 10 second Read Repetitive Tare Function RD F013 d1 0 Off 1 On Read Buzzer RD F014 d1 d2 d3 d1 Keyboard Buzzer 0 Off 1 On d2 System Buzzer 0 Off 1 On d3 Non Resettable Memory Buzzer 0 Off 1 On Read Result Buzzer Action on Negative Value RD F015 d1 d2 d1 Check Buzzer 0 Off 1 IN 2 Out 3 Hi 4 Lo d2 System Buz...
Page 82: ...al Entry RD F030 d1 0 No 1 Yes Read PF Set Key Assignment RD F031 d1 0 Set 1 Platform Read External Input Assignment RD F032 d1 d2 d3 d1 Int 1 0 5 d2 Int 2 0 5 d3 Int 3 0 5 0 Zero 1 Tare 2 Mode 3 Print M 4 MR 5 Clear Read Report Output Comport RD F033 d1 0 Uart 0 1 Uart 1 2 Uart 2 3 Uart 3 Read Average Piece Weight before Power Off RD F035 d1 0 Off 1 On Note C R1 command to read parameter for PF 1...
Page 83: ...Start String Command Code End String Read Customer Code RD CCDE d1 1 18 digit Customer Code Blank nothing Read Customer Code Description RD CCDD d1 1 24 Customer Code Adscription Blank nothing Read Product Code RD PCDE d1 1 18 digit Product Code Blank nothing Read Product Code Description RD PCDD d1 1 24 Product Code Description Blank nothing Read Machine ID RD MCID d1 2 digit Machine ID Number Bl...
Page 84: ...Date Value RD DATE d1 8 digit date value Read Expiry Duration RD F036 d1 0 9999 Day Read Time Value RD TIME d1 8 digit time value Read Week Value RD WEEK d1 6 digit time value Read Expiry Date RD EXPY d1 8 digits Format as per F4 setting Read WT in 6 digit format and without decimal RD avgw6 d1 6 digits without decimal ...
Page 85: ... Weight R0 or R1 or R2 or RA CWTA d1 8 digits including decimal Read Current Gross Weight R0 or R1 or R2 or RA CWGS d1 8 digits including decimal if any Read Current Net Weight R0 or R1 or R2 or RA CWNT d1 8 digits including decimal if any Read Weight Unit of Current Net Tare and Gross Weight R0 or R1 or R2 or RA CWUN d1 8 digits including decimal if any Read Qty Value R0 or R1 or R2 or RA CQTY d1...
Page 86: ... format and without decimal R0 or R1 or R2 or RA cwta6 d1 6 digits without decimal Read Current Gross Weight in 6 digit format and without decimal R0 or R1 or R2 or RA cwgs6 d1 6 digits without decimal Read Current Net Weight in 6 digit format and without decimal R0 or R1 or R2 or RA cwnt6 d1 6 digits without decimal Read Qty Value in 6 digit format and without decimal R0 or R1 or R2 or RA cqty6 d...
Page 87: ...t without decimal Read Accumulated Qty Value in 6 digit format and without decimal R0 or R1 or R2 or RA aqty6 d1 6 digit without decimal Read Accumulation sequence No R0 or R1 or R2 or RA aseq6 d1 6 digit without decimal Note D R0 command to read entries and result of current platform in used R1 command to read entries and result of PF 1 R2 command to read entries and result of PF 2 RA to read the...
Page 88: ...mmand Definition Command Format Parameter Description Start String Command Code Note E Parameter End String Save Preset Tare to Quick PLU S1 S2 QP PSTA d1 d2 d1 Quick PLU number 0 9 d2 Maximum 6 digits plus decimal Save Unit Weight in term of g to Quick PLU ST QP AVGW d1 d2 d1 Quick PLU number 0 9 d2 Maximum 6 digits plus decimal Save Check WT Limits to Quick PLU ST S1 S2 QP CHKW d1 d2 d3 d1 Quick...
Page 89: ...ion Asterisk number sign and semi colon not accepted Blank Nothing Save Product Code and Description to Quick PLU ST QP PCDE d1 d2 d3 d1 Quick PLU number 01 99 d2 Product Code 1 18 digit Asterisk number sign and semi colon not accepted Blank Nothing d3 Product Description Maximum 30 characteristics Asterisk number sign and semi colon not accepted Blank Nothing Note E S1 command to set parameter to...
Page 90: ... Read Preset Tare from Quick PLU R1 R2 QP PSTA 0 9 or A 0 9 PLU number A all d1 Maximum 8 digits plus decimal Read Unit Weight in term of g from Quick PLU RD QP AVGW d1 Maximum 8 digits plus decimal Read Check WT Limits from Quick PLU RD R1 R2 QP CHKW d1 d2 d1 Low check limit d2 Hi check limit Read Check QTY Limits from Quick PLU RD R1 R2 QP CHKQ d1 d2 d1 Low check limit d2 Hi check limit Read Cus...
Page 91: ...strument sends content by Quick PLU numeric sequence Note F R1 command to read content from Quick PLU of PF 1 R2 command to read content from Quick PLU of PF 2 RD command to read content from Quick PLU which is common for both PF 1 and PF 2 ...
Page 92: ...s listed on below table Always insert semi colon in front of each parameter followed by d End String number sign Hex code 23 Notes For RS485 communication add xx before start string xx machine ID number set in F18 T 1 Command Description Table Start String Command Code Note G Parameter End String S1 or S2 or SA LP d1 d2 d3 d4 d5 d6 d7 d8 d9 d10 d11 d12 d13 Note G S1 command to set parameter for PF...
Page 93: ...ion Maximum 30 characteristics Asterisk number sign and semi colon not accepted Blank Nothing d6 Unit Weight In term of g for metric version In term of 1 1000 lb for lb version Maximum 6 digit plus decimal Blank 0 d7 Low Check limit When Check Target is W Maximum 6 digit plus decimal Blank 0 When Check Target is Q Maximum 6 digit Blank 0 d8 Hi Check limit When Check Target is W Maximum 6 digit plu...
Page 94: ...r d11 Preset Tare Value Maximum 6 digit plus decimal if any Blank 0 If Platform is PA enter zero value here d12 Date Format 0 Normal 1 Week d13 Expiry Duration Maximum 4 digits 0 9999 0 or blank F4 value 1 9999 No of day plus F4 value ...
Page 95: ... 23 Notes For RS485 communication add xx before start string xx machine ID number set in F18 U 1 Command Description Table Start String Command Code Note H Parameter End String Parameter Output R1 or R2 or RA LP 01 99 or A 01 99 PLU number A all d1 d2 d3 d14 Remark If parameter A is entered instrument sends content of quick from PLU 01 to PLU 99 in numeric sequent Note H R1 command to read PLU con...
Page 96: ...escription Maximum 30 characteristics and will not be accepted Blank Nothing d7 Unit Weight in term of g Maximum 8 digits including decimal Blank Nothing d8 Low Check limit Maximum 8 digits including decimal Blank Nothing d9 Hi Check limit Maximum 8 digits including decimal Blank Nothing d10 Check Target W Weight Q PCS d11 Auto Tare Type 0 Manual 1 Auto Tare 2 Continuous Tare d12 Preset Tare Value...
Page 97: ...Fidelity Measurement Co Ltd www fi measurement com e mail info fi measurement com ...