11
NOTE: Follow the blade manufacturer’s
recommendations for dry or wet cutting. Only blades
specifically designed for dry cutting can be run without
coolant. Wet cutting blades can be damaged or
destroyed without sufficient water.
5
MAKING STRAIGHT CUTS
1. Loosen the knobs (item 26) and position the rip guide
(item 25) at the distance required. Use the scale on
the front. Retighten the knobs.
2. Position the tile and push it into the cutting blade while
holding it firmly against the guide in order to ensure a
good, clean cut.
3. Pass the material slowly under the splash guard into
the blade, without overly forcing it. This will enhance
the diamond blade lifetime and prevent overheating
the motor. Lighten the cutting pressure when
approaching the end of the cut in order to prevent the
tile from splitting.
4. The new blade needs a chance to “break-in” or “wear-
in” slightly for best cutting. This may take several
cuts. If the blade closes up or “glazes over”, it can be
opened back up with a conditioning stone.
6
MAKING BEVIL CUTS
1. Use the same procedure as for straight cuts, except
position the rip guide about 5/8” back from the blade.
7
MAINTENANCE PROCEDURES
1. Unplug the tile saw before performing any
maintenance.
2. Keep the table top clean and free of cuttings. Flush
with water.
3. Drain, clean and refill the tank frequently. flush with
plenty of water, then drain and refill the tank with
clean water.
4. It is necessary to clean the machine after each day’s
use. Clean out the tank and drain the water.
5. Store your machine in a dry place.
8
THERMAL PROTECTOR - MANUAL
RESET OPERATION
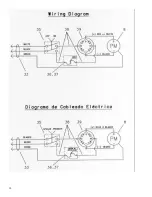
The motor has a manual reset thermal protector (Item
37). If the motor overheats, the red button “pops out” to
open the motor circuit. If this occurs, turn the motor
“ON-OFF” switch to “OFF” and after the motor cools,
push in the red button. When the button stays in, the
motor can be restarted.
We carry out all repairs in the shortest possible time and
at the most economical prices. (See front page for
address and phone numbers) Contact your authorized
Felker
®
dealer concerning maintenance and repairs.
9
REPAIRS
For quick supply of spare parts and to avoid any lost time,
it is essential to quote the data on the manufacturers plate
fixed to the machine and the part number(s) and
description to be replaced with every order.
10
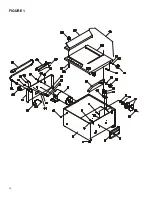
SPARE PARTS
The instructions for use and spare parts found in this
document are for information only and are not binding.
As part of our product quality improvement policy, we
reserve the right to make any and all technical modifica-
tions without prior notice.


