background image

16


Setting up your projector

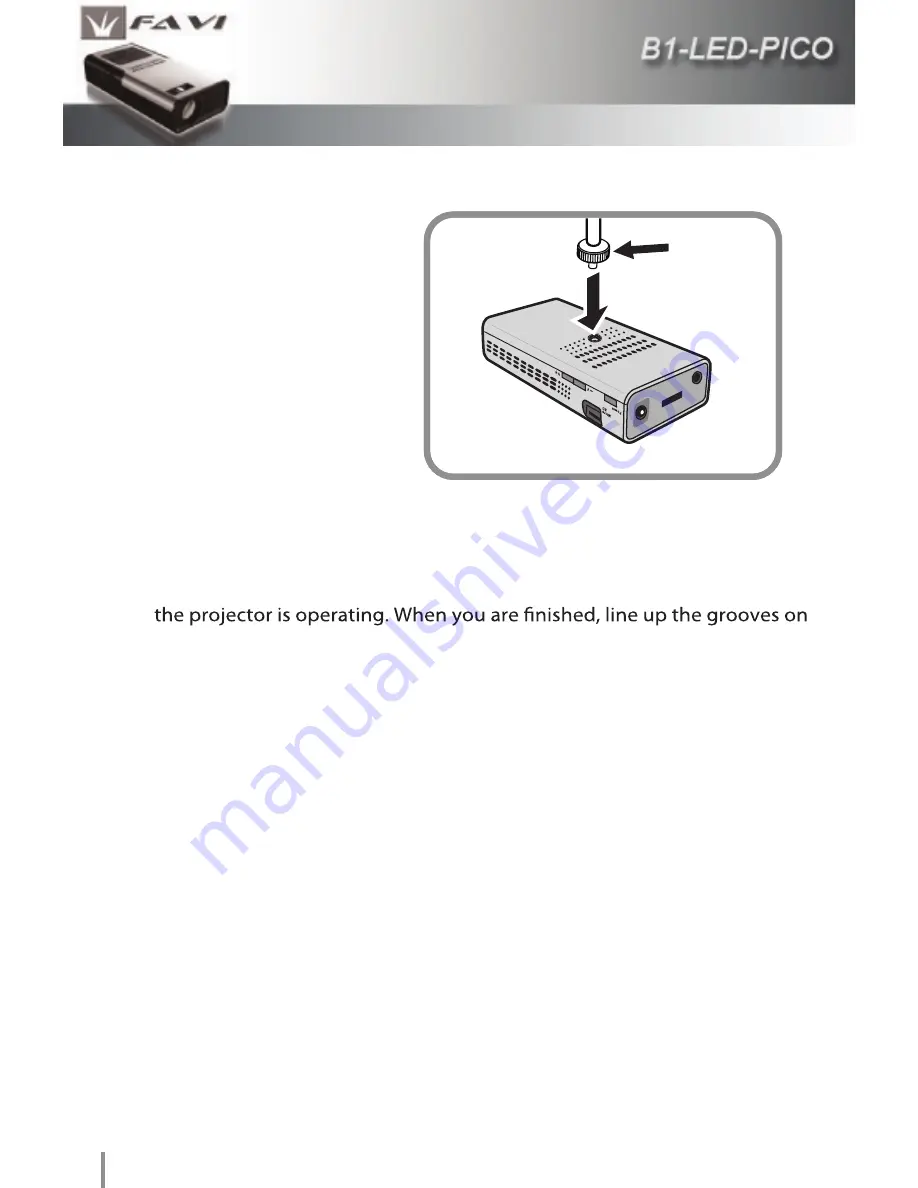
Screw the tripod to the

base of the projector as

shown in the illustration. 

Grasp the tripod’s legs to 

tighten. Do not over tighten.

You can adjust the 

tripod’s base to make better 

contact with the base of

the projector. Rotate the

base on the tripod to adjust 

it.

You can also extend the tripod’s legs to increase the height of your

projector. The tripod’s legs are keyed. When they are fully extended, you 

can rotate the inner legs to prevent them from accidentally retracting while

the inner legs with the notches on the outer legs to allow the inner legs to

retract.

Once you have the projector set up and connected, press the power button

on either the projector or remote control. Once the projector begins 

operating, you should be able to hear the cooling fan and see an image

projected onto your screen. You can then adjust the projected image to 

your liking.

IR

DC

AV / 

VGA

Adjustable base

CHAPTER

 3 

Using your Projector


Summary of Contents for B1-LED-PICO

Page 1: ...Micro SD B1 LED Pico User Guide ...

Page 2: ......

Page 3: ...cting your projector to your PC USB and Micro SD card usage overview Chapter 3 Using your Projector Setting up your projector Adjusting the Image Size and Focus A V and VGA menu Overview Chapter 4 PMP Functions Viewing Photos Slideshow Mode Thumbnail Mode Browse Mode Playing Movies and Music PMP settings System Setup Photo Setup Video Setup Music Setup 4 4 5 6 6 7 8 8 9 10 11 12 13 14 15 16 16 17 ...

Page 4: ...you need to get started Only 24 watts of power consumption means that this projector can be used just about anywhere It can project a clear image from as little as 5 inches to over 60 inches and lamps The integrated LED lamp is rated to last for up to 20 000 hours The integrated Personal Media Player allows this projector to function as a media player an image viewer and a slide show viewer You ca...

Page 5: ... electronics may be damaged This projector should not be used at tempatures above 104 F or below 40 F Relative humidity should be less then 80 This projector should not be used in a dusty location Large amounts of dust may hinder the projector s ventilation causing it to overheat Please avoid dropping hitting or throwing this projector Please make sure your projector is placed on a steady surface ...

Page 6: ... parts inside If your projector requires service please contact us This equipment has been tested and found to comply with the limits for a Class B digital device pursuant to Part 15 of the FCC Rules These limits are designed to provide reasonable protection against harmful interference in a residential installation This equipment generates uses and can radiate radio frequency energy and if not in...

Page 7: ... help prevent potential nega tive impact on the environment and human health which could otherwise be caused by inappropriate handling of this device C ollection of such devices helps conserve natural resources The label has the legal effect only in E U member states C ontact your local agency or your dealer for more detailed information about disposing of this device Reorient or relocate the rece...

Page 8: ... up to 32 GB 28 lumen LED lamp output between the projector and a computer Supports viewing JPEG and Bitmap images Comes with international power plug adapters for use on foreign business trips Supports AVI and MP4 video formats The B1 LED Pico projector has been designed to be far more functional then previous pico projector models Here is a summary of the features of your new pico projector ...

Page 9: ...9 Accessories A Projector B Mini Y Cable C Mini USB Cable D DC 12V 2A Charger E Remote Control F Tripod G Leather Case H User Guide The following accessories come with your projector ...

Page 10: ... all modes 7 IR Sensor 8 AV VGA cable input 9 12 volt DC input 10 P ower button 11 Micro S D slot 12 Decrease volume all modes 13 Increase volume all modes 14 Mini US B connector 15 Audio out jack M S 1 2 3 4 5 6 Power Micro SD 10 12 11 13 7 8 9 IR AV VGA DC USB Audio 14 15 Play Pause Select option PMP mode Rewind Highlight menu option PMP mode ...

Page 11: ...s 13 14 15 View Photos PMP mode 16 View Videos PMP mode 17 View photo slideshow PMP mode 18 Video P layback button 19 Move Upward button 20 Video P ause button 21 Rewind Move leftward PMP mode 22 Select highlighted option PMP mode 23 Fast forward Move rightward PMP mode 24 E xit the current menu 25 Move Downward button 26 Mute button PMP mode 27 Decrease volume All modes 28 Increase volume All mod...

Page 12: ...either the remote or projector while its operating will bring up this menu screen Press the power button again to power accidentally pressed the power button wait a few seconds for this screen to disappear After powering down the projector the projector s cooling fan will continue to spin for up to 30 seconds Please do not unplug your projector until after the cooling fan shuts down POWER OFF SYST...

Page 13: ...n the connector upside grasping the sides of the connector and gently pulling it out To connect a composite video device such as a DVD player to your projector connect the Y cable to the projector as shown in the illustration Switch the projector to A V mode and connect the DVD player s A V cable to the color coded RCA jacks on the Y cable Along with DVD players and other video equipment your proj...

Page 14: ... 1280x960 1280x1024 1600x900 1600x1024 1600x1200 All supported VGA resolutions are displayed in the 4 3 aspect ratio Your projector supports a 60 Hz refresh rate Higher refresh rates are not supported PC Audio IR DC AV VGA power on the projector and switch it to VGA mode Next connect the Y cable to the back of the projector and to the computer as shown in the illustration Your computer should auto...

Page 15: ...vice You can also connect the projector s When the projector is connected to a computer via the USB connection it will project this screen To return to PMP mode simply unplug the USB cable Along with its internal memory your projector also supports Micro SD cards in sizes up to 32 GB When a Micro SD card is inserted it will be detected automatically Micro SD cards are given access priority over th...

Page 16: ...ripod s legs are keyed When they are fully extended you can rotate the inner legs to prevent them from accidentally retracting while the inner legs with the notches on the outer legs to allow the inner legs to retract Once you have the projector set up and connected press the power button on either the projector or remote control Once the projector begins operating you should be able to hear the c...

Page 17: ...31 5 20 0 39 4 25 0 59 1 37 6 78 7 50 1 98 4 62 6 103 8 66 0 Distance from projector to screen Image Size All distances are measured in inches The projector s image size can be adjusted by moving the projector The closer the projector is to the screen the smaller the image size will be The farther the projector is from the screen the larger image size will be Below is a listing of image sizes and ...

Page 18: ...on your remote control to select that sub menu C ontrast R ange 0 100 Default setting 50 Brightness R ange 0 100 Default setting 50 S aturation R ange 0 100 Default setting 50 Tint R ange 0 100 Default setting 50 C olor temperature Options High Medium Low Default setting Medium Here is a list of the display settings that you can adjust Please note that some settings may not be available in VGA mod...

Page 19: ...left Top right and Bottom right Transparency Select the amount of transparency the menu screen will have The range is from 0 to 5 The higher the value the more transparent the menu screen will be OSD timeout Select how long the menu screen will be displayed before automatically closing Choices are 15 30 and 60 seconds OSD location Here is a list of the settings you can adjust on this menu screen T...

Page 20: ... inserted into the projector Viewing Photos There are three modes for viewing photos Slideshow mode Thumbnail mode and Browse mode You can select between these modes in the PMP Photo settings menu Please see pages 25 and 26 In this mode photos will be displayed one by one in a continuous slide show In the Photo Setup screen you can change the slideshow Buttons on the Projector Function Description...

Page 21: ...s in Thumbnail the right side of the screen Highlight a photo and select it to view that photo in Browse mode Buttons on the Projector Function Description Buttons on the Remote Control Enter Thumbnail mode Go back to previous image Skip to next image View photo in Browse mode Thumbnail Mode ...

Page 22: ...hoto s aspect ratio will be set to Fit Screen mode Display s photos in their correct aspect ratio Crop to fill mode Buttons on the Projector Function Description Buttons on the Remote Control Move leftward Move rightward Move upward Move downward View highlighted photo in Browse mode Go back to the main menu screen Browse Mode ...

Page 23: ...Control Go back to the main menu screen Move Leftward Move rightward Rotate the photo 90 degrees counter clockwise Rotate the photo 90 degrees clockwise Buttons on the Projector Function Description Buttons on the Remote Control Scroll leftward Zoom in 25 Scroll rightward Scroll upward Scroll downward Zoom out 25 Zoom out to original size Press again to exit browse mode Browse mode function button...

Page 24: ... as shown here the Remote ntrol Go back to the main menu screen Rewind Fast forward Decrease volume Increase volume The music player screen looks similar to the video player screen shown above It functions the same as the video player screen does Both the music and video player can be controlled by the buttons that are listed below rewind fast forward Buttons on the Projector Function Description ...

Page 25: ...ht and change these settings Each setting and its description are listed on the following two pages Buttons on the Projector Function Description Buttons on the Remote Control Go back to the previous menu screen Move upward Move downward Change a setting Press and hold to change a setting Enter sub menu Change a setting Press and hold to change a setting ...

Page 26: ...m Upgrade Gamma Change the brightness of the PMP interface by selecting from one of four settings Menu Option Function Description Display Mode Select which mode photos will be displayed in You can choose between Slideshow Thumbnail and Browse mode Display Ratio Select how photos will be displayed You can choose between Full Screen Fit Screen and Crop to fill modes Slideshow Duration Select how lo...

Page 27: ... E ffect Select equalizer presets The available presets are Normal Rock Pop Classic Soft Jazz and DBB S how S pectrum Displays a graphical spectrum in music mode Auto P lay If set to on music will automatically begin playing upon entering music mode Video Setup Menu Option Function Description Display R atio Select how you want videos to be displayed You can choose between Full Screen and Original...

Page 28: ...reo line input jacks LED lamp power 12 watts LED lamp life 20 000 hours Projected image size 5 to 80 inches Power consumption 24 watts External power supply 12 V DC 2 0 Amps Operating temperature 40ºF 104ºF Operating humidity 10 80 Size Weight 5x3x1 inches 8 ounces LCOS AVI MP4 MP3 WMA OGG BMP JPG Supported video codecs Xvid Divx Supported audio codecs ADPCM MP3 WMA OGG ...

Page 29: ......

Page 30: ......

Reviews: