background image

86

MMMMMM MM MMMMMMM MMMMMMMM 

Focus

3D

 X 130 and X 330 • SCENE 5.3

September 2014

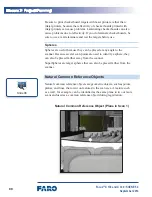
Common types of targets include:

• 

Checkerboards – Flat, paper targets that can be printed in various 

sizes. The advantages of checkerboards are they are portable and 

disposable, and can be printed in various sizes. They also require 

fewer scan points to be recognized in SCENE, and can be placed 

farther from the scanner. The disadvantage is they must be angled 

toward the scanner.

• 

Spheres – Three-dimensional, white spheres that come in various 

sizes. The advantage of spheres is that they can be placed at any 

angle to the scanner. The disadvantage is that they require more 

scan points to be recognized in SCENE.

You can use a combination of target types.

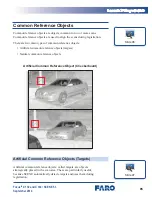
Checkerboard

Summary of Contents for Focus 3D X 130

Page 1: ...Focus3D X 130 and X 330 Laser Scanners SCENE 5 3 Training Manual September 2014...

Page 2: ......

Page 3: ...mplied including but not limited to any implied warranties of merchantability or fitness for a particular purpose regarding the FARO Focus3D or any materials and makes such materials available solely...

Page 4: ......

Page 5: ...3 Instructor Guide 4 Overview 4 Introduction Video 4 Targets 4 Connecting to the Scanner Remotely 5 Module 1 Using the Scanner 7 Lesson 1 Scanner Hardware 9 Hardware and Components 9 Focus3D X 330 10...

Page 6: ...Maintenance and Care 31 Storage 31 Cleaning the Mirror 32 Lesson 2 Scanner Software 33 Activity 1 3 Using the Scanner Interface 33 Home Screen 35 Navigation Bar 36 Status Bar 36 Information Drop Down...

Page 7: ...an Parameters 51 How the Scanner Works 51 Common Scan Parameters 57 Activity 1 6 Setting Common Scan Parameters 67 Activity 1 7 Capturing Scan Data 69 Module Summary 71 Notes 73 Module 2 Project Plann...

Page 8: ...ions 91 Number of Scanner Positions 91 Distance from the Object or Area of Interest 91 Line of Sight 93 Angle to the Object or Area of Interest 95 Bisecting 96 Target Arrangements 98 Lesson 4 Target A...

Page 9: ...trategies 121 Centralized Strategies 121 Central Object of Interest 122 Central Targets 123 Central Reference Scan 124 Traversing Strategies 124 Open Traverse 125 Closed Traverse 129 Targetless Strate...

Page 10: ...yout 148 Menu Bar 149 Toolbars 150 Structure Window 151 Image Area 158 Status Bar 160 Scan State 161 Lesson 2 Getting Started 163 Navigation Tab 164 Matching Tab 165 Folder Tab 167 General Tab 168 Uni...

Page 11: ...atic Registration Workflow 189 Preprocessing 190 Target Based Registration 193 Targetless Registration 195 Detecting Common Reference Objects 198 Saving 199 Icons in the Structure Window 204 Activity...

Page 12: ...orrespondences 241 Correspondence Split View 242 Primary Purpose 243 How to Open 243 Scan State 243 Navigation 243 Verifying the Precision of Identified Objects 250 Registering 251 Module Summary 255...

Page 13: ...g 270 Activity 6 3 Cropping Detail 271 Alignment 272 Visibility Settings 272 Scans 273 Views 273 Applying Color Information 273 Hiding and Removing Color Information 274 Refining the Color Information...

Page 14: ...y 7 2 Capturing a Detail Scan 296 Lesson 2 Registering a Detail Scan 299 Overview 299 Activity 7 3 Fixing the Detail Scan 301 Activity 7 4 Automatic Registration Full Scans 302 Activity 7 5 Registerin...

Page 15: ...CCC Focus3D X 130 and X 330 SCENE 5 3 September 2014 Activity 5 1 Using the Scan Area Screen 313 Appendix 2 Accuracy Verification 315 Scale Objects 315 Appendix 3 Glossary 317 Appendix 4 Workflow Diag...

Page 16: ......

Page 17: ...to register and refine captured data and if needed prepare the data for third party software applications This training is designed to provide a strong foundation for you to start using the laser scan...

Page 18: ...he tasks and apply the concepts necessary to use the scanner and SCENE successfully Format Words that appear on the equipment and in the software such as commands and the names of tools buttons dialog...

Page 19: ...ons are used to indicate the following types of information Activities designed to enhance your efficiency Information relevant to specific tasks Tips to make tasks easier Warnings regarding potential...

Page 20: ...the activities are presented in an order designed to provide a rhythm of learning and practice This training is task based which means that it provides only information that is essential to completin...

Page 21: ...ht of your computer screen click the Network icon I From the list of wireless devices select the scanner and click Connect II The scanner name is the scanner serial number which is on the front of the...

Page 22: ......

Page 23: ...nents and to the scanner software It also explains the steps involved in setting up the scanner setting up the scanner software and other important concepts Having a clear understanding of these funda...

Page 24: ......

Page 25: ...e scanner components and scanner setup and maintenance To proficiently work with the scanner hardware you need be familiar with Transport case contents Scanner components LEDs Safety Maintenance and c...

Page 26: ...MMMMMMMMMMMMMM Focus3D X 130 and X 330 SCENE 5 3 September 2014 Focus3D X 330 The Focus3D X 330 is shipped inside a black transport case which has wheels and an extendable handle Focus3D X 330 Transpo...

Page 27: ...4 PowerBlock battery 5 Power cable 6 SCENE software disc and Quick Start Guide 7 Mirror cleaning kit 8 PowerDock battery charger 9 Tribrach adapter 10 USB flash drive 11 SD card case 12 Focus3D X 330...

Page 28: ...E 5 3 September 2014 Front The front of the scanner is the side with the power inlet Focus3D X 330 Front The following components are located on the front of the scanner 1 Serial number 2 Mirror 3 Sca...

Page 29: ...cus3D X 130 and X 330 SCENE 5 3 September 2014 Back The back of the scanner is the side without the power inlet Focus3D X 330 Back The following components are located on the back of the scanner 1 Mir...

Page 30: ...creen side of the scanner is the side with the touch screen the Start Stop button and the SD card slot Focus3D X 330 Touch Screen Side The following components are located on the touch screen side of...

Page 31: ...and X 330 SCENE 5 3 September 2014 SD Card Slot Cover There are two inlets under the SD card slot cover Focus3D X 330 SD Card Slot The following are located under the SD card slot cover 1 SD card slo...

Page 32: ...3 September 2014 Battery Side The battery side of the scanner is the side with the battery compartment Focus3D X 330 Battery Side The following components are located on the battery side of the scanne...

Page 33: ...L Focus3D X 130 and X 330 SCENE 5 3 September 2014 Top The power button is located on the top of the scanner Focus3D X 330 Top The following components are located on the top of the scanner 1 LEDs 2 P...

Page 34: ...om of the scanner is used for mounting and service Focus3D X 330 Bottom The following components are located on the bottom of the scanner 1 SD card slot cover 2 Cooling vents 3 Automation interface co...

Page 35: ...shutting down pictures are being taken or the battery is charging when the scanner is off Steady blue The scanner is ready to scan Blinking red The scanner is scanning and the laser is on Steady orang...

Page 36: ...he tripod feet are secured In windy conditions use a heavy weight or sandbags to stabilize and secure the tripod Mounting the Scanner While the scanner can be screwed directly onto a tripod using a tr...

Page 37: ...er with the scanner inside on its side on a flat surface 2 Place the upper scanner mounting ring on the bottom of the scanner mount so that the four screw holes are aligned Make sure that the set scre...

Page 38: ...ten the set screw to secure the scanner mounting ring to the tripod mounting ring 8 If using a scanner transport cover remove it by pressing the white buttons on the levers on the sides of the case Fo...

Page 39: ...Unit When installing the external power supply unit be sure to secure the unit to relieve pressure on the unit s cord You can use the tripod hook Velcro or another system External Power Supply Unit W...

Page 40: ...can monitor the battery s power level using the scanner interface by tapping Manage General Settings Power Management When fully charged the battery lasts 4 to 6 hours Generally it takes about 4 hour...

Page 41: ...uminate blinking blue When the scanner is ready to scan the LEDs illuminate steady blue Shutting Down To shut down the scanner use the touch screen and tap Manage Shut down Scanner or quickly press an...

Page 42: ...26 MMMMMMMMMMMMMMMMMMMMMMMMMMMM Focus3D X 130 and X 330 SCENE 5 3 September 2014 Troubleshooting If the scanner stops responding press and hold the power button for four to five seconds Power Button...

Page 43: ...or transport cover containing the scanner on its side on a flat stable surface B Install the scanner mounting ring I Align the scanner mounting ring on the bottom of the scanner mount so that the four...

Page 44: ...up the red dots on the external power supply plug and the scanner II Connect the power cable to the external power supply unit and to a power source The LEDs illuminate blue when power is connected to...

Page 45: ...l scanner software updates You can find information about software updates on FARO s website www faro com Clearing Scan Data Before beginning a scan project you may want to remove all data from the SD...

Page 46: ...e chamfer side down and toward the scanner C Push the card into the card slot until it clicks into place D Close the SD card slot cover 2 Format the SD card A Tap Manage B Use the arrows at the bottom...

Page 47: ...ecifications of the power converter are appropriate for the available electrical voltage If you do not know the electrical voltage consult your local power company To avoid electrical shock use the sc...

Page 48: ...es To clean the mirror 1 Use oil free compressed air to clean the surface 2 Clamp a lens tissue with tweezers 3 Lightly spray the lens tissue with cleaning fluid Do not soak If necessary allow some of...

Page 49: ...your first set of scans Commonly used features include the Home screen General interface elements Project file structure Scan parameters Activity 1 3 Using the Scanner Interface In this activity you w...

Page 50: ...E 5 3 September 2014 3 Where can you access the inclinometer 4 What screen allows you to update the scanner software 5 Where is customer support information found 6 What information can be entered for...

Page 51: ...130 and X 330 SCENE 5 3 September 2014 Home Screen When you turn the scanner on the Home screen appears Home Screen The Home screen contains the following 1 Navigation bar 2 Status bar 3 Information...

Page 52: ...ns a button that takes you to the previous screen the Help button and the Home button The navigation bar also displays errors if they occur Navigation Bar Status Bar The status bar shows the name of t...

Page 53: ...ls about scanner settings and parameters Information Drop Down Box The information drop down box displays 1 Operator Displays the most recent operator name 2 Project Displays the most recent project n...

Page 54: ...gress the Stop Scan button appears Start Scan and Stop Scan Buttons Menu All features of the scanner interface are accessed from the menu The menu contains the following buttons Parameters Specify the...

Page 55: ...3 September 2014 General Interface Elements As you use the scanner interface you will use several different general interface elements Icons and Buttons Icon Button Function Home Help Scroll Up Scroll...

Page 56: ...330 SCENE 5 3 September 2014 Icon Button Function Backspace Zoom In Zoom Out Reset Size This only appears when you are zoomed in on a scan preview New Open Previous Scan Next Scan Move Up or Down Move...

Page 57: ...owing 1 Numbers and special characters 2 Shift 3 Move cursor 4 Space or underscore when spaces are not allowed On Screen Keyboard When you touch a letter on the on screen keyboard that letter and the...

Page 58: ...uring scanning Sound when scan is finished Sound when warnings are issued Sound when errors are issued D At the top of the screen tap General Settings 2 Select the units of measure A Use the arrows at...

Page 59: ...and select a date format A Tap Manage B Use the arrows at the bottom of the screen to scroll down and tap General Settings C Tap Date Time D Tap Change Date and Time E Tap the time so it is highlight...

Page 60: ...nterior of a multi floor building can be organized into subprojects one subproject for each level of the building Each of these subprojects can be organized into subprojects representing each room on...

Page 61: ...e same name as the original project appended with a period and a number Each subsequent subproject will be automatically appended with consecutive numbers The highest level project is called a Parent...

Page 62: ...the project that contains the subprojects Manage Projects When you view the scans by tapping View Scans you can see that each scan is also numbered consecutively beginning with 0 When the scanner aut...

Page 63: ...ject Parent projects contain subprojects You can tap on this field to assign a parent project to a subproject Customer Record a customer s name File Base Name Enter a file base name Each scan is saved...

Page 64: ...ans will be automatically placed in the Default_Project folder Troubleshooting Make sure the File Base Name and or the Initial Scan No are unique or all scans will be consecutively numbered regardless...

Page 65: ...y creates a subproject with the same name as the original project appended with a period and the number 1 Each subsequent subproject is automatically appended with consecutive numbers C Change the Fil...

Page 66: ...ve the three subprojects listed below the Training_ Your Initials project Training_ Your Initials 1 Training_ Your Initials 2 Training_ Your Initials 3 5 Tap Home Duplicating a Project You can also cr...

Page 67: ...ted back to the scanner The scanners then use various algorithms and mathematical equations to measure the location and reflectivity of scan points in the scan area Lasers The word laser is derived fr...

Page 68: ...based measurement Phase based scanners are similar to time of flight scanners in that they also emit laser light that is reflected back to the scanner However phase based scanners emit modulated laser...

Page 69: ...measured there is some ambiguity because the location of the phase can vary periodically This means that the phases of the emitted light and the returning light may align perfectly so the phase shift...

Page 70: ...ch reflects the laser outward Reflected Laser The mirror rotates around a horizontal axis and the scanner rotates around a vertical axis The scanner captures a 300 degree view around the horizontal ax...

Page 71: ...power inlet and perpendicular to the front of scanner Because the laser light is emitted both in front of and behind the scanner it only has to rotate 180 degrees to capture a 360 degree scan Start St...

Page 72: ...istance between the captured scan points increases with distance from the scanner This distance called point distance is also referred to as point density Point Distance is determined by the Resolutio...

Page 73: ...ution and Quality are the most important scan parameters because they affect the level of detail captured the scan duration and the ability to register scans properly The Resolution setting determines...

Page 74: ...MMMMMMM Focus3D X 130 and X 330 SCENE 5 3 September 2014 Resolution The Resolution setting determines the point distance which in turn determines the level of detail Tabletop Low Resolution Tabletop H...

Page 75: ...xample with a Resolution setting of 1 8 the point distance 10 meters from the scanner is 12 272 millimeters 0 5 inch Increasing the Resolution setting to 1 2 reduces the point distance to 3 068 millim...

Page 76: ...uality setting affects the rate of measurement the level of noise reduction and the range of the scanner Plane Cross Section High Quality Plane Cross Section Low Quality Increasing the Quality setting...

Page 77: ...n the scan point is removed This may result in a greater point distance lower point density Choose a Quality setting based on environmental conditions Increase the Quality setting in adverse scanning...

Page 78: ...lor When Scan with Color is on the scanner takes color photographs of the scan area after capturing the scan data The scanner makes an additional rotation and captures approximately 85 photographs per...

Page 79: ...del Indoor 10m Use indoors when the distance between the scanner and the object of interest is less than 10 meters Indoor 10m Use indoors when the distance between the scanner and the object of intere...

Page 80: ...1 8 3x On On Indoor 10m 1 5 4x On On Outdoor 20m 1 5 4x On On Outdoor 20 1 4 4x On On Preview 1 16 4x Off Off Object HD 1 2 6x On On Outdoor Far Distances 1 4 4x On On This profile is the same as Outd...

Page 81: ...can with Color Turn on or off color photography Color Settings Set the exposure modes for photographs Advanced Settings Enable of disable various filters Scan Duration The Resolution and Quality setti...

Page 82: ...hange Scan Size Number of scan points in each row and column of scan data MPts Total number of scan points in megapoints Point Distance Distance between scan points shown either as the point distance...

Page 83: ...ality Setting Scan with Color Scan Duration hh mm ss Point Distance mm at 10 m in at 30 ft 1 1 4x Off 1 1 4x On 1 4 4x Off 1 4 4x On 1 4 8x Off 1 4 8x On 1 8 4x Off 1 8 4x On 1 8 2x Off 1 8 2x On When...

Page 84: ...p Scan with Color to turn it on or off E Determine the Scan Duration and Point Distance I Tap Resolution MPts Quality II The Scan Duration and Point Distance are shown in the center column of the scre...

Page 85: ...rea 2 Move the scanner to the first scanner position 3 Make sure the scan data will be stored in the correct subproject A From the Home screen tap Manage Projects B Tap Training_ Your Initials 1 Train...

Page 86: ...the tripod legs so the yellow dot is in the center of the large circle III Tap Home C Tap Start Scan When the scan is complete a preview of the scan appears The name of the scan Your Initials 1_Scan_0...

Page 87: ...to Identify scanner hardware including components and accessories Comply with safety requirements Maintain and care for the scanner Set up the scanner Turn the scanner on and off Format the SD card U...

Page 88: ......

Page 89: ...73 NNNNN Focus3D X 130 and X 330 SCENE 5 3 September 2014 Notes...

Page 90: ......

Page 91: ...areful planning ensures that you are able to work with the scan data in SCENE in a way that is efficient and produces accurate and reliable results This module contains five lessons Lesson 1 Scanning...

Page 92: ......

Page 93: ...ntial hazards Some sites may contain hazards such as at a building site or in a high traffic area Terrain The terrain can affect target arrangements and scanner positions as well as accessibility Wind...

Page 94: ...ng until conditions have improved Project Requirements Project requirements are determined by your client the situation the scan data you need to capture and the intended use of the scan data When pla...

Page 95: ...d compared to captured scan data to verify the accuracy of the data Scale objects are objects such as rulers yardsticks or any accepted standard measurement indicator Features within the scan area wit...

Page 96: ......

Page 97: ...ned accurately relative to all of the other scans The American Society for Testing and Materials ASTM defines registration as the process of determining and applying to two or more datasets the transf...

Page 98: ...ordinate Systems The scanner saves each scan within its internal Cartesian coordinate system The origin of each scan is located in the center of the scanner s mirror Scanner Coordinate System x x y y...

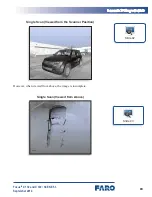
Page 99: ...LLLLLLLLLLLLLL Focus3D X 130 and X 330 SCENE 5 3 September 2014 Single Scan Viewed from the Scanner Position However when viewed from above the image is incomplete Single Scan Viewed from Above Slide...

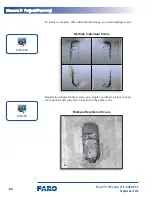
Page 100: ...014 To create a complete three dimensional image you need multiple scans Multiple Individual Scans Registration aligns multiple scans on a single coordinate system so each scan is positioned correctly...

Page 101: ...are two main types of common reference objects Artificial common reference objects targets Natural common reference objects Artificial Common Reference Object Checkerboard Artificial Common Reference...

Page 102: ...ed in various sizes They also require fewer scan points to be recognized in SCENE and can be placed farther from the scanner The disadvantage is they must be angled toward the scanner Spheres Three di...

Page 103: ...ner and still be recognized as checkerboards You can number checkerboards which makes it easy to identify which checkerboards correspond to one another When SCENE identifies a checkerboard it determin...

Page 104: ...eres are useful because they can be placed at any angle to the scanner Because several scan points are used to identify a sphere they can also be placed farther away from the scanner SuperSpheres are...

Page 105: ...able to identify the same object in two or more scans SCENE uses these objects common reference objects to create correspondences Sensor Data Sensor data can also be used during registration The senso...

Page 106: ...ata for all scans is factored into the registration relative to the sensor data of the Reference Scan Reference Scan Top Left By default SCENE usually selects the first scan in a scan project as the R...

Page 107: ...object of interest Number of Scanner Positions Each project will differ in the project requirements and constraints and the number of scanner positions will depend on these factors as well as on site...

Page 108: ...allows the scanner to be positioned farther from the object or area of interest and increases the Scan Duration Decreasing the Resolution setting increases the Point Distance decreasing the point dens...

Page 109: ...la 62 8318 10240 0 0061359 2 3 14159 10 10240 0 00613 m 6 13 mm Distance m Horizontal Resolution r Point Distance m r Line of Sight The line of sight to the object of interest is the most important fa...

Page 110: ...3D X 130 and X 330 SCENE 5 3 September 2014 Line of Sight Select scanner positions to ensure that two or more scans have overlapping areas in which common reference objects can be identified Line of S...

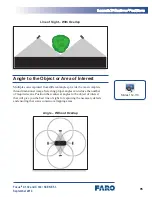
Page 111: ...ptured from different angles provide the most complete three dimensional image Selecting proper angles can reduce the number of required scans Position the scanner at angles to the object of interest...

Page 112: ...ng refers to positioning the scanner so the start stop point splits an object in the scan data Do not position the scanner so that the start stop point is on the object of interest If the entire scan...

Page 113: ...97 LLLLLLLLLLLLLLLLLLLLLLLLLLLL Focus3D X 130 and X 330 SCENE 5 3 September 2014 Bisecting the Object of Interest Angled to Avoid Bisecting the Object of Interest...

Page 114: ...ts Even if you plan on using targetless registration it is recommended that you use targets in your scan project to give you more options for ensuring successful registration Position the scanner so t...

Page 115: ...be done using other methods There are several guidelines you should follow to ensure successful registration Planning ahead and arranging the targets carefully will save time and prevent problems duri...

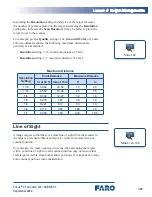
Page 116: ...but also increases the Scan Duration The two factors that most affect distance are the Resolution setting and the size of the target For example when using checkerboard targets printed on letter size...

Page 117: ...1 1 maximum distance 232 feet Maximum Distance Resolution Setting Point Distance Maximum Distance in at 30 ft mm at 10 m ft m 1 16 0 884 24 54 15 4 5 1 10 0 552 15 34 25 7 5 1 8 0 442 12 27 32 10 1 5...

Page 118: ...102 MMMMMMMMMMMMMMMMMMMMMMMMMMM Focus3D X 130 and X 330 SCENE 5 3 September 2014 Good Line of Sight First Scan Good Line of Sight Second Scan...

Page 119: ...103 LLLLLLLLLLLLLLLLLLLLLLLLLLLLLL Focus3D X 130 and X 330 SCENE 5 3 September 2014 Poor Line of Sight Both Scans Good Line of Sight Both Scans...

Page 120: ...CENE 5 3 September 2014 Unique Patterns If targets are arranged in similar patterns SCENE will detect the similarity and align the patterns Arrange groups of targets in unique patterns Two Rooms With...

Page 121: ...105 LLLLLLLLLLLLLLLLLLLLLLLLLLLLLL Focus3D X 130 and X 330 SCENE 5 3 September 2014 Two Rooms with Unique Patterns Unique Patterns Aligned...

Page 122: ...ight Ensure that the targets are arranged in unique patterns in three dimensions by varying the height of the targets You can vary the height using surfaces in the scan area such as tabletops or by ot...

Page 123: ...When creating unique target arrangements be sure not to arrange targets in a straight line When targets are placed in a straight line the line acts as an axis during registration The scans can align a...

Page 124: ...Straight Line Pattern Aligned Axis Target Types Another way to ensure that each arrangement of targets is unique is to use more than one type of target Using both spheres and checkerboards makes it ea...

Page 125: ...and X 330 SCENE 5 3 September 2014 Spacing Targets should be spaced as far apart as possible within the overlapping scan areas Spacing out the targets reduces angular error Target Spacing Poor Arrang...

Page 126: ...nd X 330 SCENE 5 3 September 2014 Angle to the Scanner When using checkerboards arrange them so they are facing the scanner SCENE may not recognize a checkerboard mounted at an angle greater than 45 d...

Page 127: ...anging targets at the start stop point of the scan is called bisecting the target and may prevent the target from being recognized in SCENE Be sure to place targets completely within the scan area and...

Page 128: ...rea targets can be mounted using Magnets Tripods Metal washers Cones When mounting targets keep the following guidelines in mind Avoid obstructions Mount checkerboards securely on flat surfaces Do not...

Page 129: ...Problems ______________________ ______________________ ______________________ ______________________ ______________________ ______________________ ______________________ ______________________ ______...

Page 130: ..._______________ Potential Problems ______________________ ______________________ ______________________ ______________________ ______________________ ______________________ ______________________ ____...

Page 131: ..._________________ Potential Problems ______________________ ______________________ ______________________ ______________________ ______________________ ______________________ ______________________ __...

Page 132: ...5 3 September 2014 Site Sketches During project planning site sketches can help you select proper target arrangements as well as scanner positions Site sketches can also be used during registration to...

Page 133: ...Add target arrangements to the site sketch Be sure to plan scanner positions and target arrangements so that the targets are not at the start stop point of the scanner 2 Arrange and mount targets in...

Page 134: ...Sensors II Adjust the tripod legs so the yellow dot is in the center of the large circle III Tap Home C Tap Start Scan 7 Capture the second scan When the first scan is done move the scanner to the se...

Page 135: ...119 LLLLLLLLLLLLLLLLLLLLLLLLLLLLLL Focus3D X 130 and X 330 SCENE 5 3 September 2014...

Page 136: ......

Page 137: ...Involves placing either the object of interest the targets or the first scan in the center of the scan area Traversing Involves moving targets from one scan area to another and linking adjacent scans...

Page 138: ...of interest is centralized the scanner has a clear line of sight to most if not all of the targets Do not place the targets directly between the scanner and the object of interest to avoid creating an...

Page 139: ...sitioning the scanner around the targets With this scanning strategy all of the scans are registered using the same group of targets The Central Targets strategy can be used when you have a limited nu...

Page 140: ...nce Scan Strategy Traversing Strategies Traversing strategies involve moving targets from one scan area to another and linking adjacent scans with targets arranged in the overlapping scan areas Use Tr...

Page 141: ...ions for the first three scans First identify the overlapping scan areas based on the maximum distance as determined by the Resolution setting For example an outdoor scan with a Resolution setting of...

Page 142: ...efore capturing the third scan identify the overlapping areas between the third and fourth scans and move the first group of targets to that area Do not move the second group of targets which is betwe...

Page 143: ...LLLLLLLLLLL Focus3D X 130 and X 330 SCENE 5 3 September 2014 Capture the fourth scan Continue identifying overlapping scan areas and moving the groups of targets as needed Open Traverse Strategy All S...

Page 144: ...an position contains a small amount of error 2 mm and this error accumulates with each subsequent scan While the first scan has an error of 2 the second scan has an error of 4 the third scan has an er...

Page 145: ...step to the Open Traverse strategy and linking the first and last scans To begin identify the overlapping scan areas between the first scan and the last scan Arrange a group of targets in that area C...

Page 146: ...MMMMMMMMMMMMMMM Focus3D X 130 and X 330 SCENE 5 3 September 2014 Then plan target arrangements and scanner positions for the first three scans Continue with the Traversing strategy Closed Traverse Str...

Page 147: ...LLLLLLLLLLLLLLLLLLLLLLLL Focus3D X 130 and X 330 SCENE 5 3 September 2014 Error Linking the first and last scans reduces the error for all of the scans Closed Traverse Strategy Error 4 6 2 2 6 4 8 2 8...

Page 148: ...time It is best to use a linear approach and locate each subsequent scanner position adjacent to the previous scan position Targetless registration requires at least 30 percent overlap between scans T...

Page 149: ...X 130 and X 330 SCENE 5 3 September 2014 Use this strategy when a smaller high resolution scan needs to be captured within a larger context Detail with an Overview Strategy This strategy will be disc...

Page 150: ...e 1 This is a simple layout because each target is visible from every scanner position However it is made more complicated by the fact that the crew must stay out of the road The four targets are plac...

Page 151: ...eptember 2014 Intersection Example 2 In this example a higher Resolution setting is required to adequately capture the targets Another option which would allow a faster scan with a lower Resolution se...

Page 152: ......

Page 153: ...now be able to Analyze conditions that affect scanning Apply a basic understanding of registration to project planning Plan scanner positions to ensure project success Arrange targets to ensure projec...

Page 154: ......

Page 155: ...139 NNNNN Focus3D X 130 and X 330 SCENE 5 3 September 2014 Notes...

Page 156: ......

Page 157: ...you to SCENE which is the software used to register multiple scans onto a single coordinate system Understanding the fundamentals of SCENE allows you to perform basic and advanced activities and succ...

Page 158: ......

Page 159: ...are with SCENE the more efficiently you can work with scan data and share scan projects with others This lesson discusses only the most commonly used elements of the SCENE interface For more informat...

Page 160: ...ng the Folder tab Project Locations To change the default project location or add additional project locations click on the browse button next to the Project Locations field As you use the browse butt...

Page 161: ...ject in SCENE The main feature of the Project Selection window is the Project Overview which contains previews of the highest level projects created on the scanner To open a scan project double click...

Page 162: ...330 SCENE 5 3 September 2014 Scan Project on the Scanner Editing Project Details You can change the information related to each project in the Project Selection window by clicking Edit Project Inform...

Page 163: ...147 LLLLLLLLLLLLLLLLLLLLLLLLLLLLLL Focus3D X 130 and X 330 SCENE 5 3 September 2014 Project Details Dialog Box...

Page 164: ...0 SCENE 5 3 September 2014 Typical SCENE Layout After opening a scan project the typical SCENE layout appears Typical SCENE Layout The basic elements of the typical SCENE layout are 1 Structure window...

Page 165: ...149 LLLLLLLLLLLLLLLLLLLLLLLLLLLLLL Focus3D X 130 and X 330 SCENE 5 3 September 2014 Menu Bar The menu bar contains menus with various submenus and commands Menu Bar...

Page 166: ...Toolbars There are several toolbars in SCENE Most toolbars open automatically with each of the different views You can also display or hide toolbars using the View menu View Menu Toolbars When you fi...

Page 167: ...330 SCENE 5 3 September 2014 Toolbars Structure Window The Structure window displays the file structure created on the scanner the scans and other data contained in the scan project Other data can in...

Page 168: ...ber 2014 The subprojects that you created on the scanner are displayed in the Structure window as clusters which are folders that contain scans Structure Window SCENE File Structure When you first ope...

Page 169: ...LLLLLLLLLLLLLLLLLLLLLLL Focus3D X 130 and X 330 SCENE 5 3 September 2014 SCENE File Structure As you work with the project additional elements become visible in the Structure window SCENE File Structu...

Page 170: ...MMMMMMMMMMMMMMMMMMMMM Focus3D X 130 and X 330 SCENE 5 3 September 2014 The highest level folder that you created on the scanner appears in the Structure window as the folder Scans Project on the Scann...

Page 171: ...rk with scan data SCENE combines several small icons for each element Each small icon provides additional information For example the icon that indicates an element has a good active fit is composed o...

Page 172: ...ing Scan Loaded Scan Reduced Size Loaded Scan Registration Correspondence Status Good Medium Poor Active Inactive Correspondences Automatic Correspondence Ignored Correspondence Forced Correspondence...

Page 173: ...Meaning Point Region Scan Point Slab Sphere Sphere Radius Miscellaneous Global Origin Missing Element Picture Viewpoint Virtual Scan High Resolution Imported Picture Shortcut Menus Most actions in SC...

Page 174: ...ed Image Area You can view scans in the image area using tabs which display names along the top of the image area or without tabs To switch this feature on and off in the menu bar click View Tabbed Do...

Page 175: ...during this training are 3D View and Correspondence Split View These views will be discussed in detail later in the training There are other views in SCENE and in the user manual Structure View Admini...

Page 176: ...r 2014 Status Bar The information displayed in the status bar depends on what you have selected where the cursor is and what view you have open The type of information displayed in the status bar incl...

Page 177: ...the hundreds of thousands 1 A point cloud is also defined as the computer visualization of the XYZ coordinates that describe a physical object or environment Each point represents an actual point on t...

Page 178: ...click Operations Point Cloud Tools Delete Scan Point Clouds for a cluster or Delete Scan Point Cloud for a scan Troubleshooting SCENE does not always show the scan point cloud icon in the Structure w...

Page 179: ...ou are prompted to select a default project location before you can continue Your instructor will guide you through this process After opening SCENE and importing scan data there are several Options y...

Page 180: ...Options tabs Navigation Matching Folder General Units For more information on the other Options tabs see the FARO SCENE 5 3 User Manual Navigation Tab On the Navigation tab you may want to select Inve...

Page 181: ...ding Place Scan Settings Expand Plane Settings Match Sphere Settings Colorize Settings Matching Tab Clicking the Place Scan Settings button opens the Default Place Scan Settings dialog box which allow...

Page 182: ...Settings Dialog Box Clicking the Match Sphere Settings button opens the Match Sphere Settings dialog box which allows you to customize which sizes of spheres SCENE automatically detects You can enter...

Page 183: ...7 LLLLLLLLLLLLLLLLLLLLLLLLLL Focus3D X 130 and X 330 SCENE 5 3 September 2014 Folder Tab On the Folder tab you can change the default locations of scan projects in the Project Locations field Folder T...

Page 184: ...MMMMMMMMMMMMMMMMMMMMMMMMMMMMMMMMMM Focus3D X 130 and X 330 SCENE 5 3 September 2014 General Tab On the General tab you can turn on automatic saving and adjust how often SCENE automatically saves Gener...

Page 185: ...169 LLLLLLLLLLLLLLLLLLLLLLLLLL Focus3D X 130 and X 330 SCENE 5 3 September 2014 Units Tab On the Units tab you can change the units that are displayed All units are displayed using decimals Units Tab...

Page 186: ...vigation tab select Invert Mouse Wheel 3 If you have used spheres on the Matching tab click the Match Sphere button then set Match Sphere Settings 4 On the Folder tab under Project Locations use the b...

Page 187: ...MMMMMMMMMMMM Focus3D X 130 and X 330 SCENE 5 3 September 2014 Module Summary This module introduced you to SCENE You should now be able to Identify the basic elements of the SCENE interface Set SCENE...

Page 188: ......

Page 189: ...173 NNNNN Focus3D X 130 and X 330 SCENE 5 3 September 2014 Notes...

Page 190: ......

Page 191: ...oduces the Basic SCENE Workflow which includes the general steps for working with scan projects in SCENE Understanding the Basic SCENE Workflow allows you to work efficiently in SCENE and choose which...

Page 192: ......

Page 193: ...xt module explains step 2 The training then returns to the Basic SCENE Workflow and the remaining steps It is important to remember that the Basic SCENE Workflow is rarely linear some steps are not al...

Page 194: ...ation Update the ScanManager Remove correspondences with the highest tension values Repeat as needed Register automatically preprocess Register manually identify objects Save Insert the SD card Save O...

Page 195: ...r data automatically This is the recommended method for importing a scan project SCENE Import Dialog Box SCENE imports all projects from the scanner including the Default_ Project If you have created...

Page 196: ...se If you have created a new project that has the same name as a project already in SCENE then SCENE automatically renames both projects to keep them separate Opening a Scan Project There are several...

Page 197: ...import the scan projects from previous activities Follow these steps 1 Insert the SD card into the computer A message appears asking if you want to start an automatic data transfer 2 Click Yes SCENE...

Page 198: ......

Page 199: ...ocus3D X 130 and X 330 SCENE 5 3 September 2014 Module Summary This module introduced you to the Basic SCENE Workflow You should now be able to Identify the Basic SCENE Workflow steps Import scan data...

Page 200: ......

Page 201: ...185 NNNNN Focus3D X 130 and X 330 SCENE 5 3 September 2014 Notes...

Page 202: ......

Page 203: ...and Manual Registration Workflow which include the general steps for registering scans After registration it is important to inspect the registration to see if the results comply with your tolerance...

Page 204: ......

Page 205: ...tomatic Registration Workflow steps The Automatic Registration Workflow steps are 1 Select preprocessing settings 2 Select a registration configuration This process is called automatic registration be...

Page 206: ...ct Place Scans Preprocessing In SCENE the term Preprocessing refers to a command that allows you perform several batch operations however it is best to perform SCENE operations in the general order ou...

Page 207: ...the Preprocessing command and additional ways to register scans refer to the FARO SCENE 5 3 User Manual To use the Preprocessing command in the Structure window right click on a cluster then click Ope...

Page 208: ...ce objects to register scans Targetless The targetless methods which are Top View Based and Cloud to Cloud do not use common reference objects to register scans In the Place Scans Settings dialog box...

Page 209: ...an Settings Dialog Box Target Based While the default settings are recommended you can adjust the following settings Correspondence Search Enable correspondence search Use to automatically search for...

Page 210: ...ojects that contain perpendicular planes such as walls and floors in a building Use points for validation Registers with an enhanced validation that compares the relative locations of scan points in e...

Page 211: ...lable for each ScanManager is a good practice during targetless registration because it allows you to work with a small number of scans at once reducing the amount of computer memory and time required...

Page 212: ...s are recommended you can adjust the following settings Subsampling Reduces and homogenizes the point density to the specified point distance which reduces the amount of time required for registration...

Page 213: ...using manual placement in Correspondence View See Module 6 for more information on Correspondence View Then Cloud to Cloud registration can be used to reduce any remaining error Cloud to Cloud Regist...

Page 214: ...point within which SCENE searches to find corresponding scan points Detecting Common Reference Objects After configuring preprocessing click OK then select the types of common reference objects you wo...

Page 215: ...sing the scans the Preprocess Scan dialog box displays the progress Preprocess Scan Dialog Box Troubleshooting Clicking Skip All in the Preprocess Scan dialog box does not skip all processes to cancel...

Page 216: ...Box Adding information in the Comment and Author fields help keep your data organized as you continue to work with the project When the project has been saved successfully a message appears SCENE Dia...

Page 217: ...ect Name Project History As you work through the next activities it is important to understand more about the Project History When you save your scan project SCENE creates a new revision which is stor...

Page 218: ...s the revision and deletes all subsequent revisions Export to Creates a new project with no other revisions Load Revision Opens the revision and does not delete subsequent revisions There is an import...

Page 219: ...e subsequent revisions all subsequent revisions will disappear from the History list until SCENE has been closed and opened again To revert to a previous revision of the scan project 1 In the Project...

Page 220: ...dow The specific icons that you see for your scan project will vary depending on what operations you have performed Activity 5 1 Automatic Registration Target Based In this activity you will automatic...

Page 221: ...lear the Spheres check box If you have not used checkerboards clear Checkerboards check box 5 Select Place Scans 6 Click Configure 7 On the drop down menu click Target Based 8 Click OK 9 Click OK 10 S...

Page 222: ......

Page 223: ...ways to inspect the registration Using the ScanManager Using 3D View Using the ScanManager The ScanManager displays the status of the registration and classifies the results as good green traffic lig...

Page 224: ...tember 2014 For Target Based registration there are up to four tabs which are ScanManager Scan Results Target Tensions Scan Point Tension ScanManager For Top View Based and Cloud to Cloud registration...

Page 225: ...he registration Managed by Displays the name of the cluster one level higher in the project structure which is displayed in the Structure window Used Settings Opens the Used Place Scans Settings dialo...

Page 226: ...subordinate clusters by double clicking on the cluster in the Sub Manager list ScanManager Tab Scan Results Tab The Scan Results tab shows the Mean Scan Point Tension for each ScanFit This value is b...

Page 227: ...211 LLLLLLLLLLLLLLLLLLLLLLLLLLLLLLLLLLLLLLLLLLLLLL Focus3D X 130 and X 330 SCENE 5 3 September 2014 Scan Results Tab...

Page 228: ...ension values are automatically sorted from highest to lowest The acceptable amount of error depends on your project requirements Target Tensions Tab Scan Point Tensions Tab The Scan Point Tensions ta...

Page 229: ...130 and X 330 SCENE 5 3 September 2014 Overlap Percent of scan points that overlap Used Points Number of scan points used to calculate the values in the Scan Point Tensions tab Details Opens a window...

Page 230: ...3 September 2014 Scan Point Tension Details The Scan Point Tension Details window includes the same information shown on the Scan Point Tensions tab and also includes a Distance Histogram which is a g...

Page 231: ...cts Creating clipping boxes Crop scan data While you can create geometric objects in 3D View they cannot be used for registration How to Open There are three ways to open 3D View In the Structure wind...

Page 232: ...ed To work with clipping boxes scans must be unloaded and scan point clouds must be created When you open a scan in 3D View the 3D Toolbar appears To make the buttons active click in the image area 3D...

Page 233: ...er 2014 Navigation The 3D Toolbar includes several navigation tools 3D View Navigation Tools The 3D View navigation buttons are Fly Click then drag the mouse to move the image area in the opposite dir...

Page 234: ...ift to look down changes the orientation of the cluster so you are viewing the scans from below along the z axis Look forwards shift to look backwards Click to change the orientation of the cluster so...

Page 235: ...angled at 30 degrees Change camera position to make all objects visible Click to show all objects in the image area Set Rotation Point Click then click in the image area to set the rotation point then...

Page 236: ...ber 2014 Selection The 3D Toolbar includes three selection tools 3D View Selection Tools The selection buttons in the 3D Toolbar are the Polygon Selector Point Cloud Polygon Selector 3d Brush Selector...

Page 237: ...with Selection in the Point Selection Toolbar are active they do not function To use the Polygon Selector scans must be loaded and not have scan point clouds created If scan point clouds are created t...

Page 238: ...nManager under Training_ Your Initials 2 B Click the Scan Results tab to view the Mean Scan Point Tension for each ScanFit C Click the Target Tension tab to view the Mean Scan Point Tension for each S...

Page 239: ...ration Clipping boxes can be created in 3D View Clipping Box Buttons in the 3D Toolbar The clipping box buttons in the 3D Toolbar are Create a new Clipping Box This is a split button that allows you t...

Page 240: ...work with clipping boxes scans must be unloaded Troubleshooting You can create clipping boxes with scans loaded however Hide Exterior and Hide Interior will not work When you click Create a new Clippi...

Page 241: ...September 2014 Resize Arrows Resize arrows allow you to resize the clipping box by dragging each side The color of the arrows correspondences to the color of each axis The resize arrows appear when yo...

Page 242: ...226 MMMMMMMMMMMMMMMMMMMMMMMMMMMM MMMMM Focus3D X 130 and X 330 SCENE 5 3 September 2014 Scale Manipulators Scale manipulators allow you to scale the clipping box Scale Manipulators...

Page 243: ...LLLLLLLLLLLLLLLLLLLLLLLLLLLLLLLLLLL Focus3D X 130 and X 330 SCENE 5 3 September 2014 Rotation Manipulators Rotation manipulators allow you to rotate the clipping box along one of the three axis Rotati...

Page 244: ...MMMMMMMMMMMMMMMMMMMM MMMMM Focus3D X 130 and X 330 SCENE 5 3 September 2014 Translation Manipulators Translation manipulators allow you to move the entire clipping box without altering it Translation...

Page 245: ...pping Box Toolbar and creates a clipping box in the center of the image area Clipping Box Toolbar The Clipping Box Toolbar contains the following tools Scale manipulators Drag one of the red green or...

Page 246: ...he last two adjustments before becoming inactive Re apply transformation change Click to redo the last undone adjustment made to the clipping box This feature works on the last two adjustments before...

Page 247: ...r also appears in the image area Troubleshooting If the Clipping Box Toolbar is not visible in the Structure window select the existing clipping box in the ClippingBoxes folder this causes the Clippin...

Page 248: ...through the scan point clouds which can be useful when working with clipping boxes To turn Clear View on or off in the 3D Toolbar click Toggle Clear View You can also press C on your keyboard to switc...

Page 249: ...pping Box Toolbar click the Clipping Box visibility tool 5 Create a new clipping box with one side parallel to a plane in the point cloud A Use the navigation tools the mouse and the mouse wheel to fi...

Page 250: ...d configuration A In the Structure window right click on the cluster Training_ Your Initials 2 B Click Operations Preprocessing Preprocess Scans C Select Place Scans Clear all other settings D Click C...

Page 251: ...Operations Preprocessing Preprocess Scans C Click Configure D On the drop down menu click Cloud to Cloud E Click OK F Click OK G Save the project I Click File Save or click the Save tool 4 Inspect th...

Page 252: ......

Page 253: ...istration results as described in the previous lesson Manual registration is based on the concept of manually identifying common reference objects in overlapping scans and as with automatic registrati...

Page 254: ...ave Preprocess Configure Target Based Navigate to the same object in both scans Verify the precision of identified common reference objects as needed Use the Mark tools Use the Create Objects command...

Page 255: ...ble in the Correspondence Split View Toolbar and in the Identify Objects Toolbar Using the selection buttons and the Create Objects command The selection buttons are available in the Point Selection T...

Page 256: ...types of targets that can be identified in SCENE are Checkerboards Circular Flat Targets Spheres Sphere Radii Geometric Objects In SCENE geometric objects are common reference objects other than targe...

Page 257: ...ondences 1 In the menu bar click Buttons Options 2 Click the Matching tab 3 Click Place Scan Settings The Default Place Scan Settings dialog box appears 4 Under Correspondence Search select or clear E...

Page 258: ...that have been manually registered common reference objects are placed directly in the scan folder Targets Identified During Automatic Registration Targets Identified During Manual Registration Corre...

Page 259: ...on during automatic registration How to Open To view scans in Correspondence Split View in the Standard Toolbar click Create Correspondence Split View Scan State SCENE automatically loads scans when y...

Page 260: ...of the area indicates the type of correspondence green indicates an automatically detected correspondence while dark blue indicates a forced correspondence The labels contain a maximum of nine charac...

Page 261: ...SCENE 5 3 September 2014 Correspondence Split View Labels To rotate the scan around the scan position click and drag in the image area To zoom in and out use the mouse wheel When you open a scan in Co...

Page 262: ...MMMMM Focus3D X 130 and X 330 SCENE 5 3 September 2014 Correspondence Split View Toolbar The Correspondence Split View buttons are Mark circular flat target Mark checkerboard target Mark sphere Mark p...

Page 263: ...click this button to force them When you register scans SCENE automatically searches for correspondences regardless of the correspondences that have been assigned To ensure that the existing correspon...

Page 264: ...elect a straight line or a series of connected straight lines click then reposition the mouse and click again Double click to end the selection To select a custom line followed by a straight line clic...

Page 265: ...he scroll wheel on the mouse to resize the sphere Pulling the mouse toward you makes the sphere larger Position the sphere over the selection area and click to end the selection Ellipse Selector Click...

Page 266: ...en right clicking in the selected area To identify an object using the Create Objects command 1 Click one of the Selection tools 2 Select an area in the image area that contains the object you want to...

Page 267: ...tion point 6 Drag the mouse to rotate the selection and verify the precision of the selection in three dimensions Registering When registering scans during the Manual Registration Workflow you must fi...

Page 268: ...in Correspondence Split View to identify common reference objects in Training_ Your Initials 1 and manually register the scans Follow these steps 1 Open two scans in Correspondence Split View A In the...

Page 269: ...f identified common reference objects as needed 4 Click the Force current correspondences between shown scans button 5 Save the project A Click File Save or click the Save tool 6 Register the scans A...

Page 270: ...254 MMMMMMMMMMMMMMMMMMMMMMMMMMMM MMMMM Focus3D X 130 and X 330 SCENE 5 3 September 2014 9 Save...

Page 271: ...ify common reference objects using the Preprocessing command Create clipping boxes Save the scan project Inspect the registration using the ScanManager Inspect the registration in 3D View Create clipp...

Page 272: ......

Page 273: ...257 NNNNN Focus3D X 130 and X 330 SCENE 5 3 September 2014 Notes...

Page 274: ......

Page 275: ...he remaining steps in the Basic SCENE Workflow The steps for completing the Basic SCENE Workflow are the same whether you have used automatic or manual registration Which steps you follow depends on t...

Page 276: ......

Page 277: ...trol over the amount of error and more confidence in the results Inspecting and refining are conducted in conjunction with one another repeat each process until you are satisfied with the results Refi...

Page 278: ...ence object at the top of the list then click Locate Locate Command The common reference object is highlighted in the Structure window and in the image area SCENE also automatically displays the clust...

Page 279: ...matically change the common reference object s name based on assigned correspondences Use for Place Scans and Correspondence Search This setting causes SCENE to automatically assign correspondences an...

Page 280: ...ck Apply or OK SCENE automatically updates the registration and removes the correspondence from the Tension column The common reference object is still visible in the Structure window To undo this pro...

Page 281: ...to appear Activity 6 1 Refining the Registration In this activity you will refine the registration to reduce the error Follow these steps 1 Select the common reference object with the highest Tension...

Page 282: ...ck Properties B Click the General tab then select Ignore for Place Scans C Click OK 3 Update the registration A In the ScanManager click Apply SCENE updates the registration and the common reference o...

Page 283: ...The two most common tasks involved in preparing data for export are Cropping out unwanted scan points Applying color information A typical series of operations involved in preparing the data for expo...

Page 284: ...inside or outside of the selection Scan State Scans must be loaded without scan point clouds created Troubleshooting To use the Polygon Selector which is used for cropping in 3D View scans must be lo...

Page 285: ...ta 4 Use the Polygon Selector button to make a selection either the area you want to keep or the area you want to remove 5 Delete the unwanted scan data A Right click in the selected area B Click Dele...

Page 286: ...scan In Planar View make a selection then right click on the selection and click View 3D View To rotate the selection click the Examine button Then click the Set Rotation Point button Click in the im...

Page 287: ...of unwanted scan data Follow these steps 7 Open a scan in Planar View A In the Structure window right click on a scan and click View Planar View A Use the navigation tools the mouse and the mouse whee...

Page 288: ...ment command The Alignment command allows you to select a plane or a slab and align it with a cardinal direction or designate it as the floor or ceiling In SCENE north is in the positive direction on...

Page 289: ...ox has four tabs View Scan Points Layer and Extra 3 Click the Layer tab 4 Click in the Visible and Names columns to switch the visibility of each element on or off Views To adjust the default visibili...

Page 290: ...ick Operations Color Pictures Apply Pictures SCENE Dialog Box Hiding and Removing Color Information If you have saved the project and then applied color information to scan data you can hide or remove...

Page 291: ...n Data Tab Use Grey Refining the Color Information Because lighting conditions vary from scan to scan there may be abrupt changes in the color information To even out the color you can create a projec...

Page 292: ...MMMMMMMMMM Focus3D X 130 and X 330 SCENE 5 3 September 2014 In the Project Point Cloud Scan Point Cloud Settings dialog box select Homogenize Point Density and Apply Color Balancing Project Point Clou...

Page 293: ...277 LLLLLLLLLLLLLLLLLLLLLLLLLLLLLLLLLLLLLLLLLLLL Focus3D X 130 and X 330 SCENE 5 3 September 2014 Before Creating a Project Point Cloud After Creating a Project Point Cloud...

Page 294: ...created or not Saving It is important to save before applying information so you can remove the color information if necessary If you do not save before applying color information a dialog box may app...

Page 295: ...the Structure window right click on a scan multiple individual scans or a cluster 2 Click Operations Color Pictures Apply Pictures The Colorize scan dialog box appears showing progress 3 Save 4 Creat...

Page 296: ......

Page 297: ...eral formats to allow you to import the data into third party software applications Scan State The required scan state depends on the method used for exporting To export a scan or cluster in the Struc...

Page 298: ...Structure Window To export a scan in Planar View 1 In the image area right click then click Direct Export exports with the most recent Export Scan Point settings or Export Scan Points opens the Expor...

Page 299: ...scan points in 3D View 1 Use the Point Cloud Polygon Selector to make a selection 2 Right click on a selection and click Export 3D Selection or in the image area or in the Structure window right clic...

Page 300: ...MMMMMM Focus3D X 130 and X 330 SCENE 5 3 September 2014 Exporting a Clipping Box in the Structure Window Troubleshooting You must have the cluster containing the clipping box open in 3D View to export...

Page 301: ...at are available in the dialog box depend on the type of process you use for exporting Export Scan Points Dialog Box Activity 6 5 Exporting In this activity you will practice exporting scan data in a...

Page 302: ...scan data you want to export 4 Click Import Export Export 3D Selection using active Clipping Boxes The Export Scan Points dialog box appears 5 Next to Format select the appropriate file format from th...

Page 303: ...the Basic SCENE Workflow You should now be able to Refine the registration Ignore correspondences Prepare data for exporting Perform general cropping Perform detail cropping Use the Alignment command...

Page 304: ......

Page 305: ...289 NNNNN Focus3D X 130 and X 330 SCENE 5 3 September 2014 Notes...

Page 306: ......

Page 307: ...ved in planning capturing and registering detail scans as well as completing the steps of the basic registration workflow Detail scans can provide an efficient and time saving method for capturing dat...

Page 308: ......

Page 309: ...some situations you may need to capture a detailed area or object rather than or in addition to capturing a full scan The advantages of capturing detail scans include Files are smaller and require fe...

Page 310: ...scanner The full scan is referred to as the overview scan Activity 7 1 Detail Scan Duration In this activity you will adjust the Scan Area settings and note how these settings affect Scan Duration Giv...

Page 311: ...a blue degree button to adjust the Vertical Area and Horizontal Area 3 Note the Scan Duration A Tap Scan Parameters B Tap Resolution MPts Quality C The Scan Duration is displayed in the middle of the...

Page 312: ...ions to the site sketch C Add target arrangements to the site sketch 2 If you are using targets arrange and mount the targets in the scan area 3 Set the parameters for the first scan 4 Make sure the c...

Page 313: ...inclinometer to make sure the scanner is level C Tap Start Scan 7 Capture the detail scan Do not move the scanner between the second and third scan A Adjust the Scan Area I At the top of the screen t...

Page 314: ......

Page 315: ...with detail scans it is best to complete the registration process for all of the other scans before registering the detail scan You can do this by fixing or locking the detail scan and then using eit...

Page 316: ...MMMMMMMMMMMMMMMMMMMMM Focus3D X 130 and X 330 SCENE 5 3 September 2014 You can view the coordinates by opening the Properties dialog box for each scan and clicking the Transformation tab Transformatio...

Page 317: ...you are working with the detail scan A In the Structure window right click on the detail scan Training_ Your Initials 2_Scan_002 B Click Properties 2 Click the Scan Area tab A Verify that the Vertica...

Page 318: ...e of the full scans and click Properties B On the Scan tab select Reference Scan C Click OK 2 Fix the detail scan A In the Structure window right click on one of the full scans and click Properties B...

Page 319: ...an with the associated overview scan A View the x y and z coordinates of both the overview scan and the detail scan I In the Structure window right click on each scan II Click Properties III Click the...

Page 320: ...SCENE 5 3 September 2014 Paste Using the keyboard shortcuts ensures that all characters are selected including any negative signs D Click OK in both dialog boxes 3 Save 4 Continue with the basic workf...

Page 321: ...etail scans can provide an efficient and time saving method for capturing data that meets project requirements You should be able to Practice the Detail with an Overview scanning strategy Determine Sc...

Page 322: ......

Page 323: ...307 NNNNN Focus3D X 130 and X 330 SCENE 5 3 September 2014 Notes...

Page 324: ......

Page 325: ...309 Focus3D X 130 and X 330 SCENE 5 3 September 2014 Appendices...

Page 326: ......

Page 327: ...tus is displayed as percent charged in two places Under Manage General Settings Power Management Battery Charge State In the status bar 2 How many date formats are available There are three date forma...

Page 328: ...information be found Customer support information can be found under Manage Service Customer Support 6 What information can be entered for an operator The following can be entered for an operator Nam...

Page 329: ...x Off 01 55 00 6 136 0 221 1 4 8x On 01 56 00 6 136 0 221 1 8 4x Off 00 02 17 12 272 0 442 1 8 4x On 00 03 44 12 272 0 442 1 8 2x Off 00 00 56 12 272 0 442 1 8 2x On 00 02 23 12 272 0 442 When the Sca...

Page 330: ...0 to 90 0 0 0 to 360 0 07 39 60 0 to 90 0 0 0 to 180 0 07 39 60 0 to 90 0 45 0 to 135 0 04 04 60 0 to 45 0 45 0 to 135 0 04 04 The scan durations are approximate and are based on values dis played on...

Page 331: ...ardsticks or any accepted standard measurement indicator Features within the scan area with known verifiable measurements such as windows and doors can also be used as scale objects The Pythagorean th...

Page 332: ...ose enough to the scanner so that the measurement units can be adequately captured and are readable Each situation will call for different types of scale objects and different placements based on fact...

Page 333: ...urement and actual dimensions fit match origin The point at which scan data originates used as a fixed reference point for the surrounding scan data the point where the axes of a coordinate system int...

Page 334: ...etail in a scan scan collection of data points that represent physical measurements taken by the scanner also refers to the process of capturing scan data tension The discrepancy between the position...

Page 335: ...319 AAAAAAAAAAAAAAAAAA AAAAAAAAAAAA Focus3D X 130 and X 330 SCENE 5 3 September 2014 Appendix 4 Workflow Diagrams...

Page 336: ...e the ScanManager Remove correspondences with the highest tension values Repeat as needed Register automatically preprocess Register manually identify objects Save Insert the SD card Save Open the sca...

Page 337: ...n Workflow 1 Select preprocessing settings 2 Select a registration configuration Click Operations Preprocessing Process Scans Save Select which types of common reference object to identify Click Confi...

Page 338: ...ss Configure Target Based Navigate to the same object in both scans Verify the precision of identified common reference objects as needed Use the Mark tools Use the Create Objects command Use the Find...

Page 339: ......

Page 340: ...rt faro com Ph 800 736 2771 For Sales Inquiries Electronic Product Catalog on www faro com E mail info faro com Ph 800 736 0234 extension 2265 For Training or Technical Services World Wide Web site ww...

Reviews: