background image

25

6

Hooking Up
the Printer

ON

OFF

AC POWER

PARALLEL

SW1

O

I

B. Running the
Self Test

A self test should now be performed to check for
proper operation of the printer. The standard self
test function requires only that a full-color ribbon
and at least one card is installed. The standard self
test function prints onto both sides of a card but
does not utilize any of the printerÕs overlay
capabilities. If printing with a full-color ribbon
with a resin black panel, most rectangles on the
back side of the self test card will appear as solid
black. A sample of the self test pattern is shown on
the following page.

1.

If power is ON, turn it OFF now by pressing

the on/cancel button. The LED indicator lights
should no longer be illuminated. Verify that a full-
color ribbon is installed and that cards are properly
loaded.

2.

Press and hold the on-line button.

3.

While holding the on-line button down, turn

the printer power back ON by quickly pressing
and releasing the on/cancel button.

4.

Release the on-line button. The gray scale self

test will begin printing approximately 5 seconds
after the on-line button has been released.

A. Applying
Power

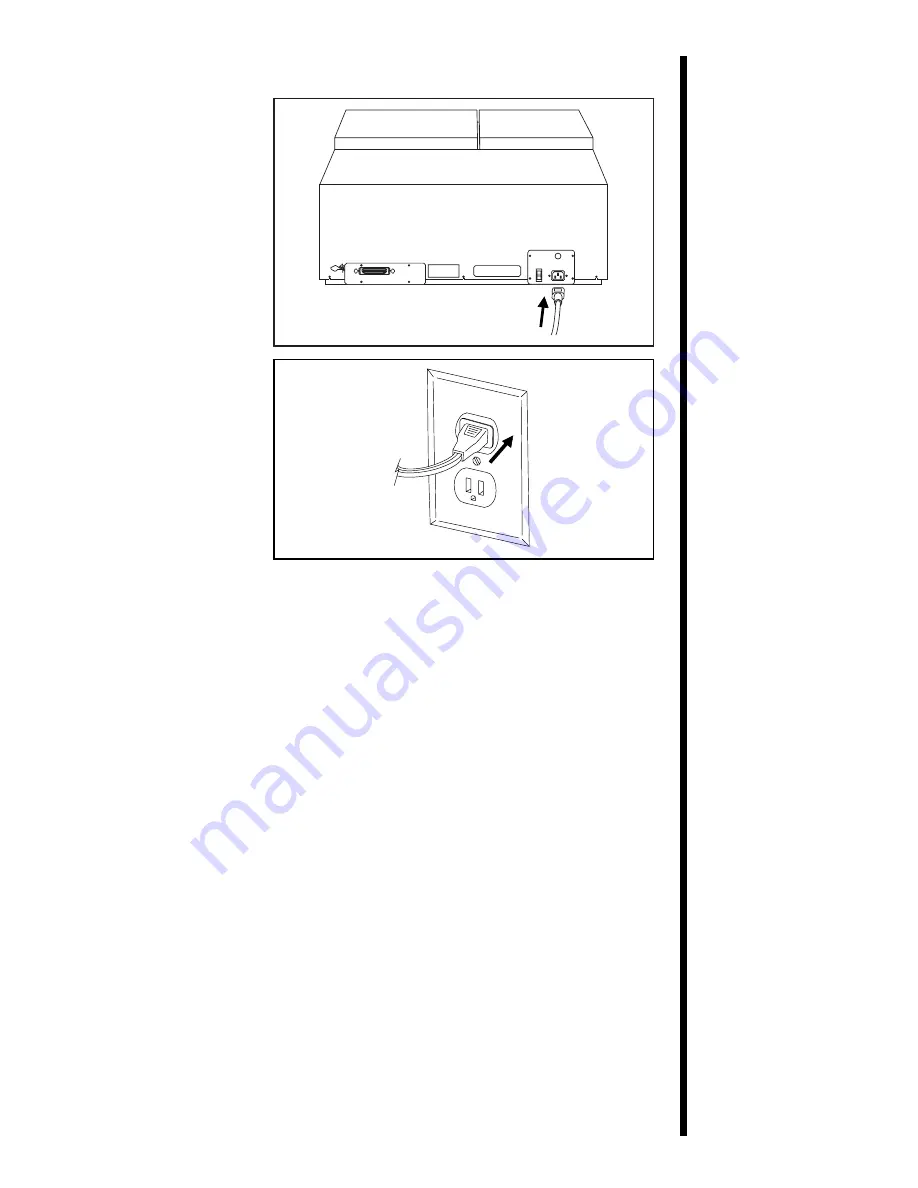
1.

Locate the power

cord supplied with
your printer.

2.

With the printerÕs

power switch turned
OFF, place one end of
the power cord into the
power port on the rear
panel of the printer.

3.

Place the other end

of the power cord into
an available wall
outlet.

4.

Once the power

cord is connected, turn
the power switch
located on the rear
panel of the printer to
its ON position.

Summary of Contents for Color ID Card Printer II

Page 1: ...Operating Instructions 970922 510343 02 ColorIDCardPrinterII Copyright 1997 All rights reserved ...

Page 2: ...formance or use of this material This document contains proprietary information which is protected by copyright All rights are reserved No part of this document may be photocopied reproduced or translated into another language without prior written consent Patent Pending Trademark Acknowledgements IBM is a registered trademark of International Business Machines Corporation Windows is a trademark o...

Page 3: ...rient or relocate the receiving antenna Increase the separation between the equipment and receiver Connect the equipment into an outlet on a circuit different from that to which the receiver is connected Consult the dealer or an experienced radio TV technician for help Use of a shielded cable is required to comply with the Class A limits of Part 15 of the FCC Rules You are cautioned that any chang...

Page 4: ...e into the Printer 23 Section 6 Hooking Up the Printer A Applying Power 25 B Running the Self Test 25 C Connecting the Color ID Card Printer to Your Computer 26 Section 7 Installing and Using the Color ID Card Printer Driver A Installing the Windows Printer Driver 28 B Installing the 32 Bit Print Spooler for Windows 95 30 C Setting Up the Windows Printer Driver 32 D Printing a Card 40 Section 8 Ma...

Page 5: ...eparator Flap 49 D Adjusting the Laminator 51 Section 10 Troubleshooting 53 Section 11 Technical Specifications 58 Appendix A Magnetic Stripe Encoding Module A Introduction 59 B Track Locations 60 C Sending Track Information 60 Appendix B Interfacing Information A Introduction 62 B Centronics type Parallel Interface 62 Index 63 vi ...

Page 6: ...g Windowsª 3 1x or Windows 95 This means that you can use the printer with virtually any software package running under Windows without any special set up or configuration beyond the initial installation of the specific software driver and interface cable Data is sent to the Color ID Card Printer in a bit mapped rasterized format so your computer along with the printer driver software will do almo...

Page 7: ...encoding capabilities A fast print speed of just 30 seconds full color card Fast 32 bit print spooler for Windows 95 Dual sided card cleaning system Upgradable memory 2MB maximum Optional color matching software Optional Ethernet network support And best of all operation of the printer is simple and straight forward Please refer to the remainder of this manual for instructions on setting up and pr...

Page 8: ...tage rating for your countryÕs power supply DO NOT ATTEMPT TO USE THE UNIT Contact your dealer or the factory Stop operation immediately if any liquid or solid object should fall into the cabinet Unplug the unit and have it checked by qualified service personnel Do not disassemble the cabinet Refer servicing only to qualified personnel Service personnel parts of this device may be damaged if expos...

Page 9: ...ONAL DURCHGEFÜHRT WERDEN Das GerŠt nur mit 120 V 50 60 Hz Wechselstrom betreiben Drucker die au erhalb der USA und Kanada verwendet werden nur mit 220 240 V 50 60 Hz Wechselstrom betreiben Wenn Sie nicht sicher sind ob Ihr GerŠt mit der Spannung des šrtlichen Stromnetzes arbeitet DAS GERÄT NICHT IN BETRIEB NEHMEN Wenden Sie sich an Ihren HŠndler oder den Hersteller des GerŠts Den Betrieb sofort un...

Page 10: ... Faire fonctionner lÕappareil uniquement sur courant alternatif de 110 120 V 50 ou 60 Hz Les imprimantes expŽdiŽes en dehors des Etats Unis et du Canada fonctionnent uniquement sur courant alternatif de 220 240 V 50 or 60 Hz En cas de doute sur la compatibilitŽ entre la tension nominale de lÕappareil et le courant du pays dÕutilisation NE PAS TENTER D UTILISER L APPAREIL Contacter le revendeur ou ...

Page 11: ...IENTO SOLICITE LA ATENCION DE UN TECNICO DE SERVICIO AUTORIZADO Opere la unidad s lo a 110 120 VAC 50 60 Hz Para las impresoras enviadas fuera de los Estados Unidos y Canad opere la unidad s lo a 220 240 VAC 50 60 Hz Si no est seguro que la unidad que tiene es compatible al voltaje de la corriente elŽctrica de su pa s NO INTENTE USAR LA UNIDAD Llame al representante de ventas o a la f brica Deteng...

Page 12: ...gli Stati Uniti e Canada lÕunitˆ funziona solo con alimentazione a 110 120 VAC 50 60 Hz Le stampanti destinate ad altri paesi funzionano solo con alimentazione a 220 240 VAC 50 60 Hz Qualora non abbiate la certezza che il trasformatore e la spina di cui disponete siano quelli adeguati allÕalimentazione erogata nel vostro paese NON USARE L UNITÀ Rivolgersi piuttosto al rivenditore o la fabbrica del...

Page 13: ...IA AO PESSOAL DE MANUTENÇÃO QUALIFICADO Opere esta unidade somente em 110 120 VAC 50 60 Hz As impressoras enviadas para fora dos Estados Unidos ou Canad devem ser operadas somente em 220 240 VAC 50 60 Hz Se voc n o souber se a sua unidade tem a voltagem correta para o sistema elŽtrico do seu pais NÃO TENTE USAR ESTA UNIDADE Entre em contato com seu revendedor ou com a f brica Pare imediatamente a ...

Page 14: ...9 Chinese or Japanese to be keylined here ...

Page 15: ...10 Chinese or Japanese to be keylined here ...

Page 16: ...11 Arabic to be keylined here ...

Page 17: ...d in a very damp room moisture may condense inside the unit Should this occur print quality may not be optimum Leave the unit turned OFF in a warm dry room for several hours before using This will allow the moisture to evaporate C Unpacking and Inspection While unpacking your printer inspect the carton to ensure that no damage has occurred during shipping Make sure that all supplied accessories ar...

Page 18: ... and also serves to cancel the current print job and reset the printer for the next print job This button also ejects any cards left within the printer after a print job is canceled The on line button takes the printer on and off line The printer must have the on line light illuminated in order to print When flashing the on line light also serves to indicate a print error condition Such conditions...

Page 19: ...illustration shows the input ports found on the rear panel of the printer For complete instructions about each of these features see later sections of this manual Power Input Port Parallel Interface Power Switch ...

Page 20: ...ch have a clear overlay panel O will print an ID card and place a clear protective overlay over the cardÕs printable area Be sure that the Overlay option within the printer driver setup window is selected when printing with these ribbons unless you intend to utilize the printer s built in laminator When applying the PolyGuard overlaminate do not apply the ribbonÕs clear overlay panel since it will...

Page 21: ...rinted with the blue and green ribbons can be read by both infra red and visible light bar code scanners Bar codes printed with the metallic gold ribbon can only be read by an infra red bar code scanner Bar codes printed with the red ribbon are NOT readable The Full Color YMCKK ribbon is intended to be used for dual sided printing By supplying two resin black panels this ribbon lets you print full...

Page 22: ...s interior Make certain that the ribbon is fed from underneath the ribbon roll Hint The Ribbon Drive Hub nearest you as you are looking into the printer from the front is spring loaded Use the end of the ribbon supply core to push in this Ribbon Drive Hub when inserting the ribbon Supply Take up Follow these steps to load ribbon into the Printer 1 Remove the ribbon from its packaging Do not touch ...

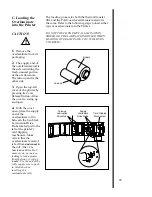
Page 23: ...int or place a clear overlay over the area containing the actual IC chip Printing over this area could damage both the IC chip and the printerÕs printhead To avoid printing over this area select the Smart Card option from the printer driver setup see Section 7 B for printer driver information Although the Color ID Card Printer is equipped with a card cleaning roller it is very important to always ...

Page 24: ...signature pad on the back side of the card A signature pad will often leave a residue on the top of the card stacked beneath it This residue will discolor the card s surface when printed If a card signature is required use cards with a matte finish on the reverse side and a polished PVC finish on top Signatures can be applied to the matte finished side with a permanent ink pen after printing 3 If ...

Page 25: ...the spring loaded Card Input Tray and placing the cards between the Card Input Guides see Section 9 for further Card Input Guide information Always load cards with the top or primary print side facing up If inserting cards with a magnetic stripe be sure that the magnetic stripe is positioned downward and that the stripe is oriented toward the rear of the printer If inserting smart cards or cards w...

Page 26: ... to change the temperature of the laminator you can adjust its temperature through the Lamination controls within the printer driver setup window see Section 7 B Once adjusted the new temperature settings will be sent down with the next print job along with the rest of the printer driver information Before printing begins the Laminator light will flash and the laminator will automatically adjust i...

Page 27: ...durability and security If you require custom thermal transfer film or PolyGuard overlaminate designs please contact your reseller or the printer manufacturer for more information If using the thermal transfer film overlaminate you must use it in conjunction with a ribbon which provides a clear overlay panel When used with this type of ribbon the printer will apply the clear overlay panel of the r...

Page 28: ...ate The take up end is the other side 3 Open the top left cover of the printer by pressing its Cover Release Button Allow the cover to swing up and open 4 With the cover open place the supply end of the overlaminate roll in between the two black Lamination Drive Hubs located just to the left of the printerÕs card flipping mechanism Make certain that the overlaminate material is fed from underneath...

Page 29: ...l in between the two black Lamination Drive Hubs located on the far left hand side of the printerÕs interior Load the take up end of the roll just as you loaded the supply end in step 4 When loaded properly the overlaminate material should feed underneath both ends of the overlaminate roll Supply Roll Take up Roll Do not reverse the overlaminate roll Damage may occur to the lamination roller ...

Page 30: ...sing the on cancel button The LED indicator lights should no longer be illuminated Verify that a full color ribbon is installed and that cards are properly loaded 2 Press and hold the on line button 3 While holding the on line button down turn the printer power back ON by quickly pressing and releasing the on cancel button 4 Release the on line button The gray scale self test will begin printing a...

Page 31: ...d The printer is equipped with an ECP compatible high speed Centronics parallel port This port is the means through which the printer receives data from your computer To connect the printer to your computer obtain a shielded bi directional parallel cable and refer to the following steps 1 Connect the Centronics type parallel side to the printer Snap the fastening clips into place Self Test Example...

Page 32: ...nector 3 The printer must have its on line light illuminated to receive data If the light is not ON press the on line button 4 If the on line light is flashing check for a card mis feed or jam and correct according to Section 8 Press the on line button to resume operation ...

Page 33: ...r to print After youÕve installed the driver put the driver diskette away in a safe place for possible future use NOTE This section of the Operator s Manual assumes that you are already familiar with Windows and know how it operates If you are not yet familiar with Windows consult the appropriate Microsoft documentation to become familiar with the basics of Windows before proceeding Windows 95 To ...

Page 34: ...ttom left of the Printers window 4 Select the Add button 5 Highlight the Install Unlisted or Updated Printer option from List of Printers 6 Select the Install button 7 Insert the supplied Printer Driver diskette into your computerÕs disk drive If you insert the diskette in a drive other than the A drive displayed in the Install Driver dialog box you must change the drive designation Select the OK ...

Page 35: ... speeds than if sending print jobs through the Windows 95 print spooler This is especially true if printing with an ECP compatible parallel port or if printing off a network The 32 Bit Print Spooler is ideal for printing a large number of consecutive ID cards for printing larger file formats 1 MB of more or if printing on a somewhat slower computer The 32 Bit Print Spooler installs just like any o...

Page 36: ...an also manually open the 32 Bit Print Spooler simply by selecting its icon from the Programs group of the Start menu When the 32 Bit Print Spooler is running its icon will appear in the Windows 95 Task Bar During a print job it is sometimes helpful to click on this icon to bring the 32 Bit Print Spooler status window to the foreground of your application This window provides a number of details a...

Page 37: ...lect the appropriate printer driver settings 1 If using Windows 3 1x go back to the Control Panel and the Printers group using steps 1 and 2 on pages 27 and 28 If using Windows 95 Click the Start button point to Settings and select Printers Then click on the Color ID Card II icon with the right mouse button and select Properties The Properties window will appear 2 In Windows 3 1x select the Setup ...

Page 38: ...events the magnetic stripe from being damaged Although this options prevents the overlay from being applied to the magnetic stripe area of a card it is still possible to print text or images over the magnetic stripe Therefore when designing the back of your card format you must be careful not to place any printable objects over the magnetic stripe area of the card Note that the Duplex Printing opt...

Page 39: ... with a monochrome resin ribbon type or those objects printed with the monochrome resin panel of a full color ribbon Click on the Dither Mode down arrow and select the appropriate dither method according to the type of image you are printing Overlay This option is only applicable if you are using a ribbon with a clear overlay panel If using such a ribbon select this option to enable the printer to...

Page 40: ...anel Graphics print option This option forces the printer driver to print all of the black within text bar codes or bitmapped images with all four of the ribbon s YMCK panels K Panel Only This option is only active when the K Panel Graphics option is selected When the K Panel Only option is selected all of the black within text bar codes or bitmapped images will be printed only with the ribbonÕs r...

Page 41: ...patible or when printing exclusively from Windows 3 1x When selected this option allows the printer driver to bypass the Windows 3 1x Print Manager or the print spooler of Windows 95 and to send all print data directly to the Color ID Card Printer This option devotes all of your system resources to the current print job thereby increasing overall print speed When the print job is finished your sys...

Page 42: ...ard This option can be selected in conjunction with any application program which supports a multiple page document In other words your program must be able to send down two or more separate pages to be printed within the same document For example if you would like to print a full color ID format on the front of your card and monochrome text or bar codes on the back you would simply create the ful...

Page 43: ...lected all control options will display and can be adjusted When the None or FargoColor color matching options are selected only the Brightness Heat option will display Magnetics When magnetically encoding a card with the Color ID Card Printer the ISO standards for magnetic encoding will automatically be used These standard settings will suffice for most encoding applications and rarely need to be...

Page 44: ...lm Lamination w Overlay option you must be using a ribbon which provides a clear overlay panel When used with this type of ribbon the printer will apply the clear overlay panel of the ribbon over the film lamination layer of a printed card This process is required for maximizing card durability when laminating with the thermal transfer film material The ribbon types which do not provide an overlay...

Page 45: ...mat 2 Once you are ready to print select Print Setup or the equivalent from the programÕs File menu to verify that the printer driver settings are correct for your card design Remember to select the proper card size and ribbon type and if applicable to verify that the proper magnetic and or lamination settings are selected After youÕve properly configured the driver select the Print button from th...

Page 46: ...lcohol for cleaning your printerÕs printhead Cleaning Cards with an adhesive backing for automatically cleaning your printerÕs gray card feed rollers and cleaning rollers Cleaning Pads pre moistened with 99 99 isopropyl alcohol for cleaning your printerÕs drive roller and general inside area IMPORTANT 1 Never use a sharp tool or abrasive object of any kind to clean the printhead You will damage th...

Page 47: ...r a soft lint free cloth slightly moistened with isopropyl alcohol to wipe dust and other accumulated particles off the surface of the printhead If using a cloth be extremely careful not to use too much alcohol It must not be allowed to drip into the printer 4 Once the printhead is completely dry shut the cover If a streak persists perform the steps in section C C Expanded Printhead Cleaning Perfo...

Page 48: ... and other foreign particles 1 Open both of the printerÕs top covers 2 Remove the ribbon from the printer and set it on the ends of its ribbon cores 3 Remove any overlaminate which may be installed in the printer 4 Use a Cleaning Pad from the Printer Cleaning Kit or a soft lint free cloth slightly moistened with isopropyl alcohol to wipe out all visible areas inside the printer Remove any debris t...

Page 49: ... Card Feed Rollers To assure consistent printer operation all of the gray card feed rollers within the printer should be cleaned during every ribbon change every 250 prints or if the rollers are noticeably dirty To clean these rollers use the special adhesive backed Cleaning Cards from the Printer Cleaning Kit Refer to the following steps to run a Cleaning Card through your printer 1 Remove the ri...

Page 50: ...ld also clean the printer s Drive Rollers and Cleaning Roller Assembly according to the steps in the following sections I Cleaning the Drive Roller The printerÕs ribbon and lamination Drive Roller should be cleaned during every ribbon change or after every 250 prints This helps to prevent jams and maintain uninterrupted service Also perform this procedure if the roller is visibly dirty Use the fol...

Page 51: ...rive Hubs on the printerÕs right hand side 4 Reach down in between the empty Ribbon Drive Hubs and lift the Cleaning Roller Assembly straight up and out of the printer Hint It may help to push in the spring loaded Ribbon Drive Hub when removing or inserting the Cleaning Roller Assembly 5 Once the Cleaning Roller Assembly is removed clean the rollers using one of the adhesive backed Cleaning Cards ...

Page 52: ...ht into the Card Hopper locate the left Card Input Guide and loosen the two screws which fasten it to the back plate of the Card Hopper 3 Once these two screws have been loosened it is possible to move the left Card Input Guide slightly to the right or to the left Insert the stack of cards 4 Adjust the left Card Input Guide so it rests flush against the side of the card stack and re tighten the tw...

Page 53: ...ete 6 Now locate the Internal Card Guide on the right hand side the card input side of the printer 7 Remove the single screw from the two holes residing to the immediate right of this Internal Card Guide 8 With your left hand pull the spring loaded Internal Card Guide toward you If printing onto cards which are between 2 3Ó and 2 5Ó in width pull the Internal Card Guide back behind the top most ho...

Page 54: ... standard CR 80 030Ó card thickness To adjust the Card Separator Flap refer to the following steps 1 Open the Card Hopper Door located on the right hand side of the printerÕs exterior by grasping the top of the door and pulling straight down Allow the door to swing completely open 2 Remove all cards from the Card Hopper 3 Open the top right cover of the printer by pressing its Cover Release Button...

Page 55: ...ard HopperÕs first Metal Roller and the shaft of the first Card Feed Roller see illustrations to locate these items With the spring loaded Card Input Tray pressed down direct your line of sight into the Card Hopper so that the shaft of the Metal Roller appears directly in front of the shaft of the Card Feed Roller Only when this line of sight is established can you accurately judge and adjust the ...

Page 56: ...pping a cardÕs leading or trailing edge the laminatorÕs Card Sensor should be adjusted To do this simply loosen the single screw which fastens the sensor to the Card Guide Rail 2 If the PolyGuard chip is being placed more toward a cardÕs trailing edge as shown move the Card Sensor slightly toward the card input end of the printer opposite the direction you would like the chip to move 3 If the Poly...

Page 57: ...chassis 2 If the PolyGuard chip is being placed more toward a cardÕs top edge as shown move the Card Guide Rail slightly toward the rear of the printer opposite the direction you would like the chip to move 3 If the PolyGuard chip is being placed more toward a cardÕs bottom edge as shown move the Card Guide Rail slightly toward the front of the printer opposite the direction you would like the chi...

Page 58: ...flashing Symptoms LED blinking could mean one of several errors If the on line LED is flashing this indicates a recoverable printing error Check that cards ribbon and overlaminate if applicable are installed in the printer Replace media as required Check that cards are pushed all the way into the printer and that the ribbon and or overlaminate is installed properly Also check for an initial ribbon...

Page 59: ...he Print directly to the printer option and click on OK 4 Again from the Details tab select the Port Settings button 5 Deselect both the Check Port state before printing option and the Spool MS DOS print jobs option and click on OK 6 Increase the Transmission retry value of the Details tab from 45 to 900 Click on OK to close the Properties window Symptoms printer makes strange sounds or stops prin...

Page 60: ...e using a card with a polished PVC finish A card with a dull or sticky finish can cause the ribbon to stick to its surface causing the ribbon to jam or even break You may have tried to feed in a card that was too thick or perhaps two cards fed at once this can sometimes cause the ribbon to tear or break If your ribbon or overlaminate breaks simply tape the broken end of the supply roll directly on...

Page 61: ... Check that the ribbon and or overlaminate is seated properly in the printer Check that nothing did in fact fall into the printer Then go ahead and push slightly harder The cover and cover latch must engage and this does require some pressure as the cover is closed The photos on my ID cards look very pixelated Symptoms photos do not look smooth or continuous but rather grainy and unclear Some appl...

Page 62: ...ter driver setup Improper card size settings will always send your image to the wrong area of the card Two or more cards feed at the same time Be sure the cards you are using are not sticking together Manually separate the cards if you suspect they are sticking to one another If separating cards remember not to touch the surface of the card where you intend to print since dirt or oil from your han...

Page 63: ... 1 02mm Card Types PVC or Polyester cards with polished PVC finish monochrome resin ribbon required for straight polyester cards Card Capacity Accepts up to 100 standard CR 80 PVC Cards auto or manual feed Software Driver Windows driver included for IBM PCÕs and compatibles Interface Standard 8 bit Centronics type parallel ECP compatible Operating Temperature 65 F to 80 F 18 C to 27 C Humidity Non...

Page 64: ...odified Although these settings will suffice for most applications it is possible to change or customize the printerÕs magnetic encoding process To do this simply select the Magnetics button from within the printer driver setup window and change the Magnetic Track Options according to how your specific magnetic stripe reading equipment is configured This window is shown below Please note that all ...

Page 65: ...tomatically added to the string of track data by customized ID software applications In most cases however the user must manually add these characters to the string of magnetic track data If these characters are not added to the track data the text intended for the magnetic track will most likely appear as printed text on the card To avoid this track information must be entered as follows When ent...

Page 66: ...ple Sending data to Track 1 1 JULIE ANDERSON 623 85 1253 Sending data to Track 2 2 0123456789 Sending data to Track 3 3 0123456789 Start End Field of Sentinel Sentinel Separator Valid Characters Characters Track 1 0 9 A Z Punct ASCII 32 95 78 Track 2 0 9 ASCII 48 63 39 Track 3 0 9 ASCII 48 63 106 ...

Page 67: ... interface is the most widely used printer interface due to its simplicity speed and standardization throughout the PC industry The printerÕs parallel interface connector is a standard 36 pin Amp type with two metal wire retaining clips and is ECP Extended Capabilities Port compatible It mates with a standard PC to printer parallel cable Try to keep the interface cable to under 6 feet if possible ...

Page 68: ...raphics 34 K Panel Only 35 Lamination 39 Laminator 21 Laminator light 13 Mag Encode Only 36 Magnetic encoding 38 59 Magnetics 38 On cancel button 13 On cancel LED 13 53 On line button 13 On line LED 13 53 Orientation 38 Overlaminates 23 Overlay 15 34 Parallel Interface 26 62 PolyGuard 22 Power cord 25 Power port 25 Power switch 25 Printer Driver 28 Printhead 42 Raster Image Processing 1 Resin blac...

Page 69: ...NOTES ...

Page 70: ...Printed In The United States of America P N 510343 ...

Reviews: