background image

IMPORTANT FACTS 

14 

Rev 3.0


Fanco Infinity DC. All Rights Reserved.


All electric motors, including fan motors make some noise and may feel hot to touch - this is not a fault. 

Ceiling fans tend to move during operation as they are not generally rigid-mounted. Rigid mounted 
ceiling fans generate excessive vibration and stress on their mountings. 

Movement of a couple of centimetres is quite normal and does not suggest the fan will fall down.  

Please note - all ceiling fans are not the same, even in the same model some may move more or less than 
others. 

Fan lights can rattle, if they are not supplied with the fan. They are not covered by warranty. 

FAN OPERATION 

A ceiling fan is an environmentally smart choice when it comes to cooling as well as helping to warm 

your room. You should see a reduction in both cooling and heating costs by regular use of your fans. 
Do not hesitate to use your fans in both summer and winter months.  

In summer place the reverse switch in the downward position (fans should spin in anti clockwise 
direction) so cool air is blowing down producing a cool breeze.  

In winter, reverse the switch (fan should spin in clock wise direction) so that an upward airflow will 

push warm air off the ceiling and circulate it downwards into the living areas. In winter months use 
the fan on a lower speed than in summer.  

CLEANING & MAINTENANCE 

Clean the fan using a clean, lint-free cloth or soft brush to prevent scratches to the finish of fan. Do not 

use abrasive agent for fan cleaning as it can damage the fan finish. To remove accumulated dust, use a 
slightly dampened cloth.   

NORMAL WEAR AND TEAR 

Threaded components working slightly loose, or blade carriers becoming slightly bent due to vigorous 

cleaning or bumping can cause extra wobble and noise. This is not covered under warranty, but a little 
care and maintenance can reduce or prevent this problem. 

NIGHT NOISES 

This is the biggest cause of service calls, which are outside the manufacturer’s warranty. If a fan has a 

fault it will be noticeable at all times. Naturally when everything is quiet at night you will be more 
inclined to hear small noises, which may not be noticeable at other times. Even slight signals super 

imposed in your electricity supply for off peak hot water control may cause a change in the fan motor 
noise. This is normal. 


PLEASE RECYCLE ALL PACKAGING MATERIAL SUPPLIED WITH THIS PRODUCT


Summary of Contents for CFFCINI2LWH

Page 1: ...strated and that which is contained within this package INSTALLATION AND OPERATION INSTRUCTION BOOK REV 3 0 INFINITY LED DC SERIES Models CFFCINI2LWH FC818123WW CEILING FANS WITH LIGHT CAUTION DO NOT...

Page 2: ...PECIFICATIONS 1 SPARE PARTS ACCESSORIES 2 SAFETY PRECAUTIONS 3 UNPACKING YOUR CEILING FAN 5 FAN INSTALLATION INSTRUCTIONS 6 REMOTE PAIRING INSTRUCTIONS 9 WIRING DIAGRAM 11 REMOTE CONTROLLER INSTRUCTIO...

Page 3: ...on to an installation procedure operating procedure maintenance procedure or the like that if not correctly performed or adhered to could result in damage to this appliance personal injury or death Do...

Page 4: ...ed SPARE PARTS LIST MODEL BLADES REMOTE CONTROL LAMP COVER SCREWS PACK HANGER BRACKET CFFCINI2LWH FL818123WH FRM105 FG488123 FR488123WH FHB48311553 OPTIONAL ACCESSORIES SOLD SEPARATELY MODEL 600 mm EX...

Page 5: ...ly 6 Do not use outdoors where it could be exposed to water or moisture 7 If unusual oscillating movement is observed immediately stop using the ceiling fan and contact licensed electrician or Fanco C...

Page 6: ...hanging bracket must be earthed 11 Do not remove the fan from the ceiling after installation 12 Make sure electricity is turned off at the main power box before commencing work Turn off the power by r...

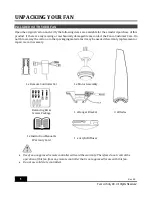
Page 7: ...ow away the carton or other packaging material as it may be needed if warranty replacement or repair is ever necessary 1 x Remote Controller Set 1 x Motor Assembly Balancing Kit Screws Package 1 x Han...

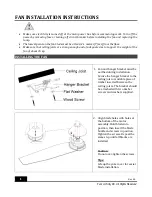
Page 8: ...to support the weight of the fan of about 35 kg INSTALLING THE FAN 1 Fan and hanger bracket must be earthed during installation Secure the hanger bracket to the ceiling joist or suitable piece of tim...

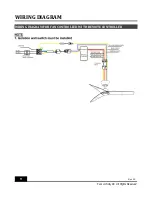
Page 9: ...l engages the ridge on the hanger bracket This will allow hands free wiring Connect the wires in accordance to the wiring diagram provided 4 Place the remote receiver inside the fan canopy and connect...

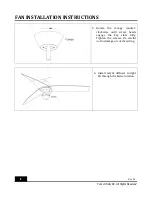
Page 10: ...Infinity DC All Rights Reserved 5 Rotate the canopy counter clockwise until screw heads engage the key slots fully Tighten the screws Be careful not to damage or cut the wiring 6 Install acrylic diff...

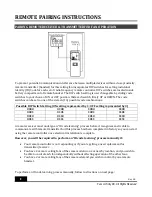
Page 11: ...sented by 1 OFF setting represented by 0 0000 0100 1000 1100 0001 0101 1001 1101 0010 0110 1010 1110 0011 0111 1011 1111 A remote receiver must undergo an ID code learning process before it recognises...

Page 12: ...all switch in the fixed wirings for each fan 2 Turn ON the power to all receivers for all fans 3 Press the transmitter s SET 4 buttons and hold both buttons for over 5 seconds 4 The receiver will beep...

Page 13: ...WIRING DIAGRAM 11 Rev 3 0 Fanco Infinity DC All Rights Reserved WIRING DIAGRAM FOR FAN CONTROLLED WITH REMOTE CONTROLLER...

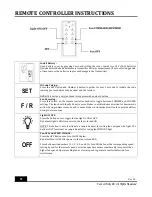
Page 14: ...uld ideally be set to move blades in anticlockwise direction for downwards airflow during summer seasons and to move blades in clockwise direction for upwards airflow during cooler seasons Light ON OF...

Page 15: ...ighten III Re tighten all screws in the hanging bracket and covering plate 3 MECHANICAL NOISE I Let the fan run for about 8 hours for settling in period 4 FAN TURNS BUT DOES NOT MOVE MUCH AIR I The fa...

Page 16: ...winter reverse the switch fan should spin in clock wise direction so that an upward airflow will push warm air off the ceiling and circulate it downwards into the living areas In winter months use the...

Reviews: