background image

C720-C721 

732568 - Rev.E

Fig. 11

Fig. 12

Fig. 13

Fig. 14

Fig. 15

ENGLISH

T

ranslation of the original instructions

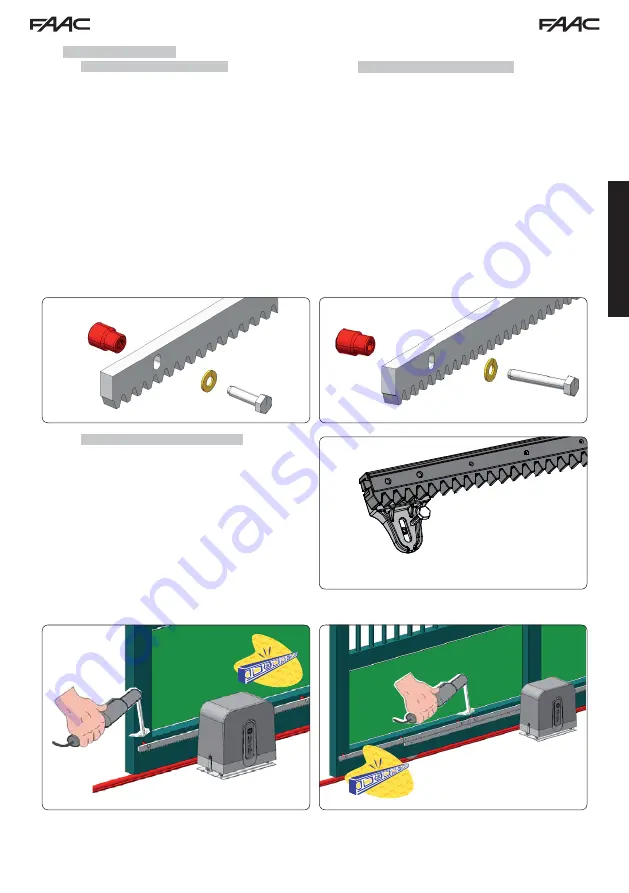
5.4  INSTALLING THE RACK

5.4.1  STEEL RACK TO WELD (Fig.11)

1.  Place the three threaded pawls on the rack element, posi-

tioning them at the top of the slot. In this way,  the slot play 

will enable any adjustments to be made.

2.  Manually take the leaf into its closing position.
3.  Lay the first piece of rack level on the pinion and weld the 

threaded pawl on the gate as shown in Fig. 14.

4.  Move the gate manually, checking if the rack is resting on 

the pinion, and weld the second and third pawls.

5.  Bring another rack element near to the previous one, using a 

piece of rack (as shown in Fig. 15), to synchronise the teeth 

of the two elements.

6.  Move the gate manually and weld the three threaded pawls, 

thus proceeding until the gate is fully covered.

5.4.2  STEEL RACK TO SCREW (Fig. 12) 

1.  Manually take the leaf into its closing position.
2.  Lay the first piece of rack level on the pinion and place the 

spacer between the rack and the gate, positioning it at 

the top of the slot. In this way,  the slot play will enable any 

adjustments to be made.

3.  Mark the drilling point on the gate. Drill a Ø 6.5 mm hole and 

apply thread with a Ø 8 mm  male tap. Screw the bolt.

4.  Move the gate manually, checking if the rack is resting on 

the pinion, and repeat the operations at point 3.

5.  Bring another rack element near to the previous one, using 

a piece of rack (as shown in figure 15) to synchronise the 

teeth of the two elements.

6.  Move the gate manually and carry out the securing opera-

tions as for the first element, thus proceeding until the gate 

is fully covered.

5.4.3  NYLON RACK TO SCREW (Fig. 13) 

1.  Manually take the leaf into its closing position.
2.  Lay the first piece of the rack level on the pinion and mark 

the drilling point on the gate; drill Ø 5.2 mm and screw in 

the self-tapping screw provided with its reinforcing plate.

3.  Move the gate manually, checking if the rack is resting on 

the pinion, and repeat the operations at point 2.

4.  Couple another rack element and fit to the previous ele-

ment.

5.  Move the gate manually and carry out the securing opera-

tions as for the first element, thus proceeding until the gate 

is fully covered.

Summary of Contents for C720

Page 1: ...C720 C721 C720 C721...

Page 2: ...circuit break is recommended 13 Make sure that a differential switch with threshold of 0 03 A is fitted upstream of the system 14 Make sure that the earthing system is perfectly constructed and connec...

Page 3: ...AIR 10 11 ACCESSORIES 10 11 1 BATTERY KIT 10 11 2 RADIO MODULE 10 CE DECLARATION OF CONFORMITY FOR MACHINES DIRECTIVE 2006 42 EC Manufacturer FAAC S p A Address Via Calari 10 40069 Zola Predosa BOLOGN...

Page 4: ...power cut if emergency batteries are not installed or if the operator is not in service 1 Cover casing 2 Motor lock 3 Link cover 4 Motor release handle 5 Transformer 6 Foundation plate 7 Cable passag...

Page 5: ...ed plus mechanical limit switches to prevent the gate derailing The gate slide track must be linear and horizontal Manual movement of the gate must be easy throughout its travel The soil must permit s...

Page 6: ...late with GALVANISED STEEL rack NYLON rack left closure Dimensions in mm This symbol must always face to wards the gate 3 Prepare a foundation plinth as shown in Fig 7 and wall in the foundation plate...

Page 7: ...nsions in mm with rack in GALVANISED STEEL 3 Adjust the height of the gearmotor and the distance from the gate with reference to the dimensions in Fig 10 Operation required for correct fastening of th...

Page 8: ...en the rack and the gate positioning it at the top of the slot In this way the slot play will enable any adjustments to be made 3 Mark the drilling point on the gate Drill a 6 5 mm hole and apply thre...

Page 9: ...ting any work on the control board connections programming mainte nance always turn off power Observe points 10 11 12 13 14 of the GENERAL SAFETY OBLIGATIONS Follow the instructions in Fig 3 to arrang...

Page 10: ...eration of the automated system approximately 40 mm must be left from the mechanical limit switches 7 TESTING THE AUTOMATED SYSTEM Once the operator has been installed carry out a thorough operational...

Page 11: ...of the safety devices including the motor thrust force which must comply with current standards and of the release devices 10 REPAIR Contact an authorised Repair Centre for repairs 11 ACCESSORIES 11...

Page 12: ...f after the selected pause time If semi automatic operating mode has been selected a second pulse must be sent to re close the gate An opening pulse issued during the re closing stage always causes a...

Page 13: ...79 6645 faactm info faacgroup com www faac de INDIA FAAC INDIA PVT LTD Noida Delhi India tel 91 120 3934100 4199 www faacindia com IRELAND NATIONAL AUTOMATION LIMITED Boyle Co Roscommon Ireland tel 35...

Reviews: