F.F. Group GHB 223 PLUS Original Instructions Manual Download Page 10

be done on a flat and stable surface, with enough 

space for moving the machine and its packaging, 

always making use of suitable equipment. 

With the air vent closed, push the straight nozzle pipe 

over the discharge port and lock it in. The arrowhead 

on the straight nozzle pipe should be on the same line 

with the volute case (Fig. 6). Rotate the pipe clockwise 

to lock. Then tighten the screw in place to secure 

(Fig. 7). Push the blower nozzle pipe over the straight 

nozzle pipe and locking pin. Rotate the pipe clockwise 

to lock (Fig. 8). The side of the blower nozzle pipe that 

says «THIS SIDE UP» must face upwards. Then tighten 

the screw in place to secure.

Before starting work please: 

1.   Check that all the screws on the machine are 

tightly fastened. 

2.   Check that the air filter is clean. 

3.   Check that vibration absorbers are fine. 

4.  Prepare accessories and make sure they are 

correctly mounted.

5.   Fill with fuel as indicated below. 


FUELING AND LUBRICATION

WARNING: 

Never smoke whilst refueling and avoid in-

haling the petrol fumes. 

The blower is equipped with 2-stroke engine. There-

fore, mixture of petrol (of 90 octane or higher) and 

2-stroke oil must always be used. It is very important to 

pay attention with the fuel mixture that you use, since 

accurate mixture of oil and fuel must be obtained. 

Small quantities of oil and fuel mixture with small 

inaccuracies,  can  affect  the  ratio  of  mixture,  which 

may lead to engine overheat and serious damages in 

the engine. It is recommended that you mix only the 

amount needed for the job that you are about to do, in 

order to keep only fresh mixture.

WARNING:

 Carefully open the tank top as pressure 

could have formed inside. 

Especially formulated 2-stroke oil for air cooled 

2-stroke engines must be used. Do not use 2-stroke 

oil intended for water cooled engines. Never use poor 

quality of oil or 4-stroke engine oil. 

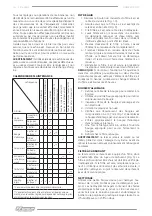
For best results and performance, the mixing ratio of 

gasoline to oil is 50:1.

Always use clean container for fuel before mixing the 

fuel. Mix and shake the fuel mixture thoroughly, be-

fore  filling  the  machine’s  fuel  tank.  Do  not  use  fuel 

mixture stored for more than a month. The fuel tank 

of the machine must be emptied before storage. 

Always use a funnel to refuel the machine.

Do not overfill. Leave a minimum 5 mm of space be

-

tween the top of the fuel-oil mixture and the inside 

edge of the tank to allow for expansion. 

WARNING:

 Always close the fuel tank cap firmly.

STARTING THE UNIT

Before starting the engine, place the machine on sta-

ble ground. 

1.   Fill the fuel tank with the correct amount of fuel 

and oil mixture.

2.   Turn On/Off switch to “ON” position (Fig. 2.7).

3.   In case of cold start: Pull the choke to the fully 

extended position so that the choke is closed 

(Fig. 3.10).

4.   Press and release the primer bulb 7-10 times 

until it is full with fuel (Fig. 4.11).

5.   Keeping  the  unit  placed  firmly  on  the  ground 

or a very sturdy work surface, grasp the starter 

rope with one hand and push on the engine 

cover with the other (Fig. 10).  Make sure all 

bystanders are a minimum of 15m away. Do not 

attempt to start near pilot lights or any open 

flame. Pull the starter rope slowly once until you 

feel the engine engage. 

6.    Start the machine by pulling the starter rope 

upwards briskly. The unit should start within 5 

pulls.

WARNING:

 To avoid breaking the starter rope, do not 

pull the whole length of it or let it slide along the edge 

of the cable guide hole. Release the starter gradually, 

to avoid letting it fly back uncontrollably. 

NOTE: 

Once warm, the engine should start on the first 

pull.

NOTE:

 Squeeze the throttle control slightly to warm 

up the engine for 15 to 30 seconds. In cold weather, 

move the throttle slowly until the engine warms up for 

30 to 60 seconds.

7.    Return the choke to fully open position once the 

engine running speed stabilizes. 

For maximum performance and reliability, allow the 

engine to warm up before operating. Run the engine 

for 2-3 minutes at idle speed.

WARNING: 

The machine must always be firmly gripped 

with your right hand on the upper handgrip during 

work (Fig. 11).  

Engine speed should be adjusted to the type of 

material to be removed: 

•  

Use the engine at low speed for lightweight 

material and small bushes on the lawn.

•  Use the engine at average speed to move grass and 

lightweight leaves on pavement or solid ground.

•  Use the engine at high speed for heavier materials 

like fresh snow or voluminous dirt. 

WARNING:

 Always pay the utmost attention to pre-

vent removed material or dust from injuring people 

or animals or damaging property. Always assess wind 

direction and never work against the wind.

STOPPING THE UNIT

1.   Release  your  hand  from  the  throttle  control. 

Allow the engine to cool down by running in idle 

for 2-3 minutes.

2.   If your unit is equipped with a spring loaded On/

Off  switch,  press  and  hold  the  button  on  “O” 

position until the engine stops. Otherwise, push 

the switch to the “Off” position.

MAINTENANCE AND CLEANING

WARNING:

 Before cleaning or doing maintenance 

work, disconnect the spark plug cap and read the rele-

vant instructions. Wear proper clothing and protective 

gloves whenever your hands are at risk. 

WARNING: 

Never do maintenance or cleaning with the 

unit running. Always work on a cool unit.

Any adjustments or maintenance operations not de-

scribed in this manual must be carried out by your Deal-

er or a specialized Service Centre with the necessary 

knowledge and equipment to ensure that the work is 

|   English

10

GHB 223 PLUS

Summary of Contents for GHB 223 PLUS

Page 1: ...ORIGINAL INSTRUCTIONS ISTRUZIONI ORIGINALI IT ORIGINALNA UPUTSTVA SR INSTRUC IUNI DE FOLOSIRE ORIGINALE RO NOTICE ORIGINALE FR EL ORIGINALNE UPUTE ZA RAD HR GHB 223 PLUS...

Page 2: ...MBOLES SPIEGAZIONE DEI SIMBOLI OBJA NJENJA O SIMBOLIMA OBJA NJENJE SIMBOLA EXPLICAREA SIMBOLURILOR 06 HANDHELD PETROL BLOWER 08 FR SOUFFLEUR ESSENCE 12 IT SOFFIATORE A BENZINA 17 EL 22 SR DUVA NA BENZ...

Page 3: ...3 www ffgroup tools com GHB 223 PLUS 3 1 4 2 1 2 3 7 8 9 10 11 4 5 6...

Page 4: ...4 GHB 223 PLUS 5 7 6 8 9...

Page 5: ...5 www ffgroup tools com GHB 223 PLUS 10 11 12...

Page 6: ...ves Porter des gants de protection Indossare guanti pro tettivi Important danger warn ing or caution Important danger aver tissement ou prudence Importante pericolo avviso o attenzione Thrown objects...

Page 7: ...mpotri va prafului Nosite za titne rukavice Nosite za titne rukavice Purta i m nu i de protec ie Va no opasnost upozorenje ili oprez Va no opasnost upozo renje ili oprez Important pericol aver tisment...

Page 8: ...slim fitting protective clothes anti vibration gloves protective goggles half mask respirator acoustic protection equipment and anti shear safe ty boots with non slip soles Never wear scarves shirts...

Page 9: ...IONS INTENDED USE This machine was designed and manufactured for blowing leaves grass paper and similar materials e g in lawns pathways car parks and roads Any other use differing from the above menti...

Page 10: ...Fig 2 7 3 In case of cold start Pull the choke to the fully extended position so that the choke is closed Fig 3 10 4 Press and release the primer bulb 7 10 times until it is full with fuel Fig 4 11 5...

Page 11: ...dusty or other severe circumstances clean the air filter element every 10 hours If necessary change the air filter ele ment every 25 hours SPARK PLUG 1 Remove the spark plug cable to access the spark...

Page 12: ...vus survenant d autres personnes ou leurs biens Consultez votre revendeur agr pour le d montage et l entretien non couverts dans ce manuel DANGERS LI S AU MONOXYDE DE CARBONE Utilisez uniquement l ex...

Page 13: ...r les dommages ven tuels dus aux niveaux lev s de bruit et de stress d aux vibrations Entretenez bien la machine portez des protections auditives et faites des pauses pendant le travail Faire fonction...

Page 14: ...puissance son ore mesur dB 103 DONN ES TECHNIQUES Num ro de l article 46 329 Mod le GHB 223 PLUS Niveau de puissance son ore garanti Lwa dB 106 Niveaux sonores Niveau de pression acous tique quivalent...

Page 15: ...d une main et poussez le capot du moteur de l autre Fig 10 Assurez vous que tous les spectateurs sont au moins 15 m tres N essayez pas de d marrer proximit de veilleuses ou de toute flamme nue Tirez l...

Page 16: ...en mousse dans une solution de d tergent m nager et d eau ti de puis rincez abondamment ou lavez dans un solvant ininflammable ou point d clair lev 5 Pressez doucement le filtre huile Laissez l l ment...

Page 17: ...e situazioni considerate oltre le tue capacit Non utilizzare l unit quando si stanchi o sotto l effetto di droghe alcol o altri farmaci Tenere lontani bambini e astanti durante il funziona mento Non c...

Page 18: ...a maniglia con forza adeguata pu ridurre il livello di vibrazioni Un regime motore basso significa un livello di rumorosit ridotto quindi azion are la macchina al regime motore pi basso necessario per...

Page 19: ...adeguate Con la presa d aria chiusa spingere il tubo dell ugello diritto sopra la porta di scarico e bloccarlo La punta della freccia sul tubo dell ugello diritto deve essere sulla stessa linea con la...

Page 20: ...amente aperta una volta stabilizzata la velocit di funzionamento del motore Per le massime prestazioni e affidabilit lasciare riscaldare il motore prima di metterlo in funzione Far girare il motore pe...

Page 21: ...are uno strumento per candele appropriato per rimuovere con cautela la candela 3 Ispezionare le condizioni della candela e del suo elettrodo 4 Deve essere pulito e non indossato 5 Verificare che la di...

Page 22: ...il riciclaggio rispettoso dell am biente I componenti in plastica sono etichettati per il riciclaggio classificato GARANZIA Questo prodotto garantito in conformit con le nor mative legali specifiche d...

Page 23: ...23 www ffgroup tools com GHB 223 PLUS Raynaud s 15...

Page 24: ...29 GHB 223 PLUS cc cc 22 5 mm 32 mm 27 rpm 3 200 kW hp 0 65 0 87 46 329 GHB 223 PLUS r min 8 000 CMR6A mm 0 6 0 7 litre 0 45 kg 4 1 dB 103 Lwa dB 106 dB 93 m s 7 7 m s 6 m h 538 m s 88 1 4 1 2 3 4 5 6...

Page 25: ...25 www ffgroup tools com GHB 223 PLUS 7 8 THIS SIDE UP 1 2 3 4 5 2 90 2 2 2 4 50 1 5mm 1 2 ON OFF ON 2 7 3 3 10 4 7 10 4 11 5 10 15 6 5 15 30 30 60 7 2 3 11...

Page 26: ...26 GHB 223 PLUS 1 2 3 2 ON OFF O OFF 10 50 100 10 50 100 1 1 4 2 9 3 4 5 6 7 10 25...

Page 27: ...27 www ffgroup tools com GHB 223 PLUS 1 2 3 4 5 0 6 0 7 mm 12 6 7 8 5 1 2 3 4 30 ml 5 6...

Page 28: ...opremu prilikom rada jedinice Uvek nosite adekvatnu ode u koja ne sputava pokrete prilikom kori enja ma ine Uvek nosite tanku za titnu ode u antivibracione rukavice za titne nao are respirator sa polu...

Page 29: ...ovana i proizvedena za duvan je li a trave papira i sli nih materijala npr Svaka druga upotreba koja se razlikuje od gore na vedenih mo e biti opasna naneti tetu ljudima i ili o tetiti stvari i ma inu...

Page 30: ...ju ite prekida na poziciju ON Sl 2 7 3 U slu aju hladnog po etka Povucite gu enje na potpuno produ en polo aj tako da se gu enje zatvori Sl 3 10 4 Pritisnite i pustite prajmer sijalicu 7 10 puta dok n...

Page 31: ...temeljno osu i 6 Potopite penasti element u isto ulje motora i ne no iscedite bilo koji vi ak ulja Motor e pu iti tokom po etnog pokretanja ako ostane previ e ulja u penastom elementu 7 Ponovo instal...

Page 32: ...uputama da koriste stroj Lokalni zakoni mogu ograni iti minimalnu dob operatera Imajte na umu da je operater ili korisnik odgovoran za nesre e ili neo ekivane doga aje koji se doga aju drugim ljudima...

Page 33: ...u rovaskularne poreme aje koji se nazivaju i Raynaudov sindrom ili bijela ruka posebno ljudima koji pate od poreme aja cirkulacije Simptomi se mogu odnositi na ake zape a i prste a pokazuju se gubitko...

Page 34: ...vjerite jesu li svi vijci na stroju dobro pri vr eni 2 Provjerite je li zra ni filtar ist 3 Provjerite jesu li apsorberi vibracija u redu 4 Pripremite dodatke i provjerite jesu li pravilno montirani 5...

Page 35: ...Uvijek procjenjujte smjer vjetra i nikada ne radite protiv vjetre ZAUSTAVLJANJE JEDINICE 1 Otpustite ruku s ru ice gasa Ostavite da se motor ohladi rade i u praznom hodu 2 3 minute 2 Ako je va a jedin...

Page 36: ...treba ga povremeno provjeravati Ako je filtar prljav zamijenite ga novim U slu aju da je un utra njost spremnika za gorivo zaprljana mo e se o is titi ispiranjem spremnika za gorivo istim benzinom I...

Page 37: ...t terse nainte de a porni motorul Deschide i ncet rezervorul de combustibil pentru a permite presiunii din interior s scad treptat ECHIPAMENT DE PROTECTIE Purta i ntotdeauna echipamente de protec ie a...

Page 38: ...aparat numai la orele rezonabile ale zilei nu diminea a devreme sau seara t rziu c nd zgomotul ar putea provoca tulbur ri Asum o pozi ie ferm i bine echilibrat Unde este posibil evita i lucrul pe tere...

Page 39: ...entru cele mai bune rezultate i performan rapor tul de amestecare dintre benzin i ulei este de 50 1 Utiliza i ntotdeauna un recipient curat pentru com bustibil nainte de a amesteca combustibilul Amest...

Page 40: ...i toate piuli ele i uruburile str nse pentru a v asigura c ma ina este ntotdeauna n condi ii de siguran ntre inerea de rutin este esen ial pentru siguran i pentru men inerea unui nivel nalt de per fo...

Page 41: ...r at pentru uz casnic care con in uleiuri aromatice precum pinul i l m ia i solven i precum kerosenul pot deteriora carcasa sau m nerul din plastic terge i umezeala cu o c rp moale DEPOZITARE AVERTIZA...

Page 42: ...roizvodi odgovaraju svim doti nim odredbama na knadno navedenih smernica u uredaba i da su u skladu sa slede im standardima DUVA NA BENZIN Broj predmeta HR EU IZJAVA O SUKLADNOSTI Pod punom odgovorno...

Page 43: ......

Page 44: ...www ffgroup tools com info ffgroup toolindustries com 30 210 55 98 400 19300 Athens Greece 9 5 Km Attiki Odos Aspropyrgos FF GROUP TOOL INDUSTRIES...

Reviews: