OPERATION AND SERVICE INFORMATION
Page 25
Owner’s Manual and Service Guide
Read all of manual to become thoroughly familiar with this vehicle. Pay particular attention to all Notes, Cautions and Warnings
The second reason is to determine why a particular vehi-
cle does not perform adequately. Performance problems
may result in a vehicle that runs slowly or in a vehicle that
is unable to operate for the time required.
A new battery must
mature
before it will develop its max-
imum capacity. Maturing may take up to 100 charge/dis-
charge cycles. After the maturing phase, the older a
battery gets, the lower the capacity. The only way to
determine the capacity of a battery is to perform a load
test using a discharge machine following manufacturer’s
recommendations.
A cost effective way to identify a poorly performing bat-
tery is to use a hydrometer to identify a battery in a set
with a lower than normal specific gravity. Once the partic-
ular cell or cells that are the problem are identified, the
suspect battery can be removed and replaced. At this
point there is nothing that can be done to salvage the
battery; however, the individual battery should be
replaced with a good battery of the same brand, type and
approximate age.
Hydrometer
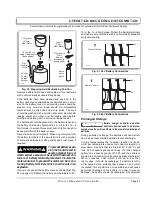
A hydrometer (P/N 50900-G1) is used to test the state of
charge of a battery cell (Ref. Fig. 34 on page 25). This is
performed by measuring the density of the electrolyte,
which is accomplished by measuring the specific gravity
of the electrolyte. The greater the concentration of sulfu-
ric acid, the more dense the electrolyte becomes. The
higher the density, the higher the state of charge.
To prevent battery explo-
sion that could result in
severe personal injury or
death, never insert a metal thermometer into a bat-
tery. Use a hydrometer with a built in thermometer
that is designed for testing batteries.
Specific gravity is the measurement of a liquid that is
compared to a baseline. The baseline is water which is
assigned a base number of 1.000. The concentration of
sulfuric acid to water in a new golf car battery is 1.280
which means that the electrolyte weighs 1.280 times the
weight of the same volume of water. A fully charged bat-
tery will test at 1.275 - 1.280 while a discharged battery
will read in the 1.140 range.
Do not perform a hydrometer test on a battery
that has just been watered. The battery must
go through at least one charge and discharge cycle in order to
permit the water to adequately mix with the electrolyte.
The temperature of the
electrolyte
is important since the
hydrometer reading must be corrected to 80° F (27° C).
High quality hydrometers are equipped with an internal
thermometer that will measure the temperature of the
electrolyte and will include a conversion scale to correct
the float reading. It is important to recognize that the
electrolyte temperature is significantly different from the
ambient temperature if the vehicle has been operated.
Using A Hydrometer
1. Draw electrolyte into the hydrometer several times to
permit the thermometer to adjust to the electrolyte
temperature and note the reading. Examine the color
of the electrolyte. A brown or gray coloration indicates
a problem with the battery and is a sign that the bat-
tery is nearing the end of its life.
2. Draw the minimum quantity of electrolyte into the
hydrometer to permit the float to float freely without
contacting the top or bottom of the cylinder.
3. Hold the hydrometer in a vertical position at eye level
and note the reading where the electrolyte meets the
scale on the float.
!
!
Fig. 34 Hydrometer
32
28
24
20
16
12
8
4
0
4
8
12
16
20
24
28
32
36
32
28
24
20
16
12
8
4
0
4
4
8
12
12
16
16
20
20
24
24
28
28
32
32
36
36
1100
1125
1150
1200
1225
1250
1275
1300
1100
1125
1150
1200
1225
1250
1275
1300
Add to Float
Reading
Subtract
from Float
Reading
Bulb
Cylinder
Float
Weight
Thermometer
1175
Ref Hyd 1
Summary of Contents for INDUSTRIAL 1000 2004
Page 8: ...Page vi TABLE OF CONTENTS Owner s Manual and Service Guide...
Page 12: ...Owner s Manual and Service Guide SAFETY INFORMATION Page x Notes...
Page 43: ...Page 27 GENERAL SPECIFICATIONS Owner s Manual and Service Guide GENERAL SPECIFICATIONS...
Page 50: ...Page 34 Owner s Manual and Service Guide GENERAL SPECIFICATIONS Notes...
Page 51: ...Page 35 Owner s Manual and Service Guide WARRANTY LIMITED WARRANTIES...
Page 54: ...Page 38 Owner s Manual and Service Guide WARRANTY Notes...
Page 56: ...Page 40 Owner s Manual and Service Guide DECLARATION OF CONFORMITY...
Page 58: ...Page 42 Owner s Manual and Service Guide DECLARATION OF CONFORMITY Notes...
Page 59: ...Appendix A 1 LABELS AND PICTOGRAMS Owner s Manual and Service Guide LABELS AND PICTOGRAMS...
Page 72: ...Sivu vi SIS LLYSLUETTELO K ytt ja huolto ohje...
Page 76: ...K ytt ja huolto ohje TURVALLISUUSOHJEITA Sivu x Muistiinpanoja...
Page 107: ...Sivu 27 TEKNISET TIEDOT K ytt ja huolto ohje TEKNISET TIEDOT...
Page 114: ...Sivu 34 K ytt ja huolto ohje TEKNISET TIEDOT Muistiinpanoja...
Page 115: ...Sivu 35 K ytt ja huolto ohje TAKUU RAJOITETTU TAKUU...
Page 118: ...Sivu 38 K ytt ja huolto ohje TAKUU Muistiinpanoja...
Page 119: ...Sivu 39 K ytt ja huolto ohje YHDENMUKAISUUSJULISTUS YHDENMUKAISUUSJULISTUS VAIN EUROOPPA...
Page 120: ...Sivu 40 K ytt ja huolto ohje YHDENMUKAISUUSJULISTUS...
Page 121: ...Sivu 41 YHDENMUKAISUUSJULISTUS K ytt ja huolto ohje EI SAATAVILLA JULKAISUHETKELL...
Page 122: ...Sivu 42 K ytt ja huolto ohje YHDENMUKAISUUSJULISTUS Muistiinpanoja...
Page 123: ...Liite A 1 KILVET JA KUVAT K ytt ja huolto ohje KILVET JA KUVAT...

