OPERATION AND SERVICE INFORMATION
Page 21
Owner’s Manual and Service Guide
Read all of manual to become thoroughly familiar with this vehicle. Pay particular attention to all Notes, Cautions and Warnings
results must be corrected to compensate for temperature
differences.
As a battery ages, it still performs adequately except that
its
capacity
is diminished. Capacity describes the time
that a battery can continue to provide its design amperes
from a full charge.
A battery has a maximum life, therefore good mainte-
nance is designed to maximize the
available
life and
reduce the factors that can reduce the life of the battery.
BATTERY MAINTENANCE
Tool List
Qty. Required
Insulated wrench, 9/16"............................................... 1
Battery carrier ............................................................. 1
Hydrometer ................................................................. 1
Battery maintenance kit P/N 25587-G01 .................... 1
At Each Charging Cycle
To reduce the possibility
of fire, never attach a
battery charger to a vehi-
cle that is to be unattended beyond the normal charg-
ing cycle. Overcharging could cause damage to the
vehicle batteries and result in extreme overheating.
The charger should be checked after 24 hours and
unplugged after the charge cycle is complete.
Before charging the batteries, inspect the plug of the bat-
tery charger and vehicle receptacle housing for dirt or
debris.
Charge the batteries after each days use.
Monthly
•
Inspect all wiring for fraying, loose terminations,
corrosion or deterioration of insulation.
•
Check that the electrolyte level is correct and add
suitable water as required.
•
Clean the batteries and wire terminations.
Electrolyte Level and Water
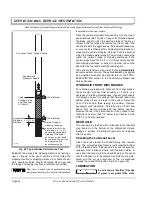
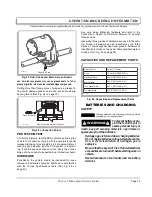
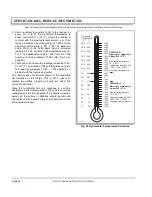
The correct level of the electrolyte is
1/2" (13 mm) above
the plates in each cell (Ref. Fig. 27 on page 21).
This level will leave approximately 1/4" - 3/8" (6 - 10 mm)
of space between the electrolyte and the vent tube. The
electrolyte level is important since
any portion
of the
plates exposed to air will be ruined beyond repair. Of
equal importance is too much water which will result in
electrolyte being forced out of the battery due to gassing
and the increase in volume of the electrolyte that results
from the charging cycle.
Do not overfill batteries. The charging
cycle will expel electrolyte and result in
component damage.
A battery being charged will ‘gas’ with the majority of the
gassing taking place at the end of the charging cycle.
This gas is hydrogen which is lighter than air. Water and
sulfuric acid droplets will be carried out of the battery
vents by the hydrogen gas; however, this loss is minimal.
If the battery electrolyte level is too high, the electrolyte
will block the vent tube and the gas will
force
it out of the
vent tube and battery cap. The water will evaporate but
the sulfuric acid will remain where it can damage vehicle
components and the storage facility floor. Sulfuric acid
loss will weaken the concentration of acid within the elec-
trolyte and reduce the life of the battery.
Over the life of the battery, a considerable amount of
water is consumed. It is important that the water used be
pure and free of contaminants that could reduce the life
of the battery by reducing the chemical reaction. The
water must be distilled or purified by an efficient filtration
system. Water that is not distilled should be analyzed
and if required, filtration installed to permit the water to
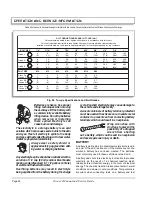
meet the requirements of the water purity table (Ref. Fig.
28 on page 22).
Even if the water is colorless, odorless, tasteless and fit
for drinking, the water should be analyzed to see that it
does not exceed the impurity levels specified in the table.
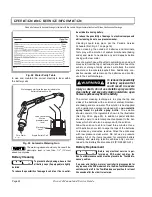
Automatic watering devices such as the one included in
the Battery Maintenance Kit (P/N 25587-G01) can be
used with an approved water source (Ref. Fig. 29 on
page 22). These watering devices are
fast and accurate
!
!
Fig. 27 Correct Electrolyte Level
Vent Cap
1/4" to 3/8"
(6 to 10 mm)
Plates
1/2" (13 mm)
Vent
Gas Vent
Expansion
Space
Electrolyte level should be
at least 1/2" (13 mm) above
the plates and 1/4" to 3/8"
(6 to 10 mm) below vent
Ref Cel 1
Summary of Contents for INDUSTRIAL 1000 2004
Page 8: ...Page vi TABLE OF CONTENTS Owner s Manual and Service Guide...
Page 12: ...Owner s Manual and Service Guide SAFETY INFORMATION Page x Notes...
Page 43: ...Page 27 GENERAL SPECIFICATIONS Owner s Manual and Service Guide GENERAL SPECIFICATIONS...
Page 50: ...Page 34 Owner s Manual and Service Guide GENERAL SPECIFICATIONS Notes...
Page 51: ...Page 35 Owner s Manual and Service Guide WARRANTY LIMITED WARRANTIES...
Page 54: ...Page 38 Owner s Manual and Service Guide WARRANTY Notes...
Page 56: ...Page 40 Owner s Manual and Service Guide DECLARATION OF CONFORMITY...
Page 58: ...Page 42 Owner s Manual and Service Guide DECLARATION OF CONFORMITY Notes...
Page 59: ...Appendix A 1 LABELS AND PICTOGRAMS Owner s Manual and Service Guide LABELS AND PICTOGRAMS...
Page 72: ...Sivu vi SIS LLYSLUETTELO K ytt ja huolto ohje...
Page 76: ...K ytt ja huolto ohje TURVALLISUUSOHJEITA Sivu x Muistiinpanoja...
Page 107: ...Sivu 27 TEKNISET TIEDOT K ytt ja huolto ohje TEKNISET TIEDOT...
Page 114: ...Sivu 34 K ytt ja huolto ohje TEKNISET TIEDOT Muistiinpanoja...
Page 115: ...Sivu 35 K ytt ja huolto ohje TAKUU RAJOITETTU TAKUU...
Page 118: ...Sivu 38 K ytt ja huolto ohje TAKUU Muistiinpanoja...
Page 119: ...Sivu 39 K ytt ja huolto ohje YHDENMUKAISUUSJULISTUS YHDENMUKAISUUSJULISTUS VAIN EUROOPPA...
Page 120: ...Sivu 40 K ytt ja huolto ohje YHDENMUKAISUUSJULISTUS...
Page 121: ...Sivu 41 YHDENMUKAISUUSJULISTUS K ytt ja huolto ohje EI SAATAVILLA JULKAISUHETKELL...
Page 122: ...Sivu 42 K ytt ja huolto ohje YHDENMUKAISUUSJULISTUS Muistiinpanoja...
Page 123: ...Liite A 1 KILVET JA KUVAT K ytt ja huolto ohje KILVET JA KUVAT...


