


MVP 104GX Operation
3-13
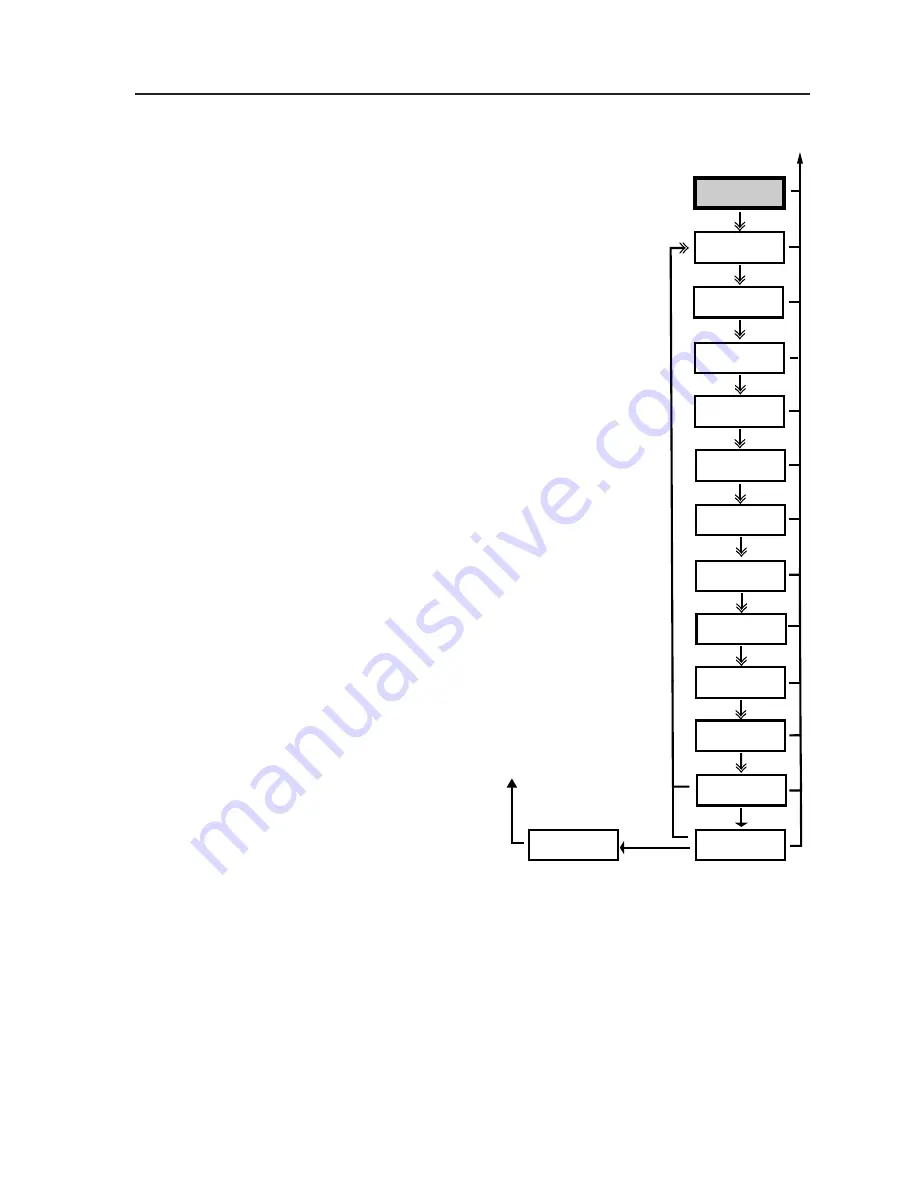
Advanced
Configuration
System Resetting
Please Wait
Background Color
color
Window Priority
A<1> B3 C4 D2
Window Borders
ON <OFF>
Video Format
System Reset
Freeze and Next
Confirm Reset
Freeze and Next
Windows Text 1 – 4
1 – 16 characters
Text Location
top left
<NTSC> PAL
#1 Input Mode #2
mode mode
Text Style
solid
VCR Mode 1 – 4
Off On Off Off
Chroma 1 – 4
Off Off Off On
Window Priority submenu
The priority of each window determines if a
window is displayed in front (priority
A
) or further
back (priorities
B
,
C
and
D
, with
D
being furthest
back).
While this submenu is active, all
Input
button
LEDs blink green. Change the priority (
A
,
B
,
C
, or
D,
with
A
being the highest [top] priority and
D
being the lowest [bottom] priority) of all 4 output
windows (1, 2, 3, 4) by rotating the
Vertical sizing
knob to select the window. The green LED for each
active window lights as it is selected.
The window number follows each priority, with the
currently selected window being bracketed by the <
> symbols, e.g. A1 B <3> C4 D2, where window 1 is
first in priority, window 3 (currently selected) is
second in priority, window 4 is third in priority, and
window 2 is last in priority.
To change the priority of any window, select the
window by rotating the
Vertical sizing
knob ( <>
brackets designate the currently selected window)
and press
Input
button
1
,
2
,
3
, or
4
, depending on
whether the window will be changed to 1, 2, 3, or 4,
respectively, for that priority (
A
,
B
,
C
, or
D
). Repeat
this process to change the priority of any window.
Press the
Next
button to advance to the Window
Text submenu, or press the
Menu
button to exit the
Window Priority submenu and proceed to the
Genlock menu.
Window Text submenu
This submenu allows text to be displayed in each
window. While this submenu is active, the green
LED for the Store button will continually blink. After selecting a window
by pressing the
Active
window selection
button (1, 2, 3, or 4), change the
window text by rotating the
Horizontal sizing
knob to select the character
position (up to 16 characters long), then rotate the
Vertical sizing
knob to
change the character. Fifty-nine alphanumeric characters including a
space
are available:
ABCDEFGHIJKLMNOPQRSTUVWXYZ
space
!”#$%&’()*+,-./0123456789:;<=>?@
Pressing the Store button deletes the currently selected text character. Press
the
Next
button to advance to the Text Style submenu, or press the
Menu
button to exit the Window Text submenu and proceed to the Genlock menu.
Summary of Contents for Multi Video Processor MVP 104GX
Page 1: ...MVP 104GX Multi Video Processor 68 484 01 Printed in the USA...
Page 7: ...1 Chapter One Introduction About the MVP 104GX MVP 104GX Features MVP 104GX...
Page 34: ...MVP 104GX Operation Operation cont d 3 16...
Page 38: ...MVP 104GX Windows based Control Program Windows based Control Program cont d 4 4...


