background image

A

MALGATOME

®


SD


U

SER 

G

UIDE


PN#: X101456, Rev. C   


    Page 33 of 56 


Troubleshooting 

This section describes general troubleshooting information, including solutions to potential 
problems. 

Use the following assessment steps to confirm proper operation of the Amalgatome SD System. If you discover a 
problem with any of these items, do not use the system; return it to Exsurco Medical for service. For additional 
information, refer to the Warranty, Service, and Returns section.  


Visually inspect the system for any signs of physical damage or wear: 

o


Loose parts 

o


Missing or loose screws 

o


Signs of being dropped or bent 

o


Areas with corrosion or pitting 


Check for the proper turning of the depth adjustment knob and depth gauge. 


Verify proper connection and fit of the pneumatic hose, ensuring that both ends of the pneumatic hose (to the 
hand piece and the air or gas supply) fit properly to their mating receptacles. 


Verify that the air supply is turned on and set to 100 psi and that the wall indicator or pressure gauge is 
reading correctly while the system is running. 


If no issues are observed during this assessment but performance issues are experienced, refer to the 
troubleshooting table below. 

Problem 

Possible Solution 

System fails to spin 
excision ring blade 
when activated 
hand piece when 
engaged with the 
disposable excision 
ring blade and lock 
ring installed 


Verify that the excision ring blade and its mating surfaces are free of lint and other 
particulate which can hinder free movement of the excision ring blade. 


Check the condition of the excision ring blade lock ring for any distortion or rough 
edges that might prevent the excision ring blade from moving properly. In this case, 
return the system to Exsurco Medical for service and repair.  


Verify that the on/off button is working properly by sliding the 

ON/OFF 

lever to the 

ON

 position, and then pressing down on the lever to engage the motor. If the lever 

does not press down on the on/off button, the system will not operate. 


Check the system for any evidence of being dropped or damaged as this can affect the 
operation and calibration of the depth gauge. In this case, return the system to Exsurco 
Medical for service and repair.  


Check pneumatic air hose for any potential leaks or cuts in it that would prevent the 
proper pressure required to power device. 


Remove the excision ring blade, cutting head, and hose from the drive unit. Turn the 
pinion (gear) and check for free rotation. Rotation should feel smooth and consistent. 
Otherwise it can indicate particulate in the motor or damaged bearings. If this is 
observed, return the unit to Exsurco Medical for servicing or repair.  

Summary of Contents for Amalgatome SD

Page 1: ...Amalgatome SD User Guide EXSURCO MEDICAL 10804 GREEN ROAD WAKEMAN OH 44889 PN X101456 REV C...

Page 2: ...This page intentionally left blank...

Page 3: ...malgatome SD System It is designed for use by qualified and trained medical professionals where the patient is under supervision of trained personnel Review this user guide paying particular attention...

Page 4: ...This page intentionally left blank...

Page 5: ...Warnings 9 Precautions 9 Setup Instructions 11 Inspection 11 Setup 11 System Check 15 Depth Gauge Setting 16 Operating Instructions 17 Graft Harvesting and Debridement 17 Postoperative Procedure 20 Cl...

Page 6: ...ppendix A Technical Specifications 42 Specifications 42 Appendix B Parts Information 44 Ordering Information 46 Appendix C Glossary of Symbols 48 Appendix D Quick Reference Guides 50 Setup 50 Postoper...

Page 7: ...partnerships and deep customer understanding We are committed to improving patients lives and outcomes by advancing the healing power of skin through innovation product development and the marketing o...

Page 8: ...AMALGATOME SD USER GUIDE PN X101456 Rev C Page 4 of 56 This page intentionally left blank...

Page 9: ...rvesting Description The Amalgatome SD System is a pneumatically powered surgical skin grafting instrument capable of producing varying thicknesses of skin grafts from 0 005 to 0 045 inches in increme...

Page 10: ...ring blade head 4 2 inch Cutting Head excision ring blade head 5 2 inch Lock Ring 6 Hand Piece Drive Unit 7 Lock Nut Wrench 8 Lock Ring Removal Tool Disposable Excision ring blades 2 inch and 4 inch...

Page 11: ...ontains the 4 inch cutting head o SDSYSTEM02 contains the 2 inch cutting head The system is provided non sterile and is reusable after cleaning and sterilization prior to use according to the procedur...

Page 12: ...s not recommended for use on the following locations on the body or where surgeon determines due to health reasons Eyelid s Post auricular region behind the ear and on the ear Inguinal region groin Ge...

Page 13: ...sult from use of other manufacturer s excision ring blades or reuse of the Amalgatome SD excision ring blades Dispose of the excision ring blades in accordance with facility protocol for sharps contai...

Page 14: ...AMALGATOME SD USER GUIDE PN X101456 Rev C Page 10 of 56 This page intentionally left blank...

Page 15: ...s in order to ensure that the parts function through the intended range of motion Do not use or reprocess damaged or defective parts If the system does not function correctly contact Exsurco Medical C...

Page 16: ...d with peel corners pull open the package allowing the sterile operator to reach in and grab the clamshell WARNING SHARP NOTE It is best practice to have the package opened for the sterile operator It...

Page 17: ...r seating Figure 2g g Place the excision ring blade lock ring over the excision ring blade and twist it in a clockwise motion until it stops Do not over tighten 3 Attach the pneumatic hose Figure 3a F...

Page 18: ...pneumatic hose to the sterile field taking care not to compress the hose Figure 3e e Connect the male end of the pneumatic hose to the appropriate air source in the operating room designated for the...

Page 19: ...xcision ring blade spins 3 Verify that all connections are secure and that the air pressure is set correctly while the system is running NOTE The required air pressure setting is 100 psi Figure 4 4 Re...

Page 20: ...he individual patient demographics e g age weight ethnicity etc Rotate the depth adjustment knob to the left counterclockwise for thinner settings and to the right clockwise for thicker settings The d...

Page 21: ...the depth gauge as necessary to the optimal setting The surgical site should be selected per facility protocol for the surgical procedure as determined for skin grafting or wound debridement Skin shou...

Page 22: ...to emerge from the cutting head 6 Use either of the following methods to collect the recovered graft or debrided tissue Method 1 Use tissue forceps to gently lift the graft as it emerges from the cutt...

Page 23: ...on Figure 6c Cutting portion or trailing edge of the instrument held parallel to the patient Demonstrating good excision ring blade engagement Figure 6d Cutting portion or trailing edge of the instrum...

Page 24: ...ft has been recovered or the wound debridement procedure is completed and the Amalgatome SD has been returned to the surgical back table or instrument table Refer to Appendix D Quick Reference Guides...

Page 25: ...aning agents with chlorine or chloride e g saline or bleach as the active ingredient as they are corrosive to stainless steel and can result in physical damage to the system including rust and corrosi...

Page 26: ...AMALGATOME SD USER GUIDE PN X101456 Rev C Page 22 of 56 This page intentionally left blank...

Page 27: ...for hand washing use of personal protective equipment PPE etc as recommended by the Association for the Advancement of Medical Instrumentation AAMI Standards and Recommended practice Safe Handling and...

Page 28: ...t immerse the unit overnight 7 Place each component in a critical water e g deionized DI reverse osmosis RO or distilled water bath for a minimum of one minute Do not immerse the unit overnight 8 Usin...

Page 29: ...econds Minimum Temperature Type of Detergent Water Prewash 2 00 Cold Tap Wash 4 00 Heated Tap 60 C Enzymatic Cleaner per the manufacturer s instructions Neutralize 2 00 Hot Tap Neutral Detergent per t...

Page 30: ...wo separate components so keep them together with other components and take care not to misplace them Figure 2 Immerse Do Not Immerse 3 With the exception of the hand piece and pneumatic hose immerse...

Page 31: ...e Do Not Immerse 6 With the exception of the hand piece and pneumatic hose place the components into a fresh tap water bath for a minimum of one minute and then repeat one time using fresh tap water D...

Page 32: ...th Figure 8 Figure 9 9 Moisten a sterile lint free wipe with critical water and wipe the hand piece and pneumatic hose for a minimum of one minute each Use multiple wipes as necessary CAUTION Do not i...

Page 33: ...ock nut and lock knob on over the pinion of handpiece to engage at base of handpiece and screw on finger tight counter clockwise till secure NOTE the design on the handpiece should match the lock knob...

Page 34: ...ned below 9 In a well lit area visually inspect each component in order to ensure all surfaces are clean and dry 10 Using the lock nut wrench replace the locking knob and locking nut back onto the han...

Page 35: ...not crimp it into the compartment Place the hand piece into the sterilization tray Ensure that the lock nut and lock knob have been previously assembled to the hand piece Use the lock nut wrench to p...

Page 36: ...elf life is dependent on the sterile barrier employed manner in which product is stored environment and handling conditions A maximum shelf life for sterilized medical devices before use should be def...

Page 37: ...m fails to spin excision ring blade when activated hand piece when engaged with the disposable excision ring blade and lock ring installed Verify that the excision ring blade and its mating surfaces a...

Page 38: ...ion ring blade Check the air connection to ensure the pressure setting is 100 psi with the system running allowing the motor to provide continuous operation to the excision ring blade without interrup...

Page 39: ...cent moon shaped patterns or uneven thickness of grafts Reduce speed and review proper angle and pressure to ensure that the correct technique is being used Skin graft is not uniform or too thick narr...

Page 40: ...erile mineral oil and exercise the lever in the ON position until it is no longer tacky O Ring on Hand Piece appears worn Normal wear of the O ring is expected The O ring will be replaced during the a...

Page 41: ...AMALGATOME SD USER GUIDE PN X101456 Rev C Page 37 of 56 This page intentionally left blank...

Page 42: ...user guide If the system becomes defective because of misuse or abnormal conditions of operations these repairs shall be charged to the customer All products returned for warranty or non warranty repa...

Page 43: ...ration warranty and service of the system The Amalgatome SD System must be returned every 12 months for inspection and preventative maintenance The pneumatic hose must be replaced every 12 months or s...

Page 44: ...to register a complaint Our Customer Service team is available Monday through Friday 8 am to 5 pm ET and is here to assist you in any way Email support exsurco com or call 1 800 243 6049 ext 4 To help...

Page 45: ...AMALGATOME SD USER GUIDE PN X101456 Rev C Page 41 of 56 This page intentionally left blank...

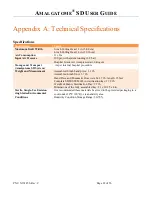
Page 46: ...ome SD System As per internal hospital procedure Weight and Measurement Assembled 2 inch hand piece 3 1 lb Assembled 4 inch Unit 3 7 lb Hand Piece and Pneumatic Hose weight 2 7 lb length 15 feet Compl...

Page 47: ...AMALGATOME SD USER GUIDE PN X101456 Rev C Page 43 of 56 This page intentionally left blank...

Page 48: ...each X100968 Amalgatome SD 2 inch Cutting Head 1 each X100969 Amalgatome SD 4 inch Cutting Head 1 each X100768 Amalgatome SD 2 inch Lock Ring 1 each X100825 Amalgatome SD 4 inch Lock Ring 1 each X1009...

Page 49: ...each X100966 Amalgatome Lock Ring Removal Tool 1 each X101133 Amalgatome Lock Nut Wrench 1 each X101456 Amalgatome SD User Guide 1 each X101491 Amalgatome SD Intro Letter Part SDSYSTEM04 Description...

Page 50: ...800 243 6049 ext 4 or email support exsurco com For a price quote and all product related questions please contact your local Exsurco Medical sales representative or contact our Sales department at 1...

Page 51: ...AMALGATOME SD USER GUIDE PN X101456 Rev C Page 47 of 56 This page intentionally left blank...

Page 52: ...r Caution USA federal law restricts this system to sale by or on the order of a physician Use by date This symbol is intended to indicate that the system should not be used after the end of the date s...

Page 53: ...GATOME SD USER GUIDE PN X101456 Rev C Page 49 of 56 Symbol Definition Caution Consult instructions for use Keep product dry Do not use if package is damaged This side up Sharp object General warning s...

Page 54: ...f 56 Appendix D Quick Reference Guides Setup Set depth gauge to preferred setting Open package right to left Teeth side down Tighten counterclockwise Sharp excision ring blade do not touch inner ring...

Page 55: ...AMALGATOME SD USER GUIDE PN X101456 Rev C Page 51 of 56 Postoperative Procedure Set depth gauge preferred setting Never touch inner ring of excision ring blade...

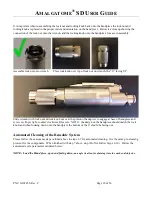
Page 56: ...of 56 Manual Cleaning of the Reusable System Clean with a soft bristle brush Lint free wipe Dry Reassemble lock nut onto hand piece Load ASD into Sterilization Tray SOAK WIPE TAP WATER BATH x2 TAP WAT...

Page 57: ...AMALGATOME SD USER GUIDE PN X101456 Rev C Page 53 of 56 This page intentionally left blank...

Page 58: ...Medical Devices in Health Care Settings Validation Methods and Labeling Document Guidance for Industry and Food and Drug Administration Staff Current version of ANSI AAMI ST8 Hospital steam sterilizer...

Page 59: ...AMALGATOME SD USER GUIDE PN X101456 Rev C Page 55 of 56 This page intentionally left blank...

Page 60: ...Amalgatome SD Phone 1 800 243 6049 Website www exsurco com Press the number below for the following departments or email at 1 Sales Clinical Support sales exsurco com 2 Marketing Product Inquiries in...

Page 61: ...This page intentionally left blank...

Page 62: ...ad Wakeman OH 44889 Exsurco Medical P O Box 376 Vermillion OH 44089 2017 Exsurco Medical Inc All Rights Reserved Amalgatome and Exsurco are registered trademarks of Exsurco Medical Inc PN X101456 Rev...

Reviews: