background image


Machine description – quick overview 

Machine control – Operating elements 


099-000125-EW501 

29.9.2022


17


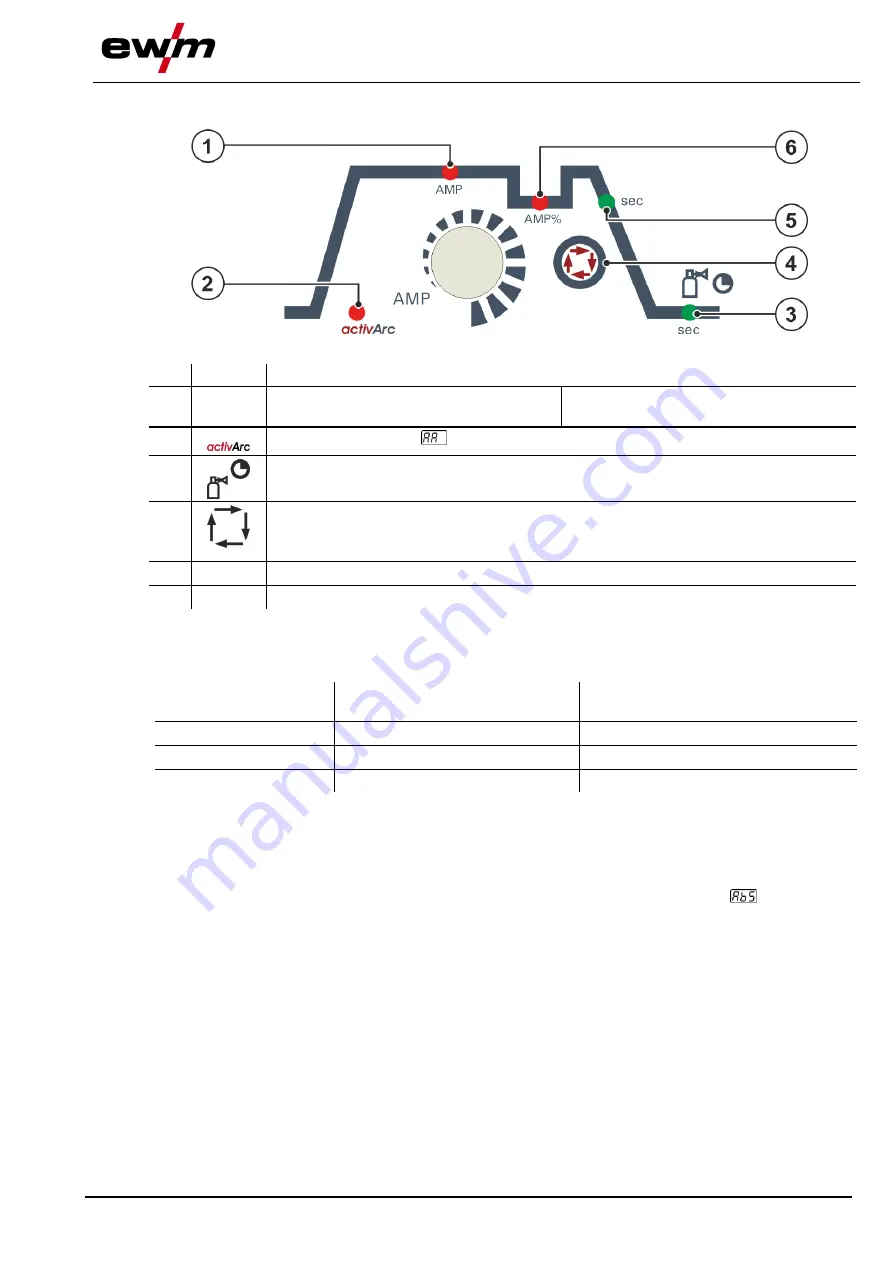
4.2.1  Function sequence 


Figure 4-3 

Item  Symbol  Description 

0


AMP  Main current (TIG) / pulse current


I min to I max (1 A increments) 

Main current (MMA) 

I min to I max (1 A increments) 

  Signal light activArc 

 > see 5.2.6 chapter


Signal light, gas post-flow time 


Select welding parameters button 

This button is used to select the welding parameters depending on the welding process 

and operating mode used. 

sec 

Down-slope time (TIG) 

AMP%  Secondary current / pulse pause current


4.2.2  Welding data display 

The following welding parameters can be displayed before (nominal values) or during (actual values) 

welding. 


Parameter 

Before welding 

(nominal values) 

During welding 

(actual values) 

Welding current 


Parameter times 


Parameter currents 


 not possible 

 possible 


4.2.3  Setting the welding current (absolute/percentage) 

The welding current for the ignition, secondary, end and hot start current can be set as a percentage of 

the main current AMP or as an absolute value. To select the display use the parameter 

 in the confi-

guration menu

 > see 5.8 chapter


Summary of Contents for Tetrix 300 Smart TM

Page 1: ...Operating instructions EN Welding machine Tetrix 300 Smart TM 099 000125 EW501 Observe additional system documents 29 9 2022...

Page 2: ...to the operation of this equipment is restricted solely to the function of the equipment No other form of liability regardless of type shall be accepted This exclusion of liability shall be deemed ac...

Page 3: ...1 4 Transport belt 19 5 1 4 1 Adjusting the lengthof thecarrying strap 19 5 1 5 Welding torch cooling system 20 5 1 5 1 Cooling unit connection 20 5 1 6 Notes on the installation of welding current le...

Page 4: ...6 2 Responsiveness 52 5 5 PC interface 52 5 5 1 Connection 52 5 6 Interfaces for automation 53 5 6 1 Automation interface 54 5 6 2 Remotecontrol connectionsocket 19 pole 55 5 6 3 RINT X12 robot interf...

Page 5: ...5 EW501 29 9 2022 5 9 2 Welding torch cooling system 71 9 2 1 Coolant typeblueCool 71 9 2 2 Coolant type KF 71 9 3 Remotecontrols and accessories 71 9 4 Options 71 9 5 Transport system 72 9 6 Computer...

Page 6: ...and even fatal injuries Safety notes include the WARNING keyword in the heading with a general warning sym bol The hazard is also highlighted using a symbol in the page margin CAUTION Working or oper...

Page 7: ...on machine Press and hold Incorrect Invalid Switch Correct Valid Turn Input Numerical value adjustable Navigation Signal light lights up in green Output Signal light flashes green Time representation...

Page 8: ...cal specialist may interconnect the sources as per standard IEC 60974 9 2010 Installa tion and use and German Accident Prevention Regulation BVG D1 formerly VBG 15 or country specific regulations Befo...

Page 9: ...temperatures of 100 C or higher and arcing and work on live components Hearing protection against harming noise Explosion risk Apparently harmless substances in closed containers may generate excessiv...

Page 10: ...ts specified in the standard The user is responsible for any interference caused by welding In order to evaluate any possible problems with electromagnetic compatibility in the surrounding area the us...

Page 11: ...lacement parts etc from our range of products Only insert and lock accessory components into the relevant connection socket when the ma chine is switched off Requirements for connection to the public...

Page 12: ...n or connection points can heat up significantly during operation water cooled version When opening the coolant circuit escaping coolant may cause scalding Open the coolant circuit only when the power...

Page 13: ...anty maintenanceand testing at www ewm group com 3 3 2 Declaration of Conformity This product corresponds in its design and construction to theEU directives listed in the decla ration The product come...

Page 14: ...Machine description quick overview Front view rear view 14 099 000125 EW501 29 9 2022 4 Machine description quick overview 4 1 Front view rear view Figure 4 1...

Page 15: ...Shielding gas connection inlet 9 Push button of automatic circuit breaker for control electronics Press to reset tripped fuse 10 Ignition type changeover switch see 5 2 3 chapter HF ignition Liftarc c...

Page 16: ...gnal light S safety sign signal light 3 Functional sequence see 4 2 1 chapter 4 Welding parameter setting rotary dial Setting currents times and parameters 5 Pulsing push button TIG automated pulses p...

Page 17: ...g process and operating mode used 5 sec Down slope time TIG 6 AMP Secondary current pulse pause current 4 2 2 Welding data display The following welding parameters can be displayed before nominal valu...

Page 18: ...t must not be lifted Do not lift or suspend the machine The machine can drop and causeinjuries The handles straps or brackets are suitable for transport by hand only The machine must not be suspended...

Page 19: ...plugs machine connections are not locked or if the workpiece connection is contaminated paint corrosion these connections and leads can heat up and cause burns when touched Check welding current conne...

Page 20: ...omponents Figure 5 2 Item Symbol Description 0 1 8 pole connection socket Cooling unit control lead 2 4 pole connection socket Cooling unit voltage supply 3 Cooling module Insert and lock the 8 pole c...

Page 21: ...th HF igniter TIG for as long as pos sible in parallel with a distance of 20 cm to avoid HF sparkover Always keep a distance of at least 20 cm to leads of other power sources to avoid interferences Al...

Page 22: ...heck that all welding current connections are firmly secured and electrical connections are in perfect condition Set up attach or suspend all conductive power source components such as casing trans po...

Page 23: ...s plug socket and lead must be checked by a qualified electrician on a regular basis When operating the generator always ensure it is earthed as stipulated in the operating in structions The network c...

Page 24: ...the shielding gas cylinder to the welding torch is a fundamental requirement for optimum welding results In addition a blocked shielding gas supply may result in the welding torch being destroyed Alw...

Page 25: ...ircuit vol tage are applied at the welding torch these can lead to electric shocks and burning on contact Keep the welding torch electrically insulated from persons animals or equipment during the set...

Page 26: ...lead connection Insert the welding current plug on the welding torch into the welding current connectionsocket and lock by turning to the right Remove yellow protective cap on G connecting nipple Scre...

Page 27: ...1 29 9 2022 27 5 2 2 Welding task selection The following welding task selection is an example of use In general the selection process always has the same sequence Signal lights LED will show the sele...

Page 28: ...e and press the torch trigger liftarc current flowing regardless of the main current set b Incline the torch over the torch gas nozzle to produce a gap of approx 2 3 mm between the electrode tip and t...

Page 29: ...g the function the machine immediately switches to the gas post flow process phase The welder starts the new process again at the first cycle The user can switch the function on or off parame ter see...

Page 30: ...torch trigger Tap torch trigger Tap and press torch trigger 5 2 7 1 Welding torch mode Modes 1 to 6 and 11 to 16 are available to the user Modes 11 to 16 feature thesame functionality as 1 to 6 but wi...

Page 31: ...elding current on off 1 ex works Secondary current latched operation Standard torch with two torch triggers Figure Operating ele ments Explanation of symbols BRT1 torch trigger 1 BRT2 torch trigger 2...

Page 32: ...trigger 2 Functions Mode Operating ele ments Welding current on off 1 ex works Secondary current Secondary current tapping function 1 latched operating mode Welding current on off 2 Secondary current...

Page 33: ...ting ele ments Welding current on off 1 ex works Secondary current tapping function 1 latched operating mode Increase welding current up function2 Decrease welding current down function2 Welding curre...

Page 34: ...ary current Secondary current tapping function 1 latched operating mode Increase welding current up function2 Decrease welding current down function2 Modes 2 and 3 are not used with this type of torch...

Page 35: ...BRT 1 torch trigger 1 Functions Mode Operating ele ments Welding current on off 3 Secondary current tapping function1 Increase welding current Decrease welding current Potentiometer torch with two to...

Page 36: ...e to perform test after conversion Before reconnection Inspection and Testing during Operation according to IEC BS EN 60974 4 Arc welding systems Inspection and Testing during Operation has to be perf...

Page 37: ...et in the machine control function sequence are dependent on the welding task selected This means that if no pulse variant was selected for example no pulseparameters will be available to set in the f...

Page 38: ...lding cur rent decreases to the secondary current AMP in the set slope time If torch trigger 2 is released the welding current increases again to the main current AMP in the set slope time The paramet...

Page 39: ...igger 1 The welding current increases in the up slope time to the main current During the main current phase you can switch to the secondary current in two ways Either tap torch trigger 1 or press and...

Page 40: ...joint welding of metal sheets made from steel and CrNi alloys up to a thickness of approximately 2 5 mm Metal sheets of different thicknesses can also be welded on top of one another As this is a one...

Page 41: ...for welding process activation Activation is indicated by flashing of the spotArc spotmatic signal light The process can be activated separately for each spot or also on a permanent basis The setting...

Page 42: ...the welding torch over the torch gas nozzle until there is a gap of approx 2 3 mm between the electrode tip and the workpiece Shielding gas flows during the set gas pre flow time The arc igni tes and...

Page 43: ...ent ramps up to the main current AMP in the selected up slope time Pressing torch trigger 1 starts the slope from main current AMP to secondary current AMP Releasing the torch trigger starts theslope...

Page 44: ...iew section EXIT ENTER 4s 4s Figure 5 26 Display Setting selection Expert menu Gas pre flow time Start current as percentage dependent on main current Upslope time to main current Slope time main curr...

Page 45: ...ng nipple Place yellow insulating cap on the G connection nipple protects against electrical vol tage and dirt Figure 5 27 Item Symbol Description 0 1 Electrode holder 2 Connection socket welding curr...

Page 46: ...weld pool with increases in current This makes it easier to weld large drop melting electrode types at low current strengths with a short arc in particular EXIT 4s Figure 5 29 5 3 4 Hotstart The funct...

Page 47: ...vents the electrode from annealing Should the electrode stick despite the Arcforce feature themachine au tomatically switches to the minimum current within approx one second This prevents the electrod...

Page 48: ...method especially suitable for welding according to welding procedure specifications Figure 5 32 AMP main current e g 100 A Ipuls pulse current x AMP e g 140 x 100 A 140 A IPP pulse pause current 1 2...

Page 49: ...IT ENTER 4s 4s Figure 5 34 Display Setting selection Expert menu Hotstart current Hotstart time Pulse current see 5 3 7 chapter Pulse balance Pulse frequency 5 4 Remote control The remote controls are...

Page 50: ...y adjustable Coarse adjustment of the cycle frequency Pulse pause ratio balance adjustable from 10 to 90 5 4 5 RTP3 spotArc 19POL Functions TIG MMA Infinitely adjustable welding current 0 to 100 depen...

Page 51: ...current immediately jumps to approx 100 A The start ramp function is switched on or off with the parameter in the machine configuration menu see 5 8 chapter Figure 5 35 Symbol Meaning Actuate foot op...

Page 52: ...on the PC and simply transfer to one or more welding machines accessory set consisting of software interface connection leads Data exchange between power source and PC Welding task administration JOB...

Page 53: ...e Unauthorised manipulations will invalidate the warranty Instruct competent personnel authorised service personnel to repair the machine Damage to the machine due to improper connection Unsuitable co...

Page 54: ..._E Synchronisation for master slave operation D Input no c IGRO Current flows signal I 0 maximum load 20mA 15V 0V welding current flowing E R Input Output Not Aus Emergency stop for higher level shut...

Page 55: ...supply 15V max 25mA 9 R Input Start Stop welding current 10 H Input Switching between main and secondary welding currents pulses 11 M N P Input Activation of control voltage specification Set all 3 si...

Page 56: ...sistance should bealigned again whenever an accessory component suchas the welding torch or the intermediate hose package AW has been chan ged The resistance value of the cables can beset directly or...

Page 57: ...e The value can bebetween 0 m and 60 m The new value is immediately saved without requiring further confirmation If no value is shown on the right hand display then measurement failed The measurement...

Page 58: ...machine configuration menu 5 8 1 Selecting changing and saving parameters ENTER l 0 B EXIT NAVIGATION A A A A A A B B B B B B B B B B B A B B B B B B B B B B B B B B B B B B B B B B B B B B A B B B Fi...

Page 59: ...value display see 4 2 2 chapter Actual value display Nominal value display TIG antistick see 5 2 5 chapter function active factory setting function inactive Show warnings see 7 2 chapter Function disa...

Page 60: ...r signal positive logic AVC Arc voltage control connection Gas monitoring Depending on where the gas sensor is situated the use of a pilot static tube and the welding process monitoring phase Function...

Page 61: ...re separated by a dot Example 07 0040 07 system bus ID 0 0 4 0 version number Cable resistance alignment see 5 6 5 chapter Only qualified service personnel may change the parameters TIG HF start soft...

Page 62: ...e dealer who supplied the machine Return deliveries of defective equipment subject to warranty may only bemade through your dealer When replacing parts use only original spare parts When ordering spar...

Page 63: ...rollers on a regular basis depending on the degree of soiling 6 2 2 Monthly maintenance tasks Visual inspection Casing damage front rear and side walls Wheels and their securing elements Transport el...

Page 64: ...tem separate from unsorted municipal waste The public waste management utilities communities have created collection points at which used equipment from private households can be disposed of free of c...

Page 65: ...everal parameters cannot beset machines with access block Entry level is blocked disable access lock All machine control signal lights are illuminated after switching on No machine control signal ligh...

Page 66: ...um applications and high alloy steels Unsuitable or worn welding torch equipment Check size of gas nozzle and replace if necessary Condensation in the gas tube Purge hose package with gas or replace 7...

Page 67: ...drive Inform service 33 Drive is operating under overload con ditions Adjust mechanical load 34 JOB unknown Select alternatives JOB The warnings can be reset by pressing a push button see table Machi...

Page 68: ...r Target value specification deviates significantly from the actual value Check plasma gas supply leak tightness kinks guide connections closure 20 Coolant flow Coolant flow rate too low Check cooling...

Page 69: ...ly serves to inform the authorised service staff It is available in the machine configuration menu see 5 8 chapter 7 6 Vent coolant circuit Figure 7 1 Switch off the machine and fill the coolant tank...

Page 70: ...A Cos efficiency 0 99 88 Protection class Overvoltage category Contamination level 3 Insulation class protection classification H IP 23 Residual current circuit breaker Type B recommended Noise level...

Page 71: ...0 C 14 F 5 l 094 000530 00005 KF 23E 200 Coolant 10 C 200 litres 094 000530 00001 KF 37E 5 Coolant up to 20 C 4 F 5 l 094 006256 00005 KF 37E 200 Coolant 20 C 200 l 094 006256 00001 TYP1 Frost protect...

Page 72: ...nation Item no Trolly 35 2 2 Transport vehicle 090 008296 00000 Trolly 38 2 E Transport vehicle long wheelbase 090 008270 00000 9 6 Computer communication Type Designation Item no PC300 XQ Set PC300 N...

Page 73: ...ndix Searching for a dealer 099 000125 EW501 29 9 2022 73 10 Appendix 10 1 Searching for a dealer Sales service partners www ewm group com en specialist dealers More than 400 EWM sales partners worldw...

Reviews: