background image


164


KPM.X.Systemhandbuch_X3.0.EN.V1.9 | Subject to misprints and technical changes. 


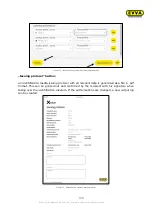
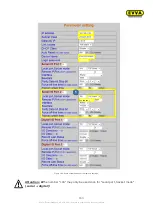
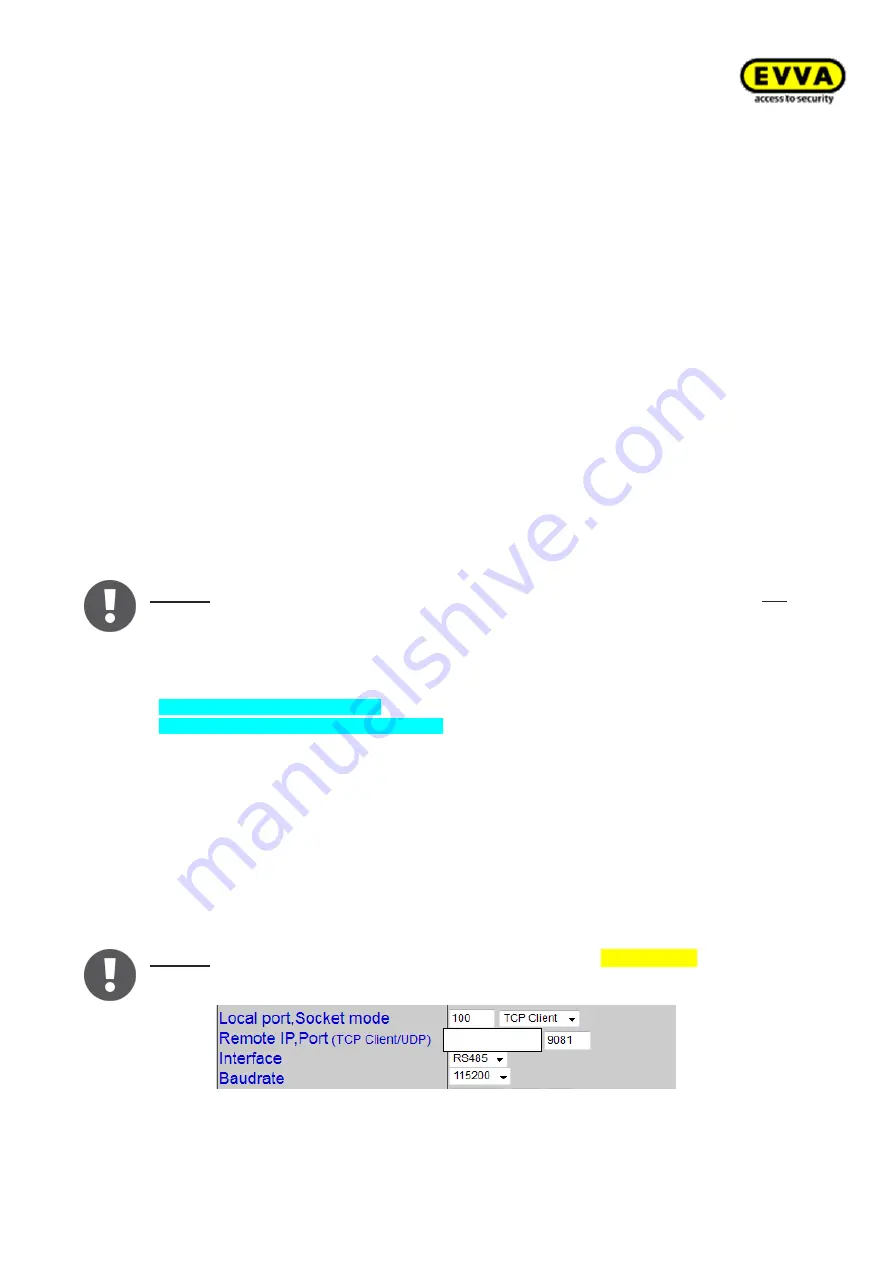
You are now on the Xesar network adapter configuration page. 
As shown on the illustration, complete the white fields. 
Configure the fields highlighted in yellow as follows: 


The 

IP  address

  defines  the  IP  address  of  the  Xesar  network  adapter. 

Please note that changing this address and clicking 

Update 

(or confirming with the 

ENTER 

key) means the network adapter can exclusively be opened and configured using this ad-
dress. 
It is necessary to define up to 123 different IP addresses for each of the 123 potential Xesar 
network adapters within a system. 
In this process, also check the network settings of the PC and observe the valid IP address 
range of your network. 


The 

Subnet mask

 defines the subnet used. 


The 

Device name

 can be individually configured and it does not influence the device func-

tion. 


The 

Login password

 (Login password) restricts access to the device configuration page. A 

default password has not been configured. 


The 

Remote IP

 corresponds to the IP address of the computer running the Xesar software 

and  is  responsible  for  communication  between  the  Xesar  network  adapter  and  the  Xesar 
software. 
Note: The 

Remote IP

 (PC) and 

IP address

 (Xesar network adapter) must differ! 


Notice:

 Make sure you have selected Local port, Socket mode 

TCP Client

 and not 

TCP Server! 

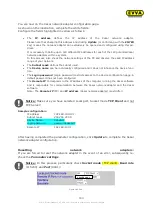
Sample configuration: 

IP address 


192.168.100.101 

Subnet mask   

255.255.255.0 

Device Name   

Adapter1 

Login password  

passwordadapter1 

Remote IP 


192.168.100.1


After having completed the parameter configuration, click 

Update 

to complete the Xesar 

network adapter configuration. 
 

Resetting 

network 

adapters:


If you are forced to reset the network adapter in the event of an error, subsequently re-
check the 

Parameter settings

.  

Notice:

 In this process, particularly check 

Socket mode 

(TCP client),

 Baud rate


(115200) and 

Port 

(9081)! 


Figure 185: Port: 

192.168.100.1


Summary of Contents for Xesar 3.0

Page 1: ...1 KPM X Systemhandbuch_X3 0 EN V1 9 05 2019 Subjects to misprints and technical changes System manual Xesar 3 0 Version 3 0 216 ...

Page 2: ...l unit 29 2 2 Installing Xesar access components 29 2 3 Xesar access components signal events 31 2 4 Xesar coding station 32 2 5 Xesar tablet 33 2 6 Xesar emergency power device 35 2 7 Admin Card 36 2 8 Identification media 37 2 9 Construction Card construction site medium 38 3 System requirements 39 3 1 Xesar 3 0 single user system 39 3 2 Xesar 3 0 multi user system server 41 3 2 1 System require...

Page 3: ...ge 82 5 3 Software Update 84 5 4 Periphery Manager 90 5 5 Linking the coding station to the Xesar software 95 5 6 Integrating your Xesar tablet into your system 102 5 7 Manually uninstalling and installing the Xesar app upgrade from Xesar 2 2 to Xesar 3 0 107 6 Securing the Xesar system data with the Installation Manager 114 6 1 Manual backup 114 6 2 Automatic backup 116 6 3 Backup files 117 6 4 R...

Page 4: ...board 165 8 3 Xesar filter functions 167 8 3 1 Manual filter 167 8 3 2 Preset filter 167 8 3 3 Column view 169 8 4 My profile 170 8 5 KeyCredits units 171 8 6 Support 173 8 6 1 About Xesar 173 8 6 2 Xesar help 174 8 6 3 Updates 174 8 6 4 Download support data 174 8 7 Maintenance tasks 175 8 8 Firmware not up to date 176 8 9 Battery warning 176 8 10 Coding stations 177 8 11 Online error 177 8 11 1 ...

Page 5: ...g AdminCard 194 8 17 Revoking the process of adding a component 196 8 18 Removing components resetting to construction mode 197 8 19 Force component removal component faulty 198 8 20 Online wall reader 198 8 21 Potential errors 200 8 21 1 Display certificate warning this is not an error 200 8 21 2 Docker does not start automatically autostart 200 8 21 3 Update to Xesar 3 0 200 8 21 4 Number of zon...

Page 6: ...m the coding station 202 8 21 19 Problems detecting media with Windows 10 Pro x64 Version build 1709202 8 21 20 Tablet synchronisation 202 8 21 21 Tablet synchronisation 202 8 21 22 Deactivate the Certificate Propagation Service 203 8 21 23 A server must not go into standby mode 203 8 21 24 A CU with 2 wall readers 203 8 21 25 Disable identification media 203 9 Table of figures 204 ...

Page 7: ...aff in the event of use on corporate premises Customers clients and end users shall be responsible for product use in compliance with legal stipulations The aforementioned information must be observed and passed on to operators and users as per the defined manufacturer product liability according to product liability legislation Non compliance releases EVVA from any liability Any use deemed as non...

Page 8: ... not assume any liability for technical or printing errors and their potential consequences However the data in this system manual is revised regularly and corrections are incorporated All trademarks and industrial property rights reserved We reserve the rights to make adaptations and update the document without prior notification 1 3 Explanation of symbols The following signs and symbols are used...

Page 9: ...leting elements from the Xesar system e g time profile installation location etc 5 Edit Editing the system Installation Manager 6 Start application Starting the system Xesar Installation Manager or starting the connection between coding sta tion and Xesar software Xesar Periphery Man ager 7 Stop application Stopping the system Xesar Installation Man ager or stopping the connection between coding s...

Page 10: ...se Maximises the view 17 Minimise Minimises the view 18 Go to Click here to go to the Xesar management soft ware The required browser window opens 19 System event log Shows actions carried out within the Xesar soft ware by users and the system 20 Filtered by zones Shows all zones to which a person has an access authorisation 21 Filtered by access points Shows all locations to which a person has an...

Page 11: ...isplayed if Xesar Lifetime KeyCred its have been activated 28 Event log For instance this icon appears below persons Filters all of a person s access events 29 Help information This symbol enables the display of help texts 30 Lists export The displayed list can be exported as CSV or XLS file 31 List view settings Adjustment of list view regarding column selec tion number of lines per page save set...

Page 12: ...ts 3 Unauthorised identification me dium The identification medium is not authorised 4 Currently valid 5 Currently invalid 6 Currently valid identification me dium becomes invalid upon up date 7 Currently invalid identification me dium becomes valid identification medium when updated 8 Currently invalid identification me dium with a validity period that lies in the future 9 Deactivated identificat...

Page 13: ...e have made the required data sheet available on our homepage https www evva com uk en products electroniclockingsystemsaccesscontrolsystems xesar Figure 1 System architecture sample image 2 1 Xesar access components Xesar s versatility offers different components such as different escutcheon handle cylinder shapes including hybrid and cam locks wall readers and padlocks Figure 2 Xesar access comp...

Page 14: ...over EVVA logo to protect the Xesar access components from penetrating dust and humidity Do not use pointed objects to open and close the cover to prevent potential damage 2 1 1 Xesar escutcheon Figure 3 Xesar escutcheon sample image The Xesar escutcheon is a battery operated access component suitable for indoor and outdoor use The Xesar escutcheon is suitable for conventional metal frames and sol...

Page 15: ...ntries with the most recent events For this reason it is important to regularly synchronise events to prevent event records from being lost Please refer to the corresponding data sheet for additional specifications at https www evva com uk en products electroniclockingsystemsaccesscontrolsystems xesar Please note the continuous release function see section Identification media and the different ac...

Page 16: ... http video evva com tutorials xesar exdrz1 exdrz1 1 domainhttp video evva com tutori als xesar exdrz1 exdrz1 1 Language neutral drilling template EVVA provides a single use cardboard drilling template without text to support the assembly of versions requiring one or several drilled holes They are printed on the corresponding product packaging and are available in our homepage in the general downl...

Page 17: ...17 KPM X Systemhandbuch_X3 0 EN V1 9 05 2019 Subjects to misprints and technical changes The drilling template is optionally available Product code E ZU BE BS V1 ...

Page 18: ...ew on the bottom of the escutcheon 2 Turn the Torx screw clockwise until you can remove the internal escutcheon plate 3 Hold the bottom of the internal escutcheon plate and carefully remove it from the attach ment panel You can now pull the internal escutcheon plate over the handle Make sure you do not scratch the handle in the process You can alternatively remove the internal handle beforehand 4 ...

Page 19: ...g escape door locks as per EN 179 and fire protection doors Please check carefully to make sure the Xesar product you selected is suitable for your application We have made the required data sheet available in the download section of our homepage https www evva com uk en products electroniclockingsystemsaccesscontrolsystems xesar 2 1 2 1 Xesar handle functional description Figure 6 Xesar handle sa...

Page 20: ...ee sec tion 2 3 Xesar access components signal events Please note that if access components are installed in fire doors the certifi cates are exclusively valid in conjunction with approvals from the correspond ing door manufacturer Please also note the following important notices before use Important notes on use general legal information danger to life and limb risk of explo sion climatic and env...

Page 21: ...ignal to confirm having correctly completed the battery replacement signal 8 in the signal table from section 2 3 Xesar access components signal events Battery replacements or power cuts must not exceed a duration of one minute as otherwise the Xesar handle must be resynchronised using the Xesar tablet 2 1 3 Xesar cylinder Figure 7 Xesar cylinder sample image Xesar cylinders are battery operated a...

Page 22: ...tronically engage the outside thumb turn for five seconds so that the cam of the Xesar cylinder engages when operating the outside thumb turn The purely mechanically operated inside parts of the versions with one sided electronic authorisa tion always remains engaged with Xesar cylinders and can be operated at any time On Xesar cylinders with double sided electronic authorisation the operation of ...

Page 23: ...ucts electroniclockingsystemsaccesscontrolsys tems xesar tab6 Depending on the cylinder s protrusion beyond the escutcheon or any in stalled cylinder rosettes the Xesar thumb turn may be hard to operate as a result of friction caused by the seal on the escutcheon or rosette of the cyl inder There is the option to remove said seals when installing the assembly indoors Xesar cylinders with European ...

Page 24: ...cylinder functional description and the description for battery replacement are similar Please refer to the corresponding data sheet for additional specifications at https www evva com uk en products electroniclockingsystemsaccesscontrolsystems xe sar tab6 Important notes on use general legal information danger to life and limb risk of explosion climatic and environmental effects installation inst...

Page 25: ...ges Please note the instructions in the Xesar cylinder assembly manual or watch the video instructions http video evva com tutorials xesar expzkzs expzkz s 1 de http video evva com tutorials xesar expzkzs expzkz s 1 de The cylinder tool is optionally available Product code E ZU PZ ZW V2 ...

Page 26: ...esar wall readers can only be used in connection with Xesar control units The connector is intended solely to synchronise the unit with the Xe sar tablet Xesar wall readers cannot be operated with the optionally available emergency power device Connect the Xesar wall reader to Xesar control units to operate electronic components such as motorised cylinders swing doors sliding doors etc Please chec...

Page 27: ...control units feature an event memory for the last 1 000 events Once the event memory is full the system overwrites the oldest entries with the most recent events For this reason it is important to regularly synchronise events to prevent event records from being lost 2 1 4 2 Xesar wall reader connection print Use the connection label to connect Xesar wall readers to the connecting cables of the Xe...

Page 28: ...e for a minimum of six hours 2 1 6 Xesar wall reader online control unit Figure 15 Xesar wall reader online control unit sample image The Xesar wall reader online control unit can be exclusively used in conjunction with Xesar wall readers Each online control unit can be connected to a maximum of one Xesar wall reader Xesar control units connected to Xesar wall readers must be installed indoors in ...

Page 29: ...y This consequently prevents system failure and safeguards access As soon as the control unit has been connected to the power supply for six hours the system ensures the time settings are maintained for a minimum of 72 hours in the event of a power cut Assemble the component as per the assembly manual enclosed with the product 2 1 7 Mains adapter for control unit Figure 16 Mains adapter sample ima...

Page 30: ...es They are printed on the corresponding product packaging and are available in our homepage in the general download section https www evva com uk en products electroniclockingsystemsaccesscontrolsystems xesar The assembly manuals and the packaging feature QR codes which will take you directly to the corresponding video sequence or assembly manual You must observe the listed sequence of installati...

Page 31: ... hh Signal 4 Unlocking attempt with authorised me dium and activated Of fice Mode tttt hhhh Signal 5 Start of Office Mode tttt hhhh Signal 6 End of Office Mode hhhh tttt Signal 7 Opening attempt with authorised medium signal indicates drained battery h h h h Signal 8 Battery inserted or component reboot tt mm hh After having inserted batteries battery charge status display possible Signal 9 Medium...

Page 32: ... sample image Figure 19 Mini coding station sample image The Xesar coding station is a read write device for any type of contactless identification media as well as the contact based Admin Card which is one of the system cards see section Admin Card The Xesar coding station provides a separate card slot on the front of the Xesar coding station for the Admin Card Install the associated driver and c...

Page 33: ...ds the inside on the left hand side of the EVVA logo near the E and fold out on the right hand side near the A to access it The integrated interface of the Xesar access component in conjunction with the Xesar programming unit is designed to synchronise Xesar software and Xesar access components only After use once again carefully close the connector cover EVVA logo of your Xesar access compo nents...

Page 34: ...n read section 8 14 1 Xesar tablet app Xesar tablet application app The Xesar application has already been preinstalled on your programming device A detailed op erating manual of the Xesar app for operating your locking system can be found in the chapter 8 14 1 Xesar tablet app We have enclosed the manufacturer s independent user guide for the Xesar tablet It has been enclosed with the product pac...

Page 35: ...component Immediately replace batteries after having used the emergency power device to operate access components and subsequently update access components using the Xesar tablet to once again enable access with all authorised identification media The installed interface below the EVVA logo in conjunction with the emergency power device is intended for emergency power supply only and it is not req...

Page 36: ...m Any KeyCredits purchased to make changes to authorisations are saved on the card also applies to KeyCredits Lifetime System changes such as adding KeyCredits can exclusively be carried out if there is a valid Admin Card in the Xesar coding station Admin Cards are required for licence operations only Note The Admin Card is not transferable and hence it cannot be used for other systems You can rep...

Page 37: ...ification medium on the Xesar cod ing station Otherwise the identification media may be incorrectly configured Please keep metal objects away from the coding station as they may impair reader functionality Once your system is no longer in construction mode following commissioning you can use identi fication media programmed with the Xesar coding station to open Xesar access components Construction...

Page 38: ...is a contactless RFID chip card based on MIFARE DESFire EV1 which is able to open Xesar access components in construction mode Manual Office Mode is also available in addition to conventional access component operation see section The Construction Card is ready for use immediately and it must not be programmed using the Xesar coding station Construction mode is active as long as the Xesar access c...

Page 39: ... user system and a single user system System requirements in the following section 3 1 Xesar 3 0 single user system We do not recommend PC single user operation for 24 7 permanent operation and use with online components If the single user PC is not in operation then the wall scanner is in offline mode and identification media are not updated ...

Page 40: ...a script Local network WiFi wireless IEEE 802 11 g n Protocols o IPv4 o HTTP HTTPS with TLS Docker Client with support for API 1 24 Docker Compose 1 10 0 installed as part of the Docker installation on the Admin PC Docker Engine 1 12 0 with support for API 1 24 will be installed on the admin PC as part of Docker installation Services provided by EVVA on the Internet Service URL Port Private ad dre...

Page 41: ...quired for a multi user solution The following minimum requirements must be met x86 64 compatible processor CPU at minimum quad core 1 5 2 3 GHz Hardware support for virtualisation Working memory RAM 4 GB with OS at least 2 GB for the server software stack Hard disk space SSD recommended 40GB note system size and planned runtime for dimensioning Direct Internet access without proxy to unlock KeyCr...

Page 42: ...andard No DSM1 Linux 6 1 6 2 No Photon OS2 Linux 2 0 Yes Important Xesar must meet real time requirements when communicating with its online compo nents In the event that Windows Server 2016 is not exclusive used by Xesar software operation as hypervisor must ensure that the required resources are permanently allo cated Non tested operating systems OS OS type Version Virtualisation possible Cent O...

Page 43: ...rect Internet access without proxy to unlock KeyCredits and licences to access EVVA secured authentic and un manipulated software delivery Local LAN to access the services provided by Xesar 3 0 server 1 USB host 2 0 1 x EVVA coding station with support for contactless RFID cards Mifare Desfire EV1 ISO 14443 and slot for Admin Card Keyboard and mouse Operating system Windows 10 Pro 64 bit version 1...

Page 44: ...pported browser Hard disk space 2GB Local LAN with access to the services provided by Xesar 3 0 server 1 USB host 2 0 1 x EVVA coding station with support for contactless RFID cards Mifare Desfire EV1 ISO 14443 Keyboard and mouse 1024x768 screen resolution recommended 1920x1080 HTML5 CSS3 compatible browser activated with Java script Service catalogue Server and workstation in a muti user system S...

Page 45: ...dix 3 5 Communication Client PC Server backend Operating systems OS Version Browser EVVA tested Windows 7 Pro Firefox from version 47 Chrome from version 48 Internet Explorer from ver sion 11 Yes Windows 8 1 Pro Yes Windows 10 Pro Yes It may be possible to implement the following solutions please consult EVVA Technical Offices Operation on a different Windows operating system such as Windows Serve...

Page 46: ...rvice https licence evva com 8072 No Services provided by Xesar 3 0 server within the local network Service URL What Configura ble port Docker Engine tcp IP Installation 2376 Host Yes Security related service https IP Installation 8200 Installation Yes Message broker mqtts IP Installation 1883 Periphery in terface Yes Management https IP Installation 8080 Operation Yes Online components dealership...

Page 47: ...47 KPM X Systemhandbuch_X3 0 EN V1 9 Subject to misprints and technical changes 3 3 Attachment to the project checklist 3 3 1 Depiction of layout ...

Page 48: ...43 4443 443 4443 HTTP Yes Provision of signed Docker images and verification of the signature Docker Client Docker Engine Docker Trusted Regis try container image delivery 4 Licence service li cence evva com WAN 8072 8072 HTTP Yes Register an installation admin card and loading of key credit codes Installation manager Licence service 5 Admin Card terminal USB Fix _ ISO 14443 _ Reading and writing ...

Page 49: ...WLAN 1883 configurable MQTT Yes Asynchronous Xesar system interface Periphery manager Coding station USB fix _ ISO 14443 _ Reading and writing of identification media Installation management via the periphery manager proxy only Only with Client PC with coding station Service catalogue Connection of online wall reader to Xesar 3 system 3 6 Communication Online wall reader Server backend Service Net...

Page 50: ... Systemhandbuch_X3 0 EN V1 9 Subject to misprints and technical changes 4 System installations upgrade and updates 4 1 Upgrade from Xesar 2 2 to Xesar 3 0 Figure 25 Important information for a software upgrade ...

Page 51: ...r 3 0 Please note the text fields highlighted in yellow for the upgrade labelled as For upgrades from Xesar 2 2 to Xesar 3 0 only For upgrades from Xesar 2 2 to Xesar 3 0 only Proceed as follows to upgrade the Xesar software from Xesar 2 2 to Xesar 3 0 Insert your Admin Card into the slot of the coding station and load the data from your Xesar 2 2 system see section 6 1 Xesar Installation Manager ...

Page 52: ... Xesar 3 0 Use KeyCredit Xesar Lifetime for un limited use and pay only once Xesar Lifetime licence must only be redeemed after having updated to Xesar 3 0 DO NOT redeem in Xesar 2 2 i e not prior to exporting importing to Xesar 3 0 Two wall readers with one control unit CU If you use the two wall readers with one control unit setup in your Xesar 2 2 system these wall readers must be removed from ...

Page 53: ...2 1 1 Download Docker IMPORTANT The current version Docker version release is Docker Community Edition 18 06 1 ce win73 2018 08 29 For more recent versions please contact your EVVA Technical Office prior to in stallation If you reinstall Docker Uninstall Docker and then reinstall it all system data will be lost This is why all containers musk be backed up before Docker is unin stalled This can be ...

Page 54: ...nload Figure 26 Installing Docker Click Yes if a Windows warning message appears Figure 27 Installing Docker security notice 2 Step Starting Docker a The Docker is starting status message automatically opens in the Windows task bar b If this is not the case double click the Docker for Windows link on your desk top Start may take a few minutes Figure 28 Starting Docker ...

Page 55: ... 3 Step Docker is now up and running a Once Docker has started a status window with the following message opens Docker is now up and running b The status window closes automatically c Right click the Docker icon to open the settings Figure 30 Docker status windowtime 4 Step click Settings Figure 31 Docker settings ...

Page 56: ...d to use Docker The certificates for connections between containers services are valid for one year They expire if a system has not been started for an unusually long period of time 1 year using the Xesar Installation Manager In this process malfunctions and error messages may appear in the Xesar software In this case the certificates are renewed upon starting for the first time The status automat...

Page 57: ...lation of Docker uninstall Docker and then reinstall it all system data will be lost This means that all files must be secured before Docker is deinstalled See section 6 Securing the Xesar system data in the Installation Manager Figure 33 Windows features Scroll down to Hyper V and activate it Then click OK ...

Page 58: ...e coding station version HID Omnikey 5422 You can directly continue with section 5 Xesar 3 0 Programs Two driver installation types are possible Automatic driver search in Windows Manual driver search directly on the manufacturer s homepage 4 2 2 1 Automatic driver search via Windows Please use the Windows Device Manager to install the coding station s driver 1 Step Plug your coding station in the...

Page 59: ...cal changes Figure 35 Windows Device Manager 3 Step Search the list for Smart card readers potentially Readers Click this entry and select the entry starting with Microsoft Right click the Mi crosoft entry and select Update driver Figure 36 Updating the Microsoft driver ...

Page 60: ...Step Windows prompts you whether to Automatically search for updated driver software Please click this option Figure 37 Driver search 5 Step the driver will now be automatically downloaded and installed by Windows Device Manager Figure 38 Coding station automatic driver installation ...

Page 61: ... technical changes 6 Step the driver has been installed Click Close Figure 39 Coding station successful driver installation The reader used is now listed in the Device Manager In this case Omnikey 5422 Figure 40 display of the coding station in the Device Manager ...

Page 62: ...e the driver and download it from the HID GLOBAL page 1 Step Check the model type of your Omnikey coding station on the reverse side e g HID OMNIKEY 5422 and connect the coding station to your PC 2 Step On the HID GLOBAL website go to the Drivers section https www hidglobal com drivers or search for HID Global Drivers in Google For Brand select OMNIKEY and enter the model of your coding station in...

Page 63: ...LF EXTRACTING AR CHIVE Figure 42 Coding station download package You may see a warning message regarding EULA please accept it Click Run in the browser to directly open the file and start the process conse quently skip the next step in these instructions 4 Step double click the file Figure 43 Coding station driver installation application ...

Page 64: ...nts and technical changes 5 Step click Accept to continue the installation Figure 44 Coding station driver installer 1 6 Step click Extract to install the driver Figure 45 Coding station driver installer 2 You have now successfully installed the HID driver ...

Page 65: ... systems redeeming KeyCredits and KeyCredit Xesar Lifetime licences Xesar Periphery Manager enables operation of the coding station on the client computer Download the Periphery Manager in the Xesar 3 0 software in the Sup port update tile The download for the Xesar Software Installation Manager can be found at our EVVA Website https www evva com uk en products electroniclockingsystemsaccesscontro...

Page 66: ...chnical changes You will receive an email with a temporary download link Click the link and the following window opens Figure 47 Download Installation Manager for software Download the file Attention The download of the Installation Manager may take up to 2 minutes ...

Page 67: ... Unpacking may take a while Figure 48 Xesar Installation Manager ZIP file 2 Step Double click to open the new folder and the application Figure 49 Installation Manager application The application file may not be removed from the file or dis placed However you can create a shortcut on the desktop and start the Installa tion Manager from there The Installation Manager must be started from a local dr...

Page 68: ... 0 EN V1 9 Subject to misprints and technical changes The following warning may appear Please click Yes Figure 50 Installation Manager warning message 3 Step Xesar Installation Manager opens Figure 51 Installation Manager window ...

Page 69: ...tion can read and process contact based media Admin Card and contactless CL all Xesar identification media smart cards The contact based reader is only required for the Installation Manager and reading the Admin Card Attention If synchronisation fails select the contact based reader see following screenshot via the drop down menu Figure 52 Installation Manager tab Admin Card ...

Page 70: ...oding station and b click the Load icon c Click the Save icon to save Figure 53 Installation manager tab Admin Card loading the card For UPGRADES from Xesar 2 2 to Xesar 3 0 only Insert the Admin Card of your Xesar 2 2 system in the coding station The following is displayed You can now import Xesar 2 2 data Figure 54 Installation Manager Admin Card import ...

Page 71: ...oading the most recent Xesar version a Click the Settings tab b Confirm Check TLS c Click Synchronise d The most recent version is automatically loaded and selected for you Select Ver sion from the drop down menu to check this and click Save Figure 55 Installation Manager tab Configuration ...

Page 72: ... the exception of and special characters can be used an additional description can also be added b the registered ports must be available in the system and the Local default option must be selected c Select your time zone from the drop down menu You cannot subsequently change this d Select the backup path for data backup e Select the settings for automatic backups f Click Confirm to initialise the...

Page 73: ...X Systemhandbuch_X3 0 EN V1 9 Subject to misprints and technical changes Figure 57 Installation Manager system specification Notice write down the web port You will need it later to configure the Xesar tablet ...

Page 74: ...stallation Manager database import You have then successfully installed a Xesar 3 0 system 9 Step installation information admin password After successful installation of the system an overview sheet which con tains the installation information is automatically generated and opened It features the installation administrator admin and system administra tor su passwords Log in with the admin user na...

Page 75: ...stallation information is absolutely necessary to con tinue operating the system Print out this information and keep it in a safe place EVVA will be unable to restore the data if you lose this information If the system information does not automatically open in a pop up window a Click the Configuration tab and click the Export icon Figure 60 System information export ...

Page 76: ...ame Open the PDF here Figure 61 Alternative system information 10 Step Starting the system a The installation has been completed successfully once the system appears as a list entry The icon indicates that the software has not been started yet b Highlight the list row for your system and then click the Start icon Figure 62 Installation Manager system not started ...

Page 77: ... misprints and technical changes The progress icon indicates that the system is starting Figure 63 Installation Manager the system loads 11 Step System running a The icon indicates that the system is running Figure 64 Installation Manager funktionen ...

Page 78: ...ading activating KeyCredits b Click the KeyCredits container icon c Enter your KeyCredits code on the rear of the scratch card in the field and click Confirm Figure 66 Entering the KeyCredits code You will receive the following messages from the EVVA licence server after having success fully loaded KeyCredits Figure 67 Licencing successful ...

Page 79: ...ence Figure 68 KeyCredit Xesar Lifetime 13 Step Opening the Xesar software dashboard a The icon indicates that the system is running b Click the arrow to open the Xesar dashboard c You can close the Installation Manager The application will continue to run in the background Notice Click the Stop icon to quite system server operation The Admin Card must have been inserted in the coding station to s...

Page 80: ... from your browser a As soon as Xesar is started with the arrow in the Installation Manager warnings will appear in the browser Attention the warnings may differ depending on the browser b Click Details Figure 70 Warning in browser 15 Step Click on Load website anyway Figure 71 Warning browser 2 ...

Page 81: ...V1 9 Subject to misprints and technical changes 16 Step Xesar software login Log in with the admin user name and password and click the arrow Example User name admin Password FmJeWgKcFA Figure 72 Login window Figure 73 Xesar dashboard ...

Page 82: ...or is lost then it can be replaced as follows Insert a new AdminCard in the coding station In the Installation Manager select the desired system 1 and click on the key button 2 In the AdminCard Operations window select Exchange card and enter the installa tion key card number and card signature from the installation information sheet ...

Page 83: ...n confirmation a new installation information sheet will be generated Print this document again and keep it in a safe place IMPORTANT Make sure that you perform a manual backup in the Installation Manager after the AdminCard exchange Otherwise a restore will not fit the new AdminCard ...

Page 84: ...nd technical changes 5 3 Software Update If a new Xesar software version is available then the new software version will be indi cated in the Update column in the Installation Manager Select the system 1 and click on the edit button 2 to go to the settings page ...

Page 85: ...on 3 to start the software update As of version 3 0 212 updates can also be performed with open maintenance tasks For data security an automatic backup is performed before an update If an update was unsuccessful then this backup file can be used to perform a new system instal lation restore See section 6 4 Restore ...

Page 86: ...9 Subject to misprints and technical changes Before a software update all tablets in the system must be logged out Confirm that all tablets are logged out All version changes are displayed in the software update Confirm to begin updating ...

Page 87: ...ystemhandbuch_X3 0 EN V1 9 Subject to misprints and technical changes An automatic system data backup is performed before the backup Then an update of the individual versions is carried out Progress is displayed ...

Page 88: ...KPM X Systemhandbuch_X3 0 EN V1 9 Subject to misprints and technical changes The update is complete Confirm to return to the Installation Manager The new software version is now added to the version column ...

Page 89: ...version of the Installation Manager is available then the following mes sage appears when starting the Installation Manager Enter the target directory to install the new Installation Manager Unzip the download file and start the new Installation Manager In future only use the latest version of the Installation Manager ...

Page 90: ...iphery Manager enables the operation of the coding station on the client com puter The coding station is used to create write to read and update identification media 1 Step The Periphery Manager is on the Xesar workstation under the Xesar Support tile Figure 74 Desktop selecting support Figure 75 Support tile ...

Page 91: ...91 KPM X Systemhandbuch_X3 0 EN V1 9 Subject to misprints and technical changes 2 Step Click on Download Periphery manager Figure 76 Periphery Manager selection ...

Page 92: ...PM X Systemhandbuch_X3 0 EN V1 9 Subject to misprints and technical changes 3 Step unpack the ZIP file Figure 77 Extracting the Periphery Manager ZIP file Figure 78 Extracting the Periphery Manager ZIP file ...

Page 93: ... Double click the Periphery Manager x x x folder and open the Periphery Manager application file Double click the application file Figure 79 Xesar periphery application Windows may potentially show warnings Please click Additional information Figure 80 Xesar periphery application warning ...

Page 94: ...ts and technical changes Click Run anyway Figure 81 Xesar Periphery Manager warning 2 You may see additional warnings please accept them and continue 5 Step Xesar Periphery Manager opens Figure 82 Periphery Manager The Periphery Manager is now ready for use ...

Page 95: ...Linking the coding station to the Xesar software Proceed as follows to use a connected coding station with the Xesar software Figure 83 Coding station on the dashboard 1 Step creating the coding station Click the coding station tile on the Xesar dashboard Figure 84 Coding stations tile ...

Page 96: ... a new coding station Figure 85 Adding a coding station 3 Step Enter the name and potentially a description and click the Confirm icon Figure 86 Coding station adding names 4 Step coding station has now been entered in the overview list but not connected to the client computer Figure 87 Coding station status ...

Page 97: ...n and downloading the configuration file a Click the coding station s list entry b Select the Use coding station in this browser option c Click the Download icon and download the coding station s configuration file d Click the Confirm icon to save your input Figure 88 Download the coding station s configuration file ...

Page 98: ...s and technical changes 6 Step In the Periphery Manager click the icon to import the configuration file The configuration file name ends with properties Figure 89 Add Periphery Manager configuration file Figure 90 Select Periphery Manager configuration file ...

Page 99: ...X Systemhandbuch_X3 0 EN V1 9 Subject to misprints and technical changes Your installation name of your system is now shown as a list entry in the Periphery Man ager Figure 92 Xesar system in Periphery Manager ...

Page 100: ...tep select the Configuration tab a Select the reader unit designated as OMNIKEY with CL b Click the Save icon Figure 91 Periphery Manager selection of the coding station 8 Step Select the Run tab and click the Start icon to start the Periphery Man ager Figure 92 Periphery Manager start ...

Page 101: ...r interface in the browser press F5 or CTRL R The coding station has now been linked to the browser Figure 96 Coding station connected status Yes b Close the Periphery Manager continues to run in the background Figure 93 Periphery Manager close Figure 94 Coding station status connected Yes Your coding station is now ready to use ...

Page 102: ...2 to Xesar 3 0 The IP address of the computer in the WiFi network is provided in the tablet as the server address with the corresponding port no e g https 172 16 250 35 9090 1 Step Finding the correct target IP address a Enter cmd in the Windows search window The Windows command line opens b Enter the ipconfig command in the command line and press Enter c Scroll to Wireless LAN adapter wireless ne...

Page 103: ...ddress for the Xesar tablet It is identical to the number configured in the Installation Manager or you may copy the number from your browser For example https 172 16 250 35 9090 Alternatively proceed as follows to find the web port number Select the Edit icon in the Installation Manager and write down the web port number Figure 96 Installation Manager Tablet Web Port ...

Page 104: ...o of your Xesar system e g https 172 16 250 35 9090 d Enter the name of the Xesar tablet e g Maintenance engineer 1 e Log in with the user name and password e g Admin password Notice Users must have been assigned to the Admin or Maintenance engineer authorisation group to be able to use the Xesar tablet Figure 97 Tablet app login 4 Step A certificate prompt appears Install the certificate Figure 9...

Page 105: ...hanges Figure 99 Xesar tablet certificate 2 The synchronisation process should only take a few seconds Figure 100 Xesar tablet authentication Depending on the quantity of data to be synchronised this process may take up to a few minutes Figure 101 Xesar tablet synchronisation ...

Page 106: ... changes Figure 102 Tablet APP home 5 Step Xesar tablet tile on the dashboard shows the number of Xesar tablets added in the system Figure 103 Xesar tablet tile Now you have integrated your Xesar tablet into the system You can now configure your system in the Xesar software ...

Page 107: ...ng Xesar access components has either been enclosed in the prod uct packaging or it is available online at https www evva com uk en products electron iclockingsystemsaccesscontrolsystems xesar tab6 5 7 Manually uninstalling and installing the Xesar app up grade from Xesar 2 2 to Xesar 3 0 For an upgrade from Xesar 2 2 to Xesar 3 0 it is necessary to manually uninstall the X2 2 app on a Xesar 2 2 t...

Page 108: ...and technical changes 2 Step Click Apps Figure 105 Xesar tablet apps settings 3 Step uninstall the Xesar 2 2 app and delete the apk file from the download folder For this purpose open your tablet s file manager Figure 106 Uninstalling the Xesar tablet Xesar app ...

Page 109: ...bject to misprints and technical changes 4 Step click OK Figure 107 Uninstalling the Xesar tablet app OK 5 Step delete the apk file from the download folder For this purpose open your tablet s file manager Figure 108 Xesar tablet file manager ...

Page 110: ...rints and technical changes 6 Step click the Download folder and delete the apk file here Figure 109 Deleting the Xesar tablet APK file 7 Step On the Xesar dashboard click the Xesar support tile Figure 110 Desktop selecting support Figure 111 Support tile ...

Page 111: ...nical changes 8 Step The current Xesar app is found under Update Click Download Xesar tab let Figure 112 Periphery Manager selection 9 Step Connect the Xesar tablet to your computer by USB and copy the file to your tablet s file manager Figure 113 Xesar tablet APK file ...

Page 112: ...ndbuch_X3 0 EN V1 9 Subject to misprints and technical changes 10 Step Click the apk file to install the Xesar app on your tablet Figure 114 Xesar tablet Xesar 3 0 APP Figure 115 Xesar tablet installing the Xesar 3 0 APP ...

Page 113: ...s 11 Step subsequently synchronise the tablet with the Xesar software Figure 116 Synchronising the Xesar tablet 12 Step Complete the integration of the Xesar tablet into Xesar 3 0 by continuing with the steps described in section 5 6 Integrating your Xesar tablet into your system ...

Page 114: ...possible to create a manual backup To do this the AdminCard must be in serted in the coding station and selected If the system stops and the Backup Manager button is pressed in the Installation Manager then the system is re started a backup is carried out and the system is stopped again after the backup is successful 1 Step Select the system that is to be backed up in the Installation Manager Open...

Page 115: ...ept on an external data carrier so that the backup data is not affected in the case of damage to the system computer If when selecting the backup path the existing network drives are not visible in the selection this is probably due to their IT rights or the drive mapping In such a case please contact your IT supervisor 3 Step Click on the backup button to create the backup This is possible at any...

Page 116: ...ups remain saved 6 2 Automatic backup You can also create automatic backups in the Installation Manager To do this select one or more of the 3 options for an automatic backup under Automatic backup from system installation page Choose between the following automatic backup variants When starting When starting the system When stopping When stopping the system Daily at At the set time time of day ca...

Page 117: ...an be created The Admin PC must not go into standby mode when automatic backups are to be per formed Because the Installation Manager must be restarted after standby mode 6 3 Backup files Automatic data backup is located at the backup location and is marked with an A at the end of the file name Only one the last automatic backup is saved per day Generally only the last 3 automatic backups are save...

Page 118: ...system Use the automatic backup settings option Particularly after making extensive changes at least a manual backup should be made Any changes that you make after a backup have not been secured are not recovera ble if a restore carried out After the restoring a backup on the same computer or migration to another com puter the IP address of the server must be checked and corrected in the Xesar sof...

Page 119: ...uccessful deletion of the system data is confirmed The following steps are necessary to restore successfully 3 Step Reinstall the Installation Manager and start it Insert the Admin Card belonging to the existing system in the coding station Select the contact based coding station s reading unit Load the AdminCard by clicking on The AdminCard number will be displayed ...

Page 120: ...he Registry in the Installa tion Manager to be able to reinstall the backup The software update can be carried out after the backup installation has been completed The backup version is described in the backup filename The following information is described in the backup filename Internal system name Backup Software Version z B 3 0 Version 207 Date and time of the backup Type of backup M manual A ...

Page 121: ...w systems in the appropriate fields System name the path to the latest valid backup file that is to be reinstalled the new path for future backups Automatic backup settings o When starting When starting the system o When stopping When stopping the system o Daily at At the set time time of day can be selected Confirm entries ...

Page 122: ...following display indicates progress status Confirm the successful creation of the system by clicking on Subsequently you can select and start the system in the Installation Manager on the Installations page Thus the system is restored as per the status of the backup file used Restored ...

Page 123: ...is is not done then the original settings are retained Export of lists All list views can be printed and exported as csv or xls file The file origin must be 65001 Unicode UTF 8 Mandatory entry fields are marked with Help texts can be called up by clicking on and displayed To allow better viewing of the lists the width of all columns can be adjusted by double clicking and and dragging the column li...

Page 124: ... Subject to misprints and technical changes 7 2 Settings Figure120 Tiles settings Security settings Figure121 Security settings Depiction of identification media validity and authorisation period Figure122 Validity and authorisation period ...

Page 125: ...ion threshold defines the time period within which the validity of the identification medium can be extended at the online wall scanner or the coding station Default authorisation period for replacement media Standard authorisation duration of replacement identification media System default 72 Stunden The default setting can be changed individually when issuing replace ment media see chapter on id...

Page 126: ...ion name Settings for personal reference Default settings for how long person related data is stored These settings may be important relating to a company s data protection requirements Figure124 Settings that reference persons There are three data storage settings for persons and access points Do not save Unlimited saving Saving with a time limit with the setting range in days Figure125 Default v...

Page 127: ...127 KPM X Systemhandbuch_X3 0 EN V1 9 Subject to misprints and technical changes Figure 126 Settings for the programming device Xesar tablet ...

Page 128: ...ined in the user groups Depiction of all predefined user groups Users can be assigned to these user groups They can not be deleted A user can be assigned to multiple user groups The authorisations add up Figure128 Predefined user groups Predefined user groups System administrator Is authorised to change user passwords Installation administrator Has all authorisations except to change user password...

Page 129: ...roup Installation administrator Has all reading and editing author isations Figure 129 User group Installation administrator The authorisations of these predefined user groups can not be changed However they can be copied modified and saved under a new name becoming the basis for a new user group ...

Page 130: ...0 EN V1 9 Subject to misprints and technical changes The authorisations are grouped as tiles on the dashboard For all group authorisations select between read authorisations or all authorisations Figure 149 grouped authorisations ...

Page 131: ...s to the basic Front desk user group and additional reading and editing rights for Persons Figure 150 User group reception main entrance Important The user defined authorisations can be easily assigned to predefined user groups Special authorisation groups can be generated as required Please contact your EVVA consultant or the EVVA technical office ...

Page 132: ...ppropriate user groups Thereby e g users from the user group Reception can not assign the authorisa tion profiles Chief and Assistant Fire Brigade or Master Key authorisation profile to an identification medium For all other authorisation profiles e g Employee trainee cleaning and shiftworker may assign an identification medium to a user see below Figure 130 Possibility to assign and limit authori...

Page 133: ... Add symbol or the The number of created users is displayed in the tile Of course users can also be persons who have access authorisations in the Xesar system with assigned identification media All created users are displayed in the user overview list see below The users su and admin are predefined during the initial installation and can not be changed or deleted SU Superadmin Has only the System ...

Page 134: ...rating of the password s security level is displayed Repeat password mandatory The selected password must be entered again here User groups Selection of the user groups defined for the user At least one user group must be selected Person This field will be displayed after saving for the first time The user function can be assigned to a person E g maintenance technician1 Hans Hu ber The personal re...

Page 135: ...t to misprints and technical changes Figure135 New user Download configuration Download the respective user certificate This is required for secure third party interface actions For example Person data import via the third party system interface ...

Page 136: ...stmas Easter holidays company holidays or other special days during one calendar year On these special days there are exceptions to the time profiles The number of calendars is displayed in the tile A maximum of 5 calendars with a total of 50 different special days can be used ATTENTION A special day may only occur in one calendar Display of the calendars Figure137 Calendar display ...

Page 137: ...ts and technical changes Calendar view Figure138 Calendar Import calendar Existing calendars can be imported and processed in ics or csv format Figure139 Import calendar ATTENTION You can not import calendars where the current day is marked as a special day ...

Page 138: ...dentification medium Example A business premises has opening times of from 08 00 16 00 The Office Mode would be 08 00 16 00 Access from the front door to the business premises with this time profile would be pos sible for all persons from 08 00 and until 16 00 also without an identification medium The EVVA access component automatically switches to open at 08 00 and to close again at 16 00 Office ...

Page 139: ...orisation profiles The Manual Office Mode is activated by holding an authorised identification medium twice to the EVVA access component This is confirmed by optical and acoustic signals see system manual The Manual Office Mode is ended manually by connecting an authorised identification medium twice to an EVVA access component or automatically at the defined closing time This is signaled by optic...

Page 140: ...c cess components Access is possible without authorisation at the defined times The EVVA access component is ready to open the door You can create a maximum of 24 time series e g Office times for business traffic Mo Fr 08 00 12 00 and 13 00 18 00 und Sa 08 00 12 00 ATTENTION In total a maximum of 5 different time windows or times per week day or calendar can be added Figure144 Error report time fr...

Page 141: ...ring the holidays defined in the calendar All existing calendars are displayed Figure146 Time series exception Closing time series Closing time series are times at which Manual Office Mode manual continuous release automatically ends This ensures that a manually started Office Mode is safely terminated at the defined time The Manual Office Mode can only be activated on defined EVVA access componen...

Page 142: ...of the closing time series The closing time can be changed on special or public holidays Figure148 Exceptions to the time series 7 6 2 Add time profile for persons and identification media Limits to authorisations You can create a maximum of 24 time series e g Access times for employees Mo Fr 07 00 19 00 Sa 07 00 13 00 Figure149 Add time profiles ...

Page 143: ...me series exceptions define deviations from the defined time series e g Holidays on which changed access times apply or when access is generally prohibited e g No time series means no access during the holidays defined in the calendar All existing calendars are displayed Figure150 Exceptions to time series ...

Page 144: ...VA access components of a Xesar system are created and defined under Access points An access points can be a door or also another application e g a lift Figure152 Access points list view 7 7 1 Add new access point First the desired EVVA access component is selected Figure153 Add new access point Figure 151 Tile Access points ...

Page 145: ...f access point Release duration Defines the time that the EVVA access component grants for access after authorisation before it disengages locks again The respective release time Short or Long is defined by the respective person or the ID medium and if authorised triggered on the EVVA access component The assignment of the release period to the person and an identification media takes place in the...

Page 146: ...n authorised identifi cation medium to the EVVA access component 7 8 Zones For easier management access points can be merged into zones This is useful if several access points have the same properties e g have the same au thorisations or organisational affiliations as departments or building sections A maximum of 95 zones can be freely defined for each system partition The Installation zone is cre...

Page 147: ...system with 96 zones does not function Remedy Remove an area from the Xesar 2 2 system and then import the system Figure158 View of zones Display Offices zone Name mandatory Name of the zone Description For a more detailed explanation Access points Depiction of the selected access points Figure159 Display Offices area ...

Page 148: ...ion profile and only at the defined times In other locations and outside the defined times access is denied An authorisation profile can be assigned to many identification media e g to all persons in a department with the same authorisation Only one authorisation profile can be assigned to each identification medium In addition to this authorisation profile a maximum of 3 individual authorisations...

Page 149: ... Description For a more detailed explanation e g shift worker on the late shift Manual Office Mode When this mode is activated all persons or identification media have the authorisation to activate the Manual Office Mode on authorised EVVA access com ponents Standard time profile Selection from the time profiles Important The standard time profile allows only a maximum of 12 time windows to be use...

Page 150: ...150 KPM X Systemhandbuch_X3 0 EN V1 9 Subject to misprints and technical changes Figure163 Authorisation profile example shift worker Selection of access points Figure 164 Selection of access points ...

Page 151: ...ected access points 7 10 Persons Figure166 Persons The Persons area defines all relevant information on the persons authorised in the sys tem Persons in a system can be assigned one or more identification media with different authorisation profiles Persons can also be users with corresponding rights according to the corresponding user group ...

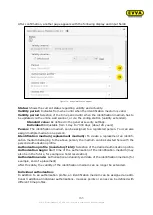
Page 152: ...medium External Yes the personal data record is managed by a third party system via the third party system interface No manual management of the personal data record within the Xesar software Non current identification media Yes One of the person s identification media is not up to date the identification media must be updated by connecting the media to the online wall reader or by laying it on th...

Page 153: ...ification medium Release duration Short or Long is selected and activated via authorised access to the EVVA access component Personal data Event log Type of event recording Events can be recorded indefinitely or for a limited time Duration If recording is temporary set the recording duration in days here External Yes The persons data record is managed by a third party system via the third party sy...

Page 154: ...coding station the following input field appears Figure170 New identification medium ID identifier or code non mandatory field You can assign the identification medium an identification media identifier e g Hans Huber Garage Visitor 1 oder Room 23 The assignment or modification of an ID is possible at any time in the identification medium detail view in the Xesar software ATTENTION The identifier ...

Page 155: ...tered person You can also assign multiple media to one person Identification medium replacement medium To create a replacement an identifi cation medium belonging to the above person the medium can be selected here with the persond authorisation profile Authorisation profile mandatory field Selection of the desired authorisation profile Authorisation begin Start time of the authorisation of the id...

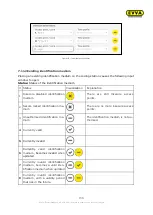
Page 156: ...n 1 Insecure disabled identification medium There are still insecure access points 2 Secure locked identification me dium There are no more insecure access points 3 Unauthorised identification me dium The identification medium is not au thorised 4 Currently valid 5 Currently invalid 6 Currently valid identification medium becomes invalid when updated 7 Currently invalid identification medium becom...

Page 157: ...0 days Person The person to whom this identification medium is assigned Authorisation begin From this point in time the identification medium is vallid and au thorised for updating Authorisation ends From this point in time the identification medium is vallid and au thorised for updating Figure173 Identification medium Individual authorisations For 3 access points or zones with individual authoris...

Page 158: ...protocol button An identification media issuing protocol with all relevant data is generated as a file in pdf format This can be printed out and confirmed by the recipient with his signature when taking over the identification medium If the authorisations are changed a new output log can be created Figure175 Identification medium issuing protocol ...

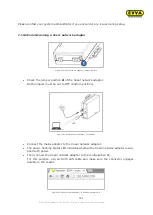
Page 159: ...ar tablet and executed by the tablet by means of con necting cable to the component 7 13 Commissioning the Xesar network adapter 7 13 1 PC configuration Figure 177 Windows Adapter settings Any computer is suitable for configuring the Xesar network adapter and you can even use the PC running the Xesar software Please configure the settings of your PC network adapter before starting to com mission t...

Page 160: ...dows IP address PC Now configure the IP address and the Subnet mask of the PC that you are using for the configuration Use the following details for this purpose o IP address 192 168 0 xxx 1 254 Subnet mask 255 255 255 0 DNS server Make sure you do not use the preconfigured IP address of the Xesar network adapter 192 168 0 100 as otherwise there will be an IP address conflict which will inhibit a ...

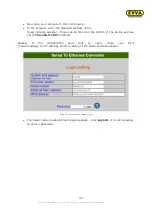
Page 161: ...he Xesar network adapter Both jumpers must be set to OFF bottom position Figure 181 Xesar network adapter Connections Connect the mains adapter to the Xesar network adapter The green flashing status LED indicates whether the Xesar network adapter is sup plied with power Then connect the Xesar network adapter to the configuration PC For this purpose use an RJ45 LAN cable and make sure the connector...

Page 162: ...network adapter these can be found on the bottom of the device and are set to 192 168 0 100 by default Notice If the configuration page fails to open check your PC s firewall settings the IP settings and the cabling of the Xesar network adapter Figure 183 Xesar network adapter Login The Xesar network adapter login page appears click Login it is not necessary to enter a password ...

Page 163: ...andbuch_X3 0 EN V1 9 Subject to misprints and technical changes Figure 184 Xesar network adapter Parameter settings Attention The number 100 may only be used once for Local port Socket mode serial digital 192 168 100 1 ...

Page 164: ...not influence the device func tion The Login password Login password restricts access to the device configuration page A default password has not been configured The Remote IP corresponds to the IP address of the computer running the Xesar software and is responsible for communication between the Xesar network adapter and the Xesar software Note The Remote IP PC and IP address Xesar network adapte...

Page 165: ...y Manager can be found in the taskbar it is depicted by the following icon Disconnect the Periphery Manager and browser using the Stop icon Right click the icon to quit Attention The Periphery Manager will not close when you click on x Incor rectly closing the Periphery Manager may cause an error upon the next start of the Periphery Manager In such a case the Periphery Manager must be set set up a...

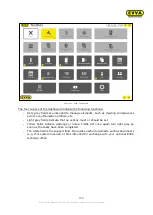
Page 166: ...ch as creating zones access points or authorisation profiles etc Light grey fields indicate that no actions must or should be set Yellow fields indicate warnings or notes Fields will once again turn light grey as soon as the tasks have been completed The white field is the support field It provides useful downloads such as documents e g this system manual or files intended for exchange with your n...

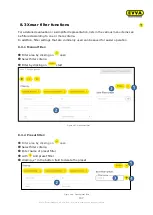
Page 167: ...e criteria In addition filter settings that are commonly used can be saved for easier operation 8 3 1 Manual filter Filter area by clicking on open Select filter criteria Filter by clicking on start 8 3 2 Preset filter Filter area by clicking on open Select filter criteria Enter name of preset filter with Add preset filter clicking x in the button field to delete the preset Figure 187 Manual list ...

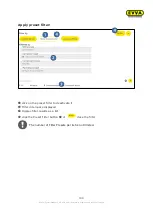
Page 168: ...nts and technical changes Apply preset filter click on the preset filter to deactivate it Filter criteria are displayed Display filter results as a list click the Preset Filter button or close the filter The number of Filter Presets per list is not limited ...

Page 169: ...to needs and the size of the display Clicking on opens a selection window in which columns can be shown or hidden Like wise the number of maximally displayed lines per page can be set The settings can be saved or reset The saved settings remain stored for each list after leaving the page for each user Figure 189 Modification of the list view ...

Page 170: ...r names and passwords here When you change passwords the system automatically indicates how strong or weak the input password is The range is from very weak to very strong red to green Alternatively click the User field and select the user account to open My profile See the following section to find out how to create new users 7 4 User Notice If you forgotten your user password only the system adm...

Page 171: ...nd KeyCredits to be deducted Changes subject to a charge are Creating new identification media Changing authorisations Notice blocking or withdrawing authorisations is free of charge Figure 193 KeyCredits no changes Changes subject to a charge are directly shown at the identification medium when you create or change authorisations Figure 194 KeyCredits subject to a charge ...

Page 172: ...l KeyCredit deductions at once The dashboard lists the current information Figure 195215 KeyCredits changes subject to a charge See the following section for information about how to add KeyCredits 12 Xesar Instal lation Manager 12 Step Adding KeyCredits Notice With KeyCredits Xesar Lifetime all changes to authorisations and issuing identification media are included and must not be confirmed ...

Page 173: ...vailable on the Xesar support page Figure 1 Figure 197 Xesar support page 8 6 1 About Xesar EVVA Imprint Xesar version is installed together with the Installation Manager and Periphery Manager and the Tablet APP Supplied firmware versions for Xesar components Link to the general licence conditions of EVVA with download link Figure 198 About Xesar ...

Page 174: ... the coding station Link to the Xesar EVVA support page We would like to help you here 8 6 3 Updates Download the current Xesar Tablet APP Download the current Xesar Periphery Manager Figure 200 Update 8 6 4 Download support data A selection of the statistical information in the support file for example number of access points zones persons identification media blocked identification media access ...

Page 175: ...attery warnings and states Components o Configuring o Removing o Adding o Firmware update The name of the Xesar tablets to which the maintenance task has been assigned The field lights up yellow if there is a new task It is automatically created by the system as soon as it is necessary to service a component Notice Maintenance tasks are carried out on components using the Xesar tablet The user wit...

Page 176: ...does not apply to upgrades from Xesar 2 2 to Xesar 3 x 8 8 Firmware not up to date Figure 203 Tile firmware not up to date The Firmware not up to date field turns yellow and indicates which component of the firmware must be updated Updating the firmware offers the following benefits Potential errors have been eliminated Battery service life increased by adaptations New functions added Notice Maint...

Page 177: ...ice In order for the Xesar software and thus your system to be connected to the coding station you must first install and configure the Periphery Manager Please refer to the following section for a detailed installation guide 5 5 Linking the coding station to the Xesar software 8 11 Online error Figure 206 Tile online installation location The online error field turns yellow if an online error occ...

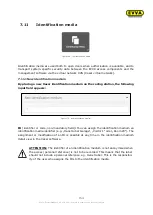
Page 178: ...d access components using the Xesar tablet Notice A maintenance task is automatically created as soon as there is an unsafe installation location within the system 8 12 Identification media Figure 208 Identification media Different types of identification media are available for Xesar For a list and descriptions see Identification media Identification media The number of displayed identification m...

Page 179: ...a Open the Add bulk processing menu item to open batch processing Figure 209 Identification media list Initially enter the run number ID to assign serial numbers in the Xesar software and start bulk processing In any other case the system will use default values and individu ally assigns numbers Click Activate bulk processing and place the first identification medium on the coding station to start...

Page 180: ...ng station Only then is the Revoke button visible As part of this process the saved data on the identifi cation medium is deleted and data can once again be written to the identification medium It remains available in the list of identification media Attention Revoking identification media deletes any data except for the key of your installation from the memory Notice This action is intended for i...

Page 181: ...oard go to the Identification media menu item and select the affected iden tification medium to withdraw an authorisation 8 12 4Blocking identification medium adding them to the blacklist Figure 214 Block identification medium adding them to the blacklist Identification medium that are blocked are automatically added to a blacklist The black list is considerd as security risk list Persons with blo...

Page 182: ...that the internal card memory currently 4k bytes is fully uded for certain identification media The tile turns yellow if Identification media that cannot be written to are in circulation This is a security pre caution The right hand side shows the number of Identification media that cannot be written to Notice Xesar segment on the identification medium requires around 2Kb Attention If the memory c...

Page 183: ...ntification media not up to date Figure 218 Identification media not up to date Identification media must be updated e g after having changed authorisations The field turns yellow and thus shows that identification media are not up to date and must be updated Tip Identification media can be updated using the coding station or online wall readers 8 12 8Releases with disabled identification media Fi...

Page 184: ...g illustrates the log entries of events that have been triggered by interaction with electromechanical locking systems e g access or rejection at access components See 8 15 Xesar virtual network XVN Important Event logging is dependent on the personal referral settings under Settings along with the respective logging settings of components locations and logging settings of individual persons Figur...

Page 185: ...documents any actions users carry out This means that it records events that are triggered by management tasks In contrast to the event log it does not record events resulting from interaction with the electronic locking system Figure 223 System event log list view Press the button to directly open the installation location to directly make changes here ...

Page 186: ...pen the Xesar tablet menu item to view all programming units linked to the system Figure 225 Reporting loss Use the Report loss button to remove the tablet from the system 8 14 1Xesar tablet app The home screen provides an overview of all unresolved maintenance tasks shows the version number and provides a Synchronise button Figure 226 Xesar app home screen ...

Page 187: ...tify door Automatically identifies the connected door Show battery status Shows the battery status of the component Update firmware Update firmware using connection cable Reset component Resets the component to factory status Request versions Shows the firmware version Settings Select here whether the component event log must always be retrieved Logout Logs out the active user Notice Refer to the ...

Page 188: ...component is in construction mode connect the Xesar tablet to the access compo nent using the connection cable for a firmware update then select Update firmware If the component is in system mode the firmware update is carried out via a maintenance task Notice Open the Request version menu item to check the firmware version of the component Figure 228 Requesting the firmware ver sion Figure 229 Up...

Page 189: ... The battery status is then shown on the programming unit Figure 231 Xesar tablet battery status OK 8 14 1 3 Initialise access components You must initialise access components in construction site mode to connect them to a system You must have created an installation location with an access component before hand See 7 7 Access points Figure 232 Initialising access components Connect the supplied c...

Page 190: ..._X3 0 EN V1 9 Subject to misprints and technical changes Figure 233 Enter initionalisation PIN Enter the initialisation PIN and a progress bar opens Notice the initialisation PIN is in 7 2Settings Figure 234 Successful baptism ...

Page 191: ...ed with update information blacklist or online wall readers from a central coding station The information is transferred from door to door on the way through the facility In this process identification media update door states and collect door information battery states access events deletions or unlocking attempts by disa bled media The information is subsequently passed on to coding stations whe...

Page 192: ...ification media that are disabled in the software Said blacklist entries are written to all identification media using the coding station or online wall reader This way the information is transferred to all operated doors The memory of one identification medium is sufficient for up to 10 blacklist entries As soon as identification media are once again used at the coding station or online wall read...

Page 193: ...e information Identification medium deleted from door component The identification medium is deleted from the door component upon attempting to unlock a door component with an up to date blacklist using an identification medium that has been disabled in the software As a consequence this medium can now no longer open doors with an out of date black list and hence this medium is no longer valid The...

Page 194: ...ia must update their identification media at the coding station or online wall reader within this period of time As a result system administrators are provided with the corre sponding information at the latest after three days events blacklist transfers etc using the identification media in circulation For instance if the validity is set to 30 days it will take longer for the information to be ret...

Page 195: ...card signature from the installation information sheet These data can be found on the installation information sheet which you printed out during the first installation Figure 238 Replacing the Admin Card system information Figure 239 Replacing the Admin Card Upon confirmation a new installation information sheet will be generated Print this document again and keep it in a safe place ...

Page 196: ...ding a component If you have added an incorrect component to the installation location you can once again remove the component here For this purpose click the dedicated button at the end of the input field Figure 240 Revoking the process of adding a component You also must not create the installation location from scratch but can just select a new component ATTENTION This only functions before ini...

Page 197: ...oving components ATTENTION if you would like to once again install the component in a system do not click Remove faulty EVVA component If you have removed the component in the software the system will automatically create a maintenance task Remove the component with the Xesar tablet For this purpose connect the component to the Xesar tablet and select the component Click Remove ac cess component i...

Page 198: ...n media Blacklist in real time Access event log in real time Component authorisation update in real time Identifying EVVA component wall reader you searched for repeatedly outputs vis ual and audible signal until the function is deactivated Activating Office Mode Starts Manual Office Mode recorded Deactivating Office Mode Closes Manual Office Mode recorded Set time manual time synchronisation usin...

Page 199: ...If the door contact is connected in series with a latch contact then the door status closed and locked can be monitored Figure 245 Door status monitoring event log The event log and system log document the various functions Figure 246 Online wall reader event log Note The Xesar 3 0 functionalities of the online wall reader are not available in X2 2 e g online configuration timed online configurati...

Page 200: ...stently work with Xesar 3 0 8 21 4Number of zones in Xesar 3 0 compared with Xesar 2 2 You can import a maximum of 95 zones from Xesar 2 2 The Installation with all 96 access points is created automatically in X 3 0 8 21 5Import from Xesar 2 2 time zone A version 2 2 system can exclusively be imported to and operated in the same time zone 8 21 6Calendar import It is not possible to import calendar...

Page 201: ... to export import to Xesar 3 0 Otherwise merely 17 KeyCredits would be added in Xesar 2 2 8 21 11 Blocking the firewall preventing the import As a rule you must currently take into account three known aspects The personal firewall must always permit the start or not block required ports vir tual machine 10 0 75 2 must have access to Windows host 10 0 75 1 445 The drive C must be enabled in the doc...

Page 202: ... If the Xesar 3 0 software display no data on the dashboard this may be due to unusually high CPU utilisation Remedy Stop and restart the installation in Installation Manager 8 21 18 Blue screen after removing a medium from the coding station Windows 7 computers may experience bluescreen errors when using the HID OmniKey 5421 coding station 8 21 19 Problems detecting media with Windows 10 Pro x64 ...

Page 203: ...go into standby mode 8 21 24 A CU with 2 wall readers If you install a coding unit with 2 wall readers the two access points are connected to each other This connection will endure even if the EVVA components are removed After the two EVVA components have been removed the status prepared for installation for CU2WL is reached again If you want to delete the two access points then you must remove on...

Page 204: ... image 32 Figure 20 Xesar tablet sample image 33 Figure 21 Emergency power device sample image 35 Figure 22 Admin Card sample image 36 Figure 23 Identification media overview 37 Figure 24 Construction Card sample image 38 Figure 25 Important information for a software upgrade 50 Figure 26 Installing Docker 54 Figure 27 Installing Docker security notice 54 Figure 28 Starting Docker 54 Figure 29 Doc...

Page 205: ...Figure 66 Entering the KeyCredits code 78 Figure 67 Licencing successful 78 Figure 68 KeyCredit Xesar Lifetime 79 Figure 69 Installation Manager funktions 79 Figure 70 Warning in browser 80 Figure 71 Warning browser 2 80 Figure 72 Login window 81 Figure 73 Xesar dashboard 81 Figure 74 Desktop selecting support 90 Figure 75 Support tile 90 Figure 76 Periphery Manager selection 91 Figure 77 Extracti...

Page 206: ...re 115 Xesar tablet installing the Xesar 3 0 APP 112 Figure 116 Synchronising the Xesar tablet 113 Figure117 Settings for system backup 114 Figure118 Manual backup 115 Figure119 Commissioning step by step 123 Figure120 Tiles settings 124 Figure121 Security settings 124 Figure122 Validity and authorisation period 124 Figure123 System settings 125 Figure124 Settings that reference persons 126 Figure...

Page 207: ...cess points 150 Figure165 Access to selected access points 151 Figure166 Persons 151 Figure167 Diaplay persons list 152 Figure168 Add person 153 Figure 169 Tile identification media 154 Figure170 New identification medium 154 Figure171 Assign identification medium 155 Figure172 Individual authorisations 156 Figure173 Identification medium 157 Figure174 identification medium indiviudal authorisatio...

Page 208: ...dentification medium 181 Figure 214 Block identification medium adding them to the blacklist 181 Figure 215 Dashboard blacklist 182 Figure 216 Identification media that cannot be written to 182 Figure 217 Insecure identification media 183 Figure 218 Identification media not up to date 183 Figure 219 Releases with disabled identification media 183 Figure 220 Event log 184 Figure 221 Event log list ...

Page 209: ...195 Figure 240 Revoking the process of adding a component 196 Figure 241 Removing components 197 Figure 242 Remove Xesar tablet component 197 Figure 243 Component defective force removal 198 Figure 244264 Online wall reader 198 Figure 245 Door status monitoring event log 199 Figure 246 Online wall reader event log 199 ...

Reviews: