background image

Network Camera 


55 

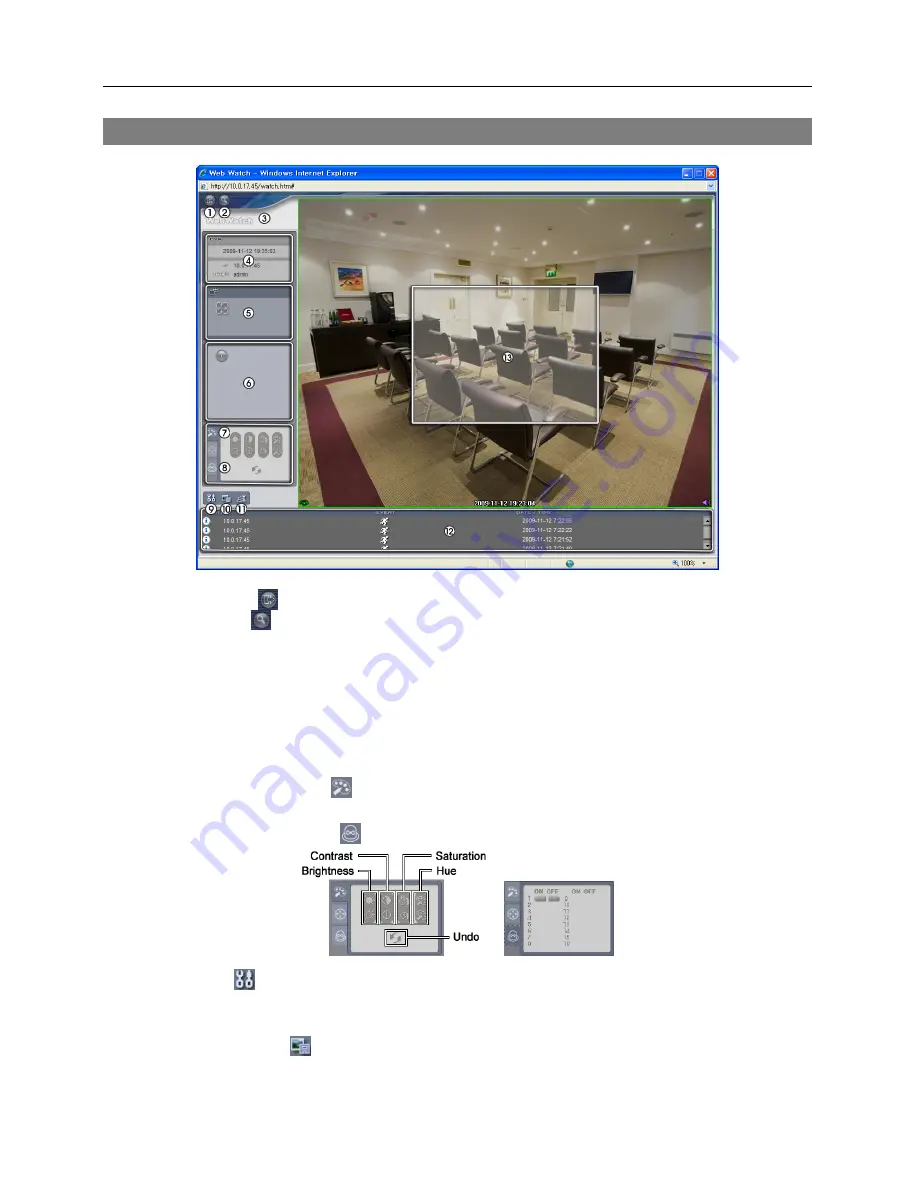
Web Monitoring Mode 


 Log Out

: Click   to log out of the WebGuard program. 

 Search

: Click   to access to the web search mode. 

 Version

: Position the mouse pointer on the WebWatch logo to see the WebGuard program 

version. 

 Information

: The 

Information 

window displays the login information of WebGuard. 

 Full Display

: Clicking the button displays the video in full screen.  Pressing the 

Esc

 button 

on a keyboard returns to the previous screen. 

 Camera Button

: The button displays the camera number. 

 Image 

Adjustment

: Click 


to adjust the brightness, contrast, saturation and hue of monitored 

image. 

 Alarm-Out Control

: Click 


to control an alarm out device remotely. 


 Setup

: Click   to set up the image drawing mode and OSD display.  You can adjust the display 

speed by changing the image drawing mode, and select OSD information to be displayed on 
the screen. 

 Save Image

: Click   to save the current image as a bitmap or JPEG file format. 

Summary of Contents for network camera

Page 1: ......

Page 2: ......

Page 3: ...cation We are not responsible for any problems resulting from the use thereof The information contained herein is subject to change without notice Revisions or new editions to this publication may be...

Page 4: ...wall outlets and extension cords as this can result in the risk of fire or electric shock 11 Objects and Liquids Never push objects of any kind through openings of this equipment as they may touch da...

Page 5: ...llustrated Parts List 5 Vandal Dome Model 5 Plastic Dome Model 6 Factory Reset 7 Lens 8 HD Model 8 Full HD Model 8 Input Output Device Ports 8 Mounting 10 View Angle 11 Chapter 3 Remote Setup 13 Quick...

Page 6: ...P Upload 39 Record 40 Event 43 Alarm In 44 Motion Detection 45 Trip Zone 47 Audio Detection 48 Tampering 49 System Event 50 Chapter 4 WebGuard 53 Web Monitoring Mode 55 Web Search Mode 57 Appendix 59...

Page 7: ...n a user s website Up to 10 simultaneous connections to the camera for remote monitoring Enhanced security using IP address filtering HTTPS SSL and IEEE 802 1X functions and password protected multipl...

Page 8: ...e system refers to a PC that the remote program SiRiS Lite or WebGuard is running Remote monitoring and recording through multistream are available by using the SiRiS Lite program provided with the ca...

Page 9: ...Network Camera 3 Remote Recording Webcasting...

Page 10: ...User s Manual 4...

Page 11: ...s Network Camera Installation CD INIT SiRiS Lite software and User s Manual Quick Reference Guide Mount Kits Dimensions Illustrated Parts List Vandal Dome Model Dome Cover Dome Cover Bottom Side View...

Page 12: ...iling Mounting Hole Dome Cover Setscrew Hole Bottom Cover Input Output Device Ports Cable Access Hole Tilt Adjustment Screw Plastic Dome Model Dome Cover Shield Case Side Cable Access Hole Body IR LED...

Page 13: ...ockwise Pan Base Allows you to adjust the pan angle SD Memory Card Slot Insert a micro SD memory card SLC Single Level Cell or MLC Multi Level Cell types of SanDisk or Transcend brands recommended Fac...

Page 14: ...us by turning the lever clockwise or counterclockwise Once it is set twist the setscrew clockwise to lock it Zoom Lever Adjust the zoom by turning the lever clockwise or counterclockwise Once it is se...

Page 15: ...the settings manage the camera upgrade the software or monitor video remotely via the network connection Refer to the INIT User s Manual for details about network connection setup When using a PoE sw...

Page 16: ...external devices network and power adapter 3 Adjust the angle of the lens for the proper view angle Refer to the View Angle section below for details 4 Adjust the focus and zoom by using the focus an...

Page 17: ...justs the rotation angle Move the rotation base clockwise or counterclockwise Tilt Adjusts the tilt angle Loosen the tilt adjustment screws move the lens up and down and tighten the screws to lock the...

Page 18: ...User s Manual 12...

Page 19: ...lay the Remote Setup screen by selecting a camera clicking the right mouse button and selecting Remote Setup on the Main screen NOTE You can also change the settings by using remote programs Clicking...

Page 20: ...uage Choose the language to be used during remote setup Name Enter the camera name up to 31 characters including spaces Note Enter additional information about the camera HW Version SW Version These f...

Page 21: ...hen the setup is applied Refer to the Network setup for details of the network settings Export Setup Click to save the current camera settings as a dat file format A setup screen appears allowing you...

Page 22: ...the domain name of the time server the DVRNS function must be set up properly when setting the Network DVRNS setup User Group User Group Click the buttons to change the settings for a group or a user...

Page 23: ...upgrade the software Setup The user can set up the system Color Control The user can control brightness contrast hue and saturation for cameras Alarm Out Control The user can reset the output during...

Page 24: ...assigned to the camera The camera periodically will be issued a new IP address automatically DNS Server Enter the IP address of the DNS server If you set up the DNS server the domain name of the serv...

Page 25: ...e DVRNS DVR Name Service function allows the camera to use dynamic IP addresses for remote connection When using this function you can access the camera remotely by using the camera name instead of it...

Page 26: ...annot change it Checking the WebGuard or RTSP box allows you to connect to the camera by using the WebGuard program or media players such as VLC Player supporting RTSP Real Time Streaming Protocol ser...

Page 27: ...rotocol or an RTSP port for TCP protocol if the camera uses a NAT Network Address Translation device for network connection or if the firewall is enabled This function might not be supported depending...

Page 28: ...g on the network traffic Check the Network bandwidth limit box and set the desired maximum bandwidth When the network is busy with traffic the camera cannot use more than the maximum bandwidth NOTE Wh...

Page 29: ...nction You can enhance the security of outgoing data from the camera by using the SSL Secure Sockets Layer protocol When using the SSL function the camera cannot be connected with a program or a syste...

Page 30: ...ngs Sets up EAP Extensible Authentication Protocol EAP Type Select the type of authentication to be used for network connection authentication The authentication type must be identical to the authenti...

Page 31: ...320 this function is not supported If you enable this function you can monitor more efficiently long and narrow space such as hallways corridors etc Video Style Select the video style between TV Color...

Page 32: ...reset Select the preset white balance value based on the conditions Auto Select to adjust the white balance automatically The system identifies the light source of where the camera is installed and se...

Page 33: ...ed for the lighting such as a fluorescent lights This reduces video flicker caused by the frequency differences 60 Hz for NTSC 50 Hz for PAL Slow Shutter Set the slow shutter mode Selecting a speed au...

Page 34: ...ff and clicking the Select All Clear All button sets up or releases Nighttime for all dates and time IR Cut Filter When the IR cut filter is enabled the camera blocks infrared light Images can be disp...

Page 35: ...o signal for video output Smart IR Set the brightness of the IR LED IR LED supported model only Check the box to adjust the brightness automatically The sensor in the middle of IR LEDs detects illumin...

Page 36: ...t up the quality of images for streaming Bitrate Control Set up the bitrate control mode for H 264 compression CBR Constant Bitrate Maintains the current bitrate regardless of the amount of motion VBR...

Page 37: ...Resolution Limit Displays the available maximum resolution of the streaming area Resolution Sets the streaming area The streaming area is displayed in red on the screen above and you can adjust the ar...

Page 38: ...e Video Camera Exposure tab setup for details about the slow shutter mode setting Sensitivity Set the motion sensitivity The higher the number is the more sensitive it is Inactivity Period Set the ina...

Page 39: ...ected The camera considers that no motion is detected when no change is detected between two consecutive images based on the sensitivity setting Privacy Masking Check the Privacy Masking box to restri...

Page 40: ...n the privacy masking area Clicking the empty space beside the number in the list allows you set up a name for the area Clicking the Delete button deletes the area Audio You can set up audio in and ou...

Page 41: ...tects events Alarm Out Check the Alarm Out box to activate alarm out Dwell Time Select the alarm out dwell time An alarm out is activated for the preset dwell time after detecting an event Schedule Se...

Page 42: ...main name instead of the IP address if you set up the DNS server when setting up the network Select Use SSL TLS if the SMTP server requires SSL Secure Sockets Layer authentication Authentication Enter...

Page 43: ...ox to send a callback message to remote systems Not supported for the WebGuard program IP Address Port Enter the IP addresses and port numbers of the remote systems to send a message Retry Select the...

Page 44: ...st Displays the audio file to be played back You can add or delete an audio file wav 16 bits 16 KHz encoded file only by clicking the Add or Remove button Selecting an audio file in the list and click...

Page 45: ...e of the ftp server Upload Path Enter the folder path to upload files Special characters cannot be used in the folder path Port Enter the port number of the ftp server User ID Password Enter the user...

Page 46: ...ase File Name Enter the common file name of the images to be uploaded to the ftp server and select the option to distinguish each image file Special characters cannot be used in the file name Selectin...

Page 47: ...sly regardless of event detection Always Time Lapse Event Records video in the time lapse recording mode while no event is detected and changes to the event recording mode when an event is detected Da...

Page 48: ...If a recording stream is not set up in a remote program it uses the Default Record Stream set during the Video Streaming setup None Records video by using whichever stream offers higher resolution be...

Page 49: ...emory card might not be very smooth when using a remote program while also recording video on the SD memory card CAUTION When removing the SD memory card uncheck the Record box first and wait for abou...

Page 50: ...anual 44 Alarm In IR LED Supported Model IR LED Non Supported Model Check the Alarm In box to set up an alarm in event When the camera senses an input on the alarm input connector it considers it as a...

Page 51: ...ut Check the box to trigger an alarm output signal Send Email Check the box to send an email Selecting Image Attachment attaches an event detected image file JPG to the email Remote Callback Check the...

Page 52: ...own list The camera will not log or send notifications of motion events occurring during the preset interval after a motion is detected You can control excessive event logging and remote notifications...

Page 53: ...Trip Direction Select the direction of the moving to be considered as an event Selecting In considers a moving as an event when the moving to the area is detected and selecting Out when the moving fr...

Page 54: ...number is the more sensitive it is Activation Time Adjust the duration that audio should last to be considered as an audio in event The camera will not consider any audio as an audio in event if it la...

Page 55: ...tected in video for example the camera is moved lens is blocked etc it considers it as an event Sensitivity Set the tampering sensitivity The higher the number is the more sensitive it is Activation T...

Page 56: ...e box to check the system operation and select the check interval Send Email Check the box to send an email when the system is operating Remote Callback Check the box and select the remote systems to...

Page 57: ...to send a message when the SD memory card is inserted to or removed from the camera Not supported for the WebGuard program NOTE You must properly configure the Email and Remote Callback settings when...

Page 58: ...User s Manual 52...

Page 59: ...NS server NOTES Enter https instead of http if you have checked the Use HTTPS box during the WebGuard port number setup Click Continue to this website not recommended when the security certificate war...

Page 60: ...d when using the Microsoft Windows Vista or later operating system In this situation it is recommended that you disable the Auto Tuning capability of your computer Run the Command Prompt with elevated...

Page 61: ...in full screen Pressing the Esc button on a keyboard returns to the previous screen Camera Button The button displays the camera number Image Adjustment Click to adjust the brightness contrast saturat...

Page 62: ...isables audio communication Aspect Ratio Select to change the image aspect ratio displayed on the screen and the option menu appears Selecting Fit to Screen displays images by fitting them to the scre...

Page 63: ...tton to play recorded video The following functions are supported fast backward pause play fast forward go to the first image go to the previous image go to the next image and got to the last image Ti...

Page 64: ...he camera by time in hour segments If the camera s time and date have been reset to a time that is earlier than some recorded video and more than one video segment exists in the same time range select...

Page 65: ...is connected to a network Power LED Network LED Flicker sequentially The unit is upgrading the software Connector Pin Outs Alarm GND GND Chassis Ground OUT Alarm Out Active Low Open Collector output...

Page 66: ...Time User Group Network IP Address DVRNS Port QoS Bandwidth Control Security IEEE 802 1X Video Camera Streaming Webcasting MAT Privacy Masking Audio Input Output Event Action Alarm Out Email Remote Ca...

Page 67: ...lance Video flickers Check to see if the camera points directly at the sun or a fluorescent light and adjust the camera s direction Connection to the INIT program is not available because of wrong ID...

Page 68: ...ommended for stable recording i SD memory cards are expendable supplies After a certain use in time partial memory sectors can be damaged and recording may not be available or data will be lost Check...

Page 69: ...GENERAL Dimensions x H 6 3 x 4 4 159mm x 112mm Shipping Dimensions W x H x D 8 1 x 6 9 x 8 1 205mm x 175mm x 205mm Unit Weight Vandal dome model 1 9 lbs 0 87kg Plastic dome model 1 1 lbs 0 51kg Shippi...

Page 70: ...User s Manual 64...

Page 71: ...14 19 Compression 30 32 D Date Time 15 DSCP 20 DVR Name Service 19 DVRNS Server 19 F Frame Rate 30 I IP Filtering 23 M MAT 32 N Network Bandwidth Limit 22 O ONVIF Protocol 14 Q Quality 30 R Resolution...

Page 72: ...read the Owner s Manual before installing the device x Never place the Equipment in a confined space eg bookcase built in cabinet unless proper ventilation is available It is advised to leave a 10cm s...

Page 73: ...must return the Equipment to Pacific Communications The consumer will be responsible for the collection and freight costs of returning the Equipment to Pacific Communications or to any designated Paci...

Page 74: ......

Reviews: