


7
MODE
There are two modes to select from:
AUTO IRIS
and
SHUT+AUTO IRIS
. To change the
mode, highlight the
MODE
field and press the LEFT and RIGHT buttons to toggle
between the two modes.
In
AUTO IRIS
mode
, SHUT
(shutter speed) is activated and adjustable while
SENSE UP
and
SHUT MAX
are deactivated.
In
SHUT+AUTO IRIS
mode
, SHUT MAX
and
SENSE UP
are activated and
adjustable. The
SHUT
MAX
value that you select will be the
maximum shutter
speed
that will be allowed in automatic mode.
BRIGHTNESS
Scroll to the
BRIGHTNESS
field and use the LEFT and RIGHT buttons to adjust the
screen brightness (000 to 255).
SHUT (shutter speed) / SHUT MAX (maximum allowed shutter speed for auto)
Use the LEFT and RIGHT buttons to adjust the shutter speed (or to select the maximum
shutter speed
–
SHUT MAX
– for when the camera is in
SHUT+AUTO IRIS
mode). The
shutter speed and maximum shutter speed can be set to be anything from a 50
th
of a
second up to a 100,000
th
of a second.
LOW LUX BRIGHT. (Low Lux Brightness)
Use the LEFT and RIGHT buttons to adjust the Low Lux Brightness value. The options
are
x0.25, x0.5, x0.75, x1.0
.
AGC GAIN (Automatic Gain Control)
The bigger the number, the brighter the image. Note that the noise will also increase as
the
AGC GAIN
is increased. The selectable
AGC GAIN
values are
000
to
200
.
SENSE UP
SENSE UP
is used to maintain a vivid screen image by automatically detecting changes
in light levels when the light levels are generally low. Use the LEFT and RIGHT buttons
to switch this function on/off and adjust its settings. The options are
OFF, x2, x4, x8, x16,
x32, x64, x128, x256, x512
, and
OFF
.
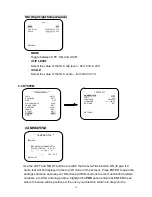
Main Menu
** MAIN MENU **
LENS
AUTO<
┘
EXPOSURE
SET<
┘
WDR
OFF
WHITE BALANCE
ATW<
┘
2DNR & 3DNR
SET<
┘
DAY/NIGHT
AUTO<
┘
IMAGE
SET<
┘
EFFECT
SET<
┘
SYSTEM
SET<
┘
EXIT<
┘
** EXPOSURE **
MODE
AUTO IRIS
BRIGHTNESS
|||
|
|||||||||||| 030
SHUT
1/50 (S)
SHUT MAX
-
LOW LUX BRIGHT.
x1.0
AGC GAIN
|||||||||||
|
|||| 150
SENSE UP
OFF
RETURN<
┘
Submenu
s Menu


