


6
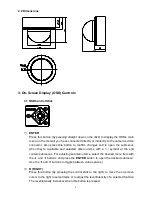
4. Open submenus
Right-hand items
(or “modes”) with a “
<┘
” symbol at the end contain submenus. For
adjusting submenu items, select the desired menu item with the
and
buttons,
then select the desired submenu title
(or “mode”) to the right of the menu item with the
and
buttons, then press ENTER to open the submenu.
5. Return to the previous page
Scroll to
RETURN
and press the ENTER
button to return to the previous page.
6. Exit the OSD menu
Scroll to
EXIT
and press the ENTER
button to exit the OSD menu.
4. Configuration with the OSD
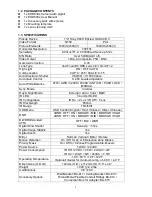
4.1 LENS
Once you have opened the OSD’s main menu on your screen, use the UP and DOWN
buttons to scroll to the
“
LENS
”
menu item. Use the LEFT and RIGHT buttons to toggle
between the
MANUAL
and
AUTO
modes. If you selected
AUTO
, you can press the
ENTER button to open the
LENS > AUTO
submenu
(also called “Auto Iris”).
SPEED
The speed of the DC lens depends on the number you set here. The range of SPEED
settings is 000 to 255. The higher the number, the faster the lens. Push the LEFT and
RIGHT buttons to decrease or increase the number.
4.2 EXPOSURE
Once you have opened the OSD’s main menu on your screen, use the UP and DOWN
buttons to scroll to the
“
EXP
OSURE”
menu item. Press the ENTER button to open the
Exposure submenu.
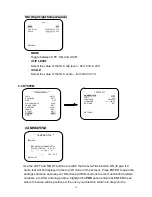
Main Menu
** MAIN MENU **
LENS
AUTO<
┘
EXPOSURE
SET<
┘
WDR
OFF
WHITE BALANCE
ATW<
┘
2DNR & 3DNR
SET<
┘
DAY/NIGHT
AUTO<
┘
IMAGE
SET<
┘
EFFECT
SET<
┘
SYSTEM
SET<
┘
EXIT<
┘
Submenu
s Menu
** AUTO IRIS **
SPEED
||||
|
||||||||||| 050
RETURN
<┘


