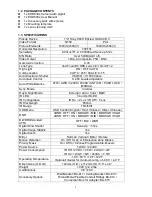
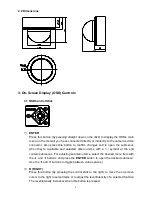
EverFocus EHD630s Operating Instructions Manual Download Page 4


2. CAMERA OVERVIEW 


2.1 Description of Camera Parts 
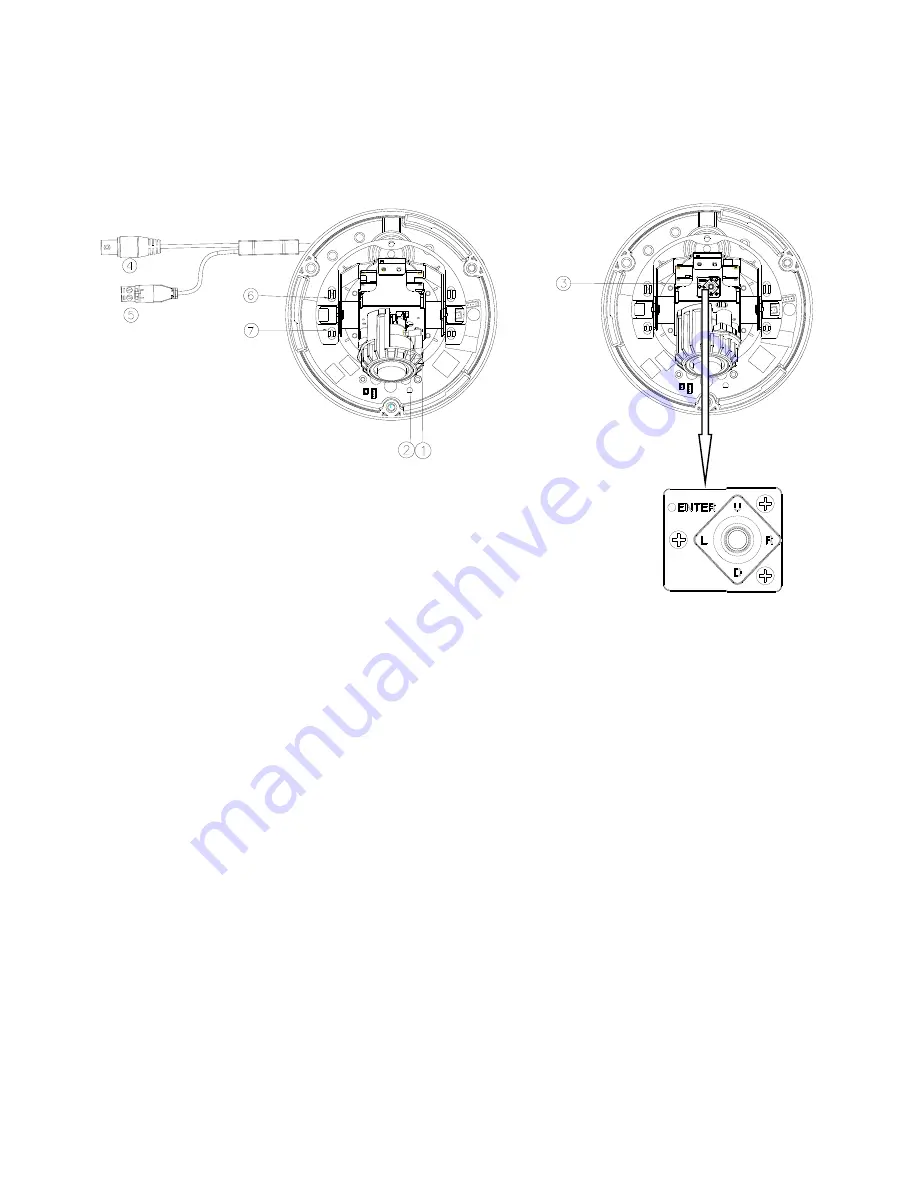


.


FAR/NEAR Adjuster 

Use this to adjust the lens to focus near or far. 

.


WIDE/TELE Adjuster 

Use this to adjust the lens angle for wide or telescope (zoom) view. 

.


OSD Control Buttons 

ENTER button 

UP & DOWN button 

LEFT & RIGHT button 

.


VIDEO Connector 

This output can be connected to a video monitor or similar device 

(75Ω). 

.


Primary Power Input Terminal 

Connect the power supply here 

– 12VDC or 24VAC. 

.


Secondary Power Input Terminal (DC/AC version only) 

The 12VDC power supply can also be connected here. 

.


Secondary VIDEO Connector (DC/AC version only) 

This is an RCA output. 


Summary of Contents for EHD630s

Page 1: ...commended herein Improper disassembly or introduction of corrosive materials may result in equipment failure or other damage 3 Try to avoid pointing the camera toward the sun In some circumstances dir...

Page 2: ...of advanced Effio S DSP technology to enhance image quality This camera also utilizes technologies like 3DNR to reduce recording file sizes and thus conserve DVR HDD space Digital Slow Shutter to see...

Page 3: ...t Mode External Auto Color B W IR LED 30 units IR LED IR Configuration IR On 2 Lux IR Off 5 Lux IR Wavelength 850nm IR Range 15m 50ft OSD Menu OSD Control English Trad Chinese Simpl Chinese DNR 3DNR O...

Page 4: ...view OSD Control Buttons ENTER button UP DOWN button LEFT RIGHT button VIDEO Connector This output can be connected to a video monitor or similar device 75 Primary Power Input Terminal Connect the po...

Page 5: ...nus when they re available and selected Menu items with a symbol at the end contain submenus For adjusting submenu items select the desired menu item with the and buttons and press the ENTER button to...

Page 6: ...ferent but will have the same wording and format 1 Open the OSD menu Press the ENTER button to open the OSD s main menu on your screen 2 Scroll with the cursor buttons to select menu items Use the and...

Page 7: ...buttons to scroll to the LENS menu item Use the LEFT and RIGHT buttons to toggle between the MANUAL and AUTO modes If you selected AUTO you can press the ENTER button to open the LENS AUTO submenu al...

Page 8: ...e shutter speed and maximum shutter speed can be set to be anything from a 50th of a second up to a 100 000th of a second LOW LUX BRIGHT Low Lux Brightness Use the LEFT and RIGHT buttons to adjust the...

Page 9: ...rightness of the whole area 000 255 DARK Use DARK to only adjust the brightness of the dark areas LOW to HIGH BRIGHT Use BRIGHT to only adjust the brightness of the bright areas 000 255 BLC Back Light...

Page 10: ...ggle between this menu item s seven mode options 2 Select the desired mode and press ENTER to open the mode s adjustment submenu ATW Auto Tracking White Balance This mode can be used to view areas wit...

Page 11: ...orescent light in the surveillance area or the light changes all the time MANUAL This mode enables more precise adjustments Increase and or decrease the Red Gain and Blue Gain values to suit the light...

Page 12: ...time B W mode is ideal for NIGHTTIME In this mode the camera is forced to deliver a B W feed during daytime and nighttime AUTO mode switches to a B W feed in the nighttime and then switches back to a...

Page 13: ...from one mode to the other only if a switch inducing change in light levels stays the same for the selected number of seconds The selectable values are 0 to 255 seconds BURST Turn the BURST function o...

Page 14: ...ly rotated MIRROR horizontally rotated and ROTATE vertically and horizontally rotated POS NEG ON OFF Positive Negative Reversal Select ON or OFF to enable or disable this function WHITE PIXEL COMP WHI...

Page 15: ...ct Once the cursor lands on the desired block press ENTER to select that block The block will become clear once you have selected it You can select as many blocks as you want on any part of the screen...

Page 16: ...ea block s submenu again or select another area block to edit COLOR Use the LEFT and RIGHT buttons to adjust the color of the selected Privacy Mask The options are BLACK RED GREEN BLUE YELLOW CYAN MAG...

Page 17: ...tings submenu and use your Direction and Enter buttons to select and confirm letters numbers etc After entering a name highlight the POS option and press ENTER to see where the name will be positioned...

Page 18: ...e LEFT RIGHT buttons to select your language preference The options are ENGLISH FIRMWARE This line displays the firmware version currently installed on the camera RESTORE Select NO to exit or select Y...

Page 19: ...ww everfocus co jp info everfocus co jp EverFocus Europe UK Unit 12 Spitfire Business Park Hawker Road Croydon Surrey CR0 4WD UK TEL 44 20 8649 9757 44 845 430 9999 FAX 44 20 8649 9907 www everfocusuk...

Reviews: