background image


51

5.7


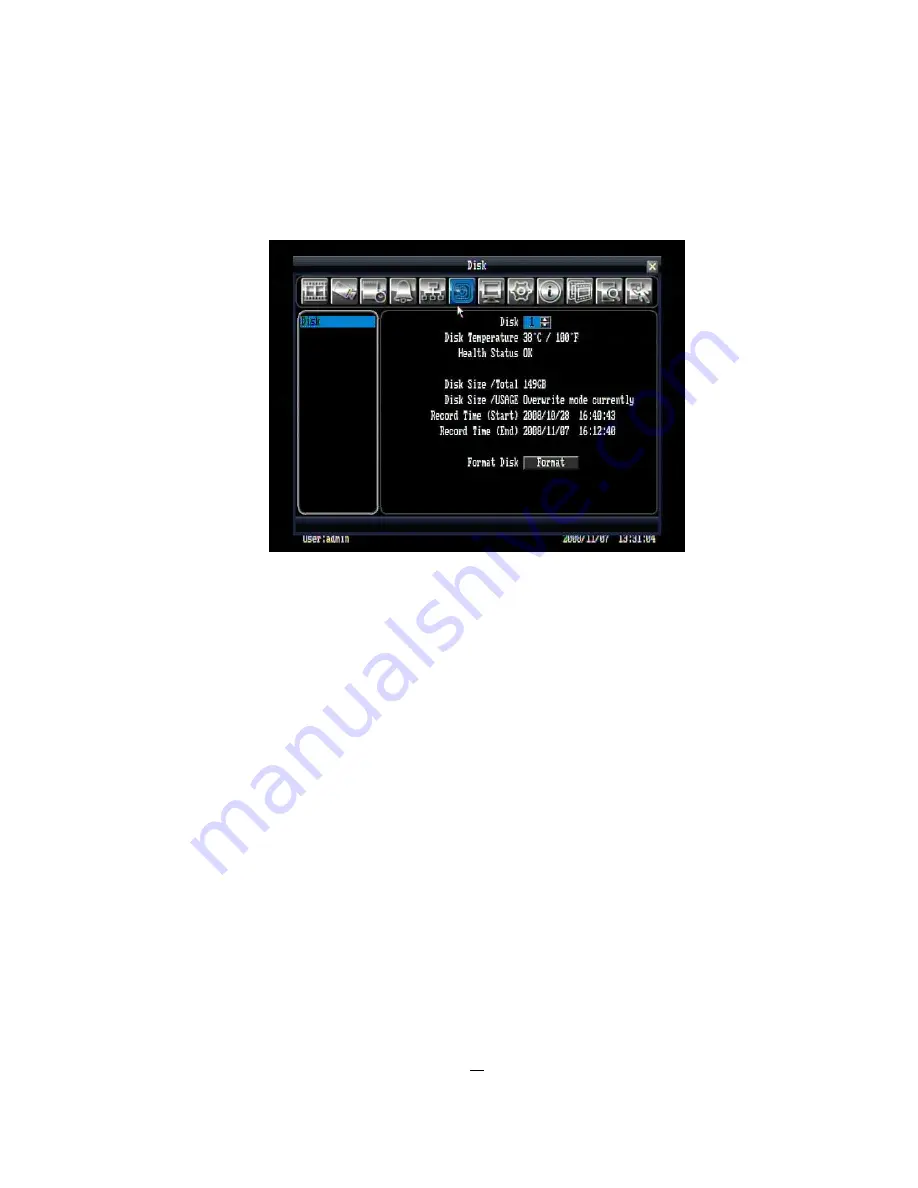
DISK SETTING 

Figure 5.20


is a screen shot of the 

DISK SETTING MENU

. This menu will walk you through disk settings. 


Figure 5.20 (Disk Menu)


Disk:

 Select the disk number. 

Disk Temperature: 

Indicates current disk temperature. 

Health Status:

 Indicates current health status of the disk. 

Disk Size/Total:

 Shows total disk size available. 

Disk Size/Usage:

 Shows percentage of used disk space. If DVR is set to automatically overwrite the disk, 

this option will show “Overwrite mode currently”. 

Record Time (Start):

 Shows earliest recorded time on the hard drive. 

Record Time (End): 

Shows latest or most current recorded time on the hard drive. 

Format Disk:

 Press “Format” button to format the disk. 

NOTE: This will erase all information on the disk..


Summary of Contents for ECOR 4

Page 1: ...Instruction Manual E EC CO OR R S Se er ri ie es s D DV VR R ...

Page 2: ...en permission of the Everfocus Electronics Corporation Release Date Dec 2008 QuickTime is a registered trademark of the Apple Computer Inc Windows is a registered trademark of the Microsoft Corporation Linksys is a registered trademark of the Linksys Corporation D Link is a registered trademark of the D Link Corporation DynDNS is a registered trademark of the DynDNS org Corporation Other product a...

Page 3: ...layback or recording operation ATTENTION This is a class A product which may cause radio interference in a domestic environment in this case the user may be urged to take adequate measures Federal Communication Commission Interference Statement This equipment has been tested and found to comply with the limits for a Class B digital device pursuant to Part 15 of the FCC Rules These limits are desig...

Page 4: ... upon publication The manufacturer reserves the right to revise and improve his products Therefore all specifications are subject to change without prior notice Misprints reserved Please read this manual carefully before installing and using this unit Be sure to keep it handy for later reference ...

Page 5: ...DOME INSTALLATION 12 2 6 FINAL INSTALL PROCESS 13 3 MOUSE AND FRONT PANEL OPERATION 14 3 1 GENERAL USB MOUSE OPERATION 14 3 1 1 OSD Root Menu 14 3 1 2 Operation in Configuration Menu 15 3 1 3 Component Options 15 3 2 GENERAL FRONT PANEL OPERATION 17 3 2 1 Front Panel Key Review 17 3 2 2 Operation in Configuration Menu 17 3 2 3 Component Options 18 4 GENERAL DVR OPERATIONS 19 4 1 RECORD 19 4 2 LOGI...

Page 6: ... 5 2 1 Record 32 5 2 2 Play 33 5 3 CAMERA SETTING 34 5 3 1 Basic Setting 34 5 3 2 Video Adjust 36 5 3 3 Motion 37 5 3 4 Video Loss 39 5 4 SCHEDULE SETTING 40 5 5 ALARM EVENT SETTING 42 5 5 1 Alarm 42 5 5 2 Event 43 5 6 NETWORK SETTING 48 5 6 1 LAN 48 5 6 2 EMAIL 49 5 6 3 DDNS 50 5 7 DISK SETTING 51 5 8 DISPLAY SETTING 52 5 8 1 Monitor OSD 52 5 8 2 Main M T SEQ 53 5 9 SYSTEM SETTING 54 5 9 1 Date T...

Page 7: ...ION TO TCP IP 72 7 2 SUBNET MASKS 72 7 3 GATEWAY ADDRESS 72 7 4 VIRTUAL PORTS 73 7 5 PRE INSTALLATION 73 7 6 WHAT IS YOUR NETWORK SETUP 74 7 7 SIMPLE ONE TO ONE CONNECTION 75 7 8 DIRECT HIGH SPEED MODEM CONNECTION 80 7 9 ROUTER OR LAN CONNECTION 82 8 EVERFOCUS DDNS SETUP 85 9 LINKSYS D LINK PORT FORWARDING 86 9 1 LINKSYS PORT FORWARDING 86 9 2 D LINK PORT FORWARDING 88 10 TROUBLESHOOTING 91 APPEND...

Page 8: ...cons and visual indicators Multiple Control Inputs mouse front panel remote control EKB500 Free EverFocus DDNS service Remote configuration support from built in web interface Smart Motion Search function Gigabit Ethernet interface for remote network viewing and controlling Real time live display for all cameras Individual channel control on schedule recording USB 2 0 ports for video archive and m...

Page 9: ...al Video Recorder x1 User s Manual x1 AC Adapter and Power Cord x1 Handheld Remote Control batteries included x 1 Hard Drive Rack Mount x1 SATA Connection Cable x1 Pack of screws x 1 marked accessories not included in some models ...

Page 10: ...on NTSC 704 x 480 704 x 240 or 352 x 240 PAL 704 x 576 704 x 288 or 352 x 288 Audio Input 1 x Line In 1 Vpp 20 KOhm RCA Output 1 x Line out 1 Vpp 20 KOhm RCA audio models only Alarm Inputs ECOR4 4 ECOR8 8 Alarm Output 1 Alarm Output N C COM N O Hard Disk 1 x 3 5 SATA hard disk Recording Rate NTSC 352 x 240 240 IPS 704 x 240 120 IPS 704 x 480 60 IPS PAL 352 x 288 200 IPS 704 x 288 100 IPS 704 x 576...

Page 11: ...control RS 485 operation from EKB500 Real time Clock Internal with optional network synchronization NTP server Watchdog Function Yes Network 10 100 1000Mbps RJ45 connection File Export USB 2 0 interface Built in DVD RW D models only RS 232 9 pin D Sub socket RS 485 Terminal connector Power Source 12 VDC with external power supply 100 240 VAC Power Consumption 60 W max Dimensions 320 W x 208 9 D x ...

Page 12: ... USB flash memory 2 DVD RW Burner DVD RW burner D models only 3 Channel Key 1 4 1 8 Press channel key CH1 CH4 CH1 CH8 to display that channel in full screen view 4 Live Press this key to show live view Press to exit from playback mode 5 View Press this key to switch between 4 screen 9 screen Picture In Picture and Full screen displays in live and playback mode Note1 PIP display is not available in...

Page 13: ...verse playback or step reverse playback depending on playback mode 9 Reverse playback or pause 10 Forward playback or pause 11 Fast Forward playback or step forward playback depending on playback mode 12 Enter and Arrow buttons If you do not use a mouse you can use these keys to change the Menu settings 13 Copy Press this key to enter Archive Menu For more detail about Copy function please see 4 7...

Page 14: ...p to 4 8 alarm inputs selectable between dry contact or TTL CMOS signal polarity 3 RS485 Terminal Connector for RS485 control 4 Alarm Out N C or N O type alarm signal out 5 Audio Output Connect a speaker or other audio listening devices to the audio output connection on the back of the digital video recorder 6 Audio Input Connect a microphone or camera audio output to the audio input connection 4 ...

Page 15: ... 8 Video Out Connect a CCTV monitor to the video output connection 9 VGA Connect a VGA monitor to the VGA output connection 10 RS232 For DVR serial command control 11 USB 2 0 back USB port allows you to archive video files to USB flash memory device or to connect the mouse 12 LAN RJ 45 network connection ...

Page 16: ...is a video signal on video input 1 upon power up 2 2 AUDIO CONNECTION INSTALLATION The ECOR DVR provides 1 audio input and 1 audio output The input is designed for max 500 mV to 10 KOhm line audio signals ATTENTION The direct connection of a non amplified microphone is not supported a microphone amplifier is required The installation must be done with audio coax cable and RCA plugs The output prov...

Page 17: ...n the ALARM menu Pin assignment Group PIN label Description Alarm in 1 Alarm input 1 G Common ground for alarm inputs 2 Alarm input 2 3 Alarm input 3 G Common ground for alarm inputs 4 Alarm input 4 Alarm out NC Output relay N C contact COM Output relay common PIN NO Output relay N O contact RS485 RS485 A RS485 B GND RS485 GND Default output relay state NO contact alarm input NC contact alarm inpu...

Page 18: ... Connection through Crossover Network Cable Figure 2 1 The point to point connection of DVR and PC requires a crossover crossed network cable This type of connection is ONLY used for direct connection to a single PC Make sure that the PC is equipped with a 10 100 1000 Mbps compatible network connection 2 4 2 Network Connection through Patch Cable Figure 2 2 The connection to an existing network re...

Page 19: ...twork Local control is provided by the optional EKB 500 keyboard Supported protocols EverFocus Pelco D Pelco P Transparent Samsung Figure 2 3 Sample installation with 3 EPTZ1000 speed domes and EKB500 Required DVR configuration RS 485 receiver address in CAMERA menu RS 485 parameters and protocol in I O CONTROL menu ATTENTION Some Pelco D P protocol domes and receivers may require an address offse...

Page 20: ...e completed the basic wiring connections you are ready to turn on the DVR Simply plug in the power source The POWER LED will light up if power is normal Once the system has finished loading you can begin to set up the menu options for the DVR ...

Page 21: ...basic operation using mouse and front panel 3 1 GENERAL USB MOUSE OPERATION 3 1 1 OSD Root Menu 1 Right click the mouse to obtain DVR control bar see Figure 3 1 When you move the mouse over each icon the appropriate title will be displayed on top of the control bar Figure 3 1 2 Click on any icon to perform that action These actions are covered in detail in Chapter 4 3 Click the x sign in the top r...

Page 22: ...he selected option will be available Click on an option to make changes 3 1 3 Component Options The following are examples of different fields available in the Configuration menu Textbox Click on the box and an on screen keyboard will appear below it For more details about on screen keyboard please see Note about on screen keyboard Dropdown box Click on the down arrow to see all selections then di...

Page 23: ...eft or Right Note about on screen keyboard Click on a button to input that character The buttons on the right and bottom have the following functions BS Delete the previous letter Delete Delete the next letter Clear Clear box Enter Confirm the selection Caps Switch to capital letters Space Enter a space Move to left Move to right Cancel Cancel and exit from the keyboard ...

Page 24: ... 3 2 2 Operation in Configuration Menu Press Menu button to enter the Main Menu NOTE If password is active you will need to log in first Refer to 4 2 Login for information on logging in The menu shown in Figure 3 3 is divided into 3 main sections Figure 3 3 OSD Menu 1 In section 1 there are twelve setup options available Use the arrow keys to highlight an icon and press Enter to select it 2 In sec...

Page 25: ... to enable or disable the setting Button Press Enter key to execute the function Selection box Press Enter key to select the field then use the Up Down arrow keys to scroll through the desired options Press Enter again to choose it Bar Press Enter key to activate the slider then use the Left Right arrow keys to adjust the setting Press Enter again to finalize the changes Note about on screen keybo...

Page 26: ...turned on it will start to record The exceptions are 1 ECOR will not record any disabled cameras Refer to section 5 3 1 for more detail 2 If a schedule is active ECOR will follow the record settings of the schedule 4 2 LOGIN In order to access ECOR options users will be asked to log in for authority identification To log in follow these steps 1 Click on the Menu icon or press Menu button to bring ...

Page 27: ...the password field to bring up the on screen keyboard see Figure 4 2 Click on each button to input the desired characters for the password When finished click Enter on the on screen keyboard to confirm the password Using front panel press Enter key to show the on screen keyboard Use the arrow keys to highlight each character and press Enter key on front panel to input the selected characters When ...

Page 28: ... to directly start rewind 4 3 3 Pause Mouse While in playback mode right click to bring up menu bar and click either or to pause the video Front panel While in playback mode press either or keys to pause the video 4 3 4 Fast forward Mouse While in playback mode right click to bring up menu bar and click to start fast forward Click the button again to increase playback speed to higher level 2x 4x 8...

Page 29: ... key to step forward once 4 3 7 Step backward Mouse While in pause mode right click to bring up menu bar and click to step backward once Front panel While in pause mode press key to step backward once 4 3 8 Stop playback Mouse While in playback or pause mode right click to bring up menu bar and click to go back to live mode Front panel While in playback or pause mode press key to go back to live m...

Page 30: ...Right click to bring up the menu bar and click to switch between 9 4 PIP and full displays By front panel Press key to switch between 9 4 PIP and full displays Notes 1 9 screen display is only available for 8 CH model 2 PIP display is not available in Playback mode 4 5 2 Bring to Full Screen Mode By mouse Left click on the selected channel to put that camera in full screen mode By front panel Pres...

Page 31: ...nfirm 2 Once the selection is made click on the OK button with the mouse or highlight OK using the arrow keys and press Enter key to confirm 3 If you wish to cancel the selection and exit from the quick menu click on the Cancel button with the mouse or highlight Cancel using the arrow keys and press the Enter key to confirm 4 6 2 Change Camera Order Cameras can be manually rearranged into a differ...

Page 32: ...meras will be archived Include Player Check the box to include the ePlayer file as part of the copy Start Date Time Select the starting date time to be archived End Date Time Select the ending date time to be archived Archive To Select whether you want to copy to USB or DVD Data Size Total size for the time period that you have selected for archiving Archive Now Press button to start archiving USB...

Page 33: ...l copy only Alarm and motion events All copies all video Archive Time From Select how far back you wish to copy from the drop down list Write Auto Archive Logic To USB Drive Press button to archive video file to USB 4 8 SEARCH By mouse Right click to bring up the menu bar and click to enter Search Menu By front panel Press key to enter Search Menu ...

Page 34: ... Time Search Play From Select the time period to be searched by choosing the Date and Time Click on the Search button to start search The DVR will automatically play the video being searched 4 8 2 Event Search Figure 4 7 Search Menu Event Search ...

Page 35: ...ick on the Search button to start searching The search results will be shown as a list of events explained in section 4 8 4 4 8 3 Smart Motion Search In order to perform a Motion Search motion must be enabled first see 5 3 3 Camera Setting Motion Figure 4 8 Search Menu Motion Search From Select motion search starting date time To Select motion search ending date time Camera Select camera number to...

Page 36: ...ed area Press Set All button to select the entire area Press Clear All to deselect the entire area Press Save Back to save the motion grid setting and go back to Motion Search menu Press Cancel to cancel motion grid editing Press Back to return to Motion Search menu See Figure 4 9 Press Search button to start searching 4 8 4 Search Result Time search will jump directly to the specified time and be...

Page 37: ... previous page of event list Go to the next page of event list Go to the last page of event list Click on any event to highlight it Date Time Check the box to show date and time in the list ID Check the box to show event ID in the list Press Play button to playback the selected event ...

Page 38: ...OUT Figure 4 11 is a screen shot of the LOGOUT SETTING MENU Figure 4 11 Logout Menu Press Logout button when you are ready to logout from the system You will need to login again before accessing any other options ...

Page 39: ...ck with the mouse to bring up the menu bar and click the button You can also press the Menu key on the front panel Note You will have to log in to access the Main Menu Please refer to 4 2 for login information 5 2 RECORD PLAY SETTING Figure 5 1 is a screen shot of the RECORD PLAY SETTING MENU This menu is used to configure basic recording and playback settings 5 2 1 Record Figure 5 1 Record Play M...

Page 40: ...will begin overwriting when full Auto Erase Video The hard drive will automatically erase after the selected number of days Select Off to disable this function Pre alarm Recording Check the box to enable pre alarm recording function 5 2 2 Play Figure 5 2 Record Play Menu Play Quick Playback Check the box to enable quick playback function Playback From X Seconds ago When the DVR is put into playbac...

Page 41: ...k the box to enable the current camera To take full advantage of the DVR s recording abilities any unused cameras should have this option disabled Record Mode 2 record modes are available to be chosen Continuous Constant recording Event Video will be recorded only when events occur Covert Check the box to hide a channel screen in live and sequence modes However the image will still be recorded and...

Page 42: ...et from 1 to 30 25 for PAL PTZ ID Set PTZ ID from 001 127 or OFF OFF is the same as 000 This ID must match the ID used by the PTZ camera in order to control the camera Copy Press Copy button to copy the settings to other cameras This will bring up the copy window shown in Figure 5 4 Check the boxes for each camera you wish to copy to then click OK to copy settings Click Select All to choose all ca...

Page 43: ...aturated or if the colors appear overwhelmed by glare try decreasing the Brightness Contrast Adjusts the total amount of light output from the display If details are lost or lines appear distorted try decreasing the contrast Color Adjusts the amount of color information in the picture Copy Press Copy button to copy the settings to other camera This will bring up the copy window Check the boxes for...

Page 44: ...the lowest setting and level 1 is the highest The default is level 5 Alarm output This will transmit a signal to another device It can be set to either NONE not activated or 1 output signal 1 transmits Output Type Output action when alarm is triggered Timeout Alarm output lasts for the set time duration Permanent Alarm will remain on until user presses Live key on front panel Timeout Dur Time dura...

Page 45: ...u Press Cancel to cancel motion grid editing Press Back to return to motion setting menu See Figure 5 7 Main Monitor Monitor display options when a motion occurs No change No change on the main monitor display Full screen A full screen of the active camera will display Copy Press Copy button to copy the settings to other camera This will bring up the copy window Check the boxes for each camera you...

Page 46: ... Permanent Alarm will continuously work until user presses Live key Transparent Alarm output continues as long as there is a video loss Trans Timeout Alarm output continues until event ends then lasts for the set time duration Timeout Dur Time duration selectable from 0 to 150 seconds Buzzer Check box to enable buzzer when a video loss event occurs Email Notify Check box to enable email notificati...

Page 47: ...ough Sunday as well as weekday weekend and daily Monday Tuesday Wednesday Thursday Friday Saturday Sunday Weekday from Monday to Friday Weekend Saturday and Sunday Daily every day of the week From This field is used to set the time you wish to start the timer recording Click on it to obtain the time setup menu Figure 5 10 Click on the arrows to change hour and minute then click OK to confirm or Ca...

Page 48: ...ecording rate displayed in the bottom left corner divided by the number of active cameras Event IPS recording rate for events Event record speed can be set from 1 to 30 IPS 25 for PAL Schedule Summary In schedule summary you will see the status start time end time and active day s of each schedule See Figure 5 11 Figure 5 11 Schedule Summary ...

Page 49: ...N C Normal Close contact Name Assign a name for the alarm input Active Camera This field is for assigning the alarm to a specific camera For example if you had an external motion detector on camera one you would set this option to 1 PTZ Preset Select PTZ Preset from 0 to 255 If the Active Camera is a PTZ speed dome the alarm will move the camera to a preset position for event recording This functi...

Page 50: ...the active camera will display Buzzer Check box to enable buzzer when an alarm occurs Email Notify Check box to enable email notification function when an alarm occurs Copy Press Copy button to copy the settings to other camera This will bring up the copy window Check the boxes for each camera you wish to copy to then click OK to copy settings Click Select All to choose all cameras Click Cancel to...

Page 51: ...ts in the log Buzzer Check box to enable buzzer when a fan fails to work Alarm Output This will transmit a signal to another device It can be set to either NONE not activated or 1 output signal 1 transmits Email Notify Check box to enable email notification function when a fan fails to work ...

Page 52: ...erature for all other active settings in HD Temperature Choose from 55 C 131 F 60 C 140 F or 65 C 149 F Alarm Output This will transmit a signal to another device It can be set to either NONE not activated or 1 output signal 1 transmits Stop Recording Check box to stop recording when HD s temperature is over the Temp Warning Limit Email Notify Check box to enable email notification function when H...

Page 53: ...ents in the log Buzzer Check box to enable buzzer when no hard drive is detected Alarm Output This will transmit a signal to another device It can be set to either NONE not activated or 1 output signal 1 transmits Email Notify Check box to enable email notification function when HD fails ...

Page 54: ...ard drive is full Alarm Output This will transmit a signal to another device It can be set to either NONE not activated or 1 output signal 1 transmits Timeout Dur The amount of time the buzzer sounds when the HD is full Duration selectable from 1 to 99 seconds Email Notify Check box to enable email notification function when HD is full ...

Page 55: ...ion DHCP DHCP server in LAN will automatically assign IP for network connection PPPoE This is a DSL connection application ONLY Check with your ISP if they use PPPoE User Name User name that is provided by ISP only shows up when PPPoE is selected Password Password that is provided by ISP only appears when PPPoE is selected IP This field shows the current IP Address for the DVR A static IP address ...

Page 56: ...ult addresses in the machine are for internal testing only You must apply your own addresses to comply with your network Refer to Chapter 8 for more details HTTP Port Port number for HTTP WEB communication Control Port Port number for controlling authentication on Network Viewer Bandwidth Limit Allows user to limit the bandwidth used by the DVR 5 6 2 EMAIL Figure 5 18 Network Menu Email SMTP Serve...

Page 57: ... that event messages are sent to Email Subject Input email subject 5 6 3 DDNS Figure 5 19 Network Menu DDNS DDNS Server Select either EverfocusDDNS or www dyndns org as the DDNS provider If DDNS will not be used simply select Disable Host name Host name of the account dyndns org only User name User name of the account dyndns org only Password Password of the account dyndns org only DVR Name Name y...

Page 58: ...th status of the disk Disk Size Total Shows total disk size available Disk Size Usage Shows percentage of used disk space If DVR is set to automatically overwrite the disk this option will show Overwrite mode currently Record Time Start Shows earliest recorded time on the hard drive Record Time End Shows latest or most current recorded time on the hard drive Format Disk Press Format button to form...

Page 59: ...display options for the Main Monitor Camera Title Check the box to display camera titles Date Time Check the box to display current date time Playback Date Time Check the box to display playback date time Playback Status Check the box to display playback status Event Status Check the box to display event status HDD Status Check the box to display hard drive status Text Insert Check the box to disp...

Page 60: ...r and dwell time on the main monitor Figure 5 22 Display Menu Main M T SEQ Step Sequence order Cannot be changed Camera Select camera number that appears on the current step Dwell sec Set the dwell time for each step Sequence dwell time can be set from 0 to 99 seconds ...

Page 61: ... Set current Time Date Format Choose date format from yyyy mm dd dd mm yyyy and mm dd yyyy Time Format Change time format between 12H and 24H mode NTP Update Interval The frequency that the system updates the correct time automatically when network is connected Select either Off Daily Weekly or Monthly NTP Server You can set the time server address that the DVR connects to for time synchronize To ...

Page 62: ...box to enable daylight saving time Start Date Set the start date of daylight saving time Start Time hh mm Set the time when daylight saving time begins Set To hh mm This is what the time will change to when daylight saving begins For most regions this will be one hour ahead of the Start Time ...

Page 63: ...name The on screen keyboard will pop up to allow you input the user name Password The on screen keyboard will pop up to allow you input the password Level Set user s level to one of the following Operator Manager or Administrator The access features of each level can be set in the Security section Status Set user s status to Enable or Disable Action Click the Delete button to remove the selected u...

Page 64: ...e the system to automatically logoff if left unused for 2 minutes Select user operation rights Select user operation rights for Camera Record Play Alarm Event Schedule Network Disk Display System Playback Covert Archive PTZ Operator All users have access to this option Manager Accessible by either manager or administrator level Administrator Only accessible by administrator level ...

Page 65: ...ects the level at which you will be connected There are three options None Odd or Even RS485 PTZ Protocol Select PTZ protocol from Transparent Pelco D Pelco P Everfocus or Samsung 485 ID If more than one DVR is used through the RS485 connection this can be used to assign different ID numbers It is selectable from 0 to127 Baud Rate The speed used to transmit instruction or information through the R...

Page 66: ... Default Click this Load button to restore all menu settings to the default values Load From USB Click this Load button to upload saved DVR configuration settings from USB Save To USB Click the Save button to save the current DVR configuration settings to USB device Language System can be set in different languages The available languages depend on the country or area subject to change Please cons...

Page 67: ... 29 Information Menu System 5 10 1 System System Version Displays firmware version number Model Displays DVR model number NTSC PAL Displays current video format Status Disk Displays disk temperature Fans Displays fan status Network IP Displays the DVR s current IP Address MAC Unique address of the DVR s internal network card This option cannot be changed ...

Page 68: ...og Log Type Event to see log sorted by event User to see log sorted by user Operation to see log sorted by operation View Log Press View Log button to view the log See Figure 5 31 for more detail Clear Log Press Clear Log button to clear the log ...

Page 69: ...Log List Go to the first page of log Go to the previous page of log Go to the next page of log Go to the last page of log Date Time Check the box to show log date time ID Check the box to show detailed log information ...

Page 70: ...enu Internet connection http IP address given by your Internet Service Provider The login page will appear on the screen similar to the one shown above Enter a user name and password to access the recorder These can be changed in the System section of the Main Menu The Default user name and password are admin and 11111111 Click on the Login button and you will log in to the recorder s Network View...

Page 71: ... connect to the DVR s IP address you should see a screen like the one below If you do not see a yellow bar like the one the arrow is pointing at your security settings may be too high If so go to the section labeled Enabling ActiveX Controls Right click on the yellow bar and select Install ActiveX Control ...

Page 72: ...le when prompted to do so Once the file finishes installing you will return to the same login page as before Type in the username and password and click Login to view the cameras Default username admin Default password 11111111 ...

Page 73: ... DO NOT see the yellow ActiveX bar at the top of your browser screen when you first connect to the DVR At the top of the Internet Explorer Window click on Tools then select Internet Options Click the Security tab at the top of the window then choose Custom Level near the bottom ...

Page 74: ... prompting for ActiveX controls Binary and script behaviors Display video and animation on a webpage that does not use external media player IE7 only Run ActiveX controls and plug ins Script ActiveX controls marked safe for scripting Prompt Download signed ActiveX controls Download unsigned ActiveX controls Disable Initialize and script ActiveX controls not marked as safe Click OK and then choose ...

Page 75: ...utton to reload the page Install the eDVR cab file when prompted to do so Once the file finishes installing you will return to the same login page as before Type in the user name and password and click Login to view the cameras Default user name admin Default password 11111111 ...

Page 76: ...normal yellow means a motion Vloss event is happening red means an alarm event is happening and grey means the camera is disabled Click on a camera number to switch that camera to full screen Click on 4UP to return to 4 screen display 3 There are 13 setup icons at the top of screen The first twelve have the same functions are the icons in the DVR s Main Menu The last icon PTZ control is described ...

Page 77: ...king Close 4 In Focus option click N to increase the focus or click F to decrease the focus 5 Under Zoom Click IN to zoom closer or OUT to zoom farther away 6 In the keypad section click on the numbers to input a desired pre set position Click Set to confirm a position Click Clear to delete a position Click GO to jump to a position 7 Tilt allows you to select the movement speed you want to use The...

Page 78: ...rch Event Search or Motion Search For more details about Search setting please refer to 4 8 Search Setting Playback Control Keys 1 Fast rewind the video 2 Play Reverse the video 3 Stop playback 4 Playback the video 5 Fast forward the video Playback Control Keys Select Camera number here ...

Page 79: ...vices the same exact IP address but the first three octets of an IP address should be the same for all computers in the local area network For example if a total of 253 computers exist in a single LAN the IP addresses could be assigned starting with 192 168 1 x where x represents a number in the range of 2 to 254 7 2 SUBNET MASKS Each host in a LAN has a subnet mask The subnet mask is a set of oct...

Page 80: ...his is the same case with ports on a network If the ports for a specific IP address are not open then you could not gain access to that IP address Note The term port also refers to several other aspects of network technology A port can refer to Ethernet connection points such as those on a hub switch or router The term port is also used to refer to a physical connection point for peripheral device...

Page 81: ...n connect to it by name See Chapter 8 for details on using EverFocus DDNS What type of DVR are you installing ______________ Everfocus EDR series EDR 410 810 920 1620 1640 or 1680 Everfocus EDVR series EDVR 4D1 9D1 16D1 16D3 Everfocus ECOR series ECOR 4 8 7 6 WHAT IS YOUR NETWORK SETUP Everfocus DVR s can operate using one of three types of networking connections 1 Simple One to One Connection A s...

Page 82: ...ing one if you have never made a cross over cable Please remember you can not use a straight through network cable for this application Once you have a cross over cable plug one end into the LAN port on the back of the DVR and the other into the network card on the back of the computer Log into the EverFocus DVR menu and go to the Network Setting Menu You must use the Static IP option for this typ...

Page 83: ...000 and a Gateway of 192 168 001 001 You can ignore DNS Server The next step is to set the computer s network settings to match those of the DVR You will need Administrator privileges on your Windows machine to do this To assign a fixed IP address in Windows 2000 XP ...

Page 84: ...77 ...

Page 85: ...78 ...

Page 86: ...ssign an IP address of 192 168 1 2 a Subnet Mask of 255 255 255 0 and a Default Gateway of 192 168 1 1 then click OK Restart both the computer and the DVR To access the DVR from the computer simply open Internet Explorer and in the address bar type http 192 168 1 3 ...

Page 87: ... purchase or make a straight through cable We recommend purchasing one if you have never made a straight through cable Please remember you can not use a cross over network cable for this application Once you have a straight through cable plug one end into the LAN port on the back of the recorder and the other into the high speed modem Cat 5 Straight Through Cable Internet Hi speed modem DVR ...

Page 88: ...automatically detect the network settings settings Therefore it can use a dynamic IP address Exit from the DVR s Menu to save the settings To access the DVR from a computer open Internet Explorer and in the address bar type http IP address given by your internet service provider Note When using this type of connection only one device can be connected to the modem at a time You will need to use a c...

Page 89: ...chase or make a straight through cable We recommend purchasing one if you have never made a straight through cable Please remember you can not use a cross over network cable for this application Once you have a straight through cable plug one end into the LAN port on the back of the recorder and the other into the router Cat 5 Straight Through Cable Internet Hi speed modem DVR Router ...

Page 90: ... instead Type command and click on OK o In Vista you will need to double click on the Command Prompt file to open it In the DOS prompt type ipconfig and press Enter The network information will be displayed on a screen similar to the one below o In Windows Vista look for the information that says IP v4 Take the values for Subnet Mask and Default Gateway and input them into the DVR these values sho...

Page 91: ...service provider blocks port 80 you can change it to a different port in the DVR s Network Menu Setup o If you are using a Linksys or D Link router see Chapter 9 for basic support on setting up ports For any other router you will need to contact the manufacturer for support To access the DVR from a computer simply open Internet Explorer and in the address bar type http the IP address given by your...

Page 92: ...r an available name Note This step is optional as it is only used to check the availability of host name If the name is available proceed to step 3 for DDNS setup Step 3 In DVR s Network Menu go to DDNS Choose EverfocusDDNS for the Server and put in your chosen name for DVR Name Step 4 Press Submit Update button to confirm Step 5 You should now be able to connect by typing the host name you create...

Page 93: ... a web browser and type the Router s default IP address 192 168 1 1 in the address bar Then press Enter A password request page will appear Non Windows XP users will see a similar screen Leave the User Name field blank The first time you access the router use the default password admin Click the OK button to continue The first screen that appears displays the Setup tab This allows you to change th...

Page 94: ...mber of the range under Start and the ending number under End Protocol Enter the protocol used for this application either TCP or UDP or Both IP Address For each application enter the IP Address of the PC running the specific application Enable Click the Enable checkbox to enable port forwarding for the relevant application When finished making changes click the Save Settings button to apply your ...

Page 95: ...u need additional technical support on this router you must call D Link Whenever you want to configure your network or the DI 624 you can access the Configuration Menu by opening a web browser and typing in the IP Address of the DI 264 The DI 264 default IP Address is 192 168 0 1 Type admin in the User Name field Leave the Password blank Click OK The first screen that shows up is the Home Tab This...

Page 96: ...e virtual service Private IP The IP address of the device running the local services Protocol Type The protocol used for the virtual service Private Port The port number that the service uses on the LAN Local Area Network Public Port The port number that the services uses on the WAN Wide Area Network Schedule The time period the virtual server will be active When you have input all the information...

Page 97: ...ion for each service Name Private IP Protocol Private Port Public Port Schedule HTTP 192 168 1 50 Both 80 80 Enable CTRL 192 168 1 50 Both 1600 1600 Enable Note If you changed port 80 in the DVR s Network Menu open that port instead of 80 ...

Page 98: ... is on the correct display setting Check that the monitor cables are good Verify the recorder is getting the correct amount of power There is no display coming from one of the channels on the DVR In the DVR s Camera Menu make sure that all cameras are checked as Installed and unchecked for Covert If there is still no picture connect a working camera to the port that has no picture If you get an im...

Page 99: ... alarm mode related to event record alarm outputs OSD message buzzer Timeout Transparent Mode t Input Event Alarm Duration t Duration t Reaction t Event t Event Duration of alarm input source motion contact system events t Duration Alarm duration for timeout defined in the event setup menus t reaction Resulting duration for this alarm mode related to event record alarm outputs OSD message buzzer A...

Page 100: ...tion Resulting duration for this alarm mode related to event record alarm outputs OSD message buzzer Permanent Mode t Input Event Alarm Duration t Reaction t Event Alarm Reset t Event Duration of alarm input source motion contact system events t Duration Alarm duration for timeout defined in the event setup menus t reaction Resulting duration for this alarm mode related to event record alarm outpu...

Page 101: ...ent Duration of alarm input source motion contact system events t Duration Alarm duration for timeout defined in the event setup menus t reaction Resulting duration for this alarm mode related to event record alarm outputs OSD message buzzer ...

Page 102: ...s t Event Duration of alarm input source motion contact system events t Duration Alarm duration for timeout defined in the event setup menus t reaction Resulting duration for this alarm mode related to event record alarm outputs OSD message buzzer ...

Page 103: ... 3 325X240 8 Single Picture Low 1 fps 62 4 325X240 8 Single Picture Low 1 fps 84 5 325X240 8 Single Picture Low 1 fps 102 6 325X240 8 Single Picture Low 1 fps 108 7 325X240 8 Single Picture Low 1 fps 94 8 325X240 8 Single Picture Low 1 fps 108 9 325X240 8 Single Picture Low 1 fps 104 10 325X240 8 Single Picture Low 1 fps 86 83 5 Complex Sec Mean time S 1 704X480 8 Dynamic Picture Superior 7 5 fps ...

Page 104: ...97 9 704X480 8 Dynamic Picture Superior 7 5 fps 8 10 704X480 8 Dynamic Picture Superior 7 5 fps 8 ...

Page 105: ... designed and manufactured with high quality materials and components which can be recycled and reused This symbol means that electrical and electronic equipment at their end of life should be disposed of separately from your household waste Please dispose of this equipment at your local community waste collection recycling centre In the European Union there are separate collection systems for use...

Reviews: