background image


Instruction Manual ZHK 


78/129 


V07-19.0 

Single-speed motors


Single-speed motors are suitable for direct and star-delta starting. If the wiring to the AHU outside 
was done by EUROCLIMA, standard wiring is for direct start. Wiring for star-delta start is possible 
on request. 
 
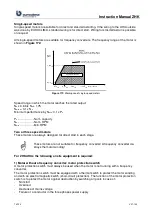
All single-speed motors are suitable for frequency converters. The frequency range of the motor is 
shown in

 Figure 172.


0,1*n


nom


0,6*n


nom


1,0*n


nom


Motor speed


1,0*P


nom


1,75*n


nom


0,1*P


nom


Motor 
power

Diagram: 

permissible absorbed power = f (speed) for three-phase 

motors with radiall fans in frequency converter operation 

Permitted workspace


 Absorbed power in case of turbulent 

flow and operation at nominal speed


Figure 172:

 Workspace of single-speed motors


Speed range in which the motor reaches the rated output: 
N

n

 x 0,6 bis N

n

 x 1,75 

N

min

 = 0,1 x N

n


Minimum performance by N

min

: 0,1 x P

n


P

n

 ..................... Nom. capacity 

N

n

 ..................... Nom. RPM 

N

min

 .................. Min. RPM 


Two or three speed motors


These motors are always designed for direct start in each stage.  


These motors are not suitable for frequency converter! A frequency converter de-
stroys the motor winding! 


For ZHK AHUs the following on site equipment is required: 


1) Motor without a frequency converter: motor protection switch 

A motor protection switch must always be used when the motor is not running with a frequency 
converter. 
The motor protection switch must be equipped with a thermal switch to protect the motor winding 
and with an electro-magnetic switch (short-circuit protection). The function of the motor protection 
switch is to protect the motor against destruction by switching all pools in case of:  

-

  Not start 

-

  Overload 

-

  Decrease of mains voltage 

-

  Failure of a conductor in the three phases power supply 


Summary of Contents for ZHK Series

Page 1: ...ZHK INSTRUCTION MANUAL ...

Page 2: ...well as local national and international regulations must be observed After completion of the work please give this instruction man ual to the operating staff Please keep the complete instruc tion and operating manual filed with your other documents Betriebsanleitung Instruction manual Manuale d istruzione ET 174 0 ...

Page 3: ...3 3 1 Control of weight limits of delivery sections 20 3 3 2 Necessary actions before lifting delivery sections with crane lugs 21 3 3 3 Mounting of crane lugs 23 3 3 4 Lifting by crane lugs 24 3 4 Overlifting of monoblocs 25 3 4 1 Weight details for monoblocs 25 3 4 2 Lifting of monoblocs 25 3 5 Further necessary actions for the overlifting of both delivery sections on crane lugs as well as monob...

Page 4: ...esh air damper 76 6 5 Pumps 76 6 6 Freeze protection measures 76 7 Electrical connection 77 7 1 Connecting to an external protective conductor system 77 7 2 AC motors 77 7 3 EC motors 82 7 4 Main switch emergency stop switch 82 7 5 Variable frequency controlled drives VFD frequency converters 83 7 6 Electric heaters 83 7 6 1 AHUs equipped from EUROCLIMA with control 84 7 6 2 AHUs which are not equ...

Page 5: ...9 5 3 Evaporative humidifiers 110 9 5 4 High pressure humidifiers 110 9 5 5 Steam humidifiers 111 9 6 UV section 111 9 7 Dampers 111 9 8 Sound attenuators 111 9 9 Weather louver 111 9 10 Energy recovery systems 111 9 10 1 Plate heat exchangers 111 9 10 2 Heat wheels 112 9 10 3 Heat pipes 112 9 10 4 Accublocs 112 9 11 Refrigeration circuit 113 9 11 1 Leakage checks 113 9 11 2 Maintenance 114 9 11 3...

Page 6: ...Instruction Manual ZHK V07 19 0 5 129 12 Disassembly and disposal 123 12 1 Disassembly 123 12 2 Disposal 124 Figure index 125 Table index 129 Original Instructions ...

Page 7: ...luding plate heat exchanger and refrigeration circuit ETA PT heat recovery by plate heat exchanger ETA ACCU heat recovery by accumulator ETA ROT heat recovery by heat wheel ETA WP refrigeration circuit heat pump function ETA PAC indirect adiabatic cooling CLEANLINE for hygienic use including control Design key AHU execution S AHU for indoor installation DG AHU for outdoor installation I AHU Indust...

Page 8: ...nless otherwise agreed the design of the AHU is for a nominal density of the air of 1 20 kg m Design responsibility for AHUs are built according to customer specifications AHUs of the series ZHK 2000 and ZHK INOVA as described in this manual are designed built and delivered according to customer requirements Therefore EUROCLIMA can select and offer a number of materials and components which are va...

Page 9: ...ts a massive security risk The operation of an AHU equipped with an electric heater while the fan motor is cut off or if the fan is working at a limited airflow for example caused by closed dampers or similar and with the electric heater in operation produces an imminent fire risk The operation in an explosive atmosphere is prohibited as long as the AHU is not executed in accordance with the ATEX ...

Page 10: ...trol cabinet The above mentioned documentation must always be available when working on the AHU You will also find stickers with warning labels and other instructions on and inside the AHU In this manual and on labels used symbols Indicate safety instructions or yellow triangle with the corresponding hazard pic togram Indication to avoid damage In addition to the contents of this manual the instru...

Page 11: ...ation of the AHU before the first start at least the following points must be imple mented or upgraded and is the responsibility of the client Assembly of delivery sections The delivery sections of the AHU must be assembled and linked together according to the drawing supplied on the inner face of fan section door See the chapter 4 Foundation erection Secure inlet and outlet openings All the inlet...

Page 12: ... according to chapter 6 3 Drain for condensate and excess water Dampers with external gear wheels According to chapter 5 5 Dampers with external gear wheels Flexible connection Installations if not supplied by EUROCLIMA refer to chapter 6 4 Duct connection airside connection to AHU Heat exchanger For all heat exchangers which are connected on site irrespective of the medium used water wa ter glyco...

Page 13: ...to consequently prevent oxygen supply and fire spread Exposure to harmful substances in case of fire In case of fire some materials can produce harmful substances In addition harmful vapors can escape from the AHU Therefore severe respiratory protec tive equipment is required and the danger zone has to be avoided Exposure to rotating parts hot surfaces electrocution When working on and or in the A...

Page 14: ...in and doors equipped with door locks are locked and the keys are re moved refer to chapter 5 2 Doors Storage of potential energy in gases and fluids All heat exchangers can be operating up to a maximum pressure of 15 bar If the fluid is under higher pressures the safety and tightness cannot be guaranteed Preventing the risk of explosion and fire spread To prevent the fire spreading fire dampers s...

Page 15: ...ur which may cause serious injuries Wear the required personal protective equipment protec tive goggles gloves etc Prevention of risks due to contact with refrigerant Physical contact with refrigerant must be strictly avoided as it can cause severe frostbite and damage the retina temperature range for example R407C at ambi ent pressure is approximately 44 C Prevent the risk of suffocation Safety r...

Page 16: ...mity to laws and directives 2 3 1 General The AHU will be built and delivered according to the agreed specifications and exactly to your re quirements It is important to note that the AHU is a part of a system and that the AHU is only after assembling and connection to the system ready for operation It is normal that the AHU is ready for operation only after installation work Depending on the part...

Page 17: ...U technicians Execution of maintenance monitoring of the operation by technical staff or trained personnel and qualified electricians and AHU technicians Work on optionally installed refrigeration components must be performed only by trained techni cians and according to EU directive 303 2008 certified refrigeration technicians Subsequently warning triangles indicate warnings that must be adhered ...

Page 18: ...ach part is secured against falling Attention narrow parts may tip over af ter removing the safeguard Secure narrow parts against tipping over Thin sheet metals like roof edges or fins are a source of injury Gloves safety shoes and long work clothes must be used Devices shall not be climbed If unavoidable weight must be compensated by use of boards Figure 1 Do not climb on the AHU Differentiation ...

Page 19: ...aster Monobloc AHUs have an additional counter frame on which the components are already pre assembled The counter frame is provided with holes diameter 50 mm which can be used for the overlift ing see chapter 3 4 Overlifting of monoblocs Size and weight of the monobloc is specified on the AHU drawing and have to be considered for the determination of the load carrying equipment and hoists see cha...

Page 20: ...lifting of AHU sections with crane lugs Chapter 3 3 is only valid for the delivery form Delivery in parts delivery sections For overlifting of AHUs delivered as Monobloc see chapter 3 4 In addition to the actions mentioned here the instructions according to chap ter 3 5 Further necessary actions for the overlifting of both delivery sections on crane lugs as well as monoblocs have to be observed Pa...

Page 21: ...x section weight kg 80 1 500 100 1 500 200 4 000 Table 1 Maximum AHU part weights for lifting by crane lugs Figure 7 Base frame height The weight of single delivery sections is shown in the attached drawing on each delivery section The delivery sections are marked with L1 L2 L3 on the drawing and with the same number on the section itself Example refer to Figure 8 Delivery section L5 601 kg Figure...

Page 22: ...gs Opening accessories such as dampers flexible connections hoods etc must be removed before lifting see the following examples This equipment must be lifted separately on a pallet and then be reinstalled Example 1 Figure 9 Delivery section with mounted damper Figure 10 Delivery section with dismounted damper ...

Page 23: ...n Manual ZHK 22 129 V07 19 0 Figure 11 Delivery section with mounted crane lugs Example 2 Figure 12 Delivery section with mounted flexible connection Figure 13 Delivery section with dismounted flexible connection ...

Page 24: ...rdance with the necessary preparations described in chapter 3 3 2 Neces sary actions before lifting delivery sections with crane lugs Execution of the lifting lugs see Figure 15 1 Right side type 2 Left side type Attention to correct mounting of the crane lug according Figure 16 blunt corner has to point upwards bending edge has to point toward the center of gravity of the section Figure 15 Left s...

Page 25: ...t H mm Screw type Nm 80 M8x20 10 100 M8x20 10 200 M12x30 30 Table 2 Tightening torque for screws 3 3 4 Lifting by crane lugs The load carrying equipment must not run over the operating side of the AHU but it must run over the opening or the front side of the AHU Figure 17 The force effect has to take place uniformly across all four crane lugs of a delivery section After the pre positioning of the ...

Page 26: ... the AHU drawing This weight must be considered at choosing appropriate transportation means 3 4 2 Lifting of monoblocs Monoblocs are generally delivered with a perforated counter frame hole diameter 50 mm for inserting suitable tubes rods where the AHU is lifted see Figure 19 and Figure 20 The tubes rods are not included in the delivery scope but have to be provided by the company which is respon...

Page 27: ...c crane lifting lugs with bolt con nections The bolts are mounted already by EUROCLIMA if this option is agreed Figure 22 The crane lugs are included in the scope of delivery of EUROCLIMA if the lifting of the mon obloc by monobloc crane lugs is agreed In accordance with the length and the weight of the monobloc AHU 2 3 or more crane lifting lugs have be mounted at each side of the AHU The weight ...

Page 28: ...load capacity per load carrying equipment is 50 of the total weight of the delivery section or monobloc The length of the load carrying equipment must permit a favorable course see Figure 26 The course of the load carrying equipment must be chosen so that overhang ing attachments roofs and the like will not be stressed or damaged Load carrying equipment shall not run over sharp edges and is not al...

Page 29: ...imes can cause damage on motors fans or pumps To avoid damage on bearings the rotors should be moved manually a few turns about once per month If the period between delivery and commissioning is more than 18 months then the bearing must be replaced Also components such as belts must be checked and if necessary replaced Removal of nylon packaging Remove the nylon packaging after delivery and place ...

Page 30: ...inforced concrete as shown in Figure 28 left or strip foundations as shown in Figure 28 right For strip foundations concrete or steel beams shall be used see Figure 28 bottom right Steel beams constructions must have an appropriate stiffness in relation to the AHU size The foundation must be flat and leveled it may not have fall in any direc tion or uneven surfaces AHUs have to strain via basefram...

Page 31: ...difier with inlets outlets overflows may be installed for humidification The pipes or hoses and their fittings can become leaky or loose so that inside or outside of the AHU water or the medium exits Cooling processes can cause dehumidification and the associated formation of condensation in the AHU The AHU is then equipped with condensate collecting trays and outlets Neverthe less condensate can ...

Page 32: ... conditions For AHUs suspended from the ceiling it is recommended in any case to provide a sufficiently dimensioned collecting tray with outlet under the AHU To avoid freezing of components the customer must ensure that the AHU is protected against weather which could lead to such problems Additionally the customer must take further measures to provide freeze protection Some possibilities for that...

Page 33: ...plet eliminators with caution and care 4 2 4 Special guidelines for flat AHUs ceiling AHUs Usage For the suspension under a ceiling Assembly of the individual components of the flat AHUs The individual components are screwed together by use of easy connection see Figure 46 chapter 5 1 2 The assembly should still be done on the ground since the Easy Connection on the top side of the flat AHU may no...

Page 34: ...ening doors processes of wells etc are not blocked by them see Figure 31 Longitudinal profiles are intended to support the aluminum profiles on the bottom edges of the flat AHU Furthermore it is recommended that the supporting profiles should be screwed together with the aluminum profiles of the bottom edge for secure positioning e g by means of threaded riv ets To avoid transmission of structure ...

Page 35: ...nly on the base frame profile Applying sealing material The supplied self adhesive sealing strip Figure 33 must be applied at all section connections be fore assembling see Figure 34 Following section connection points must be sealed The flange areas between sections Between duct and casing connection openings Between connection flange and dampers flexible connection weather protection grid sand t...

Page 36: ... be made by placing steel plates under the section The AHU sections can be pulled together with belts which attach on the base frame as shown on Figure 37 and Figure 38 Figure 37 Pulling AHU sections together Figure 38 Pulling AHU sections together detail Remove external panels at butt joints For aligning and connecting the delivery sections the external panels shall be removed unless heat exchang...

Page 37: ...e insulation Figure 40 Removal of the external panel ZHK INOVA Housing type screwing construction The external panel is located on the inner panel and is screwed to it using TORX screws see Figure 41 After removing all screws the outer panel can be removed and the insulation can then be removed Figure 41 Fitting the external panels Figure 42 External panel with un screwed screws Figure 43 Removal ...

Page 38: ...ere are other possibilities for connecting AHU parts These are dependent on the AHU series and are listed below ranked by the execution priority ZHK INOVA 1 Easy Connection see Figure 46 up to Figure 49 2 Connection angle connection frame see Figure 50 up to Figure 54 3 Connection via panels see Figure 55 and Figure 56 ZHK 2000 1 Connection angle connection frame see Figure 50 up to Figure 54 2 Co...

Page 39: ... Easy Connection at two storey AHUs Figure 50 Hexagon bolt with locknut M8x20 Figure 51 Connection angle Figure 52 Connection via connection an gle Figure 53 Hexagon bolt with nut M6x6 Figure 54 Connection frame Figure 55 Hexagon bolt with nut M6x16 Figure 56 Hole spacing of the internal panel n x 152 5 ...

Page 40: ...frame internal panel Screw spacing 152 mm Figure 57 Tapping screw ø8 x 11 Figure 58 Tapping screw Ejot ø8 x 16 Figure 59 Joint on the AHU drawing Figure 60 Connection between door frame internal panel Connection of 3 mm thick casing components without holes Figure 61 Self tapping screw ø6 3 x 22 Figure 62 Application of self tapping screws ...

Page 41: ...Joint on the AHU drawing Figure 65 Joint at the AHU Connection of internal and external panel ZHK INOVA Figure 66 Self tapping pan head screw TORX 25 ø4 x 25 Figure 67 Screw connection of internal and exter nal panel Connection of roof plates Screw spacing minimum 305 mm Figure 68 Hexagon bolt with nut stainless steel M6x16 Figure 69 Connection of roof plates ...

Page 42: ...ase frame profiles Figure 73 left If accessible in the connection angles located in the upper corners of the AHU Figure 73 bot tom center If accessible in the circumferential connection frame Figure 73 top center In the panels Figure 73 right For roof AHUs in the roof flange If only one side is accessible panels and connection frame the tapping screws ø8 x 11 or Ejot ø8 x 16 shall be used otherwis...

Page 43: ... together Reinsert the insulation and remount the external panel At AHUs of the series ZHK 2000 in outdoor execution or with outer aluminum panels the white protective film must be removed from the sealing tape before mounting Figure 74 Figure 74 Removing the protective film ...

Page 44: ...parations at wet areas For roof AHUs as well as at device separations directly before or after a wet area e g cooler hu midifier air washer special actions for sealing the AHU must be carried out 1 The sealing agent Sikaflex has to be applied instead of the sealing strip across the whole flange of the AHU 5 mm from the inner edge see Figure 80 Immediately thereafter the rele vant delivery sections...

Page 45: ...es at wet areas Figure 80 Sealing the frontal joints Figure 81 AHU separation acces sible via door Figure 82 Sealing the section con nection joint with the sealing agent For roof AHUs also the roof flange is to seal refer to Figure 83 Figure 83 Sealing the roof flange Sealing of loose delivered base frame cover Sealings have to be provided at following positions Figure 84 Joints Access door Joint ...

Page 46: ...ealing of open base frame holes if present 5 at the joints of the base frame covers After assembling the entire sealing has to be checked Figure 84 Sealing of the base frame cover At AHUs in outdoor execution an additional separation bar included in the scope of delivery must be mounted at the separation positions at the roof flange see Figure 85 Figure 85 Mounting of the sliding bar 5 1 2 4 3 ...

Page 47: ... with roof inside panel inclusive insulation The height difference of the roof inside panels on the edges which cross to the corner profiles and the top edge of the corner profiles is compensated by a sealing strip and or a double sided tape see Figure 87 Figure 87 Part of the AHU prepared for assembly of metal sheet roof A metal sheet roof which overlaps the entire width with pre punched holes Th...

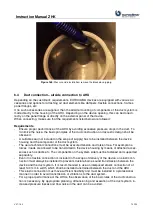
Page 48: ... protective foil from the double sided tape see Figure 87 Put on the roof sheet carefully Screw the roof sheet to the casing with the drilling screws which are intended for this purpose Close all joints between casing and roof with sealant Figure 91 Figure 91 Closing of the joints with sealant 5 1 6 Cable gland For the connection of engines pumps electric heaters sensors etc EUROCLIMA loosely sup ...

Page 49: ...igure 93 Sleeve Figure 94 Screwing Figure 95 Cable gland A drill with the diameter for the corresponding gland diameter see Table 3 column 2 is sufficient for the insertion of cables into a cabinet or a single walled housing In this case the screw is locked with the supplied locknut from the inside 5 1 7 Transport lock Remove the on fan motor base frame of spring isolators mounted transport lock s...

Page 50: ...rections Figure 97 right Figure 97 Securing the position on the foundation If AHUs will be erected on roofs a structural engineer must design the attachment of the AHU based on the local situation and weather conditions 5 2 Doors Hinged doors EU T ZHK 2000 and ZIS ZHK INOVA The EU hinged doors in ZHK execution have the following design features Space saving design Operated by a handle lever For an...

Page 51: ...igure 100 Door closed and locked Figure 101 Delivery of the keys Abovementioned doors with locks are an effective safety device according to EN ISO 12499 there is no situation where entering during fan operation is required refer also to chapter 2 2 Indica tions for minimizing specific hazards The locking mechanism of the hinged door is on the inside of the door panel and is shown in Fig ure 102 c...

Page 52: ...panel of the EU hinged doors problems can arise when closing and sealing of the door panel The door panel can be readjusted through the screws on the hinges For this purpose first the screws on the hinge Figure 108 or Figure 111 must be loosened Then the door panel can be brought in the correct position Figure 109 or Figure 112 and the screws can be tightened again Figure 107 Inclined door panel v...

Page 53: ...ide they enable a com plete removal of the door panel from the AHU in order to get access to the components inside The removal of the door panel from the casing can proceed as follows 1 Pull forward the black plastic handles 2 Rotate black plastic handles by 90 degrees 3 Take door panel with both hands and remove it Figure 113 fixed door panel TRA Figure 114 opened door panel TRA Figure 115 remove...

Page 54: ...crew connections see figure beneath Figure 119 fixing screw with clamping piece ZIB Figure 120 fixing mechanism at door frame ZIB Figure 121 fixed door panel ZIB Pay attention at removable door panels because after undoing the connection they could fall out and lead to injuries Therefore use always both hands firmly for fixing undoing and manipulating of door panels Attention Pressure sided doors ...

Page 55: ...e profile Now the pressure can escape Then the door panel can be opened completely Figure 122 Safety device catching lever Figure 123 Assembly of safety device on door panel 5 3 Dampers The close position of the dampers is indicated as shown in Figure 124 Figure 124 Closed position It is not permitted to drill in the damper otherwise it may cause damage to the gear wheels and the function of the d...

Page 56: ...must be attached on the front side between the filters between filter and door between filter and back side wall Figure 125 Pulling out the filters Figure 126 Pull out mechanism 5 4 2 Panel filter and or bag filters in filter frame Filters are supplied loose and have to be fixed by clips as follows 1 Take the filter clips which are included in the supply and are attached to brackets on the filter ...

Page 57: ...er after the other in the filter frame Figure 131 3 Press the last filter of the row against the rear panel Then press with the lever the filter cells against the sealing Figure 132 Figure 130 Loosen the clamps Figure 131 Slide in the filters Figure 132 Clamping the filters Attention For soft bags the lower bags of the filter cells need to lift up in order to prevent damage with the clamping syste...

Page 58: ...ss is avoided Important Examine if the first filter fits closely to the sealing Figure 138 Figure 137 pushing and clamping of the fil ters to the rear wall Figure 138 check if filter lie on the sealing 5 4 4 HEPA filters If a sealing is not included in the manufacturer delivery a suitable sealing is delivered loose by EUROCLIMA This sealing is then to fix on the filter cell or alternatively on the...

Page 59: ...g in the AHU casing They fulfill the prefilter function for terminal HEPA filters HEPA frame Filter Safe This is a welded filter frame It is flanged in between the AHU casing whereby leakages between frame and casing can be avoided The filter fulfills the requirements according EN ISO 14644 5 4 5 Activated carbon filter Activated carbon filter cartridges Figure 143 are delivered loosely and must b...

Page 60: ... the customer if not chosen as an option and sup plied by EUROCLIMA Figure 145 Damper with external gear wheels 5 6 Hygienic AHUs After assembly all grooves and joints at the connection positions must be sealed with the sup plied sealing agent In case of replacement of components sealing must be restored Access of components is ensured by door positions upstream and downstream of the compo nent th...

Page 61: ... heat exchanger connection it is necessary to hold against with a pipe wrench during the screwing Figure 146 Figure 146 Holding against with a pipe wrench Recommended sealing material for threaded sleeves Steam heat exchanger use special sealant Water glycol heat exchangers use Teflon tape In these cases hemp cannot be used as sealing material Connection pipes without thread If the connection pipe...

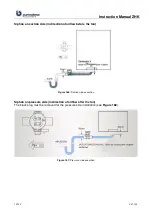
Page 62: ...or this task The piping for the heat exchanger should not hinder any maintenance required The connection of the heat exchanger is to execute as indicated on the label on the AHU connec tion diagrams in Figure 151 Figure 151 Heat exchanger connection The heat exchanger operates according to the cross counter flow principle Only preheat ex changer can be supplied for parallel flow operation on reque...

Page 63: ...ain at the lowest Otherwise the valves need to be mounted on another suit able point on the circuit Figure 153 Drain valve Figure 154 Vent valve 6 1 2 Steam heat exchanger The heater is heated to above 70 C next to the heater are plastic parts which have been installed To prevent damage of the plastic parts it is the responsibility of the client to undertake the follow ing Supply and installation ...

Page 64: ...ach temperatures of 110 C or higher Never add the chlorination in front of the water inlet of the plate heat exchanger The chlorina tion should be added as far away from the plate heat exchanger as possible see Figure 156 The water inlet should be close to the surface and the outlet near to the bottom This improves the mixing of the heated water and mainly prevents the entrance of chlorine particl...

Page 65: ...tment system is not supplied by EUROCLIMA and must be provided by the customer on site In order to reach a sufficient oper ation safety the circulation water quality should be in following range Quality Air conditioning system for Standard climate requirements Data processing areas Sterile and clean rooms Appearance Clear colorless and without sediment pH value 7 8 5 Total salt content GSG g m 800...

Page 66: ...ump circuit is delivered in parts see Figure 157 1 Pump on anti vibration socket plate 2 Suction side tube from water tank nozzle till flexible connector 3 Pressure side tube from flexible connector till water tank nozzle 4 Flexible connecting tubes 5 Threaded strut The connection between the parts must be made by flexible tubes and clamps which ensure the vibration decoupling of the pump arrangem...

Page 67: ...VC tubing diam eter pressure side suction side Flexible black rubber tube Clamp for flexible tube connection Type Normaclamp TORRO 12 W1 outer diameter mm outer diameter mm size Number for one flexible tube 25 approx 33 25 40 2 2 32 approx 42 30 45 2 2 40 approx 47 40 60 2 2 50 approx 61 50 70 3 3 63 approx 76 60 80 3 3 75 approx 87 70 90 3 3 90 approx 106 90 110 3 3 110 approx 120 110 130 3 3 125...

Page 68: ...ize range must be as indicated in Table 5 Do not apply any lubricant between the black flexible tube and the rigid grey tube This could degrade the flexible rubber tube and reduce the safety of the connection Do not use any cleanser of benzene this could damage the rubber material 3 Positioning of the flexible tube and clamps Check if the flexible tube is positioned correctly overlapping 60 mm on ...

Page 69: ...for strut Figure 160 Position and parts for installing the strut To install the threaded strut proceed as follows Fix the clamp for the strut at the upper horizontal tube near to the vertical pump coming from the pump The base support shall be installed vertically under the upper clamp For spray humidifier equipped with UV water treatment a small discrepancy may be possible Cut the threaded rod to...

Page 70: ...s must be integrated in the customer s control The water amount of the drainage can be set manually at the tacosetter At the customer s request simplified systems will be delivered Figure 161 Components of an evaporative humidifier system with circulation water operation High pressure spray humidifier The manufacturer of the high pressure spray humidifier must be contacted for the installation Ste...

Page 71: ...al drains may not be connected to one siphon The water from the siphon must run in a funnel Before starting fill the siphon with water In the case of outdoor AHUs an antifreeze mechanism has to be provided on site The heights H1 H2 and H3 can be determined from the maximum negative pressure p and maxi mum pressure p in the section of the siphon or be determined by the information on the technical ...

Page 72: ...l siphons with the below shown design are supplied by EUROCLIMA then the following in structions should be observed during installation Depending on the suction side or pressure side mounting position the siphon body has to be in stalled so that the direction of the arrow see Figure 165 corresponds to the flow direction Pa suction side Pa pressure side Figure 165 Observe the mounting position flow...

Page 73: ...n side in direction of airflow before the fan Figure 166 Suction side execution Siphon on pressure side in direction of airflow after the fan The black plug must be removed for the pressure side installation see Figure 168 Figure 167 Pressure side execution ...

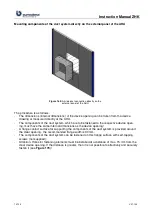
Page 74: ...y has to be installed between the device housing and the component of the duct system The aero technical connections must be executed tension and torsion free For example no forces loads are allowed to be transmitted to the device housing by means of attached acces sories such as ducts etc The components on the system side must be fastened and supported separately Even if no flexible connection is...

Page 75: ...rnal dimensions as the device opening A flange contact surface for supporting the components of the duct system is provided around the clear opening the recommended flange width is 30 mm The components of the duct system can be fastened on this flange surface with self tapping screws not supplied Attention Holes for fastening elements must be installed at a distance of max 15 mm from the clear dev...

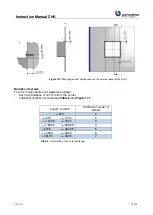
Page 76: ...screws The duct components are screwed as follows each at a distance of 120 mm from the corner additional number of screws see Table 6 and Figure 171 Table 6 Information on the screw distances Length or width Additional number of screws 915 0 915 1220 2 1372 5 1830 3 1982 5 2592 5 4 2745 3202 5 5 3355 3660 6 3812 5 3965 7 ...

Page 77: ...f subsequent pump installation it has to be noted that the intake socket is below the water surface The pump base has to be set so low that the suction tub declines towards the pump For noise insulation the foundation shall be executed as the AHU itself refer to chapter 4 1 Foundation Fresh water supply The maximum allowable pressure is 300 kPa 3 0 bar 6 6 Freeze protection measures It is the cust...

Page 78: ...stem The AHU shall be either connected at the base frames or alternatively at the potential compensation that is mounted on the flexible connection by EU ROCLIMA Furthermore each electrical component must be connected to the protective conductor system The connection to the external protective earth system has to be executed according to EN 60204 1 pt 5 2 The minimum cross sectional surface of the...

Page 79: ...he motor reaches the rated output Nn x 0 6 bis Nn x 1 75 Nmin 0 1 x Nn Minimum performance by Nmin 0 1 x Pn Pn Nom capacity Nn Nom RPM Nmin Min RPM Two or three speed motors These motors are always designed for direct start in each stage These motors are not suitable for frequency converter A frequency converter de stroys the motor winding For ZHK AHUs the following on site equipment is required 1...

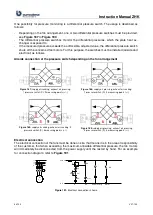
Page 80: ...ption for smaller capacities available For all plug fan motors To prevent motor damage the PTC must be connected to a PTC relay The PTC relay does not replace the motor protection switch or circuit breaker and is needed in addition The connection to a PTC relay is a prerequisite for the war ranty of the product in case of winding damage The full motor protection consists of temperature sensors and...

Page 81: ...e placed directly on the switch and so no special relay as for PTC is needed Block diagram for connection refer to Figure 174 Figure 174 Wiring diagram for thermal contacts ETA AHU These AHUs are as standard equipped with a circuit protection switch and frequency converters if not equipped with EC motors When the motor is equipped with a PTC it is connected to fre quency converter to monitor the t...

Page 82: ...ble device Af terwards connect the phases accordingly to motor terminal or main switch if supplied and wired by EUROCLIMA Figure 177 Rotation marking of plug fans Figure 178 Rotation marking of housing fans Figure 179 Rotation marking of EC fans Fastening torque for electrical connections on the control panel refer to Table 7 Thread Ø M4 M5 M6 Nm min 0 8 1 8 2 7 max 1 2 2 5 4 Table 7 Torques for t...

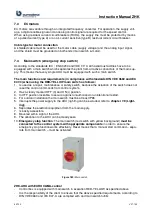
Page 83: ...YELLOW main switch as follows 1 Is used as a repair maintenance or safety switch because the actuation of the switch does not reset the control commands from control system 2 Has a clearly marked OFF 0 and ON I position 3 In OFF position lockable to secure against unauthorized or unintentional restart 4 For outdoor installation the main switch must be at least IP65 5 Interrupts the power supply to...

Page 84: ...equency converter must be adapted for the installation type IP rating type of ventilation temperature electromagnetic environment If the frequency converter will be mounted in the fan section the frequency converter must be equipped with a separate display unit In this case the display is to be kept on the outside of the AHU operating in the fan section is not permitted for safety reasons When usi...

Page 85: ...nd at full ca pacity at ON OFF operation there is a significant risk of overheating of the AHU which contributes to the damage of several components This risk occurs espe cially at low air flows For this purpose the air handling unit is equipped with a supply air sensor which directly measures and monitors the air temperature generated by the electric heater The control engineer ing is used to ens...

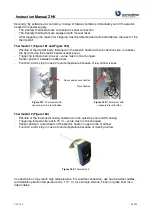
Page 86: ...t not be changed Sensor position between heating bars Function alarm stop in case of over temperature because of low airflow issues Figure 181 Thermostat with cover cap on the reset button Figure 182 Thermostat with uncovered reset button Thermostat 2 Figure 183 Position of the thermostat casing fastened on the outside panel of AHU casing Triggering temperature set to 70 C value must not be change...

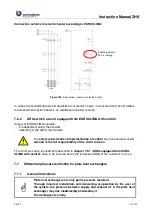
Page 87: ...d correct implementation of control has to be carried out on site and is the full responsibility of the client to do so The minimum safety requirements described in chapter 7 6 1 AHUs equipped from EURO CLIMA with control have to be ensured and is the full responsibility of the customer to do so 7 7 Differential pressure restriction for plate heat exchangers 7 7 1 General indications Plate heat ex...

Page 88: ...ured on site that all dampers which have a pressure in creasing effect For example outside air dampers exhaust air dampers dampers in ducts are not completely closed during commissioning and operation Unless otherwise stated the assumed pressure situation in the ducts suction and pressure side for the technical design is based on the specification of EN13053 The real pressure situation in the duct...

Page 89: ...arrangement Figure 187 supply air sucking exhaust air pressing 1 pressure switch S 2 measuring points Figure 188 supply air pressing exhaust air sucking 1 pressure switch S 2 measuring points Figure 189 supply air sucking exhaust air sucking 2 pressure switch S 4 measuring points Figure 190 supply air pressing exhaust air pressing 2 pressure switch S 4 measuring points Electrical connection The el...

Page 90: ...ted by the customer on site at commissioning The correct con nection of the measuring hoses according to Figure 187 to Figure 190 must be ensured before commissioning If you have any questions or doubts regarding the correct installation connection and adjustment of differential pressure switches or other measures to protect against impermissible pressures please contact EUROCLIMA 7 8 Frost protec...

Page 91: ...apter 2 2 Indications for minimizing specific hazards and the user manual of the lamp manufacturer delivered with the present instruction manual have to be considered Due to the high voltage of the lamp maintain it safely and do not work with it whilst it is on Danger of life due to electrical shock DANGER UV risk class 3 These lamps emit strong UV radiation which could lead to serious injuries of...

Page 92: ...n sioning of belts Check the motor connection and the matching of the supply voltage at the rated voltage a fluctuation of supply voltage between 5 is permitted 8 1 1 Variable frequency controlled drives frequency converter parameters The frequency converter must be configured if not done by EUROCLIMA please refer to technical data sheet parameterization using the following Table 9 respectively th...

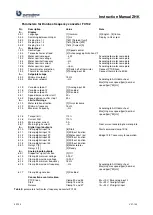
Page 93: ...ncrease after start 1 30 s 3 42 Speed decrease after stop 1 30 s 4 Limits Warnings 4 10 Motor rotation direction 0 Only clockwise 4 12 Minimum frequency 15 Hz 4 14 Maximum frequency Hz According to AHU data sheet Max Hz max speed rpm nominal speed rpm 50 Hz 4 16 Torque limit 110 4 18 Current limit 110 4 50 Warning low current 0 A 4 51 Warning high current A Nom current according to motor plate 5 D...

Page 94: ...low rate can be determined from the pressure signal Airflow rate calculation Airflow rate calculation V Nominal airflow rate m h V Nominal airflow rate m h KA KA factor for formula A m s h kB kB factor for formula B m h Pa0 5 Δpw Measured diff pressure Pa Δpw Measured diff pressure Pa ρV Air density at the fan kg m If several fans in a fan section are operated in parallel with the same speed then ...

Page 95: ...ust be observed Fan execution Displays in pcs Measuring points Total air flow rate 2 fans 50 50 1 display Only the fan near est to the operating side Displayed value 2 2 fans 100 100 2 displays Both fans sepa rately Displayed value pow ered fan 2 fans fan walls 1 display Only the fan near est to the operating side Displayed value num ber of powered fans Table 11 Notes for airflow rate indicators w...

Page 96: ...anometer are op tional and must be filled with the supplied test liquid bottle of density 1 kg l If a differential pressure switch is mounted option or is it installed on site then it is to set to the final pressure drop Information regarding final pressure drop can be found at the technical data sheet In addition the output of a warning message when the final pressure loss is reached must be ensu...

Page 97: ...r General indications Check the proper installation of the PVC fins and droplet eliminator The arrow must point in direction of airflow Figure 193 Fins made from cellulose material can have initially an odor that is normal and will soon disap pear Circulation water operation The blowdown quantity is to be setup manually at the tacosetter Recommended setting thumb Bleed off rate evaporation rate En...

Page 98: ...oup A1 according to EN378 part 1 in con trast to flammable refrigerants such as Propane or toxic refrigerants such as Ammonia They are actually non flammable under normal operating conditions and do not create explosive mixtures with air but are odorless Only higher concentrations in the air can be noted by the olfac tory sense Refrigerant vapors which escape from leaking cylinders or refrigeratio...

Page 99: ...red and compared with the nameplate If the actual power consumption is too high there is maybe a faulty connection The system must be shut down immediately Measure the volume flow and the pressure difference Often the measured airflow does not match with the design data of the device Possible causes for low airflow The external pressure drop is higher than indicated on the technical data sheet e g...

Page 100: ...ies After a change of the transmission ratio the current consumption of the motor must be controlled in each case If the consumption is too high the effective diameter has to be adjusted again The nominal current shown on the nameplate must not be exceeded Determination of frequency converter caused problems You can determine whether or not problems are caused by the frequency converter by connect...

Page 101: ...ly to damages to property or personnel 9 Maintenance EUROCLIMA AHUs are built mostly maintenance free and easy to maintain when required The maintenance intervals see Table 17 are indicative for normal operating conditions Widely differ ing applications may require different intervals ask EUROCLIMA for details The execution of the described checks and maintenance needs are necessary to ensure a pe...

Page 102: ...22 sheet 1 requirements regarding operation and maintenance 9 1 Electrical connection control cabinet All electrical connections must be inspected annually and deficiencies e g loose cable strands loose screw and clamp connection etc must be identified and eliminated immediately The following maintenance work is recommended for the control cabinet of AHUs with integrated control annual change of t...

Page 103: ...1 4 weeks 70 T 100 1 2 weeks 100 T 1 7 days Extreme humidity 1 week Table 13 Lubrication intervals for fan bearings Figure 199 Fan bearing with grease nipple example Comefri NTHZ Supplier Type Basis Temp range FINA Marson HTL 3 Lithium 30 C 120 C SHELL Alvania Fett 3 Lithium 20 C 130 C ESSO Beacon 3 Lithium 20 C 130 C MOBIL Mobilux EP3 Lithium 30 C 130 C Table 14 Recommended grease types Plug fan ...

Page 104: ...1 min 6 pole 1000 1 min 8 pole 750 1 min bis 180 12 12 12 12 bis 250 6 12 12 12 280 3 12 12 12 Table 15 Lubrication intervals for motor bearings in month For different unfavorable operating conditions the intervals are to be reduced according to the motor manufacturer s instructions Recommended grease types for the relubrication of motor bearings can be taken from Table 14 chapter 9 2 1 Fan 9 2 3 ...

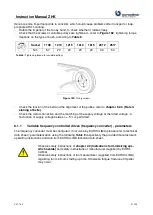
Page 105: ...tes discs rotated to each other Figure 203 Figure 203 Unfavorable operating conditions 4 9 2 4 Re tensioning of belts Moving the motor away from the fan adjusts the tensioning of the belt Depending on the size of the motor is this On a rocker swivel On rails moveably mounted Loosening the lock nut and then turning the adjustment screws make the necessary adjustment It is important to maintain the ...

Page 106: ...threaded rods on the left and right side shown in Figure 205 Figure 205 Adjustment of pulleys via threaded rods In case of various pulley widths the gap must be equal on both sides The belt drive is to be re tensioned after the first 10 operating hours Belt tension The correct tension of the belt is obtained through adjustment in compliance with the tensioning data which is calculated separately f...

Page 107: ...that are based on frequency measurements are available on the market Tension the belt in a way that during the measurement you measure the same frequency as indicated on the fan data sheet 9 2 5 Replacing of belts Loosen the belt tension to ensure that the old belt can be removed Clean components before putting on the new belt pullies and check for damage and wear Never push the new belt with a to...

Page 108: ...ly Use only filter types and filter sizes which are suitable and intended for assembly Please view the technical data for getting this information Figure 208 Figure 208 extract filter section of technical data All filters should be checked for tightness because otherwise they could be sucked in and could lead to damage If AHUs are equipped with EUROCLIMA control then a corresponding warning messag...

Page 109: ... bayonet fastening 2 Insert and fix a new filter cartridge 3 Check tightness of the filter 9 4 Heat exchangers For prolonged standstill periods we recommend the complete emptying of the heat exchanger At each refill the heat exchanger must be vented properly The manual of the component manufacturer must be read and considered for cleaning works 9 4 1 Medium water steam Special maintenance for heat...

Page 110: ...il Check automatic vapor supply stop and automatic fan run for some minutes after the AHU is shut down 9 4 2 Refrigerant For the medium refrigerant direct evaporator or condenser coil the same actions apply as de scribed in chapter 9 4 1 Medium water steam For additional actions to be taken see chapter 9 11 Refrigeration circuit 9 4 3 Electric Heater When working on the electric heater refer to th...

Page 111: ...chapter 9 5 1 are to be applied analogously Check water supply for proper function and check the water level if necessary adjust the float valve so that the valve closes at a water level of 10 15 mm below the overflow Disassemble and clean the nozzles Damaged nozzles are to be replaced Never clean the nozzle holes with hard objects Clean the nozzle holder without nozzles with high pressure water M...

Page 112: ... rotation Spray the wheels with silicone spray if necessary Warning Gears cannot be treated with organic oils Check linkages tighten the screws if necessary 9 8 Sound attenuators Acoustic baffles are basically maintenance free They must be checked for damage within major maintenance work and shall be replaced or properly repaired if required 9 9 Weather louver Check for dirt damage and corrosion a...

Page 113: ...n the drain pan and check the siphon Fill the siphon if necessary Fins cleaned by o Compressed air against the air flow direction or o Spraying with low pressure water if required add household cleaning detergent If bypass dampers exist please refer to chapter 9 7 Dampers 9 10 4 Accublocs Electrical connection The accubloc is supplied including a controller supplied loosely configured with default...

Page 114: ...per half 8 The memory blocs could be cleaned with compressed air or with a high pressure cleaner Thereby the distance of the nozzle lance must be big enough to ensure that the structure of the memory blocs do not get damaged If chemical cleaning additives are used only for alumi num suitable and non alkaline cleaning agents are allowed 9 11 Refrigeration circuit To make sure that the environmental...

Page 115: ...gh the sight glass if present If oil is not visible ensure that there has not been a loss of oil even outside of the AHU is possi ble Optionally pour oil directly by an oil pump into the compressor suction side Only use oil that is approved by the compressor manufacturer During standstill periods of the compressor operation the compressor crankcase heater switches on in order to avoid an accumulat...

Page 116: ...e work Handling If the unit goes into high or low pressure mode the problem must be acknowledged at the control panel for the compressors to start again Electrical superheat controller The electronic superheat controller has an internal battery so that the valve closes securely even during power failures Without this feature the valve remains open resulting in liquid hammering in the compressor at...

Page 117: ...ance plan for EUROCLIMA AHUs you will find in chapter 9 13 of the instruction man ual EUROCLIMA recommends maintenance in dependence on VDMA 24186 part 1 and VDI 6022 part 1 In chapter 7 of VDI 6022 part 1 you can find detailed requests on operation and maintenance EUROCLIMA recommends as cleaning agent Allrain or Multirain as disinfectant Sanosil or Sanirain of Hygan 9 13 Maintenance plan The mai...

Page 118: ...ain pan X Ch Cl Droplet eliminator X Ch Steam coil X 9 4 1 Medium water steam Electric heater Ch Cl E heater X 9 4 3 Electric Heater Check e heater section for thermal damages after mains supply failure Humidifier Ch M Pump X 9 5 1 General indications Ch Cl Decalcify cleaning if necessary Ch Drain pan X Ch Cl M Spray humidifier X 9 5 2 Spray humidifier Ch Spray humidifier tubing X M Flexible conne...

Page 119: ...nment Figure 213 Sound data information 11 ATEX AHUs The ignition hazard assessment was performed according to EN 13463 1 2009 and EN 1127 1 2011 Applied protection EN 13463 5 2011 Protection by constructional safety c 11 1 General notes Hazardous areas must be rated on the frequency and duration of the occurrence of hazardous ex plosive atmospheres gas air or steam air mixtures and or dust air mi...

Page 120: ...ormal 2 1 D Dust gas mixture Even in rare mal functions very high 20 2 D Dust gas mixture Even with the usual malfunctions high 21 3 D Dust gas mixture In normal operation normal 22 Table 18 AHU categories Classification according to surface temperature for devices of group II G Temperature class Max surface temperature C T1 450 T2 300 T3 200 T4 135 T5 100 T6 85 Table 19 Temperature classes of AHU...

Page 121: ...on measures of this category must provide the necessary se curity even though lots of disturbances and error states which usually have to be considered occur II 2 3 G c T3 inside outside The AHUs are used for processing and transport of explosive atmospheres of zone 1 and for instal lation in Zone 2 The device specific explosion protection measures of this category inside must provide the neces sa...

Page 122: ...tion cable glands probes etc After completion of the work the tightness of the work must be checked appropriately Motor Electrical connection refer to chapter 7 2 AC motors standard main switches must be as sembled outside the hazardous area Connection potential compensation according to the provided instructions of the motor manu facturer In general All conductive connections HE piping siphon duc...

Page 123: ...f explosion and the decla ration of conformity loses its validity 11 3 6 Field devices On site assembled field devices must comply the ATEX class specified by EUROCLIMA The electrical components switches lights sensors motors etc must be approved for opera tion in explosive atmospheres and must be equipped with an appropriate marking The cabling must meet the relevant standards Appropriate potenti...

Page 124: ...ternal panels and removal of the insulation Loosening of the screw connections Loosening of the rivet connections by drilling the rivets Disassembly of the built in parts Secure slender components against tipping over Use of appropriate scaffolds and load carrying equipment The AHU components must be raised with suitable load carrying equipment e g belt with hook or shekel with chain and have to b...

Page 125: ... Casing panels built in components base frames heat exchangers VZ and VZB sheet metal 170405 Stainless steel 170405 Aluminum 170402 Copper tube 170401 Copper cable Copper cable 170411 Casing insulation Mineral wool 170604 Air filter Plastic metal 150106 Droplet separator slats Plastic 150102 Insulation profile ZHK INOVA Sealing tape Piping EC motor Guidelines for the disassembly and instructions f...

Page 126: ...ne lifting lugs mounted 27 Figure 26 Permitted angle for load carrying equipment guidance 28 Figure 27 Protection against dirt 29 Figure 28 Solid foundation and strip foundation 30 Figure 29 Suspension of ceiling AHUs 32 Figure 30 Spray humidifier with both sides feet 32 Figure 31 Suspension with transverse profiles 33 Figure 32 Suspension with longitudinal and transverse profiles 33 Figure 33 Sea...

Page 127: ...he sliding bar 45 Figure 86 Applying the sealing agent on the frontal joints 46 Figure 87 Part of the AHU prepared for assembly of metal sheet roof 46 Figure 88 Drilling screw countersunk head TORX 25 with sealing ring ø 4 8 x 30 47 Figure 89 applied sealant Sikaflex 47 Figure 90 Metal sheet roof mounted 47 Figure 91 Closing of the joints with sealant 47 Figure 92 Step drill 48 Figure 93 Sleeve 48...

Page 128: ...ure 149 STRAUB coupling 61 Figure 150 mounted STRAUB coupling 61 Figure 151 Heat exchanger connection 61 Figure 152 Hydraulic connection scheme 62 Figure 153 Drain valve 62 Figure 154 Vent valve 62 Figure 155 Condenser for warming pool water 63 Figure 156 Notes concerning plate heat exchangers 63 Figure 157 Parts of spray humidifier pump circuit 65 Figure 158 Correct positioning of the flexible co...

Page 129: ...nstallation of honey comb and droplet separator packages 96 Figure 194 Smallest working diameter 98 Figure 195 Biggest working diameter 98 Figure 196 Schematic structures of a variable pulley 99 Figure 197 Position of the Allen screws on variable pullies 99 Figure 198 Typical vibration curve 100 Figure 199 Fan bearing with grease nipple example Comefri NTHZ 102 Figure 200 Unfavorable operating con...

Page 130: ...81 Table 8 Tightening torque for variable pulleys 91 Table 9 parameters for Danfoss frequency converter FC102 92 Table 10 Formulas for airflow rate measurement 93 Table 11 Notes for airflow rate indicators which are included in the scope of delivery 94 Table 12 Data of pulley types 99 Table 13 Lubrication intervals for fan bearings 102 Table 14 Recommended grease types 102 Table 15 Lubrication int...

Page 131: ... Sector 3 Millenium Business Park Mahape 400 710 Navi Mumbai INDIA Tel 91 22 4015 8934 info euroclima in www euroclima com Euroclima Apparatebau Ges m b H Arnbach 88 9920 Sillian AUSTRIA Tel 43 0 48 42 66 61 0 Fax 43 0 48 42 66 61 24 info euroclima at www euroclima com Euroclima Middle East P O Box 119870 Dubai UNITED ARAB EMIRATES Tel 9714 802 4000 Fax 9714 802 4040 info euroclima com www eurocli...

Reviews: