background image

6

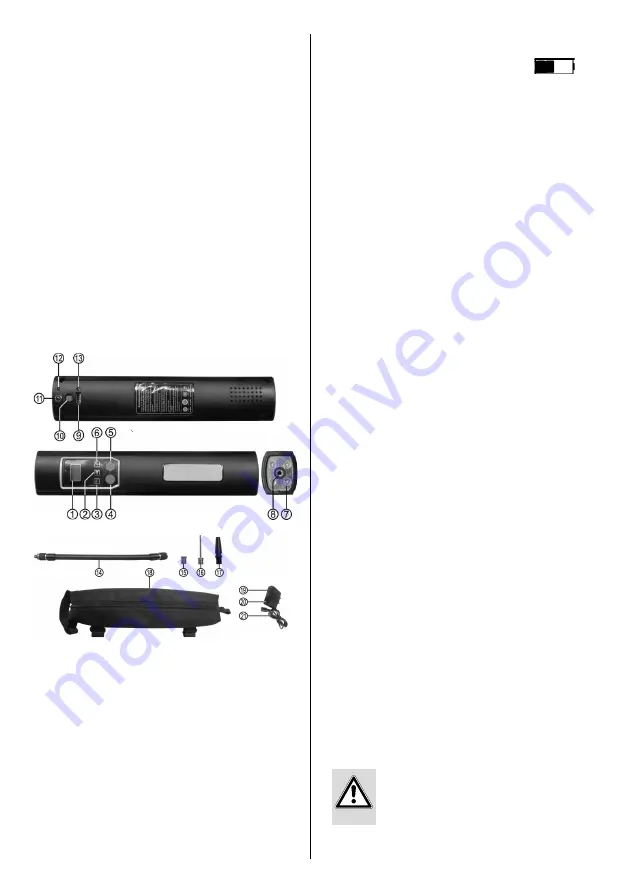
1.   Display

2.   Unit selection button

3.   (-) Button

4.   ON/OFF button for LED light

5.   ON/OFF button for compressor

6.   (+) Button

7.   LED light

8.   Connector for the air hose

9.   USB port

10.  ON/OFF button for USB connection

11.  Charging port

12.  Charging indicator light

13.  USB port indicator light

14.  Air hose

15.  Adapter for bicycle valves

16.  Adapter for balls 

17.  Universal adapter for leisure items

18.  Storage case

19.  Plug-in charger

20.  Charging indicator light

21.  Charging cable

Figure 1: Overview 

6. OPERATING INSTRUCTIONS

6.1 OVERVIEW

Figure 2: Overview of accessories

Insert the charging cable (position 21 in the overview) of the 

plug-in charger (position 19 in the overview) into the charging port 

of the compressor (position 11 in the overview). Plug the charger 

into a mains socket. The charging indicator light (position 12 in the 

overview) will now light up. During the charging process the charging 

indicator light on the plug-in charger (position 20 in the overview) will 

be red. When the compressor’s battery is fully charged, the indicator 

light will be green. It takes approximately 4 hours to charge an empty 

battery.

After charging, fi rst pull the plug-in charger out of the mains 

socket and separate the compressor from the charging cable. 

Always maintain this sequence.

6.2 CHARGING THE POWER PACK

Setting the target pressure

Press the button for selecting the unit (position 2 in the overview). 

This will activate the display light. You can set the pressure unit by 

continuing to press the button:
PSI -> BAR -> KGF/CM²
With the (-) and (+) buttons (position 3 and 6 in the overview) you 

can set the target pressure. After you have set the pressure, press the 

unit selection button once more, and the display will now show 0.00 

again in the chosen unit.

Connecting the air hose

Screw the end of the air hose with the external thread (position 14 

in the overview) into the compressor’s connector (position 8 in the 

overview).

Using the adapter

If you would like to fi ll a tyre with an auto valve (Schrader valve), you 

will not require an adapter. Screw the end of the air hose with the 

internal thread onto the valve. Now you can switch on the 

ompressor and fi ll the bicycle tyre.

Bicycle valve adapter (for Dunlop and Sclaverand valves) (15):

For Sclaverand valves: Undo the knurled screw of the valve piston and 

push down briefl y once.

Screw the valve adapter, using the knurled crown, down onto the 

bicycle valve.

Screw the end of the air hose with the internal thread onto the 

adapter. Now you can switch on the compressor and fi ll the bicycle 

tyre. After you have fi nished fi lling the tyre, detach the air hose and 

the adapter from the valve.

For Sclaverand valves: Tighten the knurled screw of the valve piston 

up again.

Adapter for balls (16):

Screw the adapter for balls into the internal thread of the air hose. 

Insert the adapter into the valve of the ball. Now you can switch on 
the compressor and fi ll the ball.

Universal adapter for leisure items (17):

Screw the universal adapter into the internal thread of the air hose. 

Insert the universal adapter into the fi lling connection of your 

leisure equipment. Depending on version, it is possible that the 

universal adapter will need to be held fi rmly during the fi lling process. 

Now you can switch on the compressor and start the fi lling process. 

6.3 OPERATING THE COMPRESSOR

Checking the charge status

Press the button for selecting the unit (position 2 in the overview). 

This will activate the display light. The battery symbol           

indicates the charge status (empty, 25%, 50%, 75%, 100%).

Filling process

To start the fi lling process press the compressor’s ON/OFF button (po-

sition 5 in the overview).

The compressor will start, during the fi lling process the pressure will 

appear on the display.

When the set target pressure has been reached the compressor will 

switch itself off . Press the ON/OFF button once more.

Only leave the compressor operating 

uninterrupted for a maximum for 5 minutes.
Allow the compressor to cool down for at least 

15 minutes afterwards before using it again.

Summary of Contents for 21077

Page 1: ...erating instructions 5 R f 21077 Compresseur multifonction rechargeable Manuel de l op rateur 8 Cod art 21077 Compressore multifunzionale ricaricabile Istruzioni per l uso 14 Art nr 21077 Multifunctio...

Page 2: ...triebsnicht unbeaufsichtigt Erh hen Sie den Luftdruck f r die aufzublasenden Objekte nicht ber die Herstellerempfehlung Sollte der Kompressor ungew hnliche Ger usche ab gebenoder berhitzen schaltenSie...

Page 3: ...aderventil bef llen m chten ben tigen Sie keinen Adapter Schrauben Sie das Ende des Luftschlauchs mit dem Innengewinde auf dasVentil Jetzt k nnen Sie durch Einschalten des Kompressors den Reifen bef l...

Page 4: ...einformierenSie sich bei Ihrer Gemeinde oder Stadtverwaltung Im Zusammenhang mit demVertrieb von Batterien und Akkus und von Ger ten die Batterien oder Akkus ent halten weisen wir Sie gem 18 des Batte...

Page 5: ...not increase the air pressure beyond the recommendations of the manufacturer If the compressor emits unusual noises or overheats switch it off immediately and give it at l east 15 minutes to cool down...

Page 6: ...an auto valve Schrader valve you will not require an adapter Screw the end of the air hose with the internal thread onto the valve Now you can switch on the ompressor and fill the bicycle tyre Bicycl...

Page 7: ...tions for electrical and electronic scrap In connection with the sale of batteries and accumulators and of devices that contain batteries and accumulators we would remind you of the following as stipu...

Page 8: ...Ne laissez pas le compresseur sans surveillance lorsqu il fonctionne Ne d passez pas les indications du fabricant de l objet gonflable lorsque vous augmentez la pression pneumatique Si le compresseur...

Page 9: ...oulez remplir un pneu avec une valve automatique valve Schrader vous n avez pas besoin d adaptateur Vissez l extr mit du tuyau air avec le filetage interne sur la valve Vous pouvez maintenant gonfler...

Page 10: ...ipale ou cantonale Dans le cadre de la vente de batteries et de piles rechargeables et d appareils contenant des batteries et de piles rechargeables et conform ment au 18 de la loisurlesbatteries Batt...

Page 11: ...rg dat de luchtdruk van de op te blazen voorwerpen niet hoger wordt dan de opgave van de fabrikant Wanneer de compressor ongewone geluiden maakt of oververhit raakt schakelt u het apparaat direct uit...

Page 12: ...u een band met een autoventiel Schrader ventiel wilt vullen hebt u geen adapter nodig Schroef het uiteinde van de luchtslang met de binnendraad op het ventiel Nu kunt u de band vullen door de compres...

Page 13: ...trische en elektronische apparaten In het kader van de verkoop van batterijen en accu s en apparaten die batterijen of accu s bevatten wijzen wij u conform artikel 18 van de Duitse Batterijwet BattG o...

Page 14: ...gli oggetti da gonfiare non oltre i valori raccomandati dal produttore Nelcasoincuiilcompressoredovesseemettererumori insoliti o surriscaldarsi spegnerlo immediatamente e lasciarlo raffreddare per al...

Page 15: ...i desidera gonfiare un pneumatico con valvola auto valvola Schrader non occorrono adattatori Avvitare l estremit del tubo flessibile dell aria con la filettatura interna sulla valvola Ora si pu gonfia...

Page 16: ...comune In relazione alla vendita di batterie e accumulatori e di dispositivi contenenti batterie o accumulatori ai sensi del 18 della legge sulle batterie richiamiamo la vostra attenzione su quanto se...

Page 17: ...pad ekompresorvyd v neobvykl zvukynebo se nadm rn zah v okam it ho vypn te a nechte minim ln 15 minut vychladnout P ed uveden m kompresoru do provozu ho zkontroluj te Po kozen natr en nebozlomen sou s...

Page 18: ...Pro nahu t n pneumatiky s autoventilem ventil Schrader nepot ebujete adapt r Na roubujte konec vzduchov hadice s vnit n m z vitem na ventil Po zapnut kompresoru m ete nyn nahustit pneumatiku Adapt r p...

Page 19: ...ektronick ch p stroj se m ete bl e informovat na va obecn nebo m stsk spr v V souvislosti s prodejem bateri a akumul tor a za zen kter obsahuj baterie nebo akumul tory v s v souladu s 18 BattG n meck...

Page 20: ...EAL GmbH Otto Hausmann Ring 107 42115Wuppertal Deutschland 49 0 202 42 92 83 0 49 0 202 42 92 83 160 info eal vertrieb com www eal vertrieb com...

Reviews: