background image


26

-


Dispose of fuel according to the stipulations in the country where the appliance is used – 

do not discharge into drains, soil or water. 


WARNINGS CONCERNING OPERATION 


-


Make sure that all guards and protective safety devices are in perfect condition. Never 

use the appliance if some guard or safety device is not in place. 

-


Use only cutting tools that are in good condition. Never use cutting tools that are bent, 

worn, cracked or otherwise damaged. The appliance may not be used until the damaged 
cutting tool is replaced with a new one. 

-


Never start or use the appliance in a closed room or indoors as this will cause risk of 

poisoning due to exhaust gases. 

-


Before beginning the work, look around carefully to get a good picture of the shape of 

the land and area to be worked on. If you see any obstacles which might get in the way 

while working, clear them away before beginning the work. 

-


Always hold the appliance firmly from the handles with both hands. Keep handles dry, 

clean and free from oil and grease. Always keep a proper footing and do not overreach.  
Maintain your balance at all times during operation. 

-


Beware of the rotating cutting tool. Never put your hands or feet near the rotating 

cutting tool. 

-


Beware of objects and material such as rocks, cutting debris etc. which may be thrown 

from the appliance at high speed. 

-


Some parts (e.g. engine and muffler) become very hot during use. Do not touch the hot 

parts during or immediately after use – risk of burns! Let the appliance cool completely 
before storage or performing any procedures to the appliance. 

-


Be aware of the effects of prolonged exposure to vibration. During longer work periods, 

it is recommended to stop working and taking breaks from time to time. 


TECHNICAL DATA 


Engine 26cm

3

, 0,8kW, 2-stroke, 9000 rpm


Trimmer head speed 

7800rpm 

String thickness 

2mm 

Trimming area 

300mm 

Fuel 

mixture of gasoline and engine oil: 


- gasoline: unleaded 98-octane  


- oil: 2-stroke engine oil (for example Viima WK2TY) 

Mixture ratio 

40:1, 2,5% 

Fuel tank volume 

750ml 

Starting method 

recoil start 

Weight 5,2kg 
Sound power level (LWA) 

110dB(A) 

Vibration level 

13m/s² 


APPLICATION AREAS 


This appliance may be used only with the original trimmer string for cutting grass and small 
weeds near trees, walls, posts, edges of lawns, and other places which are difficult for a 
lawnmower to access.


This appliance is intended only for household use.


Summary of Contents for XTP102

Page 1: ...1323 388 tuotepalaute ikh fi www ikh fi XTP102 Lue k ytt ohjeet huolellisesti ennen laitteen k ytt ja noudata kaikkia annettuja ohjeita S ilyt ohjeet my hemp tarvetta varten L s noggrant igenom bruks...

Page 2: ...s laitteesta Laitteen k ytt j on vastuussa ty alueella olevista henkil ist ja esineist Ole aina tarkkana ja keskity ty h n Laitetta k ytett ess on noudatettava aina erityist huolellisuutta ja varovais...

Page 3: ...a jotka voisivat h irit ty skentely siirr ne kaikki pois ty alueelta ennen ty skentelyn aloittamista Pid laitteen kahvoista aina tukevasti kiinni molemmin k sin Pid laitteen kahvat kuivina ja puhtaina...

Page 4: ...iksi Laite on tarkoitettu vain yksityiseen kotitalousk ytt n OSAT 1 Moottori katso osat 11 16 2 Takakahva 3 Etukahva 4 Liitostangon lukitusnuppi 5 Suojus 6 Nylonsiimalla varustettu siimakela 7 Siimale...

Page 5: ......

Page 6: ...suojatulppa painamalla lukitustappia ja vet m ll suojatulppa ulos Paina lukitustappia uudelleen ja paina alempi varsiosa ylemm n varsiosan sis n niin ett moottori ja siimap on kohdistettu asianmukaise...

Page 7: ......

Page 8: ...ta K YNNISTYS PYS YTYS kytkin 4 k ynnistysasentoon Paina primer pumppua 5 riitt v n monta kertaa n 10 kertaa kunnes kuplia ei en n y Aseta rikastin 6 t ysin alasp in t ysi rikastus Paina kaasuvivun va...

Page 9: ...alla siima k ntyy k ytt j n p in t ll alueella on uudelleen kelautumisen vaara ja kohteet voivat sinkoutua k ytt j n p in siiman liikkeest johtuen mik voi aiheuttaa tapaturmia Suorita trimmaus aina t...

Page 10: ......

Page 11: ...a varovasti kelarungon sis lle Ved samalla siimat ulos kelarungon rei ist Pid hyvin kiinni siimakelasta Ved siimoja vuorotellen niin ett ne liikkuvat vapaasti kelarungon rei iss Paina siimakelaa sis n...

Page 12: ...ili K ynnist moottori ja pid sit k ynniss kunnes se sammuu itsest n koska polttoaine loppuu Tarvittaessa irrota alempi varsi kuvan mukaisesti ja ripusta se yl s erikseen L ys kiristysnuppia Paina luki...

Page 13: ...nist moottoria useita kertoja Jos moottori ei k ynnisty irrota sytytystulppa ja kuivaa se S d v lys 0 6 0 7 mm Tyhjenn polttoaines ili ja t yt oikealla seoksella Vaihda sytytystulppa Moottori py rii l...

Page 14: ...ansvarig f r personer och f rem l p arbetsplatsen Var alltid vaksam och koncentrera dig p ditt arbete Man b r alltid iaktta speciell f rsiktighet vid anv ndning av apparaten Man b r aldrig arbeta om m...

Page 15: ...stadigt och str ck dig inte St i god balans och h ll alltid stabil st llning n r du anv nder apparaten Akta dig f r roterande klippverktyg H ll h nder och f tter p avst nd fr n roterande klippverktyg...

Page 16: ...d nylontr d 7 Nedre skaft 8 vre skaft 9 Man verenhet se delarna 17 20 10 Br nsletank och p fyllnings ppning 11 Primerbl sa 12 Luftfilterhus 13 Sp rr f r luftfilterhus 14 Choke 15 Starthandtag 16 T nds...

Page 17: ......

Page 18: ...itter korrekt S kerst ll att l sknappen har l sts fast helt i ett av h len och knappens huvud r synligt Om det beh vs rotera den nedre skaftdelen n got till l sknappen kommer ut Vrid fast knoppen f r...

Page 19: ......

Page 20: ...dan choken i mittl ge halv choke Dra i starthandtaget snabbt och kraftigt p nytt tills motorn startar Efter cirka 15 sekunder st ll choken upp t k rl ge OBS Om motorn r varm n r den ska startas l t ch...

Page 21: ...undersida med handen och dra ut de b da tr darna tills de r n got l ngre n till trimmerskyddets kanter Tr darna kapas till korrekt l ngd med kniven Trimning Trimma endast med den v nstra sidan ljusgr...

Page 22: ......

Page 23: ...r hand 4 Justering av tr dl ngden Tryck in tr dspolens undersida med handen och dra ut de b da tr darna tills de r n got l ngre n till trimmerskyddets kanter Tr darna kapas till korrekt l ngd med kniv...

Page 24: ...r gasreglage Vrid fast t ndstiftet Reng r t ndstiftet Frig r l set f r gasreglage st ll choken i k rl ge och starta motorn upprepade g nger Om motorn nd inte startar demontera och torka t ndstiftet J...

Page 25: ...Always stay alert and watch what you are doing Use extreme caution at all times when operating the appliance Do not use the appliance while you are tired sick or under the influence of alcohol drugs m...

Page 26: ...ll times during operation Beware of the rotating cutting tool Never put your hands or feet near the rotating cutting tool Beware of objects and material such as rocks cutting debris etc which may be t...

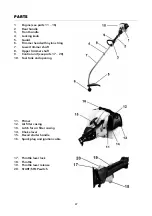
Page 27: ...7 Lower trimmer shaft 8 Upper trimmer shaft 9 Control unit see parts 17 20 10 Fuel tank and opening 11 Primer 12 Air filter casing 13 Latch for air filter casing 14 Choke lever 15 Recoil starter hand...

Page 28: ......

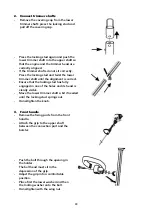
Page 29: ...is correct Ensure that the locking stud has fully engaged in one of the holes and its head is clearly visible Move the lower trimmer shaft a bit if needed until the locking stud springs out Hand tight...

Page 30: ......

Page 31: ...to the middle half choke Pull the starter handle again quickly and strongly until the engine starts After about 15 seconds set the choke lever to the upper position run ATTENTION When the motor is war...

Page 32: ...side of trimmer head by hand and pull the strings on both sides until they are longer than the guard edges The string ends are cut to the correct length by the knife Trimming Trim only with left part...

Page 33: ......

Page 34: ...nd hand tighten it 4 Adjusting the strings to the correct length Push the underside of trimmer head by hand and pull the strings out on both sides until they are longer than the guard edges The string...

Page 35: ...e the fuel lever lock set the choke lever to RUN position and start the motor a number of times If the motor does not start remove the spark plug and dry it Reset the gap 0 6 0 7 mm Drain the tank and...

Page 36: ......

Page 37: ......

Reviews: