background image

                User Manual 


© 2019 AMETEK Electronic Systems Protection   /   Technical Support: 1-800-645-9721   /   ametekesp.com


16


ii. 

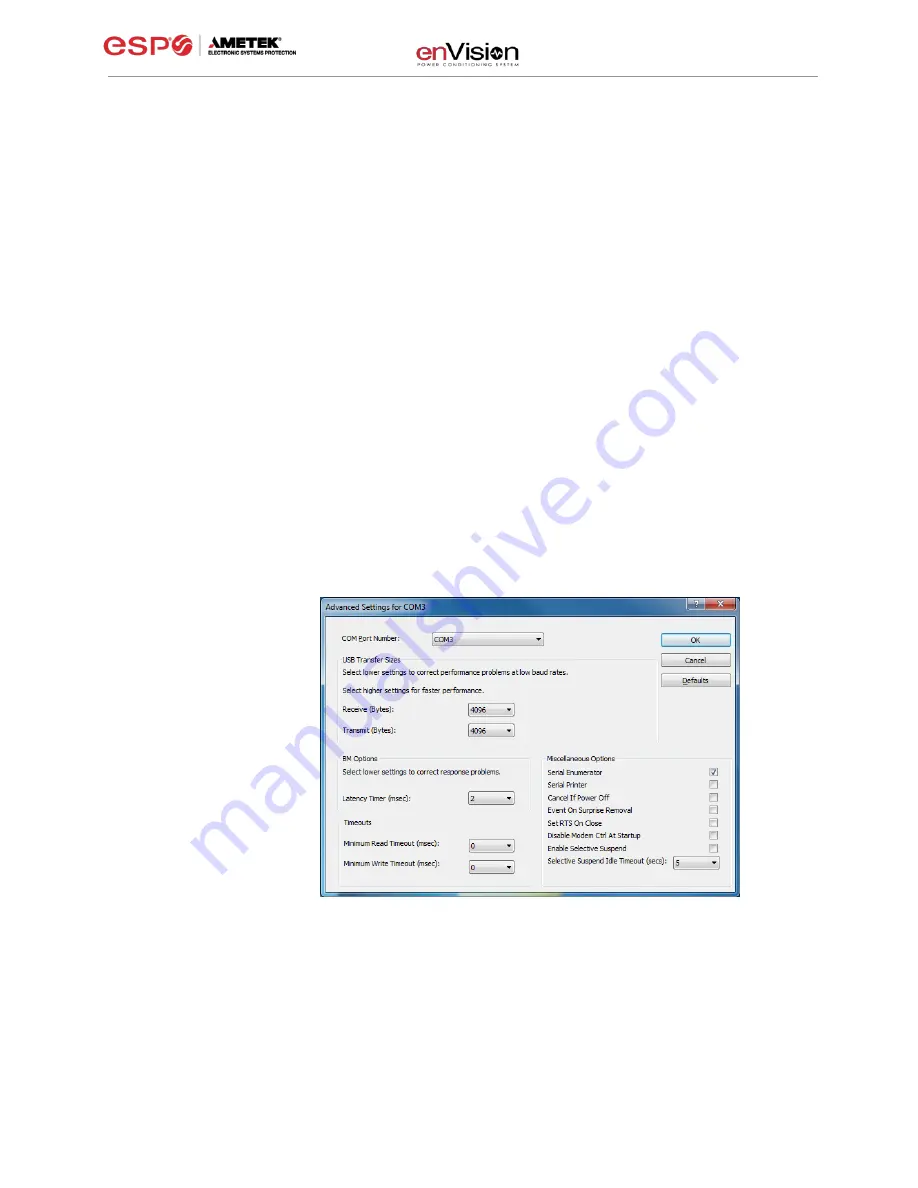
The COM port may also be manually configured using the Device Manager: 


1.  Open Device Manager 

 
a.  Click on Start button 
 

b.  Type the following command in the Search box: devmgmt.msc 

 
c.  Press Enter 
 

2. 

In the Device Manager, expand “Ports (COM & LPT)” 
 

3.  Right-

click on the entry labeled “USB Serial Port (COMx)” and click 

“Properties” 
 

4.  In the USB Serial Port Properties pop-

up box, click the “Port Settings” 

tab, and then click the “Advanced” button. 
 

5. 

In “USB Transfer Sizes”, change both the “Receive” and “Transmit” 
values to 4096. 
 

6. 

In “BM Options”, change the “Latency Timer” value to 2. 
 

7.  Leave all other settings at default. 


Summary of Contents for EnVision EV-12010 BR

Page 1: ...2019 AMETEK Electronic Systems Protection Technical Support 1 800 645 9721 ametekesp com UM enVision Rev H User Manual 120 and 208 240 Volt Models...

Page 2: ...User Manual 2019 AMETEK Electronic Systems Protection Technical Support 1 800 645 9721 ametekesp com 1...

Page 3: ...d CONNECT EQUIPMENT 6 e CONNECT FILTER TO OUTLET 7 III HARDWARE 8 1 FILTER 8 a LCD EVENT MONITOR 8 I NORMAL OPERATION 8 II WIRING FAULT 10 III ABNORMAL VOLTAGE 10 b CLEARING MEMORY 11 I BUTTONS 11 II...

Page 4: ...START THE SOFTWARE 14 3 CONFIGURE THE DATA INTERFACE CABLE AND COM PORT 15 4 SOFTWARE MODES 17 a MULTIMETER MODE 18 b SCOPE MODE 19 c CHART MODE 21 d OUTLET CONTROL MODE 22 e HISTORICAL DATA MODE 23...

Page 5: ...e modes Line Neutral Line Ground Neutral Ground 120V o Records surges in all three modes Line1 Line 2 Line1 Ground Line2 Ground 208 240V Event Timestamp Recorder up to 512 events o Records actual date...

Page 6: ...Connect a phone cord from the wall jack to the Modem Fax modular jack labeled IN and then connect a second phone cord from the Modem Fax modular jack labeled OUT to the machine equipment to be protect...

Page 7: ...e d passe pas la tension maximale du circuit de d rivation Aseg rese de que el amperaje total del equipo conectado al filtro no supere la clasificaci n m xima del circuito de derivaci n ii Connect the...

Page 8: ...Refer to Section III Hardware EnVision PCS Filter for LCD EVENT MONITOR display details iii If neither System On nor the Wiring Fault LED illuminates there is either no voltage at the receptacle or th...

Page 9: ...tion device status and troubleshooting i Normal Operation 1 When the EnVision PCS Filter is plugged into a branch circuit outlet with correct wiring and acceptable line voltage the LCD Event Monitor w...

Page 10: ...Voltages Record Over Voltages Record Over Voltages Off Surges Overload Last Recorded Event Outlet State OS On Off User Control UC Press and hold Menu and Scroll buttons to perform control action Turn...

Page 11: ...nch circuit outlet voltage is not acceptable the Filter will disconnect power to its outlets and display the following information on the LCD Event Monitor above the over voltage shutdown threshold or...

Page 12: ...on until UC User Control is displayed 2 Next press the Scroll Button to select which memory record to erase Memory All Clear ALC Disturbance History Clear dhC Power Usage Clear PUC Disturbance Count C...

Page 13: ...thernet connections RJ 45 may remain in place ii Connect the Data Interface Cable into the USB port on your PC iii Connect the Data Interface Cable into the RJ 11 OUT Jack labeled Data Port on the Fil...

Page 14: ...PCS 1C 1 3 Download and Install Software a Download the Software Installer from www amatekesp com esp envision envision 120 208v b Unzip and run the installation utility c Follow the on screen instruc...

Page 15: ...e event that the automatic driver installation process was not successful or if no internet connection is available the Data Interface Cable driver files may be installed manually Select Install Drive...

Page 16: ...software and enVision Note This process only needs to be done once for each new Data Interface Cable installed on the PC Note This process edits Windows registry values and so may be blocked by MS Win...

Page 17: ...mand in the Search box devmgmt msc c Press Enter 2 In the Device Manager expand Ports COM LPT 3 Right click on the entry labeled USB Serial Port COMx and click Properties 4 In the USB Serial Port Prop...

Page 18: ...nVision Software is organized into several operational modes The modes are activated by clicking the corresponding button at the bottom of the software interface Press the Help Button in the upper rig...

Page 19: ...9721 ametekesp com 18 a Multimeter Mode i The Multimeter Mode provides information traditionally acquired from one or more handheld digital multimeters as well as an overview of the recorded power qu...

Page 20: ...mber of recorded power quality events Surge Events SG Overvoltage Events with turn off of connected equipment OVoff Overvoltage Events with no turn off of connected equipment OVrec Undervoltage Events...

Page 21: ...ion pressing the Wait button will freeze the currently displayed waveform vi One Shot Trigger Function The scope may be set to acquire and hold a waveform display triggered by either Voltage or Curren...

Page 22: ...ond The measured parameters may be enabled or disabled by pressing the corresponding button ii Chart display of 8 electrical parameters Line Voltage AC RMS Volts Line Neutral Line1 Line2 Load Current...

Page 23: ...and provides information about wiring faults and abnormal line voltage ii Use the green On Off button to manually turn the AC outlets on and off Pressing the blue Power Cycle button will result in the...

Page 24: ...de allows for the retrieval and display of the power quality event and electrical parameter data stored in the enVision internal memory i Time Stamped Power Quality Event Data enVision is able to stor...

Page 25: ...er voltage shutdown threshold and connected equipment was turned off Over Voltage Record Line voltage exceeded the over voltage record threshold and connected equipment was not turned off Under Voltag...

Page 26: ...inute recording interval Maximum Power Draw Watts The highest real power draw measured during the 30 minute recording interval Average Recorded Voltage VRMS The average line voltage during the 30 minu...

Page 27: ...ph Pressing the Average Power Graph button will display a bar graph of the average real power draw of connected equipment during each 30 minute recording interval 2 Average Voltage Graph Pressing the...

Page 28: ...ing the V Max V Min I Max or P Max buttons will enable or disable the display of the corresponding parameter iii Internal Chart Data When enabled enVision will log the line voltage load current load p...

Page 29: ...e achieved by removing the data interface cable or by selecting and saving an invalid COM Port number Press the button that corresponds to the type of data file to import and browse to the location of...

Page 30: ...back on vii Power Fail Hold When enabled enVision will keep its outlets off following a power outage or shutdown event The outlets must be manually turned back on using software or the MENU and SCROL...

Page 31: ...running the software with elevated permissions right click program shortcut and choose Run As Administrator on Windows Vista 7 8 10 with UAC User Account Control enabled iv Save Saves the COM Port sel...

Page 32: ...eshoot the wall receptacle Use the Diagnostic Software to manually turn the outlets On Red LED Off Green LED On No power at output Defective product Contact ESP for product replacement at 800 645 9721...

Page 33: ...ion Rating VPR EV 12010 BR EV 12015 EV 12016 BR EV 12020 330V All Modes EV 20815 EV 20816 BR EV 20820 700V All Modes EV 20830 L 630 GNS 500V Line Line 600V Line Ground EV 23010 EV 23016 EV 23016 F EV...

Page 34: ...ical product accuracy Response Time Over Voltage 90 ms Under Voltage 200 ms Power Outage Event Definition AC Voltage has dropped below 20V Surge Event Definition Filter has been exposed to a transient...

Reviews: