background image

6

 of 34 

V 1.0


www.esavep.com


2.2 Installation Notes  


2.3 Notes on Operating your Ecocent: 


Read the 

Manual 

Read this entire manual before attempting to install or 

operate this unit. 


Do


NOT


Do


not


push


anything


into


the


fan


blades


when


running


and


make


sure


that


children


cannot


access


the


unit


or


play


close


to


the


unit.


Children 

Children should only operate this unit under the supervision 

of adults. 


Shut


off


the


power


supply


If


there


is


an


unusual


sound


or


smell


coming


from


the


unit,


shut


off


the


power


supply


immediately and


call


your


installation


engineer.


Professional


&


qualified


installer


is


required


The


heat


pump


must


only


be


installed


by


a


suitably


qualified 

engineer.


Failure


to


ensure


this


can


cause


damage


to


the


unit


and


may


cause


serious


injury.


The


warranty


on


the


unit


will


also


be


invalidated


if


a


suitably


qualified


engineer


is


not


engaged


to


install


it.


Earthing


Required 


Please


make


sure


that


the


unit


and


power


supply


are


properly 


earthed. 


Refrigerant


If


you


are


installing


the


unit


in


a


small


room,


please


give


careful


consideration


to


adequate


ventilation


being


available


in


the


event


of


a


refrigerant


leak.


Installation


Site


Do


not


install


the


unit


near


to


a


gas


installation.


This


unit


is


designed


to


be


installed


inside


a


building.


Site


consideration


Ensure


that


this


unit


is


installed


on


a


solid,


level


floor.


Make


sure


that


you


have


a


suitable


facility


to


cater


for


disposal


of


condensate


from


the


condensate


drain


on


the


unit.


Circuit


Breaker


Make


sure


that


this


unit


is


connected


to


the


power


supply


via


a


suitably


sized


MCB.


Unit


Upright


The


unit


must


be


installed


level


across


the


whole


diameter.


Failure


to


install


the


unit


level


will


mean


that


condensate


can


spill


over


the


lip


of


the


cylinder.


Summary of Contents for Ecocent 250T

Page 1: ...1 of 34 V 1 0 www esavep com ECOCENT 250 T 250 T2 Installation and Operation Manual ...

Page 2: ...systems such as CITB and be familiar with installing the Ecocent unit Failure to properly fit the unit may affect its safety efficiency and invalidate any guarantee Safety requirements in the UK call for an expansion space internal or external safety devices to prevent the stored water exceeding 100 C and pipe work to convey discharged hot water safely away from the safety devices THE UNIT MUST BE...

Page 3: ...asic system schematic 5 0 Specification 5 1 Appearance 5 2 System Principles 5 3 Dimensions 5 4 Specifications 5 5 Performance 5 5 1 Performance assumptions 5 6 DHW Recovery Times 6 0 Installation 6 1 Installation Sketch Map 6 2 Indirect Thermal cut out dual stat 6 3 Pipe fittings 6 4 Cold Water Supply 6 5 Cold Water Combination Valve 6 6 Drain Cock 6 7 Outlet Pipe Work 6 8 Secondary Circulation o...

Page 4: ...rol panel explanation 8 2 Controller Functions 8 3 Before running the unit 9 0 Maintenance Requirements for the Cylinder 9 1 Checking operation of safety valves 9 2 Cleaning the Strainer 9 5 Log Book 9 6 Maintenance Requirements 10 0 Simple Fault Finding 10 1 FAQs 11 0 Guarantee 11 1 Guarantee Terms 12 0 Environmental Information 13 0 Spare Parts ...

Page 5: ...fore handing over the unit to the end user The installer must advise the end user to read the manual fully before operating the unit and leave this manual with the end user Further improper installation operation and or maintenence and failure to maintain the unit as per this manual will invalidate any unit warranty or guarantee The manual may be altered and or updated in any way at the sole discr...

Page 6: ...e warranty on the unit will also be invalidated if a suitably qualified engineer is not engaged to install it Earthing Required Please make sure that the unit and power supply are properly earthed Refrigerant If you are installing the unit in a small room please give careful consideration to adequate ventilation being available in the event of a refrigerant leak Installation Site Do not install th...

Page 7: ... time during which the ambient temperature could cause the unit or pipe work from the unit to freeze it should be drained down Shut off the power When cleaning the unit shut off the power supply Power Supply You must use a suitable power supply that is appropriately Fused and protected by an RCD Caution This unit has a high centre of gravity This Ecocent must be secured to prevent it falling over ...

Page 8: ...er Pipe run lengths should be kept as short as possible for maximum economy and efficiency the use of secondary returns should be avoided Access to controls immersion heaters and indirect controls must be maintained for servicing and maintenance of the unit Please do not install valves or pipe work except discharge pipe within 50mm 2 of the T P relief valve to allow insulation to be fitted Conside...

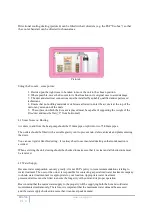
Page 9: ...mp e g Laundry Rooms See Picture 2 The unit is equipped with a condensate drain that must be properly directed to a suitable waste pipe where the condensate water non acidic can drain away If the drain is into a main sewer it must have a trap installed to prevent back smell through the Ecocent Picture 2 Cooling in the re circulating air mode picture 3 The Ecocent can extract warm air and place coo...

Page 10: ...e or split into two 75 80mm pipes The outlets should be fitted with a suitable gravity vent to prevent rain debris animals and plants entering the ducts You can use rigid or flexible ducting It is always best to use insulated ducting so that condensation is avoided When servicing the unit ducting should be checked to make sure that it is clear and all obstructions must be removed 4 2 Water Supply ...

Page 11: ...ngs taps etc The unit can be used in conjunction with most types of terminal fittings It is helpful in many mixer showers to have balanced hot and cold water supplies in these instances the balanced cold water supply can be taken from the tapping on the combination valve Branches to cold drinking water outlets should be taken before the combination valve NOTE Accessories should have a rated operat...

Page 12: ...at Air Source Heat Pump Package Where the unit is to be installed as an unvented system it will be supplied with the fittings needed to allow installation to comply with G3 Regulations This means that the supply cost for the unvented configuration unit will be higher than when installed as a vented system as additional fittings are required Where the unit is to be installed in a vented system such...

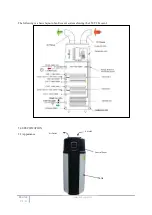
Page 13: ...13 of 34 V 1 0 www esavep com The following is a basic layout of an Ecocent system showing the 250 T2 Ecocent 5 0 SPECIFICATION 5 1 Appearance Air Outlet Air Inlet Control Panel Tank ...

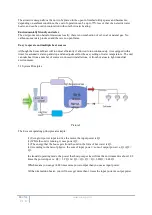
Page 14: ...top and an adjustment for the easy setting of water temperature The unit can take heat from a number of sources in domestic installations or from hot areas in light industrial environments 5 2 System Principles Picture 2 The Ecocent operating principles are simple 1 Using low power input to drive the motor the input power is Q1 2 While the unit is running it uses power Q2 3 The energy that the hou...

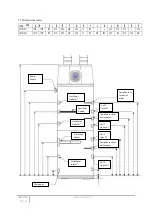
Page 15: ...10 910 610 ECOCENT 250 T2 1535 1070 910 810 580 450 250 52 100 250 450 550 750 910 350 650 Power Supply Hot Water Outlet Temp Sensor 1 for outlet water Sacrificial Anode Coil 1 Inlet Temp Sensor 2 for outlet water Coil 1 Outlet Hot Water Outlet Immersion Heater Temp Sensor 3 for outlet water Coil 2 Inlet Coil 2 Outlet Cold Water Inlet Drain point ...

Page 16: ...When the unit stops if you try to restart the unit or turn the unit on manually immediately the unit will not run for 3 minutes This is built in protection for the compressor Model ECOCENT 250 T ECOCENT 250 T2 Heatingcapacity kw 3 3 Water tank volume L 250 250 Powerinput W 790 790 Runningcurrent A 3 6 3 6 Powersupply V Ph Hz 220 230 1 50 220 230 1 50 Compressornumber 1 1 Compressortype Rotary Rota...

Page 17: ...ut Dual Stat and 2 port Motorised Valve To comply with Building Regulations and to prevent the unit from overheating a 2 port motorised valve MUST be fitted to the primary flow to the indirect coil s 6 3 Pipe Fittings All pipe connections to the unit are 22mm The fittings are also threaded 3 4 BSP male Air ducts must be at least 150mm in internal diameter It is recommended that you use insulated d...

Page 18: ...inking water outlets should be taken before the combination group valve to avoid the possibility of warm expanded water being drawn from the tap 6 6 Drain Cock The unit is fitted with a drain cock and this is used for draining down the unit You must ensure that this is accessible and that a hosepipe can be easily attached to allow water from the unit to be drained down 6 7 Outlet Pipe Work Ideally...

Page 19: ...rantee for the unit will be invalidated and serious damage may result If the TPRV fails it should only be replaced by a qualified installer under the following regulations G3 ENGLAND AND WALES TECHNICAL STANDARD P3 SCOTLAND OR BUILDING REGULATION P5 NORTHERN IRELAND AND THE WATER FITTING REGULATIONS ENGLAND AND WALES OR WATER BYELAWS SCOTLAND 6 10 Warnings Under no circumstances should the factory...

Page 20: ...STANDARD P3 SCOTLAND OR BUILDING REGULATION P5 NORTHERN IRELAND AND THE WATER FITTING REGULATIONS ENGLAND AND WALES OR WATER BYELAWS SCOTLAND state that here shall be precautions to ensure that the hot water discharged from safety devices is safely conveyed to where it is visible but will not cause danger to persons in or about the building 6 14 G3 Guidance Section The installation should include ...

Page 21: ...ect such discharges tundish visible iv where a single pipe serves a number of discharges such as in blocks of flats the number served should be limited to not more than 6 systems so that any installation discharging can be traced reasonably easily The single common discharge pipe should be at least one pipe size larger than the largest individual discharge pipe D2 to be connected If unvented hot w...

Page 22: ... approved engineer in your area 7 1 Insulation treatment As per the below picture you must insulate all connecting pipes and you must use high quality non flammable PVC insulating material of 15mm 20mm thickness A To keep the pipes in a tidy state you may wrap the pipes together after being separately insulated B Under no circumstances should you let electric wires come into contact with the plumb...

Page 23: ...that are not fitted by fully qualified engineers Further failure to have the unit fitted by a suitably qualified installer will invalidate the warranty guarantee of the unit and may be dangerous 7 4 Unit and System Controls The control panel allows the user to view and alter system operating parameters Other controls will be necessary to control zone valves for solar or other auxiliary requirement...

Page 24: ...f 34 V 1 0 www esavep com 8 0 OPERATION 8 1 Explanation of the Control Panel 8 2 Controller functions Power Menu Escape Enter Down Up STATUS Heating Outlet water temp 31 C Target Temp 57 C 24 06 2012 09 28 ...

Page 25: ...election interface where you can change the settings of the Auxiliary Heating Immersion heater and Fan Mode functions To change the status simply use the up or down buttons to select the required function then press the enter key to toggle between on and off Pressing the Esc saves the changes and returns to the main screen Unit Status Press up or down keys to move the cursor to Unit Status then pr...

Page 26: ...the up or down keys to alter the setting Once your change has been made press the Escape key to save the setting and the Escape Key again to return to the Parameter menu Please note that the adjustable range for the Out Water temperature is 10 C to 60 C The recommended value is 55 C The ΔT heating adjustable range is 2 C to 60 C The default value is 5 C Auxiliary Heating Highlight Aux heating in t...

Page 27: ...n and 0 off The default value is 1 Disinfection Please note that EN 8506 stipulates minimum temperature and time for a weekly disinfection period To change these parameters highlight Disinfection in the parameters menu then press the enter key to display the screen shown in figure 12 Press the up and down keys to highlight the parameter you wish to change enter to allow the setting to be changed t...

Page 28: ...t the same time Timer 1 on off Highlight timer 1 and press the enter key The X will start to flash Press up or down and the will start to flash This enables timer 1 Press up or down to set the time at wish the timer to turn on and press Esc to save the setting Highlight timer 1 off and repeat the process to set the time at which the timer is to turn off Timer 2 on off The process is the same as ti...

Page 29: ...able Pipe temperature Actual tested value not adjustable Evaporator temperature Actual tested value not adjustable Ambient temperature Actual tested value not adjustable Swell valve Actual tested value not adjustable 7 Parameter 1 0 Operation 1 1 Out water 10 60 C 55 C Adjustable 1 2 T1 heating 2 15 C 5 C Adjustable 2 0 Aux heaitng 2 1 Start temperature 30 90 C 55 C Adjustable 2 2 Start delay 0 90...

Page 30: ...pen or short circuit Check and replace the ambient temp sensor High pressure protection E01 6 on 1 off Too much refrigerant in the unit 2 bad heat exchanger on t he air 1 Discharge the excess gas safely 2 clean the air side heat exchanger Low pressure protection E02 7 on 1 off Refrigerant level low or there is a block in the filter or capilliary Water flow is not enough Expansion sensor is broken ...

Page 31: ...tion is happening and set a date for a full inspection when it is clear that a new magnesium anode is likely to be needed Keeping a functioning magnesium anode is critical to the longevity of the unit If you run the unit without the anode you will invalidate the warranty guarantee and the stainless steel cylinder may be seriously damaged In hard water areas consideration should be given to periodi...

Page 32: ...umber so that the evaporator can be cleaned of dust and debris 10 1 FAQs 1 Why does the compressor not start when I turn the unit on Answer If the unit has recently been running the compressor will not start within 3 minutes of shutting down It will start automatically once this 3 minutes is up 2 Why does the outlet temperature rise slowly at times Answer There is a temperature difference between ...

Page 33: ...rts thermal controls and valves relating to the cylinder for a period of one year from the date of purchase with the exception of normal wear and tear including any damage caused as a result of lime scale deposits The stainless steel vessel forming part of the cylinder is warranted guaranteed for a period of five years against faulty manufacture or materials provided that i It has been properly in...

Page 34: ... disposed of at a Local Authority Recycling Centre in order to realise the full environmental benefits Please note The pace of product development is such that we reserve the right to change product specifications without notice We do however strive to ensure that all information in this leaflet is accurate at the time of publication 13 0 SPARE PARTS Earth Save Products Limited carries spare parts...

Reviews: