Wiring
Installation and technical data
CAN-PCI/360
Rev. 1.3
24
9
1
4
5
6
7
9
2
3
8
1
4
5
6
7
2
3
8
CAN_L
CAN_H
CAN_GND
Shielded wire with
transposed wires
CAN_L
CAN_H
CAN_GND
(at wire shield)
120 Ohm
120 Ohm
earth (PE)
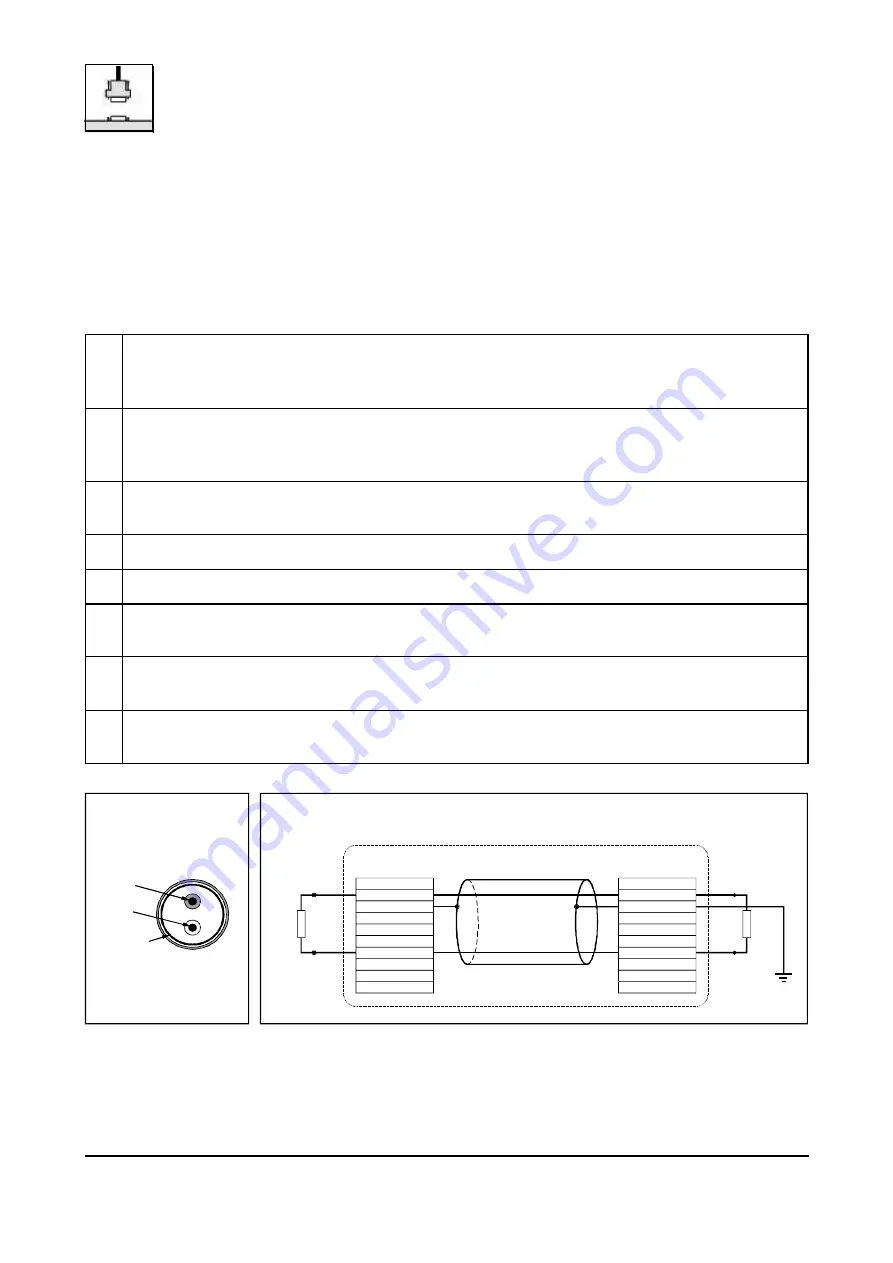
Wire structure
Signal assignment of wire and connection of earthing and terminator
n.c.
n.c.
n.c.
n.c.
n.c.
n.c.
n.c.
n.c.
n.c.
n.c.
n.c.
n.c.
n.c.
n.c.
n.c. = not connected
DSUB9 connector
(female or male)
pin designation
connector case
connector case
DSUB9 connector
(female or male)
pin designation
CAN wire with connectors
6. Correctly Wiring Electrically Insulated CAN Networks
Generally all instructions applying for wiring regarding an electromagnetic compatible installation,
wiring, cross sections of wires, material to be used, minimum distances, lightning protection, etc. have
to be followed.
The following
general rules
for the CAN wiring must be followed:
1.
A CAN net must not branch (exception: short dead-end feeders) and has to be terminated
by the wave impedance of the wire (generally 120
Ω
±10%) at both ends (between the
signals CAN_L and CAN_H and
not
at GND)!
2.
A CAN data wire requires
two twisted
wires and a wire to conduct the reference potential
(CAN_GND)!
For this the shield of the wire should be used!
3.
The reference potential CAN_GND has to be connected to the earth potential (PE) at
one
point. Exactly
one
connection to earth has to be established!
4.
The bit rate has to be adapted to the wire length.
5.
Dead-end feeders have to kept as short as possible (l < 0.3 m)!
6.
When using double shielded wires the external shield has to be connected to the earth
potential (PE) at
one
point. There must be not more than
one
connection to earth.
7.
A suitable type of wire (wave impedance ca. 120
Ω
±10%) has to be used and the voltage
loss in the wire has to be considered!
8.
CAN wires should not be laid directly next to disturbing sources. If this cannot be avoided,
double shielded wires are preferable.
Figure:
Structure and connection of wire


