Quadro Manual I: Installation Guide
Hardware Overview
Quadro2x, 2xi, Quadro4x, 4xi, 4xa, 4xia, 4xs, 4xis, Quadro16x, 16xi, 16xa, 16xia, 16xs, 16xis; (SW Version 3.0.x)
8
Hardware Overview
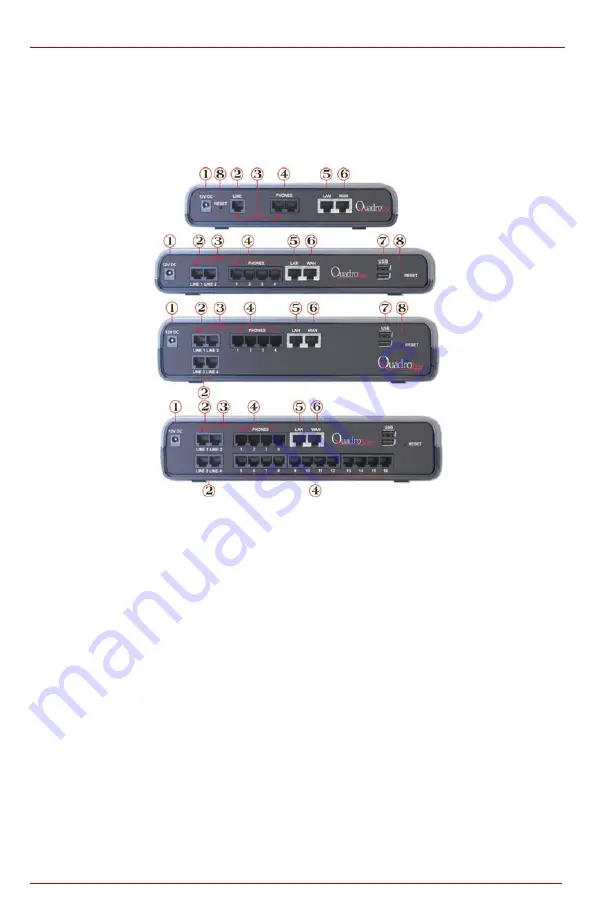
The Rear Panels of Quadro2x, 4x and 16x
Including the rear panel of Quadro4x' special edition with two additional FXO ports.
Fig. I-1: Quadro's Rear Panels (1)
1
Power supply socket.
Use only the power adapter delivered with the Quadro
.
2
LINE sockets to connect the Quadro to the PSTN network using standard analog
phone service. These are FXO (Foreign Exchange Office) analog ports.
3
In the event of a power failure, PHONE 1 is connected to LINE 1, allowing the phone
to send/receive phone calls directly to the PSTN network. PHONE 1 is powered by
the PSTN.
Please Note:
Only LINE 1 is connected to PHONE 1 during a power failure. The
other LINE and PHONE ports are not connected together.
4
PHONE sockets with RJ11 connectors enable connectivity of regular analog tele-
phones. These are FXS (Foreign Exchange Station) analog ports. As a factory de-
fault, the phones connected to PHONE sockets 1-3 (1-2 for Quadro2x) are configured
as voice extensions. PHONE socket 4 is preconfigured for a fax machine.
5
RJ45 socket to attach to the Local Area Network (LAN) via an Ethernet CAT 5 cable.
If a PC is connected directly to this socket, a straight cable is used. If an Ethernet
hub, router or switch is used, a crossover cable may be required.
6
RJ45 socket to attach the Internet Uplink (WAN) via an Ethernet CAT 5 cable.
7
The USB socket enables connectivity of USB flash memory providing expansion for
additional voice mails and record data. Refer to the Administrator’s Guide for sup-
ported devices.
8
The Reset button may be used in two ways: (1) to initiate a normal reset or (2) to
carry out a factory reset. A normal reset is executed by pressing the Reset button
with a paper clip for an instant.
Pressing the reset button and holding it down for seven seconds or more will execute
Summary of Contents for Quadro 16xa
Page 1: ......


