


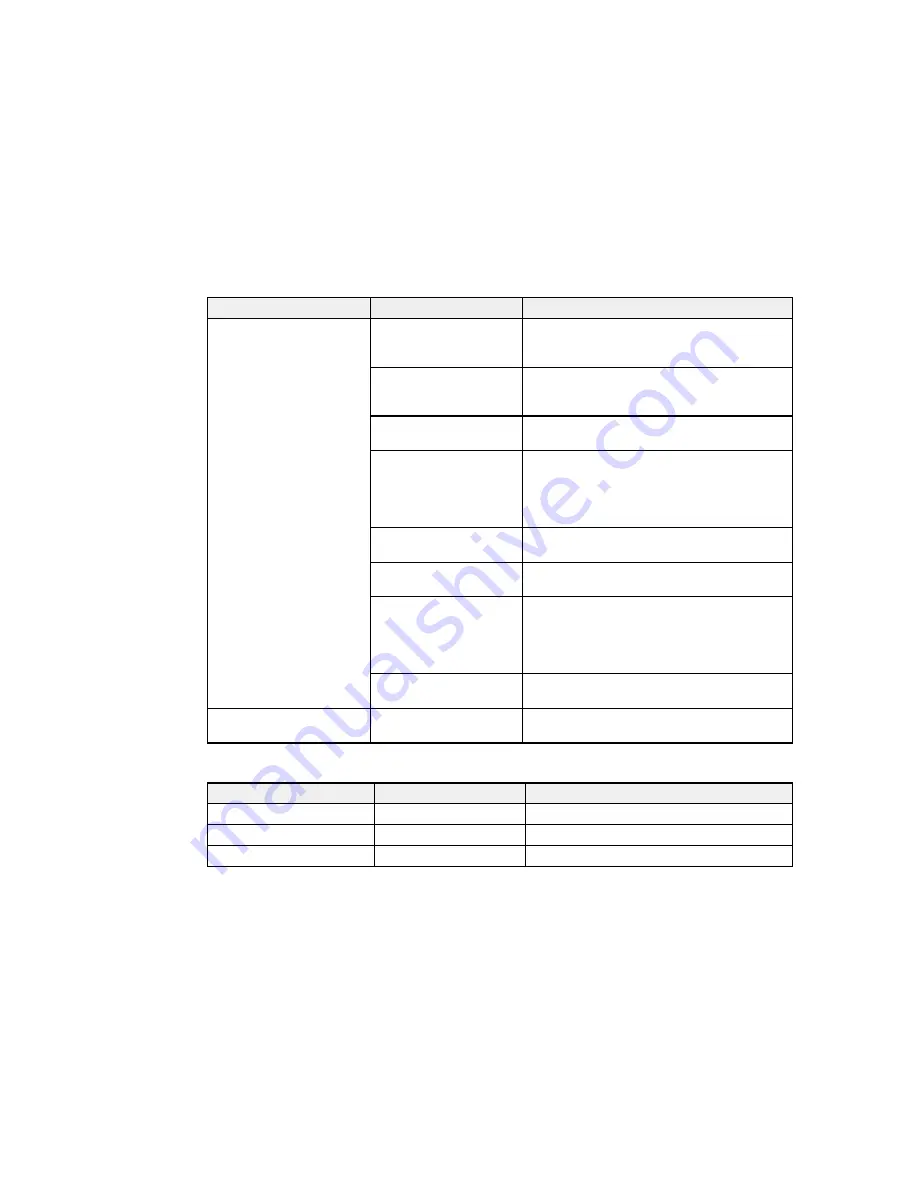
Setting
Options
Description
Advanced Settings
Roll Paper Tension
If paper wrinkles, select
High
or
Extra High
(applies only if no custom roll paper tension is
set).
Less Head Scuffing
Prevents scuffing when printing on thick paper.
This temporarily changes the
Platen Gap
setting, unless it is already set to
Wider
.
Drying Time Per Page
If ink blurs on the paper, set a time from
0.1
to
60
minutes.
Paper Size Check
Automatically detects the edges of the paper.
Turn off this setting only if the printer displays
a paper setting error when media is loaded
correctly. Changed settings take effect when
paper is reloaded.
Paper Skew Check
Stops printing when skewed paper is detected.
Leave this setting
On
to avoid paper jams.
Print Nozzle Pattern
Selects how often to print an automatic nozzle
check pattern (from
1
to
10
pages).
Periodical Cleaning
Selects the strength (
Light
,
Medium
, or
Heavy
) and frequency of automatic head
cleaning cycles. Even when
Off
, the printer
automatically cleans the print head at set
intervals to prevent clogging.
Cleaning Cycle
Selects the frequency of automatic head
cleaning cycles (
OFF
or from
1
to
10
pages).
Restore Settings
—
Returns all printer settings to their default
values.
Printer Status Settings
Setting
Options
Description
Firmware Version
xxxxxxx,x.xx,xxxx
Displays the printer's firmware version.
Option Status
—
No options available.
Show total prints
—
Shows total media printed in feet
2
or m
2
.
45
Summary of Contents for SureColor F6200
Page 1: ...Epson SureColor F6200 User s Guide ...
Page 2: ......
Page 6: ......
Page 7: ...Epson SureColor F6200 User s Guide Welcome to the Epson SureColor F6200 User s Guide 7 ...
Page 19: ...Parent topic Printer Usage Guidelines 19 ...
Page 21: ...3 Lift up the adapter holder lock lever 4 Place your media on the roll rest temporarily 21 ...
Page 52: ...2 Grasp the loop at the top of the ink inlet cap and slowly remove the ink inlet cap 52 ...
Page 63: ...Rest the stirring stick on the tab at the edge of the tank as shown 63 ...
Page 64: ...10 Cut or tear off the ink pack spout seal 64 ...
Page 76: ...2 Lift up the waste ink bottle and remove it from the holder as shown here 76 ...
Page 81: ...Removing Media 81 ...


