background image

EPSON Stylus Photo R1800/R2400

Revision B

Stylus Photo R2400

Casing Specifications

202

8.2  Casing Specifications

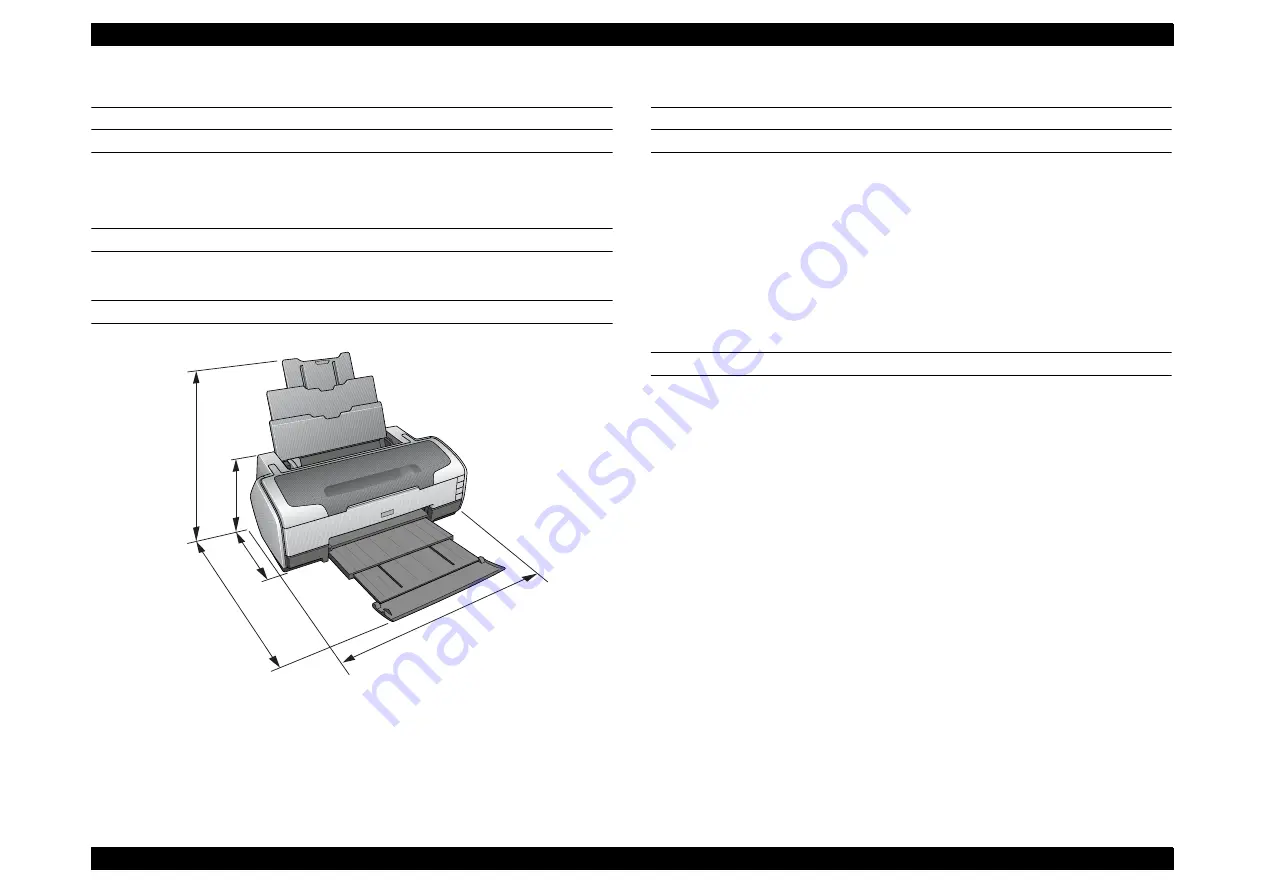
EXTERNAL DIMENSIONS

When tucked: 615 (width) x 314 (depth) x 223 mm (height)

When used: 615 (width) x 737 (depth) x 457 mm (height)

WEIGHT

11.7 kg (without the Ink Cartridges, Roll paper holder)

EXTERNAL DIMENSION DIAGRAM

ê} 8-1. 

External Dimension Diagram

8.3  Accessories

STANDARD ACCESSORIES

†

Start Here

†

Ink Cartridge (one for each of 9 colors)

†

Power Cord

†

Software CD-ROM

†

Roll Paper Holder

†

Multi-Sheet Matte Guide

†

Rear Sheet Guide

CONSUMABLES AND OPTIONS

†

Ink Cartridges

„

Photo Black:

: T0591

„

Cyan

: T0592

„

Magenta

: T0593

„

Yellow

: T0594

„

Light Cyan

: T0595

„

Light Magenta

: T0596

„

Light Black

: T0597

„

Matte Black

: T0598

„

Light Light Black : T0599

†

802.11g Radio printing adapter: PA-W11G

615

314

737

223

457

Summary of Contents for R1800 - Stylus Photo Color Inkjet Printer

Page 1: ...EPSONStylusPhotoR1800 R2400 Color Inkjet Printer SEIJ04015 SERVICE MANUAL Download Service Manual And Resetter Printer at http printer1 blogspot com ...

Page 2: ...f this manual However should any errors be detected SEIKO EPSON would greatly appreciate being informed of them The above not withstanding SEIKO EPSON CORPORATION can assume no responsibility for any errors in this manual or the consequences thereof EPSON is a registered trademark of SEIKO EPSON CORPORATION General Notice Other product names used herein are for identification purpose only and may ...

Page 3: ...NOT CONNECT THE UNIT TO A POWER SOURCE UNTIL INSTRUCTED TO DO SO WHEN THE POWER SUPPLY CABLE MUST BE CONNECTED USE EXTREME CAUTION IN WORKING ON POWER SUPPLY AND OTHER ELECTRONIC COMPONENTS WARNING 1 REPAIRS ON EPSON PRODUCT SHOULD BE PERFORMED ONLY BY AN EPSON CERTIFIED REPAIR TECHNICIAN 2 MAKE CERTAIN THAT THE SOURCE VOLTAGES IS THE SAME AS THE RATED VOLTAGE LISTED ON THE SERIAL NUMBER RATING PL...

Page 4: ...pin assignments Exploded diagram Parts List Electric circuit boards components layout Electrical circuit boards schematics Symbols Used in this Manual Various symbols are used throughout this manual either to provide additional information on a specific topic or to warn of possible danger present during a procedure or an action Be aware of all symbols when they are used and always read NOTE CAUTIO...

Page 5: ...hoto specific information is added 5 2 5 1 Printing Calibration Chart by Users p165 Descriptions of the procedure are added 5 2 5 2 Writing of Color ID by Users p169 A caution is deleted Color Correction Value Entry Procedure p170 Supported OS and ports are added Calibration Chart Print Procedure for Users p166 Descriptions of the procedure are added ...

Page 6: ...eshooting according to Panel Messages 36 3 1 2 Troubleshooting based on Observed Faults 59 Chapter 4 Disassembly And Assembly 4 1 Overview 69 4 1 1 Precautions 69 4 1 2 Tools 70 4 1 3 Screws 71 4 1 4 Work Completion Checklist 72 4 2 Disassembly 73 4 2 1 Removing the Housings 74 4 2 2 Waste Ink Pad 80 4 2 3 Front Paper Guide Pad 82 4 2 4 ASF Assy 83 4 2 5 Removing the Boards 87 4 2 6 Disassembling ...

Page 7: ...ylus Photo R1800 190 7 4 Circuit Diagram 192 Chapter 8 Stylus Photo R2400 8 1 Overview 199 8 1 1 Overview 199 8 1 2 Indicator Display in Normal Mode 200 8 1 3 Error Status 201 8 2 Casing Specifications 202 8 3 Accessories 202 8 3 1 Printhead Specifications 203 8 3 2 Ink Sequence 203 8 4 Overview 204 8 4 1 Troubleshooting according to Panel Messages 204 8 5 Parts List for EPSON Stylus Photo R2400 2...

Page 8: ...C H A P T E R 1 PRODUCTDESCRIPTION ...

Page 9: ...printing and roll paper cutter functions This product has the following features FEATURES High color print quality 5760 H x 1440 V dpi printing Max resolution 8 color printing PPI Black Photo Black Cyan Magenta Yellow Red Violet Clear Pigment Ink supported Separate Ink Cartridge for each color Built in 2 I F USB 2 0 HS compatibility IEEE 1394 Windows Macintosh exclusive Roll Paper Support Printabl...

Page 10: ...yp PG PG Release Printing PGPP A3 A4 Exclusive paper Plain paper Photo Album paper Photo Matte paper A3 fine PG rub avoidance Envelope PG Typ rub avoidance CD R Photo stand paper Non printing Standby position after power on For bottom stacker At power off The Ink Mark Sensor operates Auto Bi D Detection of dot missing Initialization at power on Cleaning wiping Replace the Ink Cartridge Waiting for...

Page 11: ...hin 10 seconds Paper switch Loads or Ejects the Paper When carriage is on the Ink Cartridge change position return carriage from Ink Cartridge change position In the condition of printing cancel the print job Ink switch Starts the Cleaning of head with 3 second pushing Moves the carriage to cartridge change position When carriage is on the ink change position return carriage from Ink Cartridge cha...

Page 12: ... Condition and LED Status Printer status Error status Indicators Power Paper Ink Priority Idle On 20 Data processing Blink 19 Pause 1 Status 05h 18 Ink sequence processing Blink 17 Ink cartridge change mode Blink 16 Ink low warning Blink 15 Tear off status 11h 14 Paper mismatch Error 0Ch Fast Blink 12 Paper Out 06h On 11 Ink end 05h On 10 No Ink cartridge or Ink cartridge error 05h On 9 Paper Jam ...

Page 13: ...t When printer fails to load a sheet it goes paper out error Set the paper to the ASF and push the Paper switch Ink out When the printer runs out the most part of the ink of any one color it warns ink low and keeps printing When the printer runs out the whole ink of any one color it stops printing and indicates ink out error Install the new Ink Cartridge No ink cartridge When printer detects that ...

Page 14: ...nd CD Tray EXTERNAL DIMENSION DIAGRAM Figure 1 3 External Dimension Diagram 1 5 Accessories STANDARD ACCESSORIES User s guide Ink Cartridge one for each of 8 colors Setup Sheet Power Cord Software CD ROM CD R Print Position Check sheet Roll Paper Holder 8 cm CD DVD adapter CD DVD tray CONSUMABLES AND OPTIONS Ink Cartridges Gloss Optimizer T0540 Black T0541 Cyan T0542 Magenta T0543 Yellow T0544 Red...

Page 15: ...C H A P T E R 2 OPERATINGPRINCIPLES ...

Page 16: ... noise during driving The CR linear scale and CR encoder sensor are used to control the motor PF Motor DC motor with brushes Drives the Paper loading rollers at the time of fixed value paper loading or paper feed eject operation To grasp the paper feed pitch the precision gear surface is fitted with the PF scale and the PF encoder sensor is used to control the motor APG Motor DC motor with brushes...

Page 17: ...ROM A6 H According to the saved information the printer controls the drive voltage to obtain a designated driving current This minimizes the unit to unit variation CR Measurement Sequence To set the appropriate drive current value according to the CR mechanical load the mechanical load is measured in a CR measurement sequence and saved into the EEPROM A4 H A5 H at power on or after replacement of ...

Page 18: ...is 4 steps or less the printer judges that the Carriage Unit is in the home position The IC14 ASIC sets the drive current value adequate for the Carriage Unit motion and outputs it to the motor driver Based on the signal output from the IC14 ASIC the IC5 Motor Driver outputs the CR Motor drive current to the CR Motor 2 2 1 3 Sequence Used for PW Detection The PW paper width detection Sensor instal...

Page 19: ...lue detection voltage CD R present tray home position detected The measurement voltage in the presence of the CD R is saved into the EEPROM as a white level The white level value is used to check the sensor deterioration condition during servicing or like If the measurement value of the white level is close to that of the PW detection level it means that the sensor is dirty or deteriorated 2 2 1 4...

Page 20: ... to the PF Roller Shaft Figure 2 4 Paper Feeding Mechanism Table 2 4 Nozzle Lines and the Corresponding Ink Color Line Ink A Yellow B Magenta C Cyan D Matte black E Photo black F Red G Blue H Gloss Optimizer 31 89mm 41 66mm Carriage moving direction Paper feeding direction 0 071mm 1 360inch 0 141mm 1 180inch Line A Line B 7 620mm 216 720inch 2 258mm 64 720inch 2 258mm 64 720inch 2 258mm 64 720inch...

Page 21: ...the Paper Back Lever Torsion Spring 3 By the LD Roller s rotation the Hopper is released from the Hopper Cams located at the left and right ends of the LD Roller and the Hopper pops up by tensile force of the Hopper Compression Spring 4 When the next sheet of paper is fed by the LD Roller and the Retard Roller the Hopper is pressed against the Frame again by the Hopper Cams And the Paper Holder of...

Page 22: ...are described below When Loading Roll Paper Pressing the Roll Paper Switch for more than 3 seconds feeds the leading edge of the roll paper backward to the PE Sensor the Paper LED flashes In this state draw the roll paper and press the Paper Switch to return the panel operation to the normal mode that enables paper feeding from the ASF When Received a Print Job for Roll Paper 1 After finished the ...

Page 23: ... of the Cam presses down the Paper EJ Transmission Lock Lever to release the tab of the Paper EJ Lock Lever from the Paper EJ Transmission Lock Lever 3 The CD R Release Lever comes free from the Paper EJ Lock Lever and comes down to enable the CD R Tray Base to open When the Carriage Unit is out of its home position the salient of the Paper EJ Lock Release Cam does not press down the Paper EJ Tran...

Page 24: ...e CD R Tray is fed in the paper ejection direction 6 The Carriage Unit moves leftward the PW Sensor detects the left side white marking then the Carriage Unit moves rightward and the PW Sensor detects the right side white marking 7 The Carriage Unit moves to the center of the CD R Tray and the PW Sensor starts detection in the back and forth direction of the CD R After the leading edge of the CD R...

Page 25: ...ansmitted to the PF Roller and the Paper EJ Roller following the route shown below The route is also followed by the paper The following shows the part names and outline of the drive transmission path Figure 2 8 Paper Feeding Mechanism Table 2 6 PF Motor Specifications Item Specifications Type DC motor with brushes Drive voltage 42V 5 voltage applied to driver Armature resistance 21 2Ω 10 Inductan...

Page 26: ...he Ink System Mechanism consists of the following units Pump Unit including the CR Lock Lever Cap Unit 2 2 5 1 Pump Unit The Pump Unit is designed to suck ink from the Print Head or Cap Unit The Cap Unit has a built in Head Cleaning Wiper The following shows the specifications of the stepping motor that drives Pump Unit The following operations are performed when the drive of the Pump Motor is tra...

Page 27: ...e Figure 2 10 Pump Unit Operating Principle Ink Suction 1 The Pinion Gear of the Pump Motor rotates in the CW direction 2 The Roller turns and simultaneously presses the tube 3 Ink is fed from the Cap Unit toward the Waste Ink Pad Pump Release 1 The Pinion Gear of the Pump Motor rotates in the CCW direction 2 The Roller moves away from the tube and releases the tube 3 Ink is not sucked Pump Motor ...

Page 28: ...layed After CSIC operation is checked the ink consumption of the I C currently installed per color is compared with the ink consumption saved in the printer EEPROM and control is performed under the following conditions When the current ink consumption data differs between the Ink Cartridge and the EEPROM 1 The printer judges that the Ink Cartridge was replaced while the printer was turned off The...

Page 29: ...e printer executes the initial ink filling operation to fill the ink cavities of the Head with ink When the initial ink filling operation is performed properly the printer clears the flag in the EEPROM so that initial ink filling operation will not be performed when it is powered on the next time The Stylus Photo R1800 requires about 160 seconds to perform the initial ink filling operation If the ...

Page 30: ...ypes of flushing Flushing before printing This is performed to reduce the viscosity of ink in the Print Head nozzles before starting to print Scheduled Flushing This is performed to prevent ink in the Print Head nozzles from increasing its viscosity during printing 2 2 7 Power On Sequence The following describes the printer operation after it is powered on When the Carriage Unit is in the Home Pos...

Page 31: ... Unit performs HP detection operation in the following path Home position Right frame CR Lock confirmation position Right frame Home position 7 The drive of the Pump Motor is transmitted to the Cap Unit the Cap opens lowers and the CR Lock is released 8 The Carriage Unit returns to the home position and the PG position returns from PG to PG Type 9 The PF Motor drive is transmitted to the PF Roller...

Page 32: ...cuit Block Diagram Table 2 9 Supplied Power Voltage Applications 42VDC Rated output current 0 45A CR Motor PF Motor PG Motor ASF Motor Pump Motor Head drive voltage 3 3VDC Rated output current 0 5A Logic sensor circuit Sensor circuit Nozzle selection circuit on the Print Head Interface control circuit C51 C52 C11 D11 D12 D13 D14 C1 FL1 F1 TH1 AC Input QF1 D51 ESAVE PSC Signal 5VDC 3 3VDC 42VDC F51...

Page 33: ...Low power Circuit Logic Circuit Element for 3 3V 1 5V The 3 3VDC generated on the C589 PSB Board is transformed to 1 5V by the Regulator IC on the C589 Main Board to use it to drive multiple components This transformation is performed to reduce power consumption of the Logic Circuit The following components operate with the 3 3V 1 5V CR Encoder Sensor PF Encoder Sensor PW Sensor Ink Mark Sensor AP...

Page 34: ...E 1394 CN3 IEEE 1394 IC1 PROM IC4 SDRAM IC12 Regulator IC8 USB2 0 CN2 Motor Driver IC5 Head Driver IC7 Q13 Q14 CN15 PF Encoder Sensor Print Head CR Encoder Sensor CR Motor CN8 C589 LED Board CN10 CN7 CSIC Board C589 PSB Board RTC IC18 CN9 PW Sensor Ink Mark Sensor DAC IC2 Motor Driver IC6 PF Motor APG Motor ASF Motor Pump Motor CN5 Relay Board PE Sensor ASF Sensor APG Sensor 1 APG Sensor 2 CN11 CN...

Page 35: ...C H A P T E R 3 TROUBLESHOOTING ...

Page 36: ... Refer to Table 3 2 Troubleshooting of Communication Error on page 37 Cover Open Tray Error Refer to Table 3 3 Troubleshooting of Cover Open Error on page 40 Paper Out Error Refer to Table 3 4 Troubleshooting of Paper Out Error on page 40 Paper Jam Error Refer to Table 3 5 Troubleshooting of Paper Jam Error on page 44 Card Loading Error Refer to Table 3 6 Troubleshooting of Card Loading Error on p...

Page 37: ...e Panel FFC to the Panel Board and LED Board connectors 2 Check the Panel FFC for damages 2 Replace the Panel FFC with a new one Panel Board 1 Check the Panel Board for damages 1 Replace the Panel Board with a new one LED FFC 1 Check that the LED FFC is connected to the LED Board Connector and Main Board Connector CN8 1 Connect the LED FFC to the LED Board Connector and Main Board Connector CN8 2 ...

Page 38: ...serted into the 1 Pin of the Main Board Connector CN7 as shown in the above picture 2 Reconnect the Power Supply Board Connector cable so that the blue colored pin is inserted into the 1 Pin 3 Check that the Fuse F1 on the Power Supply Board has not blown 3 Replace the Power Supply Board with a new one 4 Check the components on the Power Supply Board for damage 4 Replace the Power Supply Board wit...

Page 39: ... driver has been installed on the PC 1 Install the EPSON USB driver USB 1 Check that the PC and printer are connected via the USB hub 1 Enter the USB serial No indicated on the product nameplate Refer to Chapter 5 Adjustment IEEE1394 1 Check that the same code as the IEEE1394 QR label code is saved in the EEPROM address from BA H to BE H 1 Input the code given as the IEEE1394 QR label code Refer t...

Page 40: ...ard Roller of the ASF Assy for paper dust and foreign matter 1 Using a cleaning sheet part code 1262115 clean the LD Roller and Retard Roller The procedure is as follows 1 Place the cleaning sheet upside down and put it into the ASF Assy 2 Press the Paper Switch to start paper feed 3 Repeat the above steps several times To remove persistent contamination staple an alcohol dampened cloth to a postc...

Page 41: ...rrectly 2 Install the Sensor Holder correctly 3 Move the Detection Lever manually as when the paper passes and check that the Detection Lever returns to the original position automatically by the Torsion Spring when released Refer to the above photo 3 Replace the PE Sensor Holder Unit with a new one 4 Using a tester check that the PE Sensor is normal Paper absent 2 4V or more Paper present 0 4V or...

Page 42: ...o remove the contamination 3 Check that the HP detection position or white markings of the CD R Tray are not chipped 3 Replace the CD R Tray with a new one The Paper Switch was pressed at the setting of the CD R Tray or board paper Though the CD R Tray or the Board Paper is fed toward the ASF Assy but is ejected immediately PW sensor 1 Check the PW Sensor for paper dust ink etc 1 Clean the PW Sens...

Page 43: ...e specified routing positions and does not make contact with any parts 1 Place the PW Sensor FFC in the specified routing positions 2 Check that the PW Sensor FFC is connected to the CR Encoder Board and PW Sensor Connectors Refer to the above photo 2 Connect the FFC to the CR Encoder Board and PW Sensor Connectors 3 Check the PW Sensor or PW Sensor FFC for damages 3 Replace the PW Sensor with a n...

Page 44: ...er is not ejected completely and causes a jam near the Paper Eject Frame ASF Assy 1 Check that the paper is fed along the Right Edge Guide 1 Feed the paper along the Right Edge Guide Paper EJ Frame Assy 1 Check that the Star Wheel Units have not come off the Paper EJ Frame Assy 1 Securely install the Star Wheel Units to the Paper EJ Frame Assy 2 Check the Paper EJ Frame Assy for deformation or dam...

Page 45: ...the portrait orientation 1 Load the cards of the same size correctly and press the Paper Switch to eject the jammed paper The card size paper is loaded correctly but Card Loading Error is displayed PW sensor 1 Check that the PW Sensor FFC is connected to the CR Encoder Board and PW Sensor Connectors 1 Connect the FFC to the CR Encoder Board or PW Sensor 2 Check the PW Sensor or PW Sensor FFC for d...

Page 46: ...ble for damages 2 Replace the CD R Sensor with a new one Panel Board connector Connector cable of the CD R Sensor CD R Sensor Table 3 8 Troubleshooting of Ink Low Occurrence Timing Phenomenon Detail Faulty Part Part Name Check Point Remedy At operation or during printing A message is displayed on the LED and EPW3 during printing Ink Cartridge 1 Look at the remaining ink indication of the EPW3 to c...

Page 47: ... power on After the Carriage has detected the HP an error is displayed on the LED and EPW3 Ink Cartridge 1 Check that the Ink Cartridge is installed correctly 1 Install the Ink Cartridge correctly 2 Check that the tab of the Ink Cartridge is not broken 2 Replace the Ink Cartridge with a new one 3 Check that the Memory Chip is not disconnected or not damaged 3 Replace the Ink Cartridge with a new o...

Page 48: ... Board Connector CN10 2 Check the CSIC FFC for damage 2 Replace the CSIC FFC with a new one CSIC Board 1 Check the CSIC Board for damage 1 Replace the CSIC Board with a new one Carriage Unit 1 Check that the electrodes in the Carriage which make contact with the CSIC Board are not bent 1 Replace the Carriage Unit with a new one Table 3 10 Troubleshooting of No Ink Cartridge Ink Cartridge Error Occ...

Page 49: ...lty Part Part Name Check Point Remedy At power on At power on the printer does not operate at all Waste Ink Pads 1 Using the Adjustment Program check if the Protection Counter A B value has exceeded 17772 1 Replace the Waste Ink Pads and reset the Protection Counter A and B value with the Adjustment Program Home side 24 H 25 H Opposite to home side 26 H 27 H ...

Page 50: ...Connect the CR Motor connector to the Relay Connector 2 Check the CR Motor connector cable for damages 2 Replace the CR Motor with a new one 3 Check if the CR Motor operates normally 3 Replace the CR Motor with a new one Relay Connector Cables for the CR Motor 1 Check that the Relay Connector Cable is connected to the Main Board Connector CN15 1 Connect the Relay Connector Cable to the Main Board ...

Page 51: ...6 Maintenance At power on the PF Motor does not operate at all PF Motor 1 Check that the Connector Cable of the PF Motor is connected to the Main Board Connector CN16 1 Connect the PF Motor connector cable to the Main Board Connector CN16 2 Check the PF Motor connector cable for damages 2 Replace the PF Motor with a new one 3 Check if the PF Motor operates normally 3 Replace the PF Motor with a ne...

Page 52: ... the APG Motor with a new one At power on the Pump Motor does not operate at all Pump Motor 1 Check that the Pump Motor connector cable is connected to the Relay Connector 1 Connect the Pump Motor connector cable to the Relay Connector 2 Using a tester check the resistance value of the Pump Motor Value of resistance 10 3Ω 10 2 If the resistance value is abnormal replace the Ink System Unit with a ...

Page 53: ...es 2 Replace the Relay Connector Cable with a new one While the power on sequence is being executed Fatal error is displayed APG Sensor 1 Check that the APG Sensor Connector cables are connected to the APG Sensors and Relay Board Connector CN4 and CN5 1 Connect the APG Sensor Connector cables to the APG Sensors and Relay Board Connector CN4 and CN5 2 Check the APG Sensors for damages 2 Replace the...

Page 54: ...10 2 If the resistance value is abnormal replace the ASF Motor with a new one 3 Check the ASF Motor connector cable for damages 3 Replace the ASF Motor with a new one Relay Connector Cable for the ASF Motor 1 Check that the Relay Connector Cable is connected to the Main Board Connector CN19 1 Connect the Relay Connector Cable to the Main Board Connector CN19 2 Check the Relay Connector Cable for d...

Page 55: ...gainst the right of the Frame then hits the left of the Frame CR Scale 1 Check that the CR Scale is inserted in the slit of the CR Encoder Sensor 1 Insert the CR Scale into the slit of the CR Encoder Sensor 2 Check the CR Scale for damages and dirt 2 Wipe off the dirt completely or replace the CR Scale with a new one CR Encoder Sensor Board 1 Check the CR Encoder Sensor for paper dust etc 1 Remove...

Page 56: ...turn PF Encoder Sensor Holder 1 Check that the PF Encoder Sensor Holder is mounted correctly 1 Install the PF Encoder Sensor Holder correctly 2 Check that the FFC of the PF Encoder Sensor is securely connected to the PF Encoder Sensor Board Connector and Relay Board Connector CN6 2 Connect the PF Encoder Sensor FFC to the PF Encoder Sensor Board and Relay Board Connector CN6 3 Check the PF Encoder...

Page 57: ...ith a new one During printing After receiving a print data or while performing the CD R Tray home position detection sequence Board Paper detection an error is displayed on the LED and EPW3 Head FFC Sensor FFC 1 Check that the Head FFC and the Sensor FFC are securely connected to the Main Board Connectors CN9 through CN14 1 Connect the Head FFC and the Sensor FFC to the Main Board Connectors CN9 t...

Page 58: ...N10 CN12 CN13 and CN14 1 Connect the Head FFC to the Print Head Connector and Main Board Connectors CN10 CN12 CN13 and CN14 2 Check the Head FFC for damages 2 Replace the Head FFC with a new one Ink is not ejected from most nozzles Print Head 1 Check for occurrence of Head Hot 1 Replace the Print Head with a new one Table 3 12 Troubleshooting of Fatal Error Occurrence Timing Phenomenon Detail Faul...

Page 59: ...nt Remedy Dot missing and mixed colors Inks are not ejected from the Print Head to the Cap Ink System Unit Cap 1 Check for foreign matter around the Seal Rubber on the Cap Unit 1 Remove the foreign matter around the Seal Rubber completely 2 Check that the Ink Tube is connected to the Pump Tube 2 Connect the Ink Tube to the Pump Tube securely 3 Check that the Extension Spring 1 19 IS is correctly i...

Page 60: ... and Main Board Connectors CN11 CN12 CN13 and CN14 2 Connect the Head FFC to the Print Head Connector and Main Board Connectors CN11 CN12 CN13 and CN14 3 Check if the Head FFC is not damaged 3 Replace the Head FFC with a new one If the trouble still occurs after replacing it replace the Print Head with a new one Ink System Unit Cleaner Blade 1 Check if the Cleaner Blade is covered with paper dust ...

Page 61: ...Board Connectors CN10 CN12 CN13 and CN14 1 Connect the Head FFC to the Print Head Connector and Main Board Connectors CN10 CN12 CN13 and CN14 Print Head 1 Check if the print quality recovers after running a cleaning or replacing the Ink Cartridges 1 Run the cleaning and replace the Ink Cartridges several times If the trouble still occurs replace the Print Head with a new one Main Board 2 Check the...

Page 62: ...ft cloth and then apply G 71 grease Refer to Chapter 6 Maintenance 3 Check that the Carriage Shaft is mounted horizontally 3 Reassemble the Carriage Shaft correctly 4 Check the Carriage Shaft for damages 4 Replace the Carriage Shaft with a new one Narrow stripes of the same width appear horizontally to the CR moving direction If the trouble still occurs after doing all measures described in the ri...

Page 63: ...r Print Head 1 Using the Adjustment Program check that the correct Head ID has been written to the EEPROM 1 Using the Adjustment Program enter the 31 digit code of the Head ID to the EEPROM Refer to Chapter 5 Adjustment The bottom of the printout is not evenly colored Adjustment 1 Check if the Positioning Adjustment of PF Roller Shaft Retainer has been performed properly 1 Make adjustments accordi...

Page 64: ... paper data are printed on the Front Paper Guide extending off the paper PW sensor 1 Check that the PW Sensor FFC is connected 1 Connect the PW Sensor FFC 2 Check that the PW Sensor is not faulty 2 Replace the PW Sensor with a new one Ink smudges appear on the blank area of the printout Paper EJ Frame Assy 1 Check the Star Wheel Rollers for ink stain 1 Clean the Star Wheel Rollers with a soft clot...

Page 65: ...er EJ Roller Assys with a soft cloth Driven Roller Shaft 1 Check the Driven Roller Shaft for ink stain 1 Clean the Driven Roller Shaft with a soft cloth Ink System Unit 1 Check that wiping operation was performed properly 1 Install the Cleaner blade correctly or replace it with a new one Table 3 13 Print Quality Troubles Observed Faults Details of the Fault Faulty Part Part Name Check Point Remedy...

Page 66: ...been made correctly check whether PW Sensor has been adjusted properly 1 Make the adjustment according to the specified adjustment priority Refer to Chapter 5 Adjustment 2 Print the adjustment check patterns and check if the printed images are still poor or grainy 2 If the image quality does not improve after the adjustment replace the Print Head and Main Board in this order and check the image gr...

Page 67: ...it is judged that the clip function is not executed normally replace the PW sensor with a new one Refer to Chapter 5 Adjustment Table 3 13 Print Quality Troubles Observed Faults Details of the Fault Faulty Part Part Name Check Point Remedy Table 3 14 Abnormal Noise Occurrence Timing Details of the Fault Faulty Part Part Name Check Point Remedy Printing operation is performed normally but abnormal ...

Page 68: ...C H A P T E R 4 DISASSEMBLYANDASSEMBLY ...

Page 69: ... to the exploded diagrams in the Appendix Before starting your work always read the precautions described in the next section 4 1 1 Precautions Before starting the disassembling reassembling work of this product always read the following WARNING and CAUTION carefully W A R N I N G Before starting the disassembling reassembling work of this product always disconnect the power cable When the power s...

Page 70: ...int Head due to the reduction of the atmospheric pressure which may cause ink leakage Use only the recommended tools for disassembly reassembly and adjustment Refer to Table 4 1 Tool List on page 74 Tighten screws to the specified torques Use the specified lubricants and adhesives Refer to Capter 6 Maintenance Make the necessary adjustments under the instructions given for disassembling Refer to C...

Page 71: ...er refer to the following table and use the specified screws in the specified positions Table 4 2 List of Screw Types Image Description Image Description 1 C B P 3x10 2 C B S 3x6 3 C B S P2 3x10 4 C B P 3x8 5 C B S 3x8 6 C B S P4 3x8 7 C B P 2 6x8 8 C B S P4 3x6 9 C B P 3x6 10 C B S 3x4 11 C C 3x4 12 C P B P1 1 7x5 13 C B P 2 6x5 Table 4 2 List of Screw Types Image Description Image Description ...

Page 72: ...paper advanced smoothly Checked Not necessary No paper jamming Checked Not necessary No paper skew Checked Not necessary No multiple sheet feeding Checked Not necessary Is the PF Motor at correct temperature Not too hot to touch Checked Not necessary No abnormal noises Checked Not necessary Is the paper path free of obstructions Checked Not necessary Adjustment Specified Adjustment Are all the adj...

Page 73: ...e 89 APG Assy 4 2 6 3 page 93 START Ink Mark Sensor and PW sensor 4 2 8 2 page 125 Board Assy 4 2 5 1 page 87 Lower Housing and Printer Mechanism 4 2 1 5 page 78 Upper Housing 4 2 1 4 page 76 APG Assy 4 2 6 3 page 93 Release Holder Assy 4 2 6 9 page 112 FLAG Release Assy 4 2 6 10 page 113 PE Sensor Holder 4 2 8 1 page 124 Upper Paper Guide Assys 4 2 6 11 page 114 PE Sensor Holder 4 2 8 1 page 124 ...

Page 74: ...ter Figure 4 2 Removing the Rear Housing 4 2 1 2 Side Housing 1 Remove the Rear Housing See Section 4 2 1 1 on page 74 2 Insert a flat blade screwdriver into the notch on the side of the Lower Housing and lift it in the direction of the arrow to remove the Left Side Housing releasing the two tabs Remove the Right Side Housing in the same way Figure 4 3 Removing the Side Housings Rear Housing 1 C B...

Page 75: ...Insert the flat blade screwdriver into the hole on the right side of the frame and rotate the white shaft of the Ink System Unit Figure 4 5 Locking Releasing the Carriage and Opening Closing the CD R Unit Match the positioning holes of the Upper Housing with the guide pins of the Side Housing Figure 4 4 Reinstalling the Side Housing Positioning Holes Tabs Guide Pins Notches Table 4 4 Relationship ...

Page 76: ... Figure 4 7 Screws that Secure the Upper Housing C A U T I O N When moving the Carriage Unit with the CD R Unit opened turn the PG CAM Right beforehand so that PG points downwards to release the PG in order to prevent interference between the Paper EJ Frame and Carriage Unit Figure 4 6 Interference between the Frame and Carriage Unit PG Cam Right Point of Interference Paper EJ Frame PG position Ca...

Page 77: ...cure the Left Printer Cover Holder and draw it out in the direction of the arrows Remove the Right Printer Cover Holder in the same way Figure 4 9 Disconnecting the Printer Cover Holder Align the Guide Pins with the positioning holes on the Upper Housing See Figure 4 7 When inserting the CD R Sensor Cable into the Switch Board press the Connector CN2 to make sure that it is firmly installed on the...

Page 78: ...n the direction of the arrows and draw out the Waste Ink Tubes from the two Ink Tubes 3 Remove the four C B P M3 x 10 screws and two C B S P2 M3 x 10 screws that secure the Printer Mechanism 4 Hold the Printer Mechanism by its handling positions with both hands and remove it from the Lower Housing Guide Pin on the Upper Housing Upper Housing Printer Cover Notch on the Printer Cover C A U T I O N I...

Page 79: ... Mechanism Tighten the screws in the order shown in Figure 4 12 A D J U S T M E N T R E Q U I R E D After replacing the Printer Mechanism be sure to make the following adjustments 1 Platen Gap PG Adjustment 2 Ink Mark Sensor Adjustment 3 Head Angular Adjustment 4 Auto Bi D Adjustment 5 Ink Mark Sensor Adjustment 6 First dot position 7 PW Sensor Adjustment 8 PF Deterioration Compensation Counter Re...

Page 80: ... 2 Remove the C B P M3 x 8 screw that secures the Waste Ink Tube 3 Remove the 15 Waste Ink Pads from the Lower Housing Figure 4 14 Removing the Waste Ink Pads 4 C B P 3x8 6 1 kgf cm Waste Ink Pads Referring to Figure 4 15 correctly install the Waste Ink Pads Figure 4 15 Reinstalling the Waste Ink Pads 1 2 3 4 1 2 3 4 Installation Order 1 2 Installation Order ...

Page 81: ...ubes 0 digit side Lower side 130 digit side Upper side Figure 4 16 Positions of Waste Ink Tubes A D J U S T M E N T R E Q U I R E D After replacing or removing the Waste Ink Pads always make the following adjustment Waste Ink Protection Counter Clear Refer to Chapter 5 Adjustment for details of the adjustment 0 Digit Side 130 Digit Side Waste Ink Tubes ...

Page 82: ...e Pads Front Paper Guide Pad Protection After installing the Front Paper Guide Pads and Front Paper Guide Pad Protection lift the Printer Mechanism and check the following points 1 Make sure that the Tabs on the Pads are not cut midway 2 Make sure that all Tabs are in place on the Front Paper Guide and that they are facing down towards the Waste Ink Pads without any folds 3 Make sure that the Tab ...

Page 83: ...ble downside CN5 APG Sensor Cable the upper side CN6 PF Encoder Sensor FFC 6 Disconnect the FFC bundled by the Acetate Tape from the CN8 to CN14 on the Main Board and release it from the groove on the ASF Assy 7 Disconnect the APG Motor Cable and PE Sensor Cable from the ASF Assy 8 Peel off the PF Encoder FFC secured by two pieces of double sided adhesive tape from the ASF Assy Figure 4 21 Releasi...

Page 84: ...move the three C B S P4 M3 x 8 screws that secure the ASF Assy and remove the ASF Assy from the Printer Mechanism Figure 4 23 Removing the ASF Assy Referring to Figure 4 21 correctly route each of the Cables and FFC Align the Guide Pins and Tabs on the Guide Roller LDs with the positioning holes on the Main Frame Refer to Figure 4 22 Front Face 2 C B S 3x6 8 1 kgf cm Guide Pin Tab LD Roller Shaft ...

Page 85: ... ASF Guide Roller LDs When installing the Guide Roller LDs the position of the Guide Roller LDs must be adjusted so that the positions of the LD Roller Shaft and Retard Roller are optimized in order to maintain the paper feed accuracy 1 After installing the ASF Assy loosen the two C B S M3 x 6 screws that secure the Guide Roller LD Refer to Figure 4 22 2 Turn Combination Gear 29 11 on the right si...

Page 86: ...igit Side Guide Roller LD with the positioning holes on the Main Frame and tighten the Guide Roller LD 0 Digit Side with the screws See Figure 4 27 5 Check the position of the Retard Roller Holder Tab again through the gap If it is not inside the range remove the screws on the Guide Roller LD 0 Digit Side and repeat steps 2 to 4 to set the Tab within the range 6 Check the clearance in both ends of...

Page 87: ...rference between the Manual Paper Guide and the Ground Plates on the Board Assy CN5 Relay FFC CN8 LED FFC CN9 Sensor FFC CN10 Sensor FFC CN11 Head FFC CN12 Head FFC CN13 Head FFC CN14 Head FFC CN16 PF Motor Connector Cable CN17 Relay Connector Cable for Pump Motor CN18 APG Motor Connector Cable CN19 Relay Connector Cable for CR Motor Figure 4 29 Removing the Board Assy Tighten the screws in the or...

Page 88: ... Data Read Write 2 Colorimetric Calibration When impossible to read data from the old board 1 Market Initial Settings 2 USB ID Input 3 IEEE 1394 ID Input 4 Head ID Input 5 Ink Mark Sensor Adjustment 6 Head Angular Adjustment 7 Auto Bi D Adjustment 8 Ink Mark Sensor Adjustment 9 First dot position 10 PW Sensor Adjustment 11 Reset PF Deterioration counter write the maximum value 12 PF Adjustment 13 ...

Page 89: ...assembling the Printer Mechanism 4 2 6 1 Print Head 1 Remove the Upper Housing See Section 4 2 1 4 on page 76 2 Release the Carriage lock and move the Carriage Unit to the center See Section 4 2 1 3 on page 75 3 Open the Ink Cartridge Cover 4 Release the FFC Guide from the three Tabs to remove the FFC Guide from the Carriage Unit Figure 4 32 Removing the FFC Guide Align the two Tabs on the Upper H...

Page 90: ...ving the Print Head 6 Remove the two Head FFCs from the Print Head Figure 4 34 Removing the Head FFC Head 7 C B P 2 6x8 3 0 5 kgf cm 1 2 3 Head FFC Make sure that the Pad is attached at the position in Figure 4 35 Figure 4 35 Attaching the Pad The Print Head must be installed with the Guide Pins of the Carriage Unit aligned with the positioning holes on the Print Head Figure 4 36 Reinstalling the ...

Page 91: ... screws must be tightened in the order shown in Figure 4 33 while the Print Head is held down in the direction of the arrow Figure 4 37 Reinstalling the Print Head 2 A D J U S T M E N T R E Q U I R E D After replacing or removing the Print Head always make the following adjustments 1 PG Adjustment 2 Head ID Input only after replacing 3 Ink Mark Sensor Adjustment 4 Head Angular Adjustment 5 Auto Bi...

Page 92: ...ocedure 6 1 Stand the coil section 6 2 Lower the coil section downwards to remove Foot 1 from the notch on the Left CR Shaft Mounting Plate 6 3 Turn the coil section counterclockwise 6 4 Remove Torsion Spring 24 7 from the hole on the CR Scale Figure 4 40 Removing the Torsion Spring 24 7 2 7 Turn the CR Scale 90º and remove it from the Tab on the Left CR Shaft Mounting Plate Figure 4 41 Removing t...

Page 93: ...nnecting the Connector Cables Pass the CR Scale through the slot on the CR Encoder Figure 4 42 Reinstalling the CR Scale 1 Set the left end of the CR Scale with the chamfered edge facing upwards Figure 4 43 Reinstalling the CR Scale 2 Place the right end of the CR Scale correctly so that it is not hooked onto the Right CR Shaft Mounting Plate Figure 4 44 Reinstalling the CR Scale 3 CR Encoder CR S...

Page 94: ...installing the APG Assy 3 1 2 2 C B S 3x6 8 1 kgf cm FLAG Release Assy Released Not Released Upper Paper Guide Match the phase of the APG Assy in the following procedure 1 Match the delta marks of Spur Gear 16 and Combination Gear 22 28 8 32 4 2 At the position where the Tab can be identified through the notch of the PG Frame match the delta marks of Spur Gear 16 and PG Cam Left Figure 4 48 Phase ...

Page 95: ...e two C B S M3 x 6 screws that secure the Frame Support Plate Left and remove it Figure 4 50 Removing the Left Frame Support Plate PG Cam Right Insert the Left Frame Support Plate into the notch on the Main Frame See Figure 4 50 Align the two Tabs on the Main Frame and the Tab on the Paper EJ Frame Assy with the three positioning holes on the Frame Support Plate Left See Figure 4 50 Align the Tab ...

Page 96: ...ing Right PG Torsion Spring 9 Remove CR Shaft Mounting Plate Fixed Spring from the Tab and Notch on the Main Frame and draw out the spring in the direction of the arrow Figure 4 54 Removing CR Shaft Mounting Plate Fixed Spring Left PG Torsion Spring Tab A Tab B Right PG Torsion Spring Tab A Tab B Place the feet of Left PG Torsion Spring and Right PG Torsion Spring on the Carriage Shaft Figure 4 53...

Page 97: ...n Pulley Holder 12 Remove the CR Drive Belt from the CR Motor Pinion Gear Figure 4 57 Removing the CR Drive Belt 13 Remove the four C B S P4 M3 x 6 screws that secure the CR Guide Plate and remove it from the Main Frame Figure 4 58 Removing the CR Guide Plate Tabs Extension Spring for the Driven Pulley Holder Driven Pulley Holder Driven Pulley Driven Pulley Holder Align the positioning holes on th...

Page 98: ...Mounting Plate from the notch on the Main Frame to rotate the Mounting Plate toward you Figure 4 60 Rotating the Left CR Shaft Mounting Plate 16 Lift the Carriage Shaft upwards and remove the Carriage Shaft Spacer from the Carriage Shaft with tweezers Figure 4 61 Removing the Carriage Shaft Spacer 17 Rotate the Left CR Shaft Mounting Plate toward you to remove the Bushing on the Left CR Shaft Moun...

Page 99: ...cer and Right PG Cam from the Carriage Shaft Figure 4 64 Removing Right PG Cam 20 Pull the Right CR Shaft Mounting Plate away from the Tab on the Main Frame and rotate toward you Figure 4 66 Rotating the Right CR Shaft Mounting Plate Spacer PG Cam Left Hole on Main Frame Spacer Right PG Cam Install the Right PG Cam so that one of these positions marked 0 or faces downward Figure 4 65 Right PG Cam ...

Page 100: ...take care not to scratch the Carriage Shaft Carriage Unit Carriage Shaft Point of Interference CR Scale Cover 1 2 3 Set the longer end of the Carriage Shaft to the left side When the Carriage Shaft is removed the Plain Spring and Leaf Spring that are attached to the right end of the Carriage Shaft may drop off In such case be sure to attach them in the order as shown in the figure below Figure 4 6...

Page 101: ...Holder 1 24 Remove the Belt Holder from the Carriage unit Figure 4 72 Removing the Belt Holder 2 25 Release the CR Encoder Board Holder from the three Tabs to remove it from the Carriage Unit Figure 4 73 Removing the CR Encoder Board Holder 26 Disconnect the Sensor FFC from the Connector on the CSIC Board Figure 4 74 Removing the Sensor FFC Belt Holder Mounting Plate Belt Holder CR Encoder Board H...

Page 102: ...grease to the area specified for each part Left and Right Parallelism Adjust Bushing See Figure 6 2 on page 175 Left and Right CR Scale Mounting Plate See Figure 6 3 on page 175 Left and Right PG Cam See Figure 6 5 on page 176 Left and Right PG Torsion Spring See Figure 6 6 on page 176 CR Guide Plate See Figure 6 7 on page 176 Driven Pulley Hoder See Figure 6 8 on page 177 Carriage Shaft See Figur...

Page 103: ...e Pin that secures the Ink Cartridge from the Carriage Unit with a flat blade screwdriver and remove the Ink Cartridge Cover Figure 4 77 Removing the Ink Cartridge Cover Ink Cartridge Cover Carriage Unit Guide Pin Align the positioning holes on the Carriage Unit with the two Guide Pins on the Ink Cartridge Cover Make sure that the shaft on the center of the Ink Cartridge Cover fits into the Bushin...

Page 104: ...ction 4 2 6 4 on page 101 7 Hold the CSIC Board Spacer with your fingers and remove upwards Figure 4 80 Removing the CSIC Board Spacer 8 Push up the CSIC Board with a flat blade screwdriver from the notch on the right side of the Carriage Unit and remove the CSIC Board from the Carriage Unit Figure 4 81 Removing CSIC Board CSIC Board Cover Tabs CSIC Board Spacer The CSIC Board Spacer must be insta...

Page 105: ...t Secure the Paper EJ Frame Assy 6 Remove the two Guide Pins on the CD R Tray Base from the Left and Right CD R Release Lever Sub Assy 7 Pull the Star Wheel Roller toward you and remove the Paper EJ Frame Assy from the Printer Mechanism keeping the Assy from coming in contact with the Right CD R Release Lever Sub Assy and the Tab on the Right CD R Cover Figure 4 84 Removing the Paper EJ Frame Assy...

Page 106: ...Hook both rear ends of the Paper EJ Frame Assy onto the Tabs on the Main Frame Align the Bearing of the CD R Release Level Sub Assy with the Paper EJ Release Shaft Figure 4 85 Reinstalling the Paper EJ Frame Assy Match the Tabs with the five Positioning Holes See Figure 4 83 Tighten the screws in the order shown in Figure 4 84 A D J U S T M E N T R E Q U I R E D Be sure to perform the following ad...

Page 107: ...emove it upwards from the Main Frame Figure 4 88 Removing the Right CD R Release Lever Sub Assy 3 Tab Guide Pin Make sure that the Right CD R Release Lever Sub Assy is correctly assembled as shown in the figure below Figure 4 89 Reassembling the Right CD R Release Lever Sub Assy Align the Shaft and Bushing Figure 4 90 Reinstalling the Right CD R Release Lever Sub Assy Align the positioning hole of...

Page 108: ...emove the Left CD R Release Lever Sub Assy upwards from the Main Frame Figure 4 92 Removing the Left CD R Release Lever Sub Assy Spur Gear 68 Tabs Small Tab 9 C B P 3x6 6 1 kgf cm Make sure that the Left CD R Release Lever Sub Assy is correctly assembled as shown in the figure below Figure 4 93 Reinstalling the Left CD R Release Lever Sub Assy 1 Align the Shaft and Bushing Figure 4 94 Removing the...

Page 109: ... Motor Connector from the Relay Connector Figure 4 95 Disconnecting the Pump Motor Connector 5 Remove the two C B S M3 x 4 screws that secure the Ink System Guide Plate and remove it Figure 4 96 Removing the Ink System Guide Plate Be sure to screw the two Earth Cables together Referring to Figure 4 95 correctly route the Relay Connector Cable Relay Connector 5 C B S 3x8 8 1 kgf cm Earth Cable Rela...

Page 110: ...he Right Support Frame from the Main Frame Figure 4 99 Removing the Right Support Frame Tighten the screws in the order shown in Figure 4 98 2 Rear 1 Front 2 C B S 3x6 8 1 kgf cm Align the positioning holes on the Right Support Frame with the Guide Pins on the Main Frame Figure 4 100 Installing the Support Frame Right Tighten the screws in the order shown in Figure 4 99 Right Support Frame 2 Upper...

Page 111: ...n such case correctly install it referring to the figure below Figure 4 102 Installing the Paper EJ Lock Release Cam Paper EJ Transmission Lock Lever Ink System Unit Paper EJ Lock Release Cam Place the Paper EJ Lock Release Cam on the rear side of the Paper EJ Transmission Lock Lever Figure 4 103 Reinstalling the Ink System Unit 1 Align the positioning hole on the Main Frame with the Guide Pin on ...

Page 112: ... from the Main Frame with a flat blade screwdriver and remove the Release Holder Assy upwards Figure 4 105 Removing the Release Holder Assy 2 C B S 3x6 8 1 kgf cm 1 2 3 PE Sensor Connector Cable Tabs Release Holder Assy Rear side Upper Tabs Lower Tabs Front side Align the three Upper Tabs on the Release Holder Assy with the positioning holes on the Main Frame See Figure 4 105 Fit the FLAG Release ...

Page 113: ... slide the Driven Release Holder to the left as viewed from the front of the Printer Mechanism 4 Release the three Tabs on the Driven Release Holder from the Main Frame and remove the FLAG Release Assy Figure 4 108 Removing the FLAG Release Assy C A U T I O N In the following procedure Parallel Pin 1 5 may drop off when the Driven Release Holder is slid Be careful not to lose it Figure 4 107 Paral...

Page 114: ... locations shown in the figure below to prevent ink from sticking to the LD Rollers Remove the five Paper Guide Torsion Springs from the Tabs insert the notches of the Perforated Sheets into the Tabs to attach them to the Main Frame and then hook the Paper Guide Torsion Springs onto the Tabs again Insert the LD Cover Sheet in between the frame so that the Tabs on the upper side of the LD Cover She...

Page 115: ... 5 Lift the six Upper Paper Guide Assys from the Main Frame to release the shaft referring to Figure 4 112 and remove the Upper Paper Guide Assys to the rear Figure 4 113 Removing the Upper Paper Guide Assy Upper Paper Guide Torsion Sprig Tab Upper Paper Guide Assys Tabs Make sure that the leading end of the Upper Paper Guide Torsion Spring can be seen through the hole of the Upper Paper Guide Ass...

Page 116: ...d move the Carriage Unit to the center See Section 4 2 1 3 on page 75 4 Remove the EJ Grounding Spring from the Main Frame with tweezers Figure 4 114 Removing the EJ Grounding Spring A D J U S T M E N T R E Q U I R E D After replacing the following part be sure to apply G 26 grease to the specified area See Figure 6 9 on page 177 Upper Paper Guide Assy Referring to Figure 4 115 correctly install t...

Page 117: ...ushing 8 from the Main Frame Figure 4 117 Removing the Left Bushing 8 8 Return the Carriage Unit to its home position 9 Release the Tab that secures the Front Paper Guide from the Main Frame and slide the Front Paper Guide to the left and turn it until the front side faces up to remove the Front Paper Guide together with the Paper Eject Roller Figure 4 118 Removing the Front Paper Guide and Paper ...

Page 118: ... Tabs are facing down toward the Waste Ink Pads without any folds 3 Make sure that the Tab foldbacks are protruding completely from the Front Paper Guide Figure 4 121 Checking the Front Paper Guide Pad A D J U S T M E N T R E Q U I R E D After replacing the following part be sure to apply G 45 grease to the area specified for each part EJ Grounding Spring See Figure 6 10 on page 177 Front Paper Gu...

Page 119: ...the PF Drive Belt and Spur Gear 31 5 6 Remove the PG Grounding Spring from the notch on the Main Frame and remove the PF Grounding Spring from the groove on the PF Roller Shaft Figure 4 123 Removing the PF Grounding Spring 7 Make sure that the Left Parallelism Adjust Bushing is not protruding from the notch on the Main Frame If it is protruding loosen the C B S P4 M3 x 8 screw that secures the Lef...

Page 120: ...wdriver and slide Left Bushing 8 to the inside of the Printer Mechanism Figure 4 126 Removing the Left Bushing 8 C A U T I O N When performing the following procedure take care not to lose the E ring Left Bushing 8 Guide pin Notch E Ring PF Roller Shaft C A U T I O N When performing the following procedure pay attention to the following points Prevent the coated surface of the PF Roller Shaft from...

Page 121: ... Roller Shaft Figure 4 129 Handling the PF Roller Shaft A D J U S T M E N T R E Q U I R E D After replacing the following part be sure to apply G 45 grease to the area specified for each part PF Roller Shaft See Figure 6 12 on page 177 Rear Paper Guide See Figure 6 13 on page 178 PF Grounding Spring See Figure 6 13 on page 178 A D J U S T M E N T R E Q U I R E D After replacing or removing the PF ...

Page 122: ...from the CR Motor Pinion Gear 5 Remove the two C B S M3 x 4 screws that secure the CR Motor and remove the CR Motor from the Main Frame Figure 4 131 Removing the CR Motor CR Motor Relay Connector CR Motor Connector Cable CR Drive Belt Driven Pulley CR Motor Pinion Gear Make the Lot No printed surface on the CR Motor face the direction shown in the figure below Figure 4 132 Reinstalling the CR Moto...

Page 123: ...om the Printer Mechanism Figure 4 133 Removing the PF Motor PF Motor 1 2 PF Drive Belt 11 C C 3x4 4 0 5 kgf cm PF Motor Connector Cable Clamp CN16 Pinion Gear Make the slit on the PF Motor face the direction shown in the figure below Figure 4 134 Reinstalling the PF Motor Tighten the screws in the order shown in Figure 4 133 A D J U S T M E N T R E Q U I R E D After replacing or removing the PF Mo...

Page 124: ...3 Release the Tabs that secure the PE Sensor Holder from the notch on the Main Frame with a flat blade screwdriver and slide upwards and then remove toward you Figure 4 136 Removing the PE Sensor Holder Tabs PE Sensor Connector Cable Tabs Release Holder Assy Head Cable Cover PE Sensor Holder Front Tab Align the four Tabs and Guide Pin on the PE Sensor Holder with the positioning holes on the Main ...

Page 125: ...and remove the Ink Mark Sensor and PW Sensor Figure 4 139 Removing the Ink Mark Sensor and PW Sensor PW Sensor Holder 12 C P B P1 1 7x5 0 8 0 2 kgf cm Carriage Unit Bottom PW sensor Connector Ink Mark Sensor Make sure that the FFC is routed as shown in Figure 4 139 A D J U S T M E N T R E Q U I R E D After replacing or removing the Ink Mark Sensor and the PW Sensor be sure to make the following ad...

Page 126: ...ncoder Sensor Board and remove the CR Encoder Sensor Board Figure 4 140 Removing CR Encoder Sensor Board 4 2 8 4 PF Encoder Sensor Holder 1 Remove the Upper Housing See Section 4 2 1 4 on page 76 2 Disconnect the FFC from the PF Encoder Sensor Board 3 Remove the C B S M3 x 8 screw that secures the PF Encoder Sensor Holder Figure 4 141 Removing the FFC and the Screw that Secures the PF Encoder Sens...

Page 127: ...sor Holder using tweezers slide the Holder upwards to release the three Tabs and remove the PF Encoder Sensor Holder Figure 4 142 Removing the PF Encoder Sensor Holder Make sure that the PF Scale is in the slit on the PF Encoder Sensor Figure 4 143 Reinstalling the PF Encoder Sensor Holder Tabs Guide Pin PF Encoder Sensor PF Scale Slit ...

Page 128: ...C H A P T E R 5 ADJUSTMENT ...

Page 129: ...this function is to read required information from EEPROM on a defective Main Board using the D4 function and to reduce the number of ancillary adjustment items when the board is replaced 1 Select this function in the Adjustment Program 2 Read data from the defective Main Board 3 After replacing the Main Board write the data to the new board Market Initial Settings After replacing the Main Board i...

Page 130: ...upplement Be sure to confirm that there are no dots missing before executing this adjustment Ink Mark Sensor Adjustment This check is made to test whether the Ink Mark Sensor can detect patterns properly 1 Print a pattern with no dots missing and check it with the Sensor 2 Print a pattern with five dots missing and check it with the Sensor 3 The check result is OK if the two patterns are detected ...

Page 131: ...due to paper slip exit roller tolerances etc 1 Select this function in the Adjustment Program and print the adjustment pattern 2 Select or measure the adjustment value and write it to the specific EEPROM address on the Main Board Colorimetric Calibration This adjustment is made to adjust the ink discharge amount See Section 5 2 4 on page 147 CR Motor Drive Dispersion This adjustment is made to mea...

Page 132: ...r to make the printer perform Initial Ink Charge operation Refurbishment Function Shipping Liquid replacement This function is used to refurbish the initially returned product Specifically clean the inside of the Head and charge and replace the Shipping Liquid 1 Select this function in the Adjustment Program Cleaning This function is used to execute cleaning 3 CL3 when ink is not delivered from th...

Page 133: ...le indicates the replacement part based adjustment item and priority list Note Symbol explanation After removing or replacing the part After replacing the part NOTE The replacement part adjustment item indicates the adjustment to be made when the corresponding replacement part is removed singly and does not include adjustment accompanied by ancillary work ...

Page 134: ...PS Board Waste Ink Pads Ink Mark Sensor PW Sensor CR Motor PF Belt Tension Adjustment 1 PF Roller Shaft Center Support Pisition Adjustment 2 PG Adjustment 3 Main Board Data Read Write Function 4 Initial Value Write 5 USB ID Input 6 IEEE 1394 ID Input 7 Head ID Input 8 Ink Mark Sensor Adjustment 9 3 Head Angular Adjustment 10 Auto Bi D Adjustment 11 3 Ink Mark Sensor CHECK 12 3 First dot position 1...

Page 135: ... Adjustment Item Priority Carriage Shaft Carriage Unit PF Motor Paper EJ Frame Assy PF Roller Shaft Front Paper Guide Paper Eject Roller ASP Mechanism Unit ASF Assy PF Belt Tension Adjustment 1 PF Roller Shaft Center Support Pisition Adjustment 2 PG Adjustment 3 5 Reading and Writing Main Board Data 4 Initial Value Write 5 USB ID Input 6 IEEE 1394 ID Input 7 Head ID Input 8 Ink Mark Sensor Adjustm...

Page 136: ...iage Shaft 5 PG Adjustment Gauge 1276333 Gauge A gauge exclusively used to make PG Adjustment Check the corrction value by energizing it in the same way as for Stylus Photo R800 6 PF Tension Measuring Tool 1231678 Measuring tool Used to check whether or not the tension of the PF Drive Belt is within the specified value If load is greater than the specified value the PF Motor may generate heat burn...

Page 137: ...r Mechanism and install the Drive Belt on the Gear of the PF Scale and the Pinion Gear of the PF Motor 2 Press the POWER button The LCD of the Measuring Tool displays No 0 and No 1 3 From among No 0 to No 9 select the channel you want to store its setting by pressing the SELECT button The initial value may be selected as the channel 4 Press the WEIGHT button The initial value will be displayed Typ...

Page 138: ...tension until the tension falls within the allowable standard value C A U T I O N As the Drive Belt is flipped with the tip of tweezers in the following steps carefully choose the flipping position so that the Belt will not make contact with the Microphone by reaction of flipping Microphone of Timing Belt A D J U S T M E N T R E Q U I R E D Standard Value 9 0 2N 7 0 11 0N C A U T I O N Even if the...

Page 139: ...the Adjustment Gauge Plate surface with bare hands If the Adjustment Gauge Plate surface is stained by ink or etc wipe it with a soft cloth Continuty Measuring Point Adjustment Gauge Plate Top face C A U T I O N Before starting PG adjustment completely wipe drops of ink around the Print Head Remaining drops of ink will stick to the continuity measurement portion of the Adjustment Gauge and generat...

Page 140: ... of the Gauge with the Driven Roller Shaft of the Upper Paper Guide Left direction Release the left end of the Gauge from the Tab on the Front Paper Guide in Figure 5 6 Figure 5 6 Setting the Adjustment Gauge 7 Move the Carriage Unit onto the Adjustment Gauge Moving position Match the left end of the Gauge with the left end of the Carriage Unit Figure 5 7 Moving the Carriage Unit C A U T I O N Whe...

Page 141: ...the Parallelism Adjust Bushing at least twice to confirm that the continuity position and the non continuity position are the same 10 To set the PG position to 0 or more turn the PG Cams on both ends of the Carriage Shaft CCW so that the point marked 0 or or faces down A D J U S T M E N T R E Q U I R E D PG Standard Value PG MInus Minus 1 05mm 1 25mm PG Minus 1 2mm 1 4mm Adjustment Resolution 0 06...

Page 142: ...t end of the Gauge with the right end of the Carriage Unit Figure 5 11 Moving the Carriage Unit 13 Return the PG position to 14 As in Step9 move the Parallelism Adjust Bushing on the right side of the frame to set the right side PG position 15 Set the PG position to 0 or more 16 Set the Adjustment Gauge on the left side of the Front Paper Guide 17 Move the Carriage Unit onto the left side Adjustme...

Page 143: ... the following parts Lower Housing ASF Assy See Section 4 2 4 on page 83 Board Assy See Section 4 2 5 1 on page 87 Carriage Unit 2 Install the printer on a level base 3 Set the PF Roller Shaft Position Adjustment Jig in place on the Level block and perform zero adjustment Long hand position Turn the dial to adjust the 0 position on the scale to the long hand position with the jig set in place on t...

Page 144: ...s shown in the figure below Left side Inside of PF Roller left end E ring Right side Clearance between PF Roller right end Right Bushing 8 and left end of Upper Paper Guide Center Clearance between the 2nd Upper Paper Guide and 3rd one from the left Figure 5 15 Setting the PF Roller Shaft Position Adjustment Jig 2 Center Support Bushing Cam Bottom of Rear Center C A U T I O N Check for any dirt on...

Page 145: ... A D J U S T M E N T R E Q U I R E D Standard Value 30 50µ Adjustment Resolution 50µ C A U T I O N 30µ must be set to compensate for the thickness of the coating on the PF Roller Shaft Make sure that the position of the short hand is the same as at 0 adjustment C H E C K P O I N T The figure below shows the positional relationship between the Center Support Bushing Cam and the Dial Gage Figure 5 1...

Page 146: ...EPSON Stylus Photo R1800 R2400 Revision B Adjustment Adjustment 146 Figure 5 17 Outside the Specified Value Range Figure 5 18 Inside the Specified Value Range Unevenness ...

Page 147: ... and mode to mode variations in color To improve the accuracy of the Ink Counter The Color ID can improve the Ink Counter accuracy which reduces the running cost of ink Colorimetric Calibration Technology The Principle The ink discharge amount characteristic of a printer is measured by measuring color difference L a b of a printed chart with a calibrator Created Color ID information based on the o...

Page 148: ...r ID to control the amount of ink droplets C H E C K P O I N T Make sure not to confuse Head ID with Color ID Head ID An ID information specific to individual print head It is indicated on the Head QR Code Label attached to the print head Color ID An ID information specific to individual printer It is obtained by the Colorimetric Calibration C A U T I O N Before performing Colorimetric Calibration...

Page 149: ...olor ID from EEPROM when printing out a Calibration Chart START USB ID acquisition Printing date time acquisition Printing of a Calibration Chart USB ID printing date time nozzle check pattern Drying of the Calibration Chart Mail the Calibration Chart to color measurement site Receive the Calibration Chart Save the color measurement data to a file Mail the color measurement data file to repair wor...

Page 150: ...e Process The following shows the process when Perform entire process is clicked Figure 5 23 Entire Process Workflow END Select port Connect printer Check printer connection Ink setup Perform cleaning Automatic nozzle check Printing automatic nozzle check pattern End of printing of automatic nozzle check pattern Executing automatic nozzle check Print chart Printing chart Dry chart Prepare Calibrat...

Page 151: ... at the bottom cleaning cycles shown below are performed Exchange CL once CL3 once Figure 5 27 Cleaning C A U T I O N The remaining amount of the ink is checked before the USB ID is acquired If there is an ink cartridge s with a remaining amount of ink of 30 or less ink low ink out states a warning message is displayed As the USB ID is used to recognize printers when entering color measurement val...

Page 152: ... A U T I O N If an ink sensor abnormality is detected during execution of the automatic nozzle check the following error message will be displayed The automatic nozzle check has finished unsuccessfully Click OK to start a nozzle check manually 1 Click OK to print the nozzle check pattern Figure 5 29 Manual Nozzle Check 2 Check the printed nozzle check pattern If there are no broken lines or missin...

Page 153: ... Chart Figure 5 32 Illustration of Calibration Chart C H E C K P O I N T The recommended air temperature range for printing a Calibration Chart is 15 C to 28 C 2004 07 02 13 59 53 USBID MH01234567 2004 07 05 13 59 53 USB ID All 18 alphanumeric digits are indicated Print time Color measurement limit time 7 days after the print time 54 calibration patches 6 colors x 9 dot sizes Nozzle check pattern ...

Page 154: ...g The color measurement procedure screen operated by the Calibrator control plug in DLL is displayed on screen overlapping the Colorimetric Calibration Tool Figure 5 34 Color Measurement 10 Place the Calibrator on the calibration plate and click Calibrate Figure 5 35 Preparing the Calibrator When there are broken lines or missing segments This button is enabled when countdown is completed C A U T ...

Page 155: ...5 37 Starting the Color Measurement Color patch grid Color measurement completed rows Patches in the completed rows are displayed in colors created according to the measurement result Color measurement not completed rows Rows that have not been measured are displayed in pale color Arrow Indicates the start position of color measuring Cursor Automatically moves up when color measurement of a row is...

Page 156: ...During color measurement measure only the patches on the chart sheet Do not measure other parts such as the USB ID text string When there is an error possibility in measuring color a warning mark appears at the patch in question In such case make sure to measure the row that includes the patch with a warning mark again If the number of scanned patches does not match the number of patches on a sing...

Page 157: ...k ON again to end the adjustment This action reflects the color measurement values on the printer Figure 5 40 END When Measuring Color at a Place Different from the Repair Work Site 1 Repair work site 1 Start up the Colorimetric Calibration Tool for Stylus Photo R1800 on the PC and click Print a Calibration Chart Figure 5 41 Printing a Calibration Chart ...

Page 158: ... Repair Work Site p150 to make a Calibration Chart 3 When the following screen is displayed click End and follow the on screen instructions to mail the Calibration Chart to the repair work site Figure 5 43 END END Select port Connect printer Check printer connection Ink setup Perform cleaning Automatic nozzle check Print chart Printing chart Dry chart Printing automatic nozzle check pattern End of...

Page 159: ...Tool for Stylus Photo R1800 on the PC and click Execute color measuring Figure 5 44 Color Measurement The following shows the process when Execute color measuring is clicked Figure 5 45 Color Measurement Workflow Prepare Color Calibrator Prepare Calibration Chart Color measurement Start color measurement Enter USB ID END Create data file ...

Page 160: ...in the edit box using 1 byte characters and click Next Figure5 46 Entering the USB ID 4 Click Save to save the color measurement data Color measurement data file xxxxxxxx data It is recommend to enter the product s serial No as the file name for management purposes Figure 5 47 Creating a Data File 5 When the following screen is displayed click End and mail the color measurement data file to the re...

Page 161: ...put method When File is selected as Input method and the color measurement data file is selected the content of the file is reflected in the Color ID and the USB ID edit boxes When Manual input is selected as Input method Select Manual input at Input method and directly enter the numerical values in the Color ID and the USB ID edit boxes To enter numerical values start up the correction value data...

Page 162: ...re 5 53 Write the Color ID C A U T I O N Next will not be enabled even if all of the data has been entered in the Color ID and USB ID edit boxes when selecting File as Input method but not specifying a file Clicking the Browse button displays the file selection dialog box The Color ID is displayed in Color ID edit box after the color measurement data file is selected C H E C K P O I N T It takes a...

Page 163: ...the corresponding ink cartridge s with a new one XXXXX XXXXX When installing a new cartridge s make sure to shake it them at least four times A cleaning cycle will automatically start when a new cartridge s is installed To stop the process click End Cleaning error Error occurred while running the cleaning cycle Check the printer status Automatic nozzle check failure The automatic nozzle check has ...

Page 164: ...imes The calibration has failed Check the calibrator status Color measurement failure Color measuring of the Eye One calibrator has failed Measure colors of the failed row again Head ID read error Failed to read the Head ID Check the printer status Color ID mismatch error The Color ID does not match the printer Check the printer status Color ID enable flag invalid error The Color ID enable flag ha...

Page 165: ...t by himself herself by using the tool Prepare the following tools for Colorimetric Calibration EPSON Photo Paper Used for printing a Calibration Chart A4 or letter size Plain standard Paper Used for printing a nozzle check pattern A4 or letter size Clear file for mailing to our service center Plain paper A4 or letter size for mailing to our service center The procedure for printing the Calibratio...

Page 166: ...ows or CCASSPR1800Print Macintosh to start up the program on the computer 3 Connect the printer to the PC using a USB or IEEE cable and click Next Step3 Printer Connection Check Screen C H E C K P O I N T When two or more printers are currently connected the screen changes to the port selection screen Select the target printer and click Next Port Selection Screen Select a target printer The button...

Page 167: ...heet of A4 or letter size plain paper and click Next to execute the automatic nozzle check Step6 Automatic Nozzle Check 7 Load one sheet of A4 or letter size Photo paper and click Next to print the Calibration Chart Step7 Printing a Calibration Chart C H E C K P O I N T If a warning message appears on the LCD saying that ink level is low replace the indicated ink cartridge s with a new one Warning...

Page 168: ...t into a clear file and enclose a sheet of plain paper to protect the print side 2004 07 02 13 59 53 USBID MH01234567 2004 07 05 13 59 53 USB ID All 18 alphanumeric digits are indicated Print time Color measurement limit time 7 days after the print time 54 calibration patches 6 colors x 9 dot sizes Nozzle check pattern C H E C K P O I N T There is no need to print a Calibration Chart again even if...

Page 169: ...different from the exec file CCASStylusR1800 exe for service personnel xxxxxxxx dat color measurement data file The color measurement data file is the same as the file for service personnel and is supplied from the color measurement site Reflection of correction according to Head ID Every mass produced printer is calibrated by the Colorimetric Calibration at the factory To reflect color correction...

Page 170: ...s or CCASSPR1800Write Macintosh to start up the program on the computer 3 Connect the printer to the PC using a USB or IEEE cable and click Next Step3 Printer Connection Check Screen C H E C K P O I N T When two or more printers are currently connected the screen changes to the port selection screen Select the target printer and click Next Port Selection Screen Select a target printer The button i...

Page 171: ...played click End and turn the printer OFF then back ON again to end the adjustment Step5 End Screen 6 Turn the printer OFF C H E C K P O I N T It takes about three minutes to write the color correction values Do not turn off both the computor and the printer or do not kill the connection between them during the writeing is in progress Writing the Color ID ...

Page 172: ...C H A P T E R 6 MAINTENANCE ...

Page 173: ...water and wipe off any dirt If the Housings are stained with ink use a cloth moistened with neutral detergent to wipe it off Inside the printer Use a vacuum cleaner to remove any paper dust C589 Main Board ROM C A U T I O N Never use chemical solvents such as thinner benzine and acetone to clean the exterior parts of the printer like the housing These chemicals may degrade or deteriorate the quali...

Page 174: ...ter A B Limit Up to 17772 Timing for Replacing the Waste Ink Pads When the Protection Counter reaches the value shown above a Maintenance Request is indicated and the printer disables all switches except the Power switch Since the Protection Counter value can be confirmed in the adjustment program be sure to check the value when servicing regardless of whether the service is related to the Waste I...

Page 175: ...rger amount of oil or grease than specified in this manual Table 6 1 Grease Applied to the Stylus Photo R800 Type Name EPSON CODE Supplier Grease G 26 1080614 EPSON Grease G 45 1033657 EPSON Grease G 71 1304682 EPSON Lubrication Point Left and Right Adjust Parallel Bushings outer circumference Lubrication Type G 26 Lubrication Amount φ1mm x 2mm Remarks Apply with a syringe Pin Head φ1mm After lubr...

Page 176: ...brication Amount 1mm diameter of the innner circumference Remarks Apply with a brush Be careful not to attach the grease to the PF scale Left Side Right Side Left Side Right Side Lubrication Point Contact point of the Left and Right PG Torsion Springs and the Carriage Shaft Lubrication Type G 26 Lubrication Amount φ1mm x 2mm x 2 points Remarks Apply with a syringe Pin Head φ1mm Lubrication Point C...

Page 177: ...ontact point of the EJ Grounding Spring and Front and Rear Paper EJ Rollers Lubrication Type G 45 Lubrication Amount φ1mm x 2mm x 2 points Remarks Apply with a syringe Pin Head φ1mm Upper Paper Guide Rear Paper EJ Roller Front Paper EJ Roller EJ Grounding Spring Right Side Lubrication Point The bushing of the Front Paper Guide Lubrication Type G 45 Lubrication Amount 1 Apply evenly 2 φ1mm x 2mm Re...

Page 178: ...the Carriage Shaft 1 Lubrication Point 1 Contact point of the Rear Paper Guide and the PF Roller 2 Contact point of the PF Grounding Spring and the PF Roller Lubrication Type G 45 Lubrication Amount 1 Apply evenly 2 φ1mm x 2mm Remarks 1 Apply with a brush 2 Apply with a syringe Pin Head φ1mm 1 1 2 PF Roller Rear Paper Guide PF Grounding Spring C A U T I O N In the following step do not bring the n...

Page 179: ...Unit from the rear and lubricate grease with the syringe at the point shown in Figure 6 16 Figure 6 16 Lubricating the Carriage Shaft 3 5 Hold the Carriage Unit and while turning the Carriage Shaft move the Carriage Unit to the left end of the Carriage Shaft to lubricate the grease evenly 6 Lubricate grease with the syringe at the point shown in Figure 6 17 Figure 6 17 Lubricating the Carriage Sha...

Page 180: ... Maintenance Overview 180 7 Hold the Carriage Unit and while turning the Carriage Shaft move the Carriage Unit to the right end of the Carriage Shaft to lubricate the grease evenly Figure 6 18 Lubricating the Carriage Shaft 5 8 Repeat Step 4 7 ...

Page 181: ...C H A P T E R 7 APPENDIX ...

Page 182: ...or summary for the C589 MAIN Board and each connector s pin alignment Table 7 1 Connector Summary for C589 MAIN Connector Function CN5 Sensor 1 PE Sensor APG Sensor PF Encoder Sensor ASF Sensor CN7 Power Supply CN8 LED Board CN9 Sensor 2 Ink Mark Sensor CR Encoder Sensor PW Sensor CN10 CSIC CN11 Print Head 1 2 including head temperature CN12 Print Head 1 1 CN13 Print Head 2 2 CN14 Print Head 2 1 i...

Page 183: ...800 R2400 Revision B Appendix Exploded Diagram 183 7 2 Exploded Diagram Following pages show exploded diagram Exploded Diagram 1 Exploded Diagram 2 Exploded Diagram 3 Exploded Diagram 4 Exploded Diagram 5 Exploded Diagram 6 ...

Page 184: ...PSON Stylus Photo R1800 R2400 Revision B Appendix Exploded Diagram 184 Figure 7 2 Stylus Photo R1800 Exploded Diagram 1 400 08 09 13 12 10 Rev 01 C589 ACCE 011E PX G5000 EPSON STYLUS PHOTO R1800 No 1 11 ...

Page 185: ... R1800 R2400 Revision B Appendix Exploded Diagram 185 Figure 7 3 Stylus Photo R1800 Exploded Diagram 2 Rev 01 C589 CASE 011 PX G5000 EPSON STYLUS PHOTO R1800 No 2 104 106 105 115 108 A 101 107 116 114 103 109 113 102 100 ...

Page 186: ...EPSON Stylus Photo R1800 R2400 Revision B Appendix Exploded Diagram 186 Figure 7 4 Stylus Photo R1800 Exploded Diagram 3 350 360 A Rev 01 C589 ELEC 011 PX G5000 EPSON STYLUS PHOTO R1800 No 3 B 200 300 ...

Page 187: ...R2400 Revision B Appendix Exploded Diagram 187 Figure 7 5 Stylus Photo R1800 Exploded Diagram 4 Rev 01 C589 MECH 011 PX G5000 EPSON STYLUS PHOTO R1800 No 4 C 549 519 C 500 524 516 513 514 515 512 511 505 501 504 503 506 502 509 ...

Page 188: ...xploded Diagram 188 Figure 7 6 Stylus Photo R1800 Exploded Diagram 5 Rev 01 C589 MECH 021 PX G5000 EPSON STYLUS PHOTO R1800 No 5 542 B 538 540 539 536 537 534 535 528 522 532 529 521 545 520 525 508 507 550 526 523 523 523 523 523 523 518 517 533 541 547 ...

Page 189: ...endix Exploded Diagram 189 Figure 7 7 Stylus Photo R1800 Exploded Diagram 6 719 704 710 711 719 709 714 708 713 712 707 706 703 701 716 723 722 702 720 700 709 717 705 715 718 724 724 721 Rev 01 C589 MECH 031 PX G5000 EPSON STYLUS PHOTO R1800 No 6 ...

Page 190: ...IC 503 HOLDER DETECTOR PW 504 BOARD ASSY INK MARK 505 BOARD ASSY ENCORDER CR 506 BOARD ASSY DETECTOR PW 507 HOLDER BOARD ASSY ENCORDER PF 508 BOARD ASSY ENCORDER PF 509 COVER IC ASSY ASP 511 SHAFT CR GUIDE 512 SCALE CR 513 TORSION SPRING 24 7 514 MOTOR ASSY CR 515 CABLE HEAD B 516 CABLE HEAD 517 DETECTOR LEAF B2 518 HARNESS DETECTOR CD R 519 AUTO PG ASSY ASP 520 TRAY CDR BASE SUB ASSY ASP 521 INK ...

Page 191: ...NK EJECT LEFT FC2 708 POROUS PAD INK EJECT LEFT FD2 709 POROUS PAD INK EJECT LEFT FE2 710 POROUS PAD TUBE FA2 711 POROUS PAD TUBE FB2 712 POROUS PAD INK EJECT RIGHT FF2 713 POROUS PAD INK EJECT RIGHT FG2 714 POROUS PAD INK EJECT RIGHT FH2 715 POROUS PAD INK EJECT RIGHT FI2 716 POROUS PAD INK EJECT IS LEFT B 717 POROUS PAD INK EJECT IS LOWER LEFT B 718 POROUS PAD INK EJECT IS LOWER FB2 719 POROUS P...

Page 192: ... B Appendix Circuit Diagram 192 7 4 Circuit Diagram Following pages show Circuit Diagram C589 MAIN control circuit board 1 C589 MAIN control circuit board 2 C589 PSB power supply circuit board C589 PNL circuit board C589 PNL B circuit board ...

Page 193: ...EPSON Stylus Photo R1800 R2400 Revision B Appendix Circuit Diagram 193 C589 MAIN control circuit board 1 ...

Page 194: ...EPSON Stylus Photo R1800 R2400 Revision B Appendix Circuit Diagram 194 C589 MAIN control circuit board 2 ...

Page 195: ...EPSON Stylus Photo R1800 R2400 Revision B Appendix Circuit Diagram 195 C589 PSB power supply circuit board ...

Page 196: ...EPSON Stylus Photo R1800 R2400 Revision B Appendix Circuit Diagram 196 C589 PNL circuit board ...

Page 197: ...EPSON Stylus Photo R1800 R2400 Revision B Appendix Circuit Diagram 197 C589 PNL B circuit board ...

Page 198: ...C H A P T E R 8 STYLUSPHOTOR2400 ...

Page 199: ...hoto R2400 Trouble Shooting Describes the troubleshooting unique to the Stylus Photo R2400 8 1 1 Overview FEATURES High quality color printing High quality phot printing using the Photo Mach technology Much higher quality using the Microweave and Super Microweave Highest resolution 2880 x 1440 dpi minimum dot size 3 2ng MSDT High speed print Two built in interfaces IEEE 1394 USB 2 0 HS compatible ...

Page 200: ...layed independently When facing front of printer insertion locations rows of ink cartridges are taken as A B C D E F G and H from the left These rows correspond to LED1 LED2 LED3 LED4 LED5 LED6 LED7 and LED8 respectively Table 8 1 Printer Condition and LED Status Printer status Error status Indicators Power Paper Ink Priority Idle On 20 Data processing Blink 19 Ink sequence processing Blink 17 Ink...

Page 201: ...ter goes this error Close the front cover Paper mismatch error If the paper path specified by the print data is different from the printer s real paper path the printer goes to this error Change the printer s paper path to the one specified by the data Paper out When printer fails to load a sheet it goes paper out error Set the paper to the ASF and push the Paper switch Ink out When the printer ru...

Page 202: ...lder EXTERNAL DIMENSION DIAGRAM ê 8 1 External Dimension Diagram 8 3 Accessories STANDARD ACCESSORIES Start Here Ink Cartridge one for each of 9 colors Power Cord Software CD ROM Roll Paper Holder Multi Sheet Matte Guide Rear Sheet Guide CONSUMABLES AND OPTIONS Ink Cartridges Photo Black T0591 Cyan T0592 Magenta T0593 Yellow T0594 Light Cyan T0595 Light Magenta T0596 Light Black T0597 Matte Black ...

Page 203: ...splacement cleaning are performed to prevent a new ink from mixing with a old one If the ink types are not displaced in the E row a replacement cleaning is performed instead of a displacement cleaning Cartridge displacement CL 3 09g 0 425g per color Cartridge replacement CL1 each color Suction amount 3 09g 0 386g per color Cartridge replacement CL2 each color Suction amount 3 14g 0 393g per color ...

Page 204: ...tion Error on page 205 Model Difference Refer to Table 8 6 Troubleshooting of Communication Error on page 205 Cover Open Tray Error Refer to Table 8 7 Troubleshooting of Cover Open Error on page 208 Paper Out Error Refer to Table 8 8 Troubleshooting of Paper Out Error on page 209 Paper Jam Error Refer to Table 8 9 Troubleshooting of Paper Jam Error on page 212 Paper Mismatch Error Refer to Table 8...

Page 205: ...the Panel FFC to the Panel Board and LED Board connectors 2 Check the Panel FFC for damages 2 Replace the Panel FFC with a new one Panel Board 1 Check the Panel Board for damages 1 Replace the Panel Board with a new one LED FFC 1 Check that the LED FFC is connected to the LED Board Connector and Main Board Connector CN8 1 Connect the LED FFC to the LED Board Connector and Main Board Connector CN8 ...

Page 206: ...inserted into the 1 Pin of the Main Board Connector CN7 as shown in the above picture 2 Reconnect the Power Supply Board Connector cable so that the blue colored pin is inserted into the 1 Pin 3 Check that the Fuse F1 on the Power Supply Board has not blown 3 Replace the Power Supply Board with a new one 4 Check the components on the Power Supply Board for damage 4 Replace the Power Supply Board w...

Page 207: ...SB driver has been installed on the PC 1 Install the EPSON USB driver USB 1 Check that the PC and printer are connected via the USB hub 1 Enter the USB serial No indicated on the product nameplate Refer to Chapter 5 Adjustment IEEE1394 1 Check that the same code as the IEEE1394 QR label code is saved in the EEPROM address from BA H to BE H 1 Input the code given as the IEEE1394 QR label code Refer...

Page 208: ...08 Table 8 7 Troubleshooting of Cover Open Error Occurrence Timing Phenomenon Detail Faulty Part Part Name Check Point Remedy During printing A Cover Open Tray Error is indicated during printing Printer Cover 1 Check that the front cover is not open 1 Close the front cover ...

Page 209: ...etard Roller The procedure is as follows 1 Place the cleaning sheet upside down and put it into the ASF Assy 2 Press the Paper Switch to start paper feed 3 Repeat the above steps several times To remove persistent contamination staple an alcohol dampened cloth to a postcard and clean the rollers in the following method 1 Place the alcohol dampened cloth toward the LD Roller surface of the ASF Assy...

Page 210: ...correctly 2 Install the Sensor Holder correctly 3 Move the Detection Lever manually as when the paper passes and check that the Detection Lever returns to the original position automatically by the Torsion Spring when released Refer to the above photo 3 Replace the PE Sensor Holder Unit with a new one 4 Using a tester check that the PE Sensor is normal Paper absent 2 4V or more Paper present 0 4V ...

Page 211: ...ior edge of it reaches to the Driven Roller on the Upper Paper Guide Then the Board Tray tries to go farther but it is ejected PW sensor 1 Check that the PW Sensor FFC is placed in the specified routing positions and does not make contact with any parts 1 Place the PW Sensor FFC in the specified routing positions 2 Check that the PW Sensor FFC is connected to the CR Encoder Board and PW Sensor Con...

Page 212: ...aper is not ejected completely and causes a jam near the Paper Eject Frame ASF Assy 1 Check that the paper is fed along the Right Edge Guide 1 Feed the paper along the Right Edge Guide Paper EJ Frame Assy 1 Check that the Star Wheel Units have not come off the Paper EJ Frame Assy 1 Securely install the Star Wheel Units to the Paper EJ Frame Assy 2 Check the Paper EJ Frame Assy for deformation or d...

Page 213: ...n the portrait orientation 1 Load the cards of the same size correctly and press the Paper Switch to eject the jammed paper The card size paper is loaded correctly but Card Loading Error is displayed PW sensor 1 Check that the PW Sensor FFC is connected to the CR Encoder Board and PW Sensor Connectors 1 Connect the FFC to the CR Encoder Board or PW Sensor 2 Check the PW Sensor or PW Sensor FFC for...

Page 214: ...oard Sensor or Connector cable for damages 2 Replace the CD R Sensor Board Sensor with a new one Panel Board connector Connector cable of the CD R Sensor CD R Sensor Table 8 12 Troubleshooting of Ink Low Occurrence Timing Phenomenon Detail Faulty Part Part Name Check Point Remedy At operation or during printing A message is displayed on the LED and EPW3 during printing Ink Cartridge 1 Look at the ...

Page 215: ...At power on After the Carriage has detected the HP an error is displayed on the LED and EPW3 Ink Cartridge 1 Check that the Ink Cartridge is installed correctly 1 Install the Ink Cartridge correctly 2 Check that the tab of the Ink Cartridge is not broken 2 Replace the Ink Cartridge with a new one 3 Check that the Memory Chip is not disconnected or not damaged 3 Replace the Ink Cartridge with a new...

Page 216: ...in Board Connector CN10 2 Check the CSIC FFC for damage 2 Replace the CSIC FFC with a new one CSIC Board 1 Check the CSIC Board for damage 1 Replace the CSIC Board with a new one Carriage Unit 1 Check that the electrodes in the Carriage which make contact with the CSIC Board are not bent 1 Replace the Carriage Unit with a new one Table 8 14 Troubleshooting of No Ink Cartridge Ink Cartridge Error O...

Page 217: ...Timing Phenomenon Detail Faulty Part Part Name Check Point Remedy At power on At power on the printer does not operate at all Waste Ink Pads 1 Using the Adjustment Program check if the Protection Counter A B value has exceeded 17540 1 Replace the Waste Ink Pads and reset the Protection Counter A and B value with the Adjustment Program ...

Page 218: ...1 Connect the CR Motor connector to the Relay Connector 2 Check the CR Motor connector cable for damages 2 Replace the CR Motor with a new one 3 Check if the CR Motor operates normally 3 Replace the CR Motor with a new one Relay Connector Cables for the CR Motor 1 Check that the Relay Connector Cable is connected to the Main Board Connector CN15 1 Connect the Relay Connector Cable to the Main Boar...

Page 219: ...r 6 Maintenance At power on the PF Motor does not operate at all PF Motor 1 Check that the Connector Cable of the PF Motor is connected to the Main Board Connector CN16 1 Connect the PF Motor connector cable to the Main Board Connector CN16 2 Check the PF Motor connector cable for damages 2 Replace the PF Motor with a new one 3 Check if the PF Motor operates normally 3 Replace the PF Motor with a ...

Page 220: ...ce the APG Motor with a new one At power on the Pump Motor does not operate at all Pump Motor 1 Check that the Pump Motor connector cable is connected to the Relay Connector 1 Connect the Pump Motor connector cable to the Relay Connector 2 Using a tester check the resistance value of the Pump Motor Value of resistance 10 3Ω 10 2 If the resistance value is abnormal replace the Ink System Unit with ...

Page 221: ...ages 2 Replace the Relay Connector Cable with a new one While the power on sequence is being executed Fatal error is displayed APG Sensor 1 Check that the APG Sensor Connector cables are connected to the APG Sensors and Relay Board Connector CN4 and CN5 1 Connect the APG Sensor Connector cables to the APG Sensors and Relay Board Connector CN4 and CN5 2 Check the APG Sensors for damages 2 Replace t...

Page 222: ...Ω 10 2 If the resistance value is abnormal replace the ASF Motor with a new one 3 Check the ASF Motor connector cable for damages 3 Replace the ASF Motor with a new one Relay Connector Cable for the ASF Motor 1 Check that the Relay Connector Cable is connected to the Main Board Connector CN19 1 Connect the Relay Connector Cable to the Main Board Connector CN19 2 Check the Relay Connector Cable for...

Page 223: ... against the right of the Frame then hits the left of the Frame CR Scale 1 Check that the CR Scale is inserted in the slit of the CR Encoder Sensor 1 Insert the CR Scale into the slit of the CR Encoder Sensor 2 Check the CR Scale for damages and dirt 2 Wipe off the dirt completely or replace the CR Scale with a new one CR Encoder Sensor Board 1 Check the CR Encoder Sensor for paper dust etc 1 Remo...

Page 224: ...f turn PF Encoder Sensor Holder 1 Check that the PF Encoder Sensor Holder is mounted correctly 1 Install the PF Encoder Sensor Holder correctly 2 Check that the FFC of the PF Encoder Sensor is securely connected to the PF Encoder Sensor Board Connector and Relay Board Connector CN6 2 Connect the PF Encoder Sensor FFC to the PF Encoder Sensor Board and Relay Board Connector CN6 3 Check the PF Encod...

Page 225: ... with a new one During printing After receiving a print data or while performing the CD R Tray home position detection sequence Board Paper detection an error is displayed on the LED and EPW3 Head FFC Sensor FFC 1 Check that the Head FFC and the Sensor FFC are securely connected to the Main Board Connectors CN9 through CN14 1 Connect the Head FFC and the Sensor FFC to the Main Board Connectors CN9...

Page 226: ... CN10 CN12 CN13 and CN14 1 Connect the Head FFC to the Print Head Connector and Main Board Connectors CN10 CN12 CN13 and CN14 2 Check the Head FFC for damages 2 Replace the Head FFC with a new one Ink is not ejected from most nozzles Print Head 1 Check for occurrence of Head Hot 1 Replace the Print Head with a new one Table 8 16 Troubleshooting of Fatal Error Occurrence Timing Phenomenon Detail Fa...

Page 227: ...2400 Revision B Stylus Photo R2400 Exploded Diagram 227 8 5 Exploded Diagram Following pages show exploded diagram Exploded Diagram 1 Exploded Diagram 2 Exploded Diagram 3 Exploded Diagram 4 Exploded Diagram 5 Exploded Diagram 6 ...

Page 228: ...ON Stylus Photo R1800 R2400 Revision B Stylus Photo R2400 Exploded Diagram 228 Figure 8 3 Stylus Photo R2400 Exploded Diagram 1 18 17 16 400 Rev 01 C603 ACCE 001 PX 5500 EPSON STYLUS PHOTO R2400 No 1 10 11 ...

Page 229: ...s Photo R2400 Exploded Diagram 229 Figure 8 4 Stylus Photo R2400 Exploded Diagram 1 Rev 01 C603 CASE 001 PX 5500 EPSON STYLUS PHOTO R2400 No 2 100 For JPN 118 123 102 120 119 118 117 104 106 121 122 105 For JPN 115 108 A 101 107 116 114 103 109 113 ...

Page 230: ...ylus Photo R1800 R2400 Revision B Stylus Photo R2400 Exploded Diagram 230 Figure 8 5 Stylus Photo R2400 Exploded Diagram 1 Rev 01 C603 ELEC 001 PX 5500 EPSON STYLUS PHOTO R2400 No 3 553 117 350 360 A B 200 300 ...

Page 231: ...B Stylus Photo R2400 Exploded Diagram 231 Figure 8 6 Stylus Photo R2400 Exploded Diagram 1 Rev 01 C603 MECH 001 PX 5500 EPSON STYLUS PHOTO R2400 No 4 554 C 549 519 C Without REF 554 500 524 516 513 514 515 512 511 505 501 504 503 506 502 509 ...

Page 232: ...d Diagram 232 Figure 8 7 Stylus Photo R2400 Exploded Diagram 1 Rev 01 C603 MECH 002 PX 5500 EPSON STYLUS PHOTO R2400 No 5 522 552 552 552 552 552 542 G B 538 540 539 536 537 534 535 528 522 532 529 521 545 520 525 508 507 550 526 551 523 523 523 518 517 533 541 547 522 ...

Page 233: ...SY MAIN 350 BOARD ASSY PANEL 360 HARNESS 500 PRINTER MECHANISM ASP ESL 501 CARRIAGE ASSY B ASP 502 BOARD ASSY CSIC 503 HOLDER DETECTOR PW 504 BOARD ASSY INK MARK 505 BOARD ASSY ENCORDER CR 506 BOARD ASSY DETECTOR PW 507 HOLDER BOARD ASSY ENCORDER PF 508 BOARD ASSY ENCORDER PF 509 COVER IC ASSY ASP 511 SHAFT CR GUIDE 512 SCALE CR 513 TORSION SPRING 24 7 514 MOTOR ASSY CR 515 CABLE HEAD B 516 CABLE ...

Page 234: ... POROUS PAD INK EJECT LEFT FB2 707 POROUS PAD INK EJECT LEFT FC2 708 POROUS PAD INK EJECT LEFT FD2 709 POROUS PAD INK EJECT LEFT FE2 710 POROUS PAD TUBE FA2 711 POROUS PAD TUBE FB2 712 POROUS PAD INK EJECT RIGHT FF2 713 POROUS PAD INK EJECT RIGHT FG2 714 POROUS PAD INK EJECT RIGHT FH2 715 POROUS PAD INK EJECT RIGHT FI2 716 POROUS PAD INK EJECT IS LEFT B 717 POROUS PAD INK EJECT IS LOWER LEFT B 718...

Reviews: