


Epson Stylus Photo PX650/TX650/TX659/PX660/PX660 Premium/Artisan 635
Revision C
TROUBLESHOOTING
Troubleshooting When There is No Error Display
54
Confidential
Faulty print
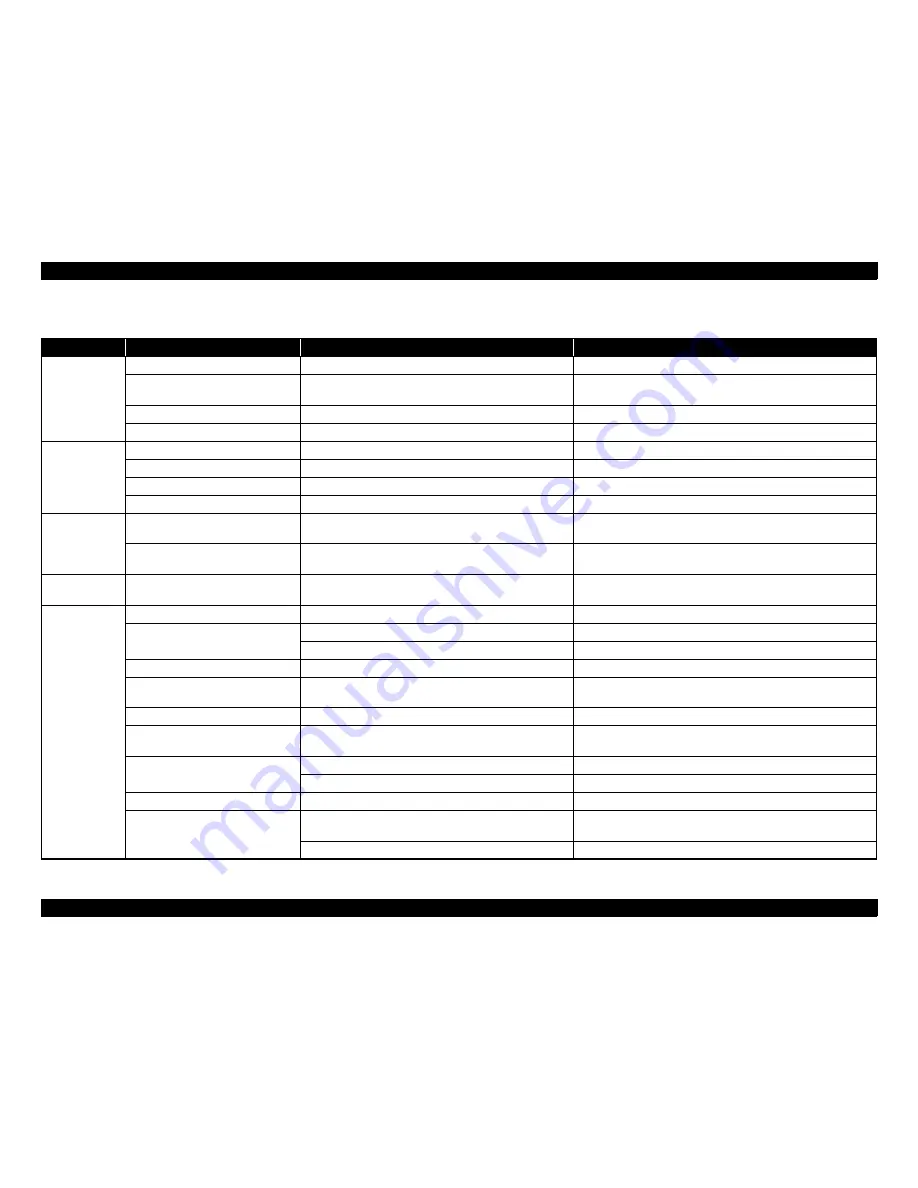
Table 3-8. Diagnostics when printing is abnormal
Condition
Cause
Check Point
Remedy
Improper printing
occurs only with
specific dots
Printhead surface is dirty (Dot missing)
Alternate cleaning and test printing several times.
Clean the Printhead surface with a cotton swab.
Capping absorbent material is in contact
with Printhead surface
Check for the deformed or damaged capping absorbent
material.
Replace the Ink System Assy.
Head FFC not operating properly
Check for the damaged Head FFC.
Replace the Head FFC.
Printhead not operating properly
Alternate cleaning and nozzle check several times.
If condition does not improve after cleaning, replace the Printhead.
Dot missing
sometimes occurs
Printhead surface is dirty (Dot missing)
Alternate cleaning and nozzle check several times.
Clean the Printhead surface with a cotton swab.
Ink Cartridge not operating properly
Install a new ink cartridge and perform nozzle check.
Replace the ink cartridge.
Faulty connection inside the Head FFC
Use a circuit tester to check the FFC.
Replace the Head FFC.
Printhead not operating properly
Repeat cleaning several times, and then perform nozzle check.
If condition does not improve after cleaning, replace the Printhead.
Print is not as
intended
Head FFC is not connected
Check to see if the FFC is firmly connected to each board and
CR Unit.
Connect the FFC firmly.
Printhead not operating properly
Check connection of Head FFC to Printhead.
If there is no problem with the Head FFC to Printhead connection,
replace the Printhead.
Vertical lines are
not in alignment
Bi-D adjustment is not made
Check to see if Bi-D adjustment has been done properly.
Perform Bi-D adjustment.
White lines
appear in output
data
Dirt is adhering to CR Guide Shaft
Check for dirt adhering to surface of the CR Guide Shaft.
Clean the surface of the CR Guide Shaft with a soft dry cloth.
PF Roller not operating properly
Check for dirt on the PF Roller.
Carefully clean the surface of the PF Roller with a soft brush.
Check for the damaged PF Roller.
Replace the PF Roller.
Ink Cartridge not operating properly
Install a new ink cartridge and test printing.
Replace the ink cartridge.
Carriage Slide not moving properly
Check to see if sufficient grease is remaining on carriage slide
parts at back of main frame.
Clean the main frame carriage slide parts and lubricate with a specified
quantify of G-71.
(p.135)
Platen Gap not set properly
Check to see if platen gap adjustment has been done properly.
Adjust platen gap.
(p.120)
Gear is damaged
Check for abnormality in gears between PF mechanism and
ASF mechanism.
Replace the damaged parts.
Dot jet direction is angled due to dirt on
Printhead surface
Alternate cleaning and test printing several times.
Clean with a cotton swab.
Check for dust and dirt on the Cleaner Blade.
Clean or replace the Cleaner Blade.
Printhead not operating properly
Repeat cleaning several times, and then perform test print.
Replace the Printhead.
CR Guide Shaft not operating properly
Check to see if the CR Guide Shaft is firmly installed in
specified position.
Reassemble the CR Guide Shaft.
Check for damage to surface of the CR Guide Shaft.
Replace the CR Guide Shaft.
Summary of Contents for PX650 Series
Page 9: ...Confidential C H A P T E R A 1 PRODUCTDESCRIPTION ...
Page 34: ...Confidential C H A P T E R 2 OPERATINGPRINCIPLES ...
Page 41: ...Confidential C H A P T E R 3 TROUBLESHOOTING ...
Page 60: ...Confidential C H A P T E R 4 DISASSEMBLYANDASSEMBLY ...
Page 110: ...Confidential C H A P T E R 5 ADJUSTMENT ...
Page 130: ...Confidential C H A P T E R 6 MAINTENANCE ...
Page 138: ...Confidential C H A P T E R 7 APPENDIX ...
Page 140: ...Confidential C H A P T E R 8 EpsonStylusPhotoPX660 PX660Premium Artisan635 ...


