background image

41

1.

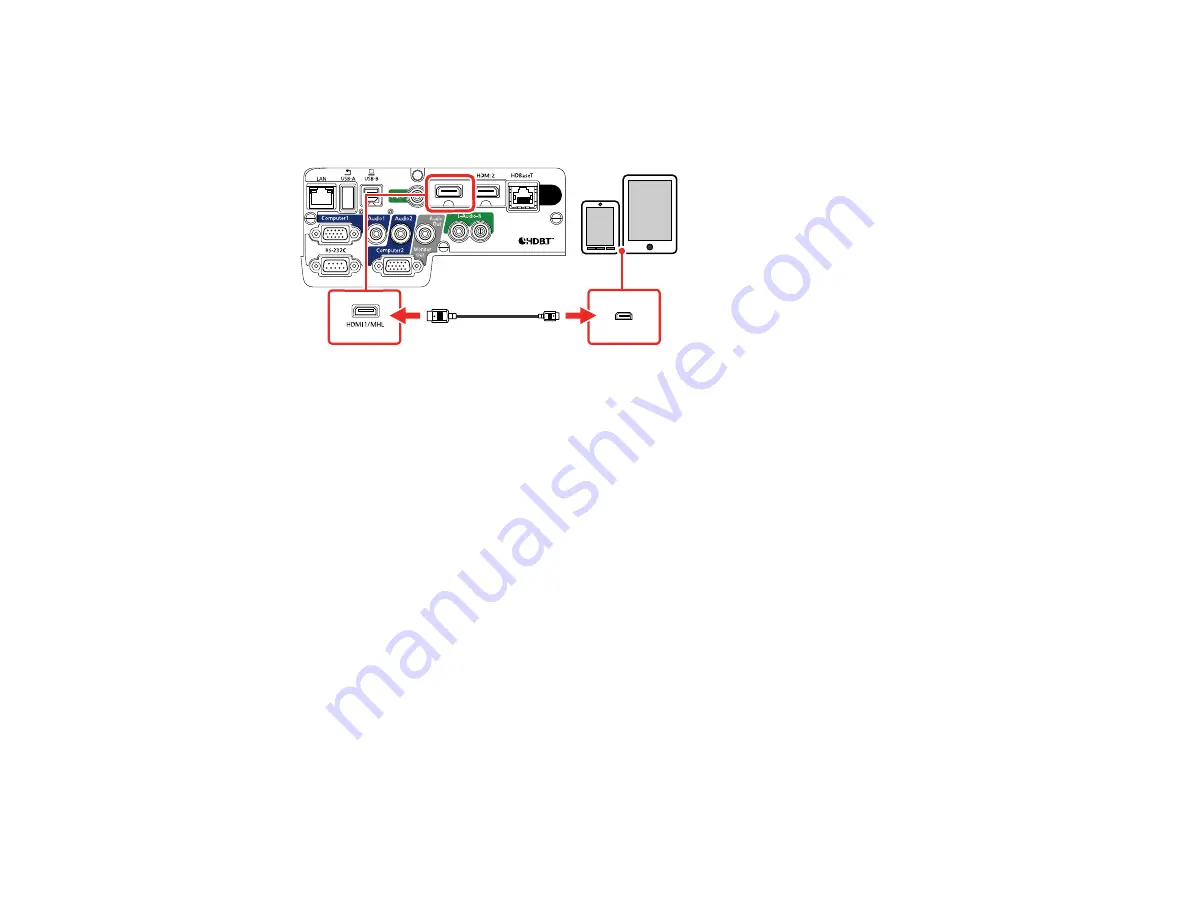
Connect the MHL cable or adapter to your device's Micro-USB port.

2.

If you are using an MHL adapter, connect it to an MHL-compatible HDMI cable.

3.

Connect the other end of the cable to the projector's

HDMI1/MHL

port.

Note:

The projector converts the digital audio signal sent from your video source into a mono analog

signal for the internal speaker or a stereo analog signal if you are connecting to external speakers.

Parent topic:

Connecting to Video Sources

Connecting to a Component Video Source

If your video source has component video ports, you can connect it to the projector using an optional
component-to-VGA video cable. Depending on your component ports, you may need to use an adapter
cable along with a component video cable.

1.

Connect the component connectors to your video source's color-coded component video output
ports, usually labeled

Y

,

Pb

,

Pr

or

Y

,

Cb

,

Cr

. If you are using an adapter, connect these connectors

to your component video cable.

Summary of Contents for PowerLite Home Cinema 2040

Page 1: ...PowerLite 975W 2040 2055 2065 2140W 2155W 2165W 2245U 2250U 2255U 2265U User s Guide ...

Page 2: ......

Page 3: ...arts Front Top 20 Projector Parts Rear 23 Projector Parts Base 25 Projector Parts Control Panel 26 Projector Parts Remote Control 27 Setting Up the Projector 30 Projector Placement 30 Projector Setup and Installation Options 30 Projection Distance 32 Projector Connections 35 Connecting to Computer Sources 35 Connecting to a Computer for USB Video and Audio 35 Connecting to a Computer for VGA Video...

Page 4: ...a Network 53 Wired Network Projection 53 Connecting to a Wired Network 53 Selecting Wired Network Settings 54 Wireless Network Projection 57 Installing the Wireless LAN Module 58 Installing the Wireless LAN Module into the USB A port 60 Using a QR Code to Connect a Mobile Device 62 Using Quick Wireless Connection Windows 64 Selecting Wireless Network Settings Manually 66 Wireless LAN Menu Settings...

Page 5: ... Correcting Image Shape with Screen Fit 93 Correcting Image Shape with the Horizontal Keystone Slider 95 Correcting Image Shape with the Keystone Buttons 95 Correcting Image Shape with Quick Corner 98 Resizing the Image with the Zoom Ring 100 Focusing the Image Using the Focus Ring 100 Focusing the Image with Focus Help 101 Remote Control Operation 103 Using the Remote Control as a Wireless Mouse ...

Page 6: ...res 126 Password Security Types 126 Setting a Password 126 Selecting Password Security Types 128 Entering a Password to Use the Projector 129 Saving a User s Logo Image to Display 130 Locking the Projector s Buttons 132 Unlocking the Projector s Buttons 133 Installing a Security Cable 133 Projector Identification System for Multiple Projector Control 134 Setting the Projector ID 134 Setting the Re...

Page 7: ...ce 171 Cleaning the Lens 171 Cleaning the Projector Case 172 Air Filter and Vent Maintenance 172 Cleaning the Air Filter and Vents 173 Replacing the Air Filter 173 Projector Lamp Maintenance 175 Replacing the Lamp 176 Resetting the Lamp Timer 185 Replacing the Remote Control Batteries 186 Transporting the Projector 188 Solving Problems 189 Projection Problem Tips 189 Projector Light Status 190 Usi...

Page 8: ...to Password Problems 204 Solutions When Using HDMI Link 204 Solving Network Problems 205 Solutions When Wireless Authentication Fails 205 Solutions When You Cannot Access the Projector Through the Web 205 Solutions When Network Alert E Mails are Not Received 206 Where to Get Help 206 Technical Specifications 208 General Projector Specifications 208 Projector Lamp Specifications 212 Remote Control ...

Page 9: ...EC60950 1 A2 225 FCC Compliance Statement 229 Open Source Software License 229 Binding Arbitration and Class Waiver 284 Trademarks 287 Copyright Notice 287 A Note Concerning Responsible Use of Copyrighted Materials 288 Copyright Attribution 288 ...

Page 10: ......

Page 11: ...2040 2055 2065 2140W 2155W 2165W 2245U 2250U 2255U 2265U User s Guide Welcome to the PowerLite 975W 2040 2055 2065 2140W 2155W 2165W 2245U 2250U 2255U 2265U User s Guide For a printable PDF copy of this guide click here ...

Page 12: ... 5000 lumens of color brightness color light output and 5000 lumens of white brightness white light output PowerLite 2065 2165W 2265U Up to 5500 lumens of color brightness color light output and 5500 lumens of white brightness white light output Note Color brightness color light output and white brightness white light output will vary depending on usage conditions Color light output measured in ac...

Page 13: ...easy wireless setup Real time automatic keystone correction always displays a rectangular screen Screen Fit feature automatically resizes images for your projection screen PowerLite 975W 2055 2065 2155W 2165W 2245U 2250U 2255U 2265U Support for Crestron RoomView network monitoring systems Epson s Instant Off and Direct Power On features for quick setup and shut down Network message broadcast syste...

Page 14: ... LAN module PowerLite 975W 2055 2065 2155W 2165W 2245U 2255U 2265U 5 Power cord 6 VGA computer cable not included with PowerLite 975W 7 Password Protected sticker 8 Projector documentation CD 9 Projector software CD Parent topic Projector Features Related concepts Projector Connections ...

Page 15: ... Signal or connection type Additional component necessary Composite video RCA style video or A V cable Component video D sub 15 pin component to VGA video cable or adapter Available for purchase from Epson or an authorized Epson reseller HDMI Compatible HDMI cable Available for purchase from Epson or an authorized Epson reseller Note Older Mac computers 2009 and earlier may not support HDMI audio ...

Page 16: ...documentation from the Epson web site Go to epson com support U S or epson ca support Canada and select your projector EasyMP Multi PC Projection EasyMP Multi PC Projection Operation Guide Lets you hold interactive meetings by projecting the computer screens of users over a network EasyMP Network Updater Windows only EasyMP Network Updater Operation Guide Lets you update firmware for a projector o...

Page 17: ... filter ELPAF41 V13H134A41 Wireless LAN module ELPAP10 included with PowerLite 975W 2055 2065 2155W 2165W 2245U 2255U 2265U V12H731P02 6 SpeedConnect ceiling plate ELPMBP07 V12H807001 SpeedConnect suspended ceiling tile replacement kit ELPMBP06 V12H806001 Suspended ceiling tile replacement kit ELPMBP05 V12H805001 3 fixed extension column ELPMBC04 V12H812001 Custom micro adjustable projector mount ...

Page 18: ...will ship you a replacement unit anywhere in the United States Canada or Puerto Rico See the Extra Care Road Service brochure for details Register your product online using the projector CD or at this site onlineregister com epson Registering also lets you receive special updates on new accessories products and services Parent topic Projector Features Notations Used in the Documentation Follow the...

Page 19: ...hecking this manual and any other sources listed here you can use the Epson PrivateLine Support service to get help fast For details see Where to Get Help Parent topic Introduction to Your Projector Related references Where to Get Help Projector Part Locations Check the projector part illustrations to learn about the parts on your projector Projector Parts Front Top Projector Parts Rear Projector ...

Page 20: ...20 Projector Parts Front Top PowerLite 2040 2140W ...

Page 21: ...21 PowerLite 975W 2055 2065 2155W 2165W ...

Page 22: ...rLite 975W 2055 2065 2155W 2165W 2245U 2250U 2255U 2265U 8 Wireless LAN light PowerLite 975W 2055 2065 2155W 2165W 2245U 2250U 2255U 2265U 9 Air filter cover intake vent 10 Air filter cover latch 11 Illumination sensor PowerLite 975W 2055 2065 2155W 2165W 2245U 2250U 2255U 2265U 12 Control panel 13 Focus Help button PowerLite 975W 2055 2065 2155W 2165W 2245U 2250U 2255U 2265U ...

Page 23: ... PowerLite 975W 2055 2065 2155W 2165W 2245U 2250U 2255U 2265U 16 Focus ring 17 Lamp cover 18 Status lights 19 Horizontal keystone slider PowerLite 2040 2140W Parent topic Projector Part Locations Projector Parts Rear PowerLite 2040 2140W ...

Page 24: ...S 232C port 3 Audio1 port 4 Computer2 Monitor Out port 5 Audio2 port 6 Audio Out port 7 AC input 8 L Audio R ports 9 Security lock slot 10 Remote receiver 11 HDBaseT port PowerLite 2165W 2265U 12 HDMI2 port 13 HDMI1 MHL port 14 Video port 15 USB B port 16 USB A port 17 Network LAN port ...

Page 25: ...e cover screw PowerLite 2040 2140W Parent topic Projector Part Locations Projector Parts Base 1 Ceiling mount holes 3 2 Security cable attachment point 3 Rear foot 4 Front adjustable foot Parent topic Projector Part Locations ...

Page 26: ...uttons displays the adjustment screen and adjusts screen shape and arrow buttons 6 Esc button cancels exits functions 7 Volume buttons adjusts speaker volume horizontal keystone adjustment buttons and arrow buttons 8 Menu button accesses projector menu system Parent topic Projector Part Locations Related references Projector Light Status Related tasks Using the Projector Help Displays ...

Page 27: ...27 Projector Parts Remote Control 1 Power button ...

Page 28: ...buttons control presentation slides 14 E Zoom buttons zoom into and out of the image 15 A V Mute button turns off picture and sound 16 Split button splits the screen between two image sources 17 Home button accesses source selection projector help information and other features 18 Freeze button stops video action 19 Volume up down buttons adjust speaker volume 20 Pointer button activates on screen...

Page 29: ...29 29 Remote control signal emitter emits remote control signals Parent topic Projector Part Locations ...

Page 30: ...tion Keep these considerations in mind as you select a projector location Place the projector on a sturdy level surface or install it using a compatible mount Leave plenty of space around and under the projector for ventilation and do not place it on top of or next to anything that could block the vents Position the projector within reach of a grounded electrical outlet or extension cord Projector...

Page 31: ...ector make sure to position it squarely in front of the center of the screen not at an angle if possible If you project from the ceiling or from the rear be sure to select the correct Projection option in the projector s menu system Parent topic Projector Placement ...

Page 32: ...n vary depending on the zoom factor aspect ratio and other settings Use the tables here to determine approximately how far to place the projector from the screen based on the size of the projected image Conversion figures may have been rounded up or down You can also use the projector Throw Distance Calculator at epson com support U S or epson ca support Canada 1 Projection distance 2 Distance fro...

Page 33: ... 181 inches 283 to 460 cm 6 3 inches 16 cm 150 inches 168 to 272 inches 426 to 692 cm 9 4 inches 24 cm PowerLite 975W 2140W 2155W 16 10 Aspect Ratio Image or Screen Screen or image size Projection distance 1 Wide to Tele Offset from lens center 2 50 inches 58 to 95 inches 149 to 243 cm 0 7 inch 2 cm 80 inches 94 to 153 inches 239 to 390 cm 1 1 inches 3 cm 100 inches 118 to 192 inches 300 to 488 cm...

Page 34: ...1 9 inches 5 cm 150 inches 201 to 329 inches 512 to 837 cm 2 9 inches 7 cm PowerLite 2165W 2250U 2255U 2265U 16 10 Aspect Ratio Image or Screen Screen or image size Projection distance 1 Wide to Tele Offset from lens center 2 50 inches 58 to 96 inches 146 to 243 cm 2 4 inches 6 cm 80 inches 93 to 154 inches 236 to 392 cm 3 8 inches 10 cm 100 inches 116 to 193 inches 296 to 491 cm 4 8 inches 12 cm ...

Page 35: ...tting Up the Projector Related references Projector Setup Settings Extended Menu Connecting to Computer Sources Follow the instructions in these sections to connect a computer to the projector Connecting to a Computer for USB Video and Audio Connecting to a Computer for VGA Video Connecting to a Computer for HDMI Video and Audio Connecting to a Computer for USB Mouse Control Connecting to a Comput...

Page 36: ...e Epson USB Display software on your computer OS X The USB Display setup folder appears on your screen Select USB Display Installer and follow the on screen instructions to install the Epson USB Display software Follow any on screen instructions You need to install this software only the first time you connect the projector to the computer Note If you are using Windows XP and you see a message ask...

Page 37: ... port on the projector 4 Tighten the screws on the VGA connector Parent topic Connecting to Computer Sources Related tasks Connecting to a Computer for Sound Connecting to a Computer for HDMI Video and Audio If your computer has an HDMI port you can connect it to the projector using an optional HDMI cable Note To connect a Mac that includes only a Mini DisplayPort Thunderbolt port or Mini DVI port...

Page 38: ...omputer Sources Connecting to a Computer for USB Mouse Control If you connected your computer to a Computer USB B or HDMI port on the projector you can set up the remote control to act as a wireless mouse This lets you control projection at a distance from your computer To do this connect the projector to your computer using a USB cable if it is not connected already 1 Connect the USB cable to you...

Page 39: ...ptional 3 5 mm stereo mini jack audio cable as described here 1 Connect the audio cable to your laptop s headphone or audio out jack or your desktop s speaker or audio out port 2 Connect the other end to the Audio port that corresponds to the Computer port you are using Parent topic Connecting to Computer Sources Connecting to Video Sources Follow the instructions in these sections to connect vide...

Page 40: ... one of the projector s audio ports instead to play sound Connect one end of an optional 3 5 mm stereo mini jack audio cable to one of the projector s audio ports and the other end to your computer s audio out port Then select the audio port you connected to as the HDMI1 Audio Output or HDMI2 Audio Output setting in the Extended menu Parent topic Connecting to Video Sources Related references Proj...

Page 41: ... if you are connecting to external speakers Parent topic Connecting to Video Sources Connecting to a Component Video Source If your video source has component video ports you can connect it to the projector using an optional component to VGA video cable Depending on your component ports you may need to use an adapter cable along with a component video cable 1 Connect the component connectors to yo...

Page 42: ...eed to change the Input Signal setting in the projector s Signal menu Parent topic Connecting to Video Sources Related references Input Signal Settings Signal Menu Related tasks Connecting to a Video Source for Sound Connecting to a Composite Video Source If your video source has a composite video port you can connect it to the projector using an optional RCA style video or A V cable 1 Connect the...

Page 43: ...f you are projecting video using a Computer port connect the projector to the video source using an optional stereo mini jack audio cable If you are projecting video using the Video port connect the projector to the video source using an RCA audio cable Note If you connected your video source to the projector using an HDMI cable the audio signal is transferred with the video signal you do not need...

Page 44: ... Sources Connecting to an HDBaseT Transmitter To send an HDMI or RS 232C signal over a long distance you can connect the projector to an optional HDBaseT transmitter using a 100Base TX network cable PowerLite 2165W 2265U This is useful when you want to send a signal to or control the projector from a remote location such as in a hall or event site since you can use a network cable up to 328 feet 1...

Page 45: ...nication from the Ethernet and serial ports on the transmitter select On as the Control Communications setting in the projector s Extended menu Turning on this setting disables the projector s LAN and RS 232C ports If you connected an Extron XTP transmitter or switcher to the projector s HDBaseT port select On as the Extron XTP setting in the projector s Extended menu Parent topic Projector Connec...

Page 46: ...n the external monitor you may need to change the Monitor Out Port setting in the Extended menu Parent topic Projector Connections Related references Projector Setup Settings Extended Menu Connecting to External Speakers To enhance the sound from your presentation you can connect the projector to external self powered speakers You can control the volume using the projector s remote control You can...

Page 47: ...nect the stereo mini jack end of the cable to your projector s Audio Out port Parent topic Projector Connections Related references Projector Setup Settings Extended Menu Connecting to External USB Devices Follow the instructions in these sections to connect external USB devices to the projector USB Device Projection Connecting a USB Device or Camera to the Projector Selecting the Connected USB So...

Page 48: ...equirements USB Mass Storage Class compliant not all USB Mass Storage Class devices are supported Formatted in FAT or FAT32 Self powered by their own AC power supplies bus powered hard drives are not recommended Does not have multiple partitions You can project slide shows from image files on a connected USB device Parent topic Connecting to External USB Devices Connecting a USB Device or Camera t...

Page 49: ... you connected to the USB A port 1 Make sure the connected USB source is turned on if necessary 2 Press the USB button on the remote control 3 Press the button again to cycle through other USB sources if available Parent topic Connecting to External USB Devices Disconnecting a USB Device or Camera From the Projector When you finish presenting with a connected USB device or camera you must prepare ...

Page 50: ...ment camera manual for details For the Epson DC 21 document camera connect it to the projector s HDMI Computer or Video port and to the corresponding port on the document camera See the document camera manual for details Note For additional features supported by software connect your document camera to your computer instead of the projector See the document camera manual for details Parent topic P...

Page 51: ...51 1 Remove the battery cover 2 Insert the batteries with the and ends facing as shown ...

Page 52: ...not expose batteries to heat or flame Keep batteries out of the reach of children they are choking hazards and are very dangerous if swallowed Parent topic Setting Up the Projector Opening the Lens Cover To open the projector s lens cover slide the A V Mute slide lever until it clicks into the open position Parent topic Setting Up the Projector ...

Page 53: ...cribed here install the network software from the included CD or download the software and manuals as necessary Note If your projector is connected via a LAN cable to a network that includes a wireless access point you can connect to the projector wirelessly through the access point using the Epson network software Connecting to a Wired Network Selecting Wired Network Settings Parent topic Using t...

Page 54: ...n Selecting Wired Network Settings Before you can project from computers on your network you must select the network settings for the projector using its menu system Note Make sure you already connected the projector to your wired network using the LAN port 1 Turn on the projector 2 Press the Menu button ...

Page 55: ...lect Network Configuration and press Enter 5 Select the Basic menu and press Enter 6 Select the following basic options as necessary Projector Name lets you enter a name up to 16 alphanumeric characters long to identify the projector over the network ...

Page 56: ...or accessing the projector as a moderator using EasyMP Multi PC Projection or the Epson iProjection app Projector Keyword lets you turn on a security password to prevent access to the projector by anyone not in the room with it You must enter a displayed randomized keyword from a computer using the EasyMP Multi PC Projection software to access the projector Display LAN Info lets you select how the...

Page 57: ...en instructions to save your settings and exit the menus Parent topic Wired Network Projection Wireless Network Projection You can project over a wireless network To do this you must set up your projector and computer for wireless projection Note The Epson 802 11b g n wireless LAN module is not included with all projector models After setting up the projector as described here install the network ...

Page 58: ... wireless network install the Epson 802 11b g n wireless LAN module PowerLite 975W 2055 2065 2155W 2165W 2245U 2250U 2255U 2265U Do not install any other type of wireless LAN module Note The wireless LAN module is optional for the PowerLite 2250U Caution Never remove the module while its indicator light is blue or flashing or while you are projecting wirelessly You may damage the module or lose da...

Page 59: ...59 3 Remove the screw securing the wireless LAN module stopper then remove the stopper 4 Insert the wireless LAN module into the port ...

Page 60: ...A port To use the projector over a wireless network install the Epson 802 11b g n wireless LAN module into the projector s USB A port PowerLite 2040 2140W Do not install any other type of wireless module Note The wireless LAN module and module cover are not included with your projector Caution Never remove the module while its indicator light is blue or flashing or while you are projecting wireles...

Page 61: ...61 1 Remove the wireless LAN module cover screw 2 Insert the wireless LAN module into the USB A port ...

Page 62: ...lect the wireless network settings for your projector you can display a QR code on the screen and use it to connect a mobile device using the Epson iProjection app Note Make sure you have installed the latest version of Epson iProjection on your device Visit epson com wireless projector app U S or epson ca wireless projector app Canada for more information 1 Press the Menu button ...

Page 63: ...Enter 3 Select Network Configuration and press Enter 4 Select the Basic menu and press Enter 5 Set the Display LAN Info setting to Text QR Code 6 Select Complete and follow the on screen instructions to save your settings and exit the menus ...

Page 64: ...sit epson com wireless projector app U S or epson ca wireless projector app Canada for instructions Parent topic Wireless Network Projection Using Quick Wireless Connection Windows You can create a Quick Wireless Connection USB Key to quickly connect the projector to a Windows computer wirelessly Then you can project your presentation and remove the key when you are done Note A USB flash drive is ...

Page 65: ...ewall message click Yes to disable the firewall You need administrator authority to install the software If it is not installed automatically double click MPPLaunch exe in the USB key After a few minutes your computer image is displayed by the projector If it does not appear press the LAN or Source Search button on your remote control or restart your computer 9 Run your presentation as necessary 1...

Page 66: ... project from your wireless network you must select the network settings for the projector using its menu system 1 Turn on the projector 2 Press the Menu button 3 Select the Network menu and press Enter 4 Make sure the Wireless LAN Power setting is set to On 5 Select Network Configuration and press Enter ...

Page 67: ...fault user name is EPSONREMOTE default password is guest Web Control Password lets you enter a password up to 8 alphanumeric characters long for accessing the projector over the web Default user name is EPSONWEB default password is admin Moderator Password lets you enter a password up to 4 numbers long for accessing the projector as a moderator with EasyMP Multi PC Projection or the Epson iProject...

Page 68: ... control to highlight characters and press Enter to select them 8 Select the Wireless LAN menu and press Enter 9 Select the settings on the Wireless LAN menu as necessary for your network 10 When you finish selecting settings select Complete and follow the on screen instructions to save your settings and exit the menus After you complete the wireless settings for your projector you need to select ...

Page 69: ...wireless network access points in Advanced connection mode SSID Up 32 alphanumeric characters Sets the SSID network name of the wireless LAN system the projector is connecting to Security Open WPA2 PSK WPA WPA2 PSK WPA2 EAP PowerLite 975W 2055 2065 2155W 2165 W 2245U 2250U 2255U 2265U WPA WPA2 EAP PowerLite 975W 2055 2065 2155W 2165 W 2245U 2250U 2255U 2265U Selects the type of wireless security u...

Page 70: ...omatically set to Off to manually enter the network s IP Address Subnet Mask and Gateway Address SSID Display On Off Selects whether to display the SSID on the network standby screen IP Address Display On Off Selects whether to display the IP address on the network standby screen IPv6 Settings IPv6 Auto Configuration Use Temporary Address Selects the IPv6 settings when you connect the projector to...

Page 71: ...g network Advanced mode select the network name SSID If your projector is configured for Quick mode select the projector s SSID Parent topic Wireless Network Projection Setting Up Wireless Network Security You can set up security for your projector to use on the wireless network Set up one of the following security options to match the settings used on your network WPA WPA2 PSK security Advanced c...

Page 72: ...ng You can send images to your projector from mobile devices such as laptops smartphones and tablets using Miracast technology PowerLite 975W 2165W 2255U 2265U If your device supports Miracast you do not need to install any additional software Screen Mirroring Restrictions Selecting Screen Mirroring Settings Connecting for Screen Mirroring with Miracast Connecting for Screen Mirroring with a Windo...

Page 73: ...ontents with copyright protection with a Miracast connection Parent topic Wireless Network Projection from a Mobile Device Screen Mirroring Selecting Screen Mirroring Settings You can select Screen Mirroring settings for your projector and then project images from your mobile device or computer 1 Press the Menu button 2 Select the Network menu and press Enter 3 Set the Screen Mirroring setting to ...

Page 74: ...sly and project images and sound 1 Select the Screen Mirroring settings on your projector as necessary 2 Press the LAN button on the remote control to switch to the Screen Mirroring source You see the Screen Mirroring standby screen 3 On your mobile device use the Miracast function to search for the projector Note See your mobile device s documentation for information on accessing the Miracast fun...

Page 75: ...n 3 Do one of the following Windows 10 Open Action Center and select Connect Windows 8 x Select Devices Project Add a wireless display 4 Select your projector s Display Name from the list 5 If you see the PIN entry screen on your computer enter the PIN code displayed on the Screen Mirroring standby screen or at the bottom right of the projected image The projector displays the image from your comp...

Page 76: ...From option 9 Choose an Address field enter the e mail address and select the alerts you want to receive there Repeat for up to three addresses Your e mail address can be up to 32 alphanumeric characters long 10 If you are using the PJLink protocol for projector control turn on PJLink Notification and enter the IP address where you want to receive PJLink notifications for the Notified IP Address s...

Page 77: ...ss of the affected projector Detailed information about the problem Note If a critical problem causes a projector to shut down you may not receive an e mail alert Parent topic Setting Up Projector Network E Mail Alerts Setting Up Monitoring Using SNMP Network administrators can install SNMP Simple Network Management Protocol software on network computers so they can monitor projectors If your netw...

Page 78: ...ceive SNMP notifications using 0 to 255 for each address field Note To enter the IP address using the numeric keys on the remote control press and hold the Num button Do not use these addresses 127 x x x or 224 0 0 0 through 255 255 255 255 where x is a number from 0 to 255 7 Select the Others menu and press Enter ...

Page 79: ...Windows only 14 When you finish selecting settings select Complete and follow the on screen instructions to save your settings and exit the menus Parent topic Using the Projector on a Network Controlling a Networked Projector Using a Web Browser Once you have connected your projector to your network you can select projector settings and control projection using a compatible web browser This lets y...

Page 80: ...reen If you see a log in window enter your user name and password The default user name is EPSONWEB and the default password is admin 5 To control projection remotely select the Basic Control option Note If you see a log in window enter your user name and password The default user name is EPSONREMOTE and the default password is guest You see a screen like this 1 Power button control ...

Page 81: ...265U 16 Selects the Computer1 port source 17 Searches for connected sources 6 Select the icon corresponding to the projector function you want to control Parent topic Using the Projector on a Network Related references Projector Setup Settings ECO Menu Crestron RoomView Support If you are using the Crestron RoomView network monitoring and control system you can set up your projector for use on the...

Page 82: ...lessly set up the projector using the Advanced network connection mode Note If you want to use the Crestron RoomView system when the projector is turned off you need to adjust the Standby Mode setting in the ECO menu 1 Press the Menu button 2 Select the Network menu and press Enter 3 Select Network Configuration and press Enter 4 Select the Others menu and press Enter 5 Set the Crestron RoomView s...

Page 83: ...tible web browser 1 Start your web browser on a computer connected to the network 2 Type the projector s IP address into the browser s address box and press the computer s Enter key You see this screen 3 Select the input source that you want to control in the Sources List box You can scroll through available sources using the up and down arrows in the box 4 To control projection remotely click the...

Page 84: ...the projector click the Info tab 6 To change projector Crestron and password settings click the Tools tab select settings on the displayed screen and click Send 7 When you finish selecting settings click Exit to exit the program Parent topic Crestron RoomView Support ...

Page 85: ...he Image with the Zoom Ring Focusing the Image Using the Focus Ring Focusing the Image with Focus Help Remote Control Operation Selecting an Image Source Projection Modes Image Aspect Ratio Color Mode Controlling the Volume with the Volume Buttons Projecting a PC Free Presentation Turning On the Projector Turn on the computer or video equipment you want to use before you turn on the projector so i...

Page 86: ...ontrol to turn on the projector The projector beeps and the Status light flashes blue as the projector warms up Once the projector is warmed up the Status light stops flashing and turns blue Warning Never look into the projector lens when the lamp is on This can damage your eyes and is especially dangerous for children If you do not see a projected image right away try the following Verify the len...

Page 87: ...ks Selecting an Image Source Using the Home Screen You can select input sources and other frequently used options from the Home screen 1 To display the Home screen do one of the following Press the Home button on the remote control Turn on the projector with the Home Screen Auto Disp setting enabled Turn on the projector when no signal is received from the selected input source 2 Press the arrow b...

Page 88: ...e screen Parent topic Turning On the Projector Related references Projector Setup Settings Extended Menu Turning Off the Projector Before turning off the projector shut down any computer connected to it so you can see the computer display during shutdown Note Turn off this product when not in use to prolong the life of the projector Lamp life will vary depending upon mode selected environmental co...

Page 89: ...utton The projector beeps twice the lamp turns off and the Status light turns off Note With Epson s Instant Off technology there is no cool down period so you can pack up the projector for transport right away if necessary 3 To transport or store the projector make sure the Status light is off then unplug the power cord ...

Page 90: ...lose the projector s lens cover Parent topic Using Basic Projector Features Related references Projector Light Status Selecting the Language for the Projector Menus If you want to view the projector s menus and messages in another language you can change the Language setting 1 Turn on the projector 2 Press the Menu button ...

Page 91: ... and press Enter 6 Press Menu or Esc to exit the menus Parent topic Using Basic Projector Features Adjusting the Image Height If you are projecting from a table or other flat surface and the image is too high or low you can adjust the image height using the projector s adjustable feet 1 Turn on the projector and display an image ...

Page 92: ...ght If the projected image is unevenly rectangular you need to adjust the image shape Parent topic Using Basic Projector Features Image Shape You can project an evenly rectangular image by placing the projector directly in front of the center of the screen and keeping it level If you place the projector at an angle to the screen or tilted up or down or off to the side you may need to correct the i...

Page 93: ...ure Settings Settings Menu Automatically Correcting Image Shape with Screen Fit You can use the projector s Screen Fit feature to automatically correct the shape and position of images to fit on your screen PowerLite 975W 2055 2065 2155W 2165W 2245U 2250U 2255U 2265U The projector s sensor can detect the screen size and shape in these conditions Screen size is 100 inches 254 cm or less Projection ...

Page 94: ...dges of the screen 4 Press the Screen Fit button again Two displays flash briefly then this message appears 5 Fine tune the image shape as necessary using the arrow buttons on the control panel 6 When you are finished press Esc Now if necessary you can correct the image corners individually using Quick Corner by pressing the arrow buttons on the control panel Parent topic Image Shape ...

Page 95: ...You can display a pattern to aid in adjusting the projected image using the Settings menu Note You can also display the pattern by pressing the User button on the remote control if the test pattern is assigned to this button 2 Adjust the slider until the image is evenly rectangular After correction your image is slightly smaller Parent topic Image Shape Correcting Image Shape with the Keystone But...

Page 96: ... adjusting the projected image using the Settings menu Note You can also display the pattern by pressing the User button on the remote control if the test pattern is assigned to this button 2 Press one of these keystone buttons on the control panel to display the Keystone adjustment screen ...

Page 97: ...er correction your image is slightly smaller Note If the projector is installed out of reach you can also correct the image shape with the remote control using the H V Keystone settings in the projector menus Parent topic Image Shape Related references Projector Feature Settings Settings Menu ...

Page 98: ...t the projector s position to correct the image shape If this isn t possible use the Quick Corner setting to correct the image shape 1 Turn on the projector and display an image Note You can display a pattern to aid in adjusting the projected image using the Settings menu Note You can also display the pattern by pressing the User button on the remote control if the test pattern is assigned to this...

Page 99: ...etting and press Enter 5 Select the Quick Corner setting and press Enter Then press Enter again You see the Quick Corner adjustment screen 6 Use the arrow buttons on the projector or the remote control to select the corner of the image you want to adjust Then press Enter ...

Page 100: ...e pattern by pressing the User button on the remote control if the test pattern is assigned to this button 2 To enlarge or reduce the image size rotate the projector s zoom ring Parent topic Using Basic Projector Features Focusing the Image Using the Focus Ring 1 Turn on the projector and display an image Note You can display a pattern to aid in adjusting the projected image using the Settings men...

Page 101: ...U 2250U 2255U 2265U Focus Help works in these conditions Screen size is 100 inches 254 cm or less Projection distance is between 4 9 to 9 8 feet 1 5 to 3 0 m for the PowerLite 2165W 2245U 2250U 2255U 2265U and 2 9 to 9 8 feet 0 9 to 3 0 m for the PowerLite 2055 2065 2155W Projection angle is not more than 20º horizontally or 30º vertically away from the center of the screen The room is not too bri...

Page 102: ...102 You see a screen like this 2 Turn the focus ring until the two orange circles overlap 3 When you are finished press Esc or Focus Help to exit Parent topic Using Basic Projector Features ...

Page 103: ...tor s receivers within the distance and angles listed here 1 26 feet 8 m 2 45 3 30 4 15 Note Avoid using the remote control in conditions with bright fluorescent lights or in direct sunlight or the projector may not respond to commands If you will not use the remote control for a long time remove the batteries Using the Remote Control as a Wireless Mouse Using the Remote Control as a Pointer Paren...

Page 104: ...also connect a USB cable to the projector s USB B port and to a USB port on your computer for wireless mouse support 3 Start your presentation 4 Use the following buttons on the remote control to control your presentation To move through slides or pages press the up or down Page buttons To move the cursor on the screen use the arrow buttons To left click press the button once press it twice to dou...

Page 105: ... remote control to move the pointer on the screen 3 Press Esc to clear the pointer from the screen Parent topic Remote Control Operation Related references Projector Feature Settings Settings Menu Selecting an Image Source If you connected multiple image sources to the projector such as a computer and DVD player you may want to switch from one image source to the other 1 Make sure the connected im...

Page 106: ...n for the source you want on the remote control If there is more than one port for that source press the button again to cycle through the sources 1 Computer port sources 2 Video HDMI MHL and HDBaseT PowerLite 2165W 2265U sources 3 USB port sources computer display and external devices 4 Network source LAN and Screen Mirroring PowerLite 975W 2165W 2255U 2265U ...

Page 107: ...s the image over top to bottom to project upside down from a ceiling or wall mount Rear flips the image horizontally to project from behind a translucent screen Rear Ceiling flips the image over top to bottom and horizontally to project from the ceiling and behind a translucent screen Changing the Projection Mode Using the Remote Control Changing the Projection Mode Using the Menus Parent topic Us...

Page 108: ... to bottom 3 To change projection back to the original mode hold down the A V Mute button for five seconds again Parent topic Projection Modes Changing the Projection Mode Using the Menus You can change the projection mode to flip the image over top to bottom and or left to right using the projector menus 1 Turn on the projector and display an image 2 Press the Menu button ...

Page 109: ... determines the image s aspect ratio However for certain images you can change the aspect ratio to fit your screen by pressing a button on the remote control If you always want to use a particular aspect ratio for a certain video input source you can select it using the projector s menus Changing the Image Aspect Ratio Available Image Aspect Ratios Parent topic Using Basic Projector Features Chang...

Page 110: ...mage Aspect Ratio Related references Input Signal Settings Signal Menu Available Image Aspect Ratios You can select the following image aspect ratios depending on the input signal from your image source Note Black bands and cropped images may project in certain aspect ratios depending on the aspect ratio and resolution of your input signal PowerLite 975W 2140W 2155W 2165W 2245U 2250U 2255U 2265U A...

Page 111: ...area and maintains the aspect ratio of the image 4 3 Displays images using the full projection area at 4 3 aspect ratio 16 9 Converts the aspect ratio of the image to 16 9 Note The Auto aspect ratio setting is available only for HDMI image sources Parent topic Image Aspect Ratio Color Mode The projector offers different Color Modes to provide optimum brightness contrast and color for a variety of ...

Page 112: ...te control to change the Color Mode The image appearance changes and the name of the Color Mode appears briefly on the screen 4 To cycle through all the available Color Modes for your input signal press the Color Mode button repeatedly Parent topic Color Mode Available Color Modes You can set the projector to use these Color Modes depending on the input source you are using Color Mode Description ...

Page 113: ...o make medical diagnoses Parent topic Color Mode Turning On Auto Iris In certain color modes you can turn on the Auto Iris setting to automatically optimize the image based on the brightness of the content you project 1 Turn on the projector and switch to the image source you want to use 2 Press the Menu button 3 Select the Image menu and press Enter 4 Select the Auto Iris setting and choose one o...

Page 114: ... internal speaker system or any external speakers you connected to the projector You must adjust the volume separately for each connected input source 1 Turn on the projector and start a presentation that includes audio 2 To lower or raise the volume press the Volume buttons on the remote control or control panel 3 To set the volume to a specific level for an input source use the projector menus P...

Page 115: ...edia for Windows instead You may not be able to use the security features on certain USB storage devices with PC Free features When connecting a USB compatible hard drive connect the AC adapter supplied with the drive File type and extension Details Image jpg Make sure the file is not CMYK format Progressive format Highly compressed Above 8192 8192 resolution Image bmp Make sure the file resolutio...

Page 116: ...rent topic Projecting a PC Free Presentation Starting a PC Free Slide Show After connecting a USB device or digital camera to the projector you can switch to the USB input source and start your slide show Note You can change the PC Free operation options or add special effects by highlighting Option at the bottom of the screen and pressing Enter 1 Press the USB button on the projector remote contr...

Page 117: ...s page and press Enter You can also press the Page up or down buttons on the remote control 3 Do one of the following To display an individual image press the arrow buttons to highlight the image and press Enter Press the Esc button to return to the file list screen To display a slide show of all the images in a folder press the arrow buttons to highlight the Slideshow option at the bottom of the ...

Page 118: ...ing a PC Free Presentation Starting a PC Free PDF File Presentation After connecting a USB device to the projector you can switch to the USB input source and start your PDF file presentation Note You cannot do the following while presenting a PDF file from a USB device Release a password Display e signatures JPEG2000 images transparent effects 3D artwork or comments Play multimedia content Display...

Page 119: ...and press Enter 3 To display the first page of a PDF file at full size press the arrow buttons to highlight the file and press Enter Press the Esc button to return to the file list screen Note If any file names are longer than 8 characters or include unsupported symbols the file names may be shortened or changed only in the screen display If a PDF file extension is not pdf the file does not appear...

Page 120: ... To stop the display press the Esc button press the up or down arrow button to highlight EXIT and press Enter Parent topic Projecting a PC Free Presentation Starting a PC Free Movie Presentation After connecting a USB device or digital camera to the projector you can switch to the USB input source and start your movie Note You can change the PC Free operation options by highlighting Option at the ...

Page 121: ...tons on the remote control 3 To play back a movie press the arrow buttons to highlight the file and press Enter Note If any file names are longer than 8 characters or include unsupported symbols the file names may be shortened or changed only in the screen display If you want to play back all the movies in a folder in sequence select the Slideshow option at the bottom of the screen 4 To stop movie...

Page 122: ...ays a slide show one time through Screen Switching Time No Does not display the next file automatically 1 Second to 60 Seconds Displays files for the selected time and switches to the next file automatically high resolution images may switch at a slightly slower rate Effect Wipe Transitions between images with a wipe effect Dissolve Transitions between images with a dissolve effect Random Transiti...

Page 123: ...redirect your audience s attention during a presentation Any sound or video action continues to run however so you cannot resume projection at the point that you stopped it If you want to display an image such as a company logo or picture when the presentation is stopped you can set up this feature using the projector s menus Note If the picture and sound are off for more than 30 minutes the power...

Page 124: ...opping Video Action Temporarily You can temporarily stop the action in a video or computer presentation and keep the current image on the screen Any sound or video action continues to run however so you cannot resume projection at the point that you stopped it 1 Press the Freeze button on the remote control to stop the video action 2 To restart the video action in progress press Freeze again Paren...

Page 125: ...uttons on the remote control to adjust the zoomed image Use the arrow buttons to position the crosshair in the image area you want to zoom into Press the E Zoom button repeatedly to zoom into the image area enlarging it as necessary Press and hold the E Zoom button to zoom in more quickly To pan around the zoomed image area use the arrow buttons To zoom out of the image press the E Zoom button as ...

Page 126: ...without first entering a password User s Logo Protection password prevents anyone from changing the custom screen the projector can display when it turns on or when you use the A V Mute feature The presence of the custom screen discourages theft by identifying the projector s owner Network Protection password prevents anyone from changing the network settings in the projector menus Schedule Protec...

Page 127: ...d 3 Select Yes and press Enter 4 Press and hold down the Num button on the remote control and use the numeric buttons to set a four digit password The password displays as as you enter it Then you see the confirmation prompt 5 Enter the password again You see the message Password accepted 6 Press Esc to return to the menu 7 Make a note of the password and keep it in a safe place in case you forget...

Page 128: ... Enter select On press Enter again and press Esc 3 To prevent changes to network settings select Network Protection press Enter select On press Enter again and press Esc 4 To prevent changes to the projector s time or schedule settings select Schedule Protection press Enter select On press Enter again and press Esc PowerLite 975W 2055 2065 2155W 2165W 2245U 2250U 2255U 2265U 5 To prevent changes t...

Page 129: ...s set up and a Power On Protection password is enabled you see a prompt to enter a password whenever you turn on the projector You must enter the correct password to use the projector 1 Press and hold down the Num button on the remote control while you enter the password using the numeric buttons Note The default password is 0000 ...

Page 130: ...nter the password again When you contact Epson Support provide the displayed request code and proof of ownership for assistance in unlocking the projector Parent topic Password Security Types Related references Where to Get Help Saving a User s Logo Image to Display You can transfer an image to the projector and then display it whenever the projector turns on You can also display the image when th...

Page 131: ...user s logo 4 Select Yes and press Enter You see a selection box overlaying your image 5 Use the arrow buttons on the remote control to surround the image area you want to use as the User s Logo and press Enter You see a prompt asking if you want to select this image area 6 Select Yes and press Enter If you want to change the selected area select No press Enter and repeat the last step ...

Page 132: ...ut signal select Display Background and set it to Logo To display it whenever you turn the projector on select Startup Screen and set it to On To display it whenever you press the A V Mute button select A V Mute and set it to Logo To prevent anyone from changing the User s Logo settings without first entering a password set a password and enable User s Logo security Parent topic Password Security ...

Page 133: ...wer button select Partial Lock You see a confirmation prompt 6 Select Yes and press Enter Unlocking the Projector s Buttons Parent topic Projector Security Features Unlocking the Projector s Buttons If the projector s buttons have been locked hold the Enter button on the projector s control panel for seven seconds to unlock them Parent topic Locking the Projector s Buttons Installing a Security Ca...

Page 134: ...for Multiple Projector Control You can operate multiple projectors using one remote control for more elaborate presentations To do this you assign an identification number to each projector and to the remote control Then you can operate all the projectors at once or individually You can also match the colors displayed by any projectors you plan to use near each other Setting the Projector ID Setti...

Page 135: ...ote control s ID is set to zero by default so it can operate any compatible projector If you want to set the remote control to operate only a particular projector you need to set the remote control s ID to match the projector s ID 1 Turn on the projector you want the remote control to operate with exclusively 2 Make sure you know the projector s ID number as set in the Extended menu Projector ID s...

Page 136: ...l Note You must set the remote control ID to match the projector ID each time you turn on the projector you have set it to control When you select 0 on the remote control you can operate all projectors regardless of the Projector ID setting If you turn off the Projector ID setting the remote control will operate the projector regardless of the ID selected on the remote Parent topic Projector Ident...

Page 137: ... Adjust the Brightness setting on the projector with the darkest display so it matches the lighter display and press Enter You may need to switch the remote control ID back and forth to make adjustments to each projector in all of these steps 10 Change the Adjustment Level setting to 5 on each projector but this time match the lighter display to the darker one 11 Adjust the Brightness setting on A...

Page 138: ...ntrol the split screen feature using the remote control or the projector menus Note While you use the split screen feature other projector features may not be available and some settings may be automatically applied to both images 1 Press the Split button on the remote control The currently selected input source moves to the left side of the screen 2 Press the Menu button ...

Page 139: ...te Depending on the video input signals the images may not appear at the same size even if you choose the Equal setting 6 To choose the audio you want to hear select the Audio Source setting press Enter select an audio option press Enter and press Menu to exit Note Select Auto to hear audio from the largest screen or the left screen 7 To exit the split screen feature press the Split or Esc button ...

Page 140: ...ote control PowerLite 975W 2055 2065 2155W 2165W 2245U 2250U 2255U 2265U The Gesture Presenter feature is available only under the following conditions The Gesture Presenter setting in the Settings menu is set to On The Projection setting in the Extended menu is set to Front Screen size is 100 inches 254 cm or less Projection distance is between 4 9 to 9 8 feet 1 5 to 3 0 m for the PowerLite 2165W...

Page 141: ... a USB port on your computer for Gesture Presenter support Note You do not need to connect a USB cable if you are using EasyMP Multi PC Projection or Screen Mirroring to connect your computer to the projector 3 Turn on the projector and start your presentation 4 Press the Gesture button on the remote control You see the Gesture Presenter settings ...

Page 142: ...on setting 6 Do one of the following To move to the next slide or page cover the up arrow with your hand To move to the previous slide or page cover the down arrow with your hand Note When you are not using the arrows stand away from them to avoid accidentally covering them 7 When you are finished press the Gesture button to exit Gesture Presenter Note You can also close Gesture Presenter by press...

Page 143: ...an event 1 Press the Menu button 2 Select the Extended menu and press Enter 3 Select the Schedule Settings setting and press Enter The Schedule Settings screen appears 4 Select the Schedule menu and press Enter 5 Select Add New and press Enter 6 In the Event Settings section select the events you want to have occur Select No Change for events that you do not want to occur 7 In the Date Time Settin...

Page 144: ...ndar indicate the following about the scheduled events One time event Reoccurring event Communication is on off Event is invalid Parent topic Scheduling Projector Events Editing a Scheduled Event You can edit any currently scheduled event 1 Press the Menu button 2 Select the Extended menu and press Enter 3 Select the Schedule Settings setting and press Enter ...

Page 145: ...dit and press Esc 6 Select one of the following On Off Enable or disable the selected event Edit Edit the settings for the selected event Clear Delete the selected event Add New Add a new scheduled event 7 When you are finished select Return and press Enter 8 Select Setup complete and select Yes to save your changes Note To delete all scheduled events select Schedule Reset and select Yes Parent to...

Page 146: ...ature Settings Settings Menu Projector Setup Settings Extended Menu Projector Network Settings Network Menu Projector Setup Settings ECO Menu Projector Information Display Info Menu Projector Reset Options Reset Menu Using the Projector s Menus You can use the projector s menus to adjust the settings that control how your projector works The projector displays the menus on the screen 1 Press the M...

Page 147: ...on the current input source 3 To change settings in the displayed menu press Enter 4 Press the up or down arrow button to move through the settings 5 Change the settings using the buttons listed on the bottom of the menu screens 6 To return all the menu settings to their default values select Reset 7 When you finish changing settings on a menu press Esc 8 Press Menu or Esc to exit the menus Parent...

Page 148: ...ode See the list of available Color Modes Adjusts the vividness of image colors for various image types and environments Brightness Varying levels available Lightens or darkens the overall image Contrast Varying levels available Adjusts the difference between light and dark areas of the image Color Saturation Varying levels available Adjusts the intensity of the image colors Tint Varying levels av...

Page 149: ...uction Reduces flickering in analog images in 3 levels Advanced Gamma Adjusts the gamma levels of the image RGBCMY Adjusts the hue saturation and brightness for each color Deinterlacing Sets whether to convert interlaced to progressive signals for certain video image types Off for fast moving video images Video for most video images Film Auto for movies computer graphics and animation Auto Iris Of...

Page 150: ...references Available Color Modes Projector Setup Settings ECO Menu Input Signal Settings Signal Menu Normally the projector detects and optimizes the input signal settings automatically If you need to customize the settings you can use the Signal menu The available settings depend on the currently selected input source Note You can restore the default settings of the Position Tracking and Sync set...

Page 151: ...justs signal to eliminate vertical stripes in computer images Sync Varying levels available Adjusts signal to eliminate fuzziness or flickering in computer images Position Up down left right Adjusts the image location on the screen Auto Setup On Off Automatically optimizes computer image quality when On Overscan Auto Off 4 8 Changes the projected image ratio to make the edges visible by a selectab...

Page 152: ...ght Expanded for images from a computer select if the image is too dark Input Signal Auto RGB Component Specifies the signal type from input sources connected to computer ports Auto detects signals automatically RGB corrects color for computer RGB video inputs Component corrects color for component video inputs Video Signal Auto Various video standards Specifies the signal type from the input sour...

Page 153: ...t source Setting Options Description Keystone H V Keystone Quick Corner Adjusts image shape to rectangular horizontally and vertically H V Keystone lets you manually correct horizontal and vertical sides turn on or off automatic correction and the H Keystone Adjuster setting PowerLite 2040 2140W Quick Corner select to correct image shape and alignment using an on screen display ...

Page 154: ...o cancel split screen display Gesture Presenter Start Stop Marker Position Gesture Presenter Adjusts the Gesture Presenter options Start Stop starts or stops the Gesture Presenter function Marker Position sets the marker position to the right or left Gesture Presenter enables or disables the Gesture Presenter feature Volume Varying levels available Adjusts the volume of the projector s speaker sys...

Page 155: ...a linked device PJ Device or Bidirectional turns on the linked device when the projector is turned on Device PJ or Bidirectional turns on the projector when the linked device is turned on Power Off Link controls whether linked devices are turned off when the projector is turned off Link Buffer improves the performance of the linked operations by changing the settings if the HDMI Link function is n...

Page 156: ...eceiver Off turns off all receivers User Button Power Consumption Info Deinterlacing Closed Caption Test Pattern Resolution Multi Projection Display the QR Code Assigns a menu option to the User button on the remote control for one touch access Test Pattern Displays a test pattern to assist in focusing and zooming the image and correcting image shape press Esc to cancel pattern display Parent topi...

Page 157: ...ription Home Screen Home Screen Auto Disp Custom Function 1 Custom Function 2 Select various options for the projector s Home screen Home Screen Auto Disp controls whether the Home Screen displays automatically when the projector is turned on Custom Function 1 Custom Function 2 lets you customize the options displayed on the Home Screen and save your settings as a preset ...

Page 158: ...en appears when the projector starts up A V Mute selects the screen color or logo to display when A V Mute is turned on Closed Caption Off CC1 CC2 Controls use of closed captions and selects the closed caption type closed captions are visible only for NTSC signals connected through the Video port User s Logo Creates a screen that the projector displays to identify itself and enhance security Proje...

Page 159: ...ojector when it receives an image signal available only when Standby Mode is set to Communication On Monitor Out Port specifies the function of the Computer2 Monitor Out port Monitor Out select to output images to an external monitor Computer2 select when inputting a computer or component video signal Date Time Adjusts the projector s date and time settings A V Settings A V Output Audio Output HDM...

Page 160: ...de Color Matching RGBCMY Select various options when projecting from multiple projectors Multi Projection set to On to match the display quality of multiple projectors Projector ID sets the projector to a particular ID number which allows you to use a remote control to individually control projectors Color Mode adjusts the vividness of image colors for various image types and environments make sur...

Page 161: ... by Reset option Parent topic Adjusting the Menu Settings Projector Network Settings Network Menu Settings on the Network menu let you view network information and set up the projector for monitoring and control over a network Setting Options Description Screen Mirroring PowerLite 975W 2165W 2255U 2265U On Off Turns on screen mirroring mode ...

Page 162: ...ngs PowerLite 975W 2165W 2255U 2265U Various screen mirroring options Configures your screen mirroring settings only available when Screen Mirroring is On Wireless LAN Power On Off Turns on wireless LAN mode Net Info Wireless LAN Connection mode Wireless LAN System Antenna level Projector Name SSID DHCP IP Address Subnet Mask Gateway Address MAC Address Region Code IPv6 Displays wireless network s...

Page 163: ...ode for connecting with iOS or Android devices using the Epson iProjection app Network Configuration Accesses additional network menus Configures your network settings Parent topic Adjusting the Menu Settings Projector Setup Settings ECO Menu Settings on the ECO menu let you customize projector functions to save power When you select a power saving setting a leaf icon appears next to the menu item...

Page 164: ...and saves power and lamp life Light Optimizer On Off When Power Consumption is set to Normal and both Auto Iris and Multi Projection are turned off the lamp brightness is adjusted based on the projected image you can set this option for each color mode Sleep Mode On Off Automatically places the projector in standby mode after an interval of inactivity Sleep Mode Timer 1 to 30 minutes Sets the inte...

Page 165: ...tting to allow the following operations to occur when the projector is in standby mode Monitor and control the projector over a network Communication from the HDBaseT port Control Communications must be set to On ECO Display On Off Displays a leaf icon in the bottom left corner of the projected screen to indicate the power saving status when the lamp brightness changes Parent topic Adjusting the M...

Page 166: ... not register any hours until you have used the lamp for at least 10 hours Information item Description Lamp Hours Displays the number of hours H the lamp has been used in Normal and ECO Power Consumption modes if the information is displayed in yellow obtain a genuine Epson replacement lamp soon Source Displays the name of the port to which the current input source is connected Input Signal Displ...

Page 167: ...ys the signal level of the HDBaseT transmitter a yellow signal level indicates the signal is weak Event ID Code List Parent topic Adjusting the Menu Settings Related references Optional Equipment and Replacement Parts Projector Lamp Specifications Event ID Code List If the Event ID option on the Info menu displays a code number check this list of Event ID codes for the solution to the projector pr...

Page 168: ...formation on your computer and try connecting again 00432 The network software did not start Turn the projector off and then on again 00435 0433 Cannot display the transferred images Restart the network software 0434 Unstable network communication Check the network communication status wait a few moments and try connecting to the network again 0481 0482 0485 0483 The network softawre quit unexpect...

Page 169: ...e EasyMP Network Projection program and restarting your projector If that does not solve the problem contact Epson for help 089A The EAP authentication type does not match the network Check the wireless LAN security settings and make sure that the security certificate is installed correctly 089C EAP server authentication failed Check the wireless LAN security settings and make sure that the securi...

Page 170: ...e Reset Lamp Hours option You cannot reset the following settings using the Reset All Config option Input Signal User s Logo Schedule Settings Language Network menu items Lamp Hours Password Date Time Color Matching Display Background Startup Screen A V Mute Parent topic Adjusting the Menu Settings ...

Page 171: ...ed Epson servicer Warning Before cleaning any part of the projector turn it off and unplug the power cord Never open any cover on the projector except as specifically explained in this manual Dangerous electrical voltages in the projector can injure you severely Warning Do not try to service this product yourself except as specifically explained in this manual Refer all other servicing to qualifie...

Page 172: ...n the projector Caution Do not use wax alcohol benzine paint thinner or other chemicals to clean the projector case These can damage the case Do not use canned air or the gases may leave a residue Parent topic Projector Maintenance Air Filter and Vent Maintenance Regular filter maintenance is important to maintaining your projector Your Epson projector is designed with an easily accessible user re...

Page 173: ...any detergent or solvent to clean it Caution Do not use canned air The gases may leave a flammable residue or push dust and debris into the projector s optics or other sensitive areas 3 If dust is difficult to remove or the air filter is damaged replace the air filter Parent topic Air Filter and Vent Maintenance Replacing the Air Filter You need to replace the air filter in the following situation...

Page 174: ...2 Slide the air filter cover latch and open the air filter cover 3 Pull the air filter out of the projector Note Air filters contain polypropylene Dispose of used air filters according to local regulations ...

Page 175: ...eps track of the number of hours the lamp is used and displays this information in the projector s menu system Replace the lamp as soon as possible when the following occurs The projected image gets darker or starts to deteriorate A message appears when you turn on the projector telling you to replace the lamp The projector s On Standby light is flashing blue and its Lamp light is flashing orange ...

Page 176: ...cing it to avoid injury You can replace the lamp while the projector is mounted to the ceiling if necessary 1 Turn off the projector and unplug the power cord 2 Allow the projector lamp to cool down for at least one hour 3 Use the screwdriver included with the replacement lamp to loosen the screw securing the lamp cover Warning If the lamp is broken glass fragments may be loose inside the lamp cha...

Page 177: ...177 4 Slide the lamp cover out and lift it off 5 Loosen the screws securing the lamp to the projector The screws do not come all the way out PowerLite 975W 2055 2065 2155W 2165W 2245U 2250U 2255U 2265U ...

Page 178: ...178 PowerLite 2040 2140W ...

Page 179: ...179 6 Do one of the following PowerLite 975W 2055 2065 2155W 2165W 2245U 2250U 2255U 2265U Lift up the lamp handle and gently pull the lamp out of the projector ...

Page 180: ...p the raised section of the lamp and gently pull the lamp out of the projector Note The lamp s in this product contain mercury Please consult your state and local regulations regarding disposal or recycling Do not put in the trash ...

Page 181: ...lamp into the projector If it does not fit easily make sure it is facing the right way Press the handle down PowerLite 975W 2055 2065 2155W 2165W 2245U 2250U 2255U 2265U PowerLite 975W 2055 2065 2155W 2165W 2245U 2250U 2255U 2265U ...

Page 182: ...182 PowerLite 2040 2140W Caution Do not touch any glass on the lamp assembly to avoid premature lamp failure ...

Page 183: ...183 8 Push in the lamp firmly and tighten the screws to secure it PowerLite 975W 2055 2065 2155W 2165W 2245U 2250U 2255U 2265U ...

Page 184: ...184 PowerLite 2040 2140W 9 Replace the lamp cover and tighten the screw to secure it ...

Page 185: ... Related tasks Resetting the Lamp Timer Resetting the Lamp Timer You must reset the lamp timer after replacing the projector s lamp to clear the lamp replacement message and to keep track of lamp usage correctly Note Do not reset the lamp timer if you have not replaced the lamp to avoid inaccurate lamp usage information 1 Turn on the projector 2 Press the Menu button 3 Select the Reset menu and pr...

Page 186: ...ses two AA manganese or alkaline batteries Replace the batteries as soon as they run out Caution Use only the type of batteries specified in this manual Do not install batteries of different types or mix new and old batteries 1 Remove the battery cover as shown 2 Remove the old batteries Warning If the battery fluid has leaked wipe it away with a soft cloth and avoid getting the fluid on your hand...

Page 187: ...and press it down until it clicks into place Warning Dispose of used batteries according to local regulations Do not expose batteries to heat or flame Keep batteries out of the reach of children they are choking hazards and are very dangerous if swallowed Parent topic Projector Maintenance ...

Page 188: ...tor When transporting the projector a long distance or as checked luggage place it in a carrying case Then pack the case in a firm box with cushioning around it and mark the box Fragile When shipping the projector for repairs place it in its original packing materials if possible or use equivalent materials with cushioning around the projector Mark the box Fragile Note Epson shall not be liable fo...

Page 189: ...ly try turning it off and unplugging it Then plug it back in and turn it on If this does not solve the problem check the following The lights on the projector may indicate what the problem is The Help option on the Home screen can display information about common problems if the projector is operating The solutions in this manual can help you solve many problems If none of these solutions help you...

Page 190: ...nd let you know when a problem occurs Check the status and color of the lights and look for a solution in the table here 1 On Standby light 2 Status light 3 Lamp light 4 Temp light On Standby light Status light Lamp light Temp light Status and solution Blue Blue Off Off Normal operation ...

Page 191: ...ogged with dust or obstructed by nearby objects Clean or replace the air filter Make sure the environmental temperature is not too hot Off Flashing blue Off Orange Projector has overheated and turned off leave it turned off to cool down for about five minutes then do the following Make sure that the vents and air filter are not clogged with dust or obstructed by nearby objects Clean or replace the...

Page 192: ...d damage do not continue using the projector Off Flashing blue Off Flashing orange A fan or sensor has a problem turn the projector off unplug it and contact Epson for help Off Flashing blue Flashing orange Off Internal projector error turn the projector off unplug it and contact Epson for help Off Flashing blue Flashing orange Flashing orange Auto Iris error turn the projector off unplug it and c...

Page 193: ...nter You see the Help menu 5 Press the up and down arrow buttons to highlight the problem you want to solve 6 Press Enter to view the solutions 7 When you are finished do one of the following To select another problem to solve press Esc To exit the help system press Home Parent topic Solving Problems Solving Image or Sound Problems Check the solutions in these sections if you have any problems wit...

Page 194: ...o see if your connected computer is in sleep mode or displaying a blank screen saver Press the Menu button If the projector menu is able to display there may be a problem with the connected video source cable connection or port Check the settings on the Signal menu to make sure they are correct for the current video source Adjust the Brightness setting or select the Normal Power Consumption settin...

Page 195: ...sing Windows DirectX turn off DirectX functions If the mouse cursor flickers select Make the movement of the mouse pointer smooth in the Epson USB Display Settings program on your computer feature not available with Windows 2000 Turn off the Transfer layered window setting in the Epson USB Display Settings program on your computer Make sure you are using the most recent version of the USB Display ...

Page 196: ...splay on an external monitor 1 Hold down the laptop s Fn key and press the key labeled with a monitor icon or CRT LCD See your laptop manual for details Wait a few seconds for an image to appear On Windows 7 or later hold down the Windows key and press P at the same time then click Duplicate 2 To display on both the laptop s monitor and the projector try pressing the same keys again 3 If the same ...

Page 197: ...t Supported message appears try the following solutions Make sure the correct input signal is selected on the Signal menu Make sure the computer s display resolution does not exceed the projector s resolution and frequency limit If necessary select a different display resolution for your computer See your computer manual for details As a test try setting the computer s display resolution to the lo...

Page 198: ...ound Problems Related references Input Signal Settings Signal Menu Supported Video Display Formats Solutions When the Image is Not Rectangular If the projected image is not evenly rectangular try the following solutions Turn on automatic keystone adjustments using the projector s menus Place the projector directly in front of the center of the screen facing it squarely if possible If you adjusted ...

Page 199: ... the projector If you are projecting from a computer press the Auto button on the remote control to automatically adjust the tracking and sync If the problem remains display a uniformly patterned image on the screen and manually adjust the Tracking and Sync settings If you adjusted the image shape using the projector controls try decreasing the Sharpness setting to improve image quality If you con...

Page 200: ...djust the tracking and sync If any bands or overall blurriness remain display a uniformly patterned image on the screen and manually adjust the Tracking and Sync settings If you are projecting from a computer try using a lower resolution or try to match the projector s native resolution Parent topic Solving Image or Sound Problems Related concepts Projector Placement Related references Image Quali...

Page 201: ... lamp soon Parent topic Solving Image or Sound Problems Related concepts Color Mode Projector Placement Related references Image Quality Settings Image Menu Input Signal Settings Signal Menu Projector Setup Settings ECO Menu Solutions to Sound Problems If there is no sound when you expect it or the volume is too low or high try the following solutions Adjust the projector s volume settings Press t...

Page 202: ...s Controlling the Volume with the Volume Buttons Solving Projector or Remote Control Operation Problems Check the solutions in these sections if you have problems operating the projector or remote control Solutions to Projector Power or Shut Off Problems Solutions to Problems with the Remote Control Solutions to Password Problems Solutions When Using HDMI Link Parent topic Solving Problems Solutio...

Page 203: ...emote control batteries are installed correctly and have power If necessary replace the batteries Make sure you are operating the remote control within the reception angle and range of the projector Make sure the projector is not warming up or shutting down Check to see if a button on the remote control is stuck down causing it to enter sleep mode Release the button to wake the remote control up S...

Page 204: ...ain Provide the request code and proof of ownership for assistance in unlocking the projector If you set a Web Control password and forgot the user ID or password try entering the following User ID EPSONWEB Default password admin If you set a Remote password in Epson Web Control and forgot the user ID or password try entering the following User ID EPSONREMOTE Default password guest If you lose the...

Page 205: ...pic Solving Problems Solutions When Wireless Authentication Fails If you cannot authenticate a wireless connection try the following solutions PowerLite 975W 2055 2065 2155W 2165W 2245U 2250U 2255U 2265U If the wireless settings are correct but authentication fails you may need to update the Date Time settings on the Extended menu if available Make sure the Wireless LAN Power setting is set to On ...

Page 206: ...e the projector is turned on and connected to the network correctly If an error shut down the projector it cannot send an e mail Make sure you set up the projector e mail alert settings correctly on the projector s network Mail menu or in the network software Set the Standby Mode setting to Communication On so the network software can monitor the projector in standby mode Parent topic Solving Netw...

Page 207: ...c Time Saturday Days and hours of support are subject to change without notice Toll or long distance charges may apply Before you call have the following information ready Product name Product serial number located on the bottom or rear of the projector or in the menu system Proof of purchase such as a store receipt and date of purchase Computer or video configuration Description of the problem Pu...

Page 208: ...pecifications Supported Video Display Formats USB Display System Requirements General Projector Specifications Type of display Poly silicon TFT active matrix Resolution PowerLite 2040 2055 2065 1024 768 pixels XGA PowerLite 975W 2140W 2155W 2165W 1280 800 pixels WXGA PowerLite 2245U 2250U 2255U 2265U 1920 1200 pixels WUXGA Lens PowerLite 975W 2040 2055 2065 2140W 2155W 2165W F 1 51 to 1 99 Focal l...

Page 209: ...18 standard Color light output 5000 lumens ECO Power Consumption mode White light output 3800 lumens ISO 21118 standard PowerLite 2245U Normal Power Consumption mode White light output 4200 lumens ISO 21118 standard Color light output 4200 lumens ECO Power Consumption mode White light output 3100 lumens ISO 21118 standard PowerLite 2155W Normal Power Consumption mode White light output 5000 lumens...

Page 210: ...s white light output will vary depending on usage conditions Color light output measured in accordance with IDMS 15 4 white light output measured in accordance with ISO 21118 Contrast ratio 15000 1 with Auto Iris on Dynamic color mode Normal Power Consumption mode and Wide Zoom mode Image size in native aspect ratio PowerLite 2250U 2255U 2265U 50 inches 1 27 m to 300 inches 7 62 m PowerLite 2245U ...

Page 211: ... m PowerLite 2040 2055 2065 32 7 inches 0 83 m to 545 7 inches 13 86 m PowerLite 975W 2140W 2155W 33 5 inches 0 85 m to 539 8 inches 13 71 m Projection methods Front rear ceiling mounted Optical aspect ratio width to height PowerLite 2040 2055 2065 4 3 PowerLite 975W 2140W 2155W 2165W 2245U 2250U 2255U 2265U 16 10 Focus adjustment Manual Zoom adjustment Manual Zoom ratio Tele to Wide 1 0 to 1 6 In...

Page 212: ...n angle PowerLite 975W 2055 2065 2155W 2165W 2245U 2250U 2255U 2265U Vertical 30º manual 30º using Auto Keystone or Screen Fit Horizontal 30º manual 20º using Auto Keystone or Screen Fit PowerLite 2040 2140W Vertical 30º manual 30º using Auto Keystone Horizontal 30º manual USB Type B port compatibility USB 1 1 and 2 0 compliant for USB display or external mouse USB Type A port compatibility One US...

Page 213: ...urs ECO Power Consumption mode Up to about 10000 hours PowerLite 975W Up to about 10000 hours Note Turn off this product when not in use to prolong the life of the projector Lamp life will vary depending upon mode selected environmental conditions and usage Brightness decreases over time Parent topic Technical Specifications Remote Control Specifications Reception range 26 feet 8 m Batteries Two a...

Page 214: ...5W 3 9 inches 101 mm Width 14 8 inches 377 mm Depth 11 4 inches 291 mm Weight PowerLite 2255U 2265U 10 4 lb 4 7 kg PowerLite 2165W 2245U 2055 10 1 lb 4 6 kg PowerLite 2055 2155W 9 5 lb 4 3 kg PowerLite 2040 2140W 9 3 lb 4 2 kg PowerLite 975W 2065 9 7 lb 4 4 kg Parent topic Technical Specifications Projector Electrical Specifications Rated frequency 50 60 Hz ...

Page 215: ...ating PowerLite 2065 2165W 2265U Normal Power Consumption mode 450 W ECO Power Consumption mode 340 W PowerLite 2055 2155W 2245U 2250U 2255U Normal Power Consumption mode 429 W ECO Power Consumption mode 340 W PowerLite 2040 2140W Normal Power Consumption mode 333 W ECO Power Consumption mode 235 W PowerLite 975W Normal Power Consumption mode 334 W Standby 2 41 W Network Standby 0 31 W Energy Savi...

Page 216: ...sumption mode 340 W PowerLite 2040 2140W Normal Power Consumption mode 316 W ECO Power Consumption mode 228 W PowerLite 975W Normal Power Consumption mode 317 W Standby 2 41 W Network Standby 0 31 W Energy Saving Parent topic Technical Specifications Projector Environmental Specifications Temperature Operating Up to 7500 ft 2286 m 41 to 104 F 5 to 40 C 7500 ft 2286 m to 10000 ft 3048 m 41 to 95 F ...

Page 217: ... the projector s native resolution However your projector includes Epson s SizeWise chip that supports other computer display resolutions so your image will be resized to fit automatically Your computer s monitor port or video card refresh rate vertical frequency must be compatible with the projector See your computer or video card manual for details The table here lists the compatible refresh rat...

Page 218: ... 1600 1200 WUXGA 60 1900 1200 Composite video TV NTSC 60 720 480 TV SECAM 50 720 576 TV PAL 50 60 720 576 Component video SDTV 480i 480p 60 720 480 SDTV 576i 576p 50 720 576 HDTV 720p 50 60 1280 720 HDTV 1080i 50 60 1920 1080 HDMI and HDBaseT input signals VGA 60 640 480 SVGA 60 800 600 XGA 60 1024 768 WXGA 60 1280 800 60 1366 768 WXGA 60 1440 900 WXGA 60 1600 900 UXGA 60 1600 1200 ...

Page 219: ...480 SDTV 576i 576p 50 720 576 HDTV 720p 50 60 1280 720 HDTV 1080i 50 60 1920 1080 HDTV 1080p 24 30 1920 1080 Wide resolution only for PowerLite 975W 2140W 2155W 2165W 2245U 2250U 2255U 2265U PowerLite 2245U 2250U 2255U 2265U only HDMI connection using HDBaseT transmitter for PowerLite 2165W 2265U only PowerLite 975W 2140W 2155W 2165W 2245U 2250U 2255U 2265U only Parent topic Technical Specificatio...

Page 220: ...um 32 and 64 bit Home Basic and Starter 32 bit Windows 8 x Pro and Enterprise 32 and 64 bit Windows 10 Home Pro and Enterprise 32 and 64 bit USB version USB 2 0 CPU Intel Core2 Duo or faster Intel Core i3 or faster recommended Intel Core2 Duo or faster Intel Core i5 or faster recommended Memory 2GB or more 4GB or more recommended Hard disk space 20MB or more Display Resolution between 640 480 and ...

Page 221: ... lamp is turned on the bright light can damage your eyes Never let children look into the lens when it is on Never open any cover on the projector except the lamp and filter covers Dangerous electrical voltages inside the projector can severely injure you Except as specifically explained in this User s Guide do not attempt to service this product yourself Refer all servicing to qualified service p...

Page 222: ...he plug Do not hold the plug with wet hands Do not insert the plug into a dusty outlet Insert the plug firmly into the outlet Do not pull the power cord when disconnecting the plug always be sure to hold the plug when disconnecting it Do not overload wall outlets extension cords or power strips Failure to comply with these precautions could result in fire or electric shock Do not place the project...

Page 223: ...projector if the power cord or plug is damaged or frayed if liquid or foreign objects get inside the projector or if it has been exposed to rain or water if it has been dropped or the housing has been damaged Do not touch the plug during an electrical storm Otherwise you may receive an electric shock Unplug the projector when it will not be used for extended periods Do not use the projector where ...

Page 224: ...r cord Do not place heavy objects on top of the power cord or bend twist or pull it excessively Keep the power cord away from hot electrical appliances If the lamp breaks ventilate the room to prevent gases contained in the lamp from being inhaled or coming in contact with your eyes or mouth If you do inhale gases or gases come in contact with your eyes or mouth seek medical advice immediately If ...

Page 225: ...uclear power control equipment or medical equipment related to direct medical care please make your own judgment on this product s suitability after a full evaluation Parent topic Important Safety Instructions List of Safety Symbols corresponding to IEC60950 1 A2 The following table lists the meaning of the safety symbols labeled on the equipment No Symbol Approved Standards Description 1 IEC60417...

Page 226: ...f DC power connector To identify the positive and negative connections the polarity on a piece of equipment to which a DC power supply may be connected 9 Polarity of DC power connector To identify the positive and negative connections the polarity on a piece of equipment to which a DC power supply may be connected 10 IEC60417 No 5001B Battery general On battery powered equipment To identify a devi...

Page 227: ...y an earth ground terminal in cases where neither the symbol No 13 is explicitly required 15 IEC60417 No 5032 Alternating current To indicate on the rating plate that the equipment is suitable for alternating current only to identify relevant terminals 16 IEC60417 No 5031 Direct current To indicate on the rating plate that the equipment is suitable for direct current only to identify relevant term...

Page 228: ...ctor 22 ISO3864 IEC60825 1 Caution laser radiation To indicate the equipment has a laser radiation part 23 ISO 3864 Disassembly prohibition To indicate a risk of injury such as electric shock if the equipment is disassembled 24 IEC60417 No 5266 Standby partial standby To indicate that part of the equipment is in the ready status 25 ISO3864 IEC60417 No 5057 Caution movable parts To indicate that yo...

Page 229: ...he equipment into an outlet on a circuit different from that to which the receiver is connected Consult the dealer or an experienced radio TV technician for help WARNING The connection of a non shielded equipment interface cable to this equipment will invalidate the FCC Certification or Declaration of this device and may cause interference levels which exceed the limits established by the FCC for ...

Page 230: ... 4 20 linux 3 4 49 patches udhcp 0 9 8 wireless_tools 29 dbus 1 6 18 EPSON original drivers Stonestreet One Drivers mtd utils 1 5 0 dibbler 1 0 1 linux 2 6 32 u boot 2001 06 busybox 1 19 4 backports 3 10 4 1 wifi driver The GNU General Public License Version 2 is as follows You also can see the GNU General Public License Version 2 at http www gnu org licenses GNU GENERAL PUBLIC LICENSE Version 2 J...

Page 231: ...ms so they know their rights We protect your rights with two steps 1 copyright the software and 2 offer you this license which gives you legal permission to copy distribute and or modify the software Also for each author s protection and ours we want to make certain that everyone understands that there is no warranty for this free software If the software is modified by someone else and passed on ...

Page 232: ...ontains or is derived from the Program or any part thereof to be licensed as a whole at no charge to all third parties under the terms of this License c If the modified program normally reads commands interactively when run you must cause it when started running for such interactive use in the most ordinary way to print or display an announcement including an appropriate copyright notice and a not...

Page 233: ...t contains plus any associated interface definition files plus the scripts used to control compilation and installation of the executable However as a special exception the source code distributed need not include anything that is normally distributed in either source or binary form with the major components compiler kernel and so on of the operating system on which the executable runs unless that...

Page 234: ...ty of any such claims this section has the sole purpose of protecting the integrity of the free software distribution system which is implemented by public license practices Many people have made generous contributions to the wide range of software distributed through that system in reliance on consistent application of that system it is up to the author donor to decide if he or she is willing to ...

Page 235: ...HOLDER OR ANY OTHER PARTY WHO MAY MODIFY AND OR REDISTRIBUTE THE PROGRAM AS PERMITTED ABOVE BE LIABLE TO YOU FOR DAMAGES INCLUDING ANY GENERAL SPECIAL INCIDENTAL OR CONSEQUENTIAL DAMAGES ARISING OUT OF THE USE OR INABILITY TO USE THE PROGRAM INCLUDING BUT NOT LIMITED TO LOSS OF DATA OR DATA BEING RENDERED INACCURATE OR LOSSES SUSTAINED BY YOU OR THIRD PARTIES OR A FAILURE OF THE PROGRAM TO OPERATE...

Page 236: ...er suits your program You should also get your employer if you work as a programmer or your school if any to sign a copyright disclaimer for the program if necessary Here is a sample alter the names Yoyodyne Inc hereby disclaims all copyright interest in the program Gnomovision which makes passes at compilers written by James Hacker signature of Ty Coon 1 April 1989 Ty Coon President of Vice This ...

Page 237: ... 2 hence the version number 2 1 Preamble The licenses for most software are designed to take away your freedom to share and change it By contrast the GNU General Public Licenses are intended to guarantee your freedom to share and change free software to make sure the software is free for all its users This license the Lesser General Public License applies to some specially designated software pack...

Page 238: ... the users of a free program by obtaining a restrictive license from a patent holder Therefore we insist that any patent license obtained for a version of the library must be consistent with the full freedom of use specified in this license Most GNU software including some libraries is covered by the ordinary GNU General Public License This license the GNU Lesser General Public License applies to ...

Page 239: ...ensee is addressed as you A library means a collection of software functions and or data prepared so as to be conveniently linked with application programs which use some of those functions and data to form executables The Library below refers to any such software library or work which has been distributed under these terms A work based on the Library means either the Library or any derivative wor...

Page 240: ...ent of the application Therefore Subsection 2d requires that any application supplied function or table used by this function must be optional if the application does not supply it the square root function must still compute square roots These requirements apply to the modified work as a whole If identifiable sections of that work are not derived from the Library and can be reasonably considered i...

Page 241: ...ever linking a work that uses the Library with the Library creates an executable that is a derivative of the Library because it contains portions of the Library rather than a work that uses the library The executable is therefore covered by this License Section 6 states terms for distribution of such executables When a work that uses the Library uses material from a header file that is part of the...

Page 242: ...tible with the version that the work was made with c Accompany the work with a written offer valid for at least three years to give the same user the materials specified in Subsection 6a above for a charge no more than the cost of performing this distribution d If distribution of the work is made by offering access to copy from a designated place offer equivalent access to copy the above specified...

Page 243: ... further restrictions on the recipients exercise of the rights granted herein You are not responsible for enforcing compliance by third parties with this License 11 If as a consequence of a court judgment or allegation of patent infringement or for any other reason not limited to patent issues conditions are imposed on you whether by court order agreement or otherwise that contradict the condition...

Page 244: ...compatible with these write to the author to ask for permission For software which is copyrighted by the Free Software Foundation write to the Free Software Foundation we sometimes make exceptions for this Our decision will be guided by the two goals of preserving the free status of all derivatives of our free software and of promoting the sharing and reuse of software generally NO WARRANTY 15 BEC...

Page 245: ...version This library is distributed in the hope that it will be useful but WITHOUT ANY WARRANTY without even the implied warranty of MERCHANTABILITY or FITNESS FOR A PARTICULAR PURPOSE See the GNU Lesser General Public License for more details You should have received a copy of the GNU Lesser General Public License along with this library if not write to the Free Software Foundation Inc 51 Frankli...

Page 246: ... University nor the names of its contributors may be used to endorse or promote products derived from this software without specific prior written permission THIS SOFTWARE IS PROVIDED BY THE REGENTS AND CONTRIBUTORS AS IS AND ANY EXPRESS OR IMPLIED WARRANTIES INCLUDING BUT NOT LIMITED TO THE IMPLIED WARRANTIES OF MERCHANTABILITY AND FITNESS FOR A PARTICULAR PURPOSE ARE DISCLAIMED IN NO EVENT SHALL...

Page 247: ...s make NO WARRANTY or representation either express or implied with respect to this software its quality accuracy merchantability or fitness for a particular purpose This software is provided AS IS and you its user assume the entire risk as to its quality and accuracy This software is copyright C 1991 1998 Thomas G Lane All Rights Reserved except as specified below Permission is hereby granted to ...

Page 248: ...porting scripts config guess config sub ltconfig ltmain sh Another support script install sh is copyright by M I T but is also freely distributable It appears that the arithmetic coding option of the JPEG spec is covered by patents owned by IBM AT T and Mitsubishi Hence arithmetic coding cannot legally be used without obtaining one or more licenses For this reason support for arithmetic coding has...

Page 249: ...rs Cosmin Truta libpng versions 1 0 7 July 1 2000 through 1 2 5 October 3 2002 are Copyright c 2000 2002 Glenn Randers Pehrson and are distributed according to the same disclaimer and license as libpng 1 0 6 with the following individuals added to the list of Contributing Authors Simon Pierre Cadieux Eric S Raymond Gilles Vollant and with the following additions to the disclaimer There is no warra...

Page 250: ...ntability and of fitness for any purpose The Contributing Authors and Group 42 Inc assume no liability for direct indirect incidental special exemplary or consequential damages which may result from the use of the PNG Reference Library even if advised of the possibility of such damage Permission is hereby granted to use copy modify and distribute this source code or portions hereof for any purpose...

Page 251: ...2 5 License terms of conditions of each program which are provided by owner of the copyright to the zlib are as follows Copyright notice C 1995 1998 Jean loup Gailly and Mark Adler This software is provided as is without any express or implied warranty In no event will the authors be held liable for any damages arising from the use of this software Permission is granted to anyone to use this softw...

Page 252: ...TY AND FITNESS FOR A PARTICULAR PURPOSE List of aes src 29 04 09 programs aes src 29 04 09 License terms of conditions of each program which are provided by owner of the copyright to the aes src 29 04 09 are as follows Copyright c 1998 2008 Brian Gladman Worcester UK All rights reserved LICENSE TERMS The redistribution and use of this software with or without changes is allowed without the payment...

Page 253: ...uted in the hope that it will be useful but WITHOUT ANY WARRANTY expressed or implied including the implied warranties of MERCHANTABILITY or FITNESS FOR A PARTICULAR PURPOSE A copy of this license is available at http www opensource org licenses Any Red Hat trademarks that are incorporated in the source code or documentation are not subject to the BSD License and may only be used or replicated wit...

Page 254: ... for such software THIS SOFTWARE IS BEING PROVIDED AS IS WITHOUT ANY EXPRESS OR IMPLIED WARRANTY IN PARTICULAR NEITHER THE AUTHOR NOR AT T MAKES ANY REPRESENTATION OR WARRANTY OF ANY KIND CONCERNING THE MERCHANTABILITY OF THIS SOFTWARE OR ITS FITNESS FOR ANY PARTICULAR PURPOSE The author of this software is David M Gay Copyright C 1998 2001 by Lucent Technologies All Rights Reserved Permission to ...

Page 255: ...9K Technical Support Center at 800 29 29 AMD 800 292 9263 in the USA or 0800 89 1131 in the UK or 0031 11 1129 in Japan toll free The direct dial number is 512 462 4118 Advanced Micro Devices Inc 29K Support Products Mail Stop 573 5900 E Ben White Blvd Austin TX 78741 800 292 9263 5 C W Sandmann Copyright C 1993 C W Sandmann This file may be freely distributed as long as the author s name remains ...

Page 256: ...ution and use in source and binary forms with or without modification are permitted provided that the following conditions are met 1 Redistributions of source code must retain the above copyright notice this list of conditions and the following disclaimer 2 Redistributions in binary form must reproduce the above copyright notice this list of conditions and the following disclaimer in the documenta...

Page 257: ...d use in source and binary forms with or without modification are permitted provided that the following conditions are met 1 Redistributions of source code must retain the above copyright notice this list of conditions and the following disclaimer 2 Redistributions in binary form must reproduce the above copyright notice this list of conditions and the following disclaimer in the documentation and...

Page 258: ...BUTORS BE LIABLE FOR ANY DIRECT INDIRECT INCIDENTAL SPECIAL EXEMPLARY OR CONSEQUENTIAL DAMAGES INCLUDING BUT NOT LIMITED TO PROCUREMENT OF SUBSTITUTE GOODS OR SERVICES LOSS OF USE DATA OR PROFITS OR BUSINESS INTERRUPTION HOWEVER CAUSED AND ON ANY THEORY OF LIABILITY WHETHER IN CONTRACT STRICT LIABILITY OR TORT INCLUDING NEGLIGENCE OR OTHERWISE ARISING IN ANY WAY OUT OF THE USE OF THIS SOFTWARE EVE...

Page 259: ...IS SOFTWARE IS PROVIDED BY THE AUTHOR AND CONTRIBUTORS AS IS AND ANY EXPRESS OR IMPLIED WARRANTIES INCLUDING BUT NOT LIMITED TO THE IMPLIED WARRANTIES OF MERCHANTABILITY AND FITNESS FOR A PARTICULAR PURPOSE ARE DISCLAIMED IN NO EVENT SHALL THE AUTHOR OR CONTRIBUTORS BE LIABLE FOR ANY DIRECT INDIRECT INCIDENTAL SPECIAL EXEMPLARY OR CONSEQUENTIAL DAMAGES INCLUDING BUT NOT LIMITED TO PROCUREMENT OF S...

Page 260: ...INCLUDING BUT NOT LIMITED TO PROCUREMENT OF SUBSTITUTE GOODS OR SERVICES LOSS OF USE DATA OR PROFITS OR BUSINESS INTERRUPTION HOWEVER CAUSED AND ON ANY THEORY OF LIABILITY WHETHER IN CONTRACT STRICT LIABILITY OR TORT INCLUDING NEGLIGENCE OR OTHERWISE ARISING IN ANY WAY OUT OF THE USE OF THIS SOFTWARE EVEN IF ADVISED OF THE POSSIBILITY OF SUCH DAMAGE 19 Todd C Miller Copyright c 1998 Todd C Miller ...

Page 261: ...s this permission provided that the above copyright notice appears in all copies and that both the copyright notice and this permission notice appear in supporting documentation In addition Intel grants this permission provided that you prominently mark as not part of the original any modifications made to this software or documentation and that the name of Intel Corporation not be used in adverti...

Page 262: ...LITY OR TORT INCLUDING NEGLIGENCE OR OTHERWISE ARISING IN ANY WAY OUT OF THE USE OF THIS SOFTWARE EVEN IF ADVISED OF THE POSSIBILITY OF SUCH DAMAGE 27 Konstantin Chuguev enable newlib iconv Copyright c 1999 2000 Konstantin Chuguev All rights reserved Redistribution and use in source and binary forms with or without modification are permitted provided that the following conditions are met 1 Redistr...

Page 263: ...HE AUTHOR OR CONTRIBUTORS BE LIABLE FOR ANY DIRECT INDIRECT INCIDENTAL SPECIAL EXEMPLARY OR CONSEQUENTIAL DAMAGES INCLUDING BUT NOT LIMITED TO PROCUREMENT OF SUBSTITUTE GOODS OR SERVICES LOSS OF USE DATA OR PROFITS OR BUSINESS INTERRUPTION HOWEVER CAUSED AND ON ANY THEORY OF LIABILITY WHETHER IN CONTRACT STRICT LIABILITY OR TORT INCLUDING NEGLIGENCE OR OTHERWISE ARISING IN ANY WAY OUT OF THE USE O...

Page 264: ...conditions and the following disclaimer in the documentation and or other materials provided with the distribution THIS SOFTWARE IS PROVIDED BY THE AUTHOR AND CONTRIBUTORS AS IS AND ANY EXPRESS OR IMPLIED WARRANTIES INCLUDING BUT NOT LIMITED TO THE IMPLIED WARRANTIES OF MERCHANTABILITY AND FITNESS FOR A PARTICULAR PURPOSE ARE DISCLAIMED IN NO EVENT SHALL THE AUTHOR OR CONTRIBUTORS BE LIABLE FOR AN...

Page 265: ... source and binary forms with or without modification are permitted provided that the following conditions are met 1 Redistributions of source code must retain the above copyright notice this list of conditions and the following disclaimer 2 Redistributions in binary form must reproduce the above copyright notice this list of conditions and the following disclaimer in the documentation and or othe...

Page 266: ...ONTRACT STRICT LIABILITY OR TORT INCLUDING NEGLIGENCE OR OTHERWISE ARISING IN ANY WAY OUT OF THE USE OF THIS SOFTWARE EVEN IF ADVISED OF THE POSSIBILITY OF SUCH DAMAGE 36 CodeSourcery Inc Copyright c 2009 CodeSourcery Inc All rights reserved Redistribution and use in source and binary forms with or without modification are permitted provided that the following conditions are met Redistributions of...

Page 267: ...ote products derived from this software without specific prior written permission THIS SOFTWARE IS PROVIDED BY THE COPYRIGHT HOLDERS AND CONTRIBUTORS AS IS AND ANY EXPRESS OR IMPLIED WARRANTIES INCLUDING BUT NOT LIMITED TO THE IMPLIED WARRANTIES OF MERCHANTABILITY AND FITNESS FOR A PARTICULAR PURPOSE ARE DISCLAIMED IN NO EVENT SHALL THE COPYRIGHT OWNER OR CONTRIBUTORS BE LIABLE FOR ANY DIRECT INDI...

Page 268: ...oftware and to permit persons to whom the Software is furnished to do so subject to the following conditions The above copyright notice and this permission notice shall be included in all copies or substantial portions of the Software THE SOFTWARE IS PROVIDED AS IS WITHOUT WARRANTY OF ANY KIND EXPRESS OR IMPLIED INCLUDING BUT NOT LIMITED TO THE WARRANTIES OF MERCHANTABILITY FITNESS FOR A PARTICULA...

Page 269: ... a form in which it can be used in the development of other software library form etc the above copyright display these terms of utilization and the following stipulation of no guarantee shall be inserted in documentation accompanying redistribution user s manual etc 3 When this software is redistributed in a form in which it cannot be used in the development of other software embedded in devices ...

Page 270: ...utions in binary form must reproduce the above copyright notice this list of conditions and the following disclaimer in the documentation and or other materials provided with the distribution 3 All advertising materials mentioning features or use of this software must display the following acknowledgement This product includes software developed by the University of California Berkeley and its con...

Page 271: ...be inserted in documentation accompanying redistribution user s manual etc 3 When this software is redistributed in a form in which it cannot be used in the development of other software embedded in devices etc following conditions shall be satisfied a The above copyright display these terms of utilization and the following stipulation of no guarantee shall be inserted in documentation accompanyin...

Page 272: ...or other materials provided with the distribution 3 Neither the name s of the above listed copyright holder s nor the names of its contributors may be used to endorse or promote products derived from this software without specific prior written permission THIS SOFTWARE IS PROVIDED BY THE COPYRIGHT HOLDERS AND CONTRIBUTORS AS IS AND ANY EXPRESS OR IMPLIED WARRANTIES INCLUDING BUT NOT LIMITED TO THE...

Page 273: ... products derived from this software without specific prior written permission THIS SOFTWARE IS PROVIDED BY THE COPYRIGHT HOLDERS AND CONTRIBUTORS AS IS AND ANY EXPRESS OR IMPLIED WARRANTIES INCLUDING BUT NOT LIMITED TO THE IMPLIED WARRANTIES OF MERCHANTABILITY AND FITNESS FOR A PARTICULAR PURPOSE ARE DISCLAIMED IN NO EVENT SHALL THE COPYRIGHT OWNER OR CONTRIBUTORS BE LIABLE FOR ANY DIRECT INDIREC...

Page 274: ...ary functions are written in C and are freestanding Also included in the distribution is a set of C wrapper functions and a just in time compiler that can be used to optimize pattern matching These are both optional features that can be omitted when the library is built THE BASIC LIBRARY FUNCTIONS Written by Philip Hazel Email local part ph10 Email domain cam ac uk University of Cambridge Computin...

Page 275: ... of the University of Cambridge nor the name of Google Inc nor the names of their contributors may be used to endorse or promote products derived from this software without specific prior written permission THIS SOFTWARE IS PROVIDED BY THE COPYRIGHT HOLDERS AND CONTRIBUTORS AS IS AND ANY EXPRESS OR IMPLIED WARRANTIES INCLUDING BUT NOT LIMITED TO THE IMPLIED WARRANTIES OF MERCHANTABILITY AND FITNES...

Page 276: ...o this Software and Documentation may be copyrighted by their authors and need not follow the licensing terms described here If modifications to this Software and Documentation have new licensing terms the new terms must be clearly indicated on the first page of each file where they apply OPEN MARKET MAKES NO EXPRESS OR IMPLIED WARRANTY WITH RESPECT TO THE SOFTWARE OR THE DOCUMENTATION INCLUDING W...

Page 277: ...uce the above copyright notice this list of conditions and the following disclaimer in the documentation and or other materials provided with the distribution 3 All advertising materials mentioning features or use of this software must display the following acknowledgment This product includes software developed by the OpenSSL Project for use in the OpenSSL Toolkit http www openssl org 4 The names...

Page 278: ... distribution is covered by the same copyright terms except that the holder is Tim Hudson tjh cryptsoft com Copyright remains Eric Young s and as such any Copyright notices in the code are not to be removed If this package is used in a product Eric Young should be given attribution as the author of the parts of the library used This can be in the form of a textual message at program startup or in ...

Page 279: ...and distribution terms for any publically available version or derivative of this code cannot be changed i e this code cannot simply be copied and put under another distribution licence including the GNU Public Licence iperf This projector product includes the open source software program iperf which applies the terms and conditions provided by owner of the copyright to the iperf The iperf are WIT...

Page 280: ...nois NCSA nor the names of its contributors may be used to endorse or promote products derived from this Software without specific prior written permission THE SOFTWARE IS PROVIDED AS IS WITHOUT WARRANTY OF ANY KIND EXPRESS OR IMPLIED INCLUDING BUT NOT LIMITED TO THE WARRANTIES OF MERCHANTABILITY FITNESS FOR A PARTICULAR PURPOSE AND NONINFRINGEMENT IN NO EVENT SHALL THE CONTIBUTORS OR COPYRIGHT HO...

Page 281: ...orks However we will be interested in any kind of bug reports as is distribution You can use this software for whatever you want in parts or full form without having to pay us royalty free usage You may not pretend that you wrote this software If you use it or only parts of it in a program you must acknowledge somewhere in your documentation that you have used the FreeType code credits We specific...

Page 282: ...TY OF ANY KIND EITHER EXPRESS OR IMPLIED INCLUDING BUT NOT LIMITED TO WARRANTIES OF MERCHANTABILITY AND FITNESS FOR A PARTICULAR PURPOSE IN NO EVENT WILL ANY OF THE AUTHORS OR COPYRIGHT HOLDERS BE LIABLE FOR ANY DAMAGES CAUSED BY THE USE OR THE INABILITY TO USE OF THE FREETYPE PROJECT 2 Redistribution This license grants a worldwide royalty free perpetual and irrevocable right and license to use e...

Page 283: ...cense you are not required to accept it However as the FreeType Project is copyrighted material only this license or another one contracted with the authors grants you the right to use distribute and modify it Therefore by using distributing or modifying the FreeType Project you indicate that you understand and accept all the terms of this license 4 Contacts There are two mailing lists related to ...

Page 284: ...es then in effect for consumer related disputes but excluding any rules that permit joinder or class actions in arbitration for more detail on procedure see Section 1 6 below You and Epson understand and agree that a the Federal Arbitration Act 9 U S C 1 et seq governs the interpretation and enforcement of this Section 1 b this Agreement memorializes a transaction in interstate commerce and c this...

Page 285: ...on of this Agreement including any claim that all or any part of this Agreement is void or voidable Notwithstanding this broad delegation of authority to the arbitrator a court may determine the limited question of whether a claim or cause of action is for an IP Claim which is excluded from the definition of Disputes in Section 1 1 above The arbitrator shall be empowered to grant whatever relief w...

Page 286: ...reement Your right to attorney s fees and expenses under Section 1 6d above does not limit your rights to attorney s fees and expenses under applicable law notwithstanding the foregoing the arbitrator may not award duplicative awards of attorney s fees and expenses 1 7 Opt out You may elect to opt out exclude yourself from the final binding individual arbitration procedure and waiver of class and ...

Page 287: ...LLC HDBaseTTM and the HDBaseT Alliance logo are trademarks of the HDBaseT Alliance Miracast is a registered trademark of Wi Fi Alliance General Notice Other product names used herein are for identification purposes only and may be trademarks of their respective owners Epson disclaims any and all rights in those marks Parent topic Notices Copyright Notice All rights reserved No part of this publica...

Page 288: ... Note Concerning Responsible Use of Copyrighted Materials Copyright Attribution Parent topic Notices A Note Concerning Responsible Use of Copyrighted Materials Epson encourages each user to be responsible and respectful of the copyright laws when using any Epson product While some countries laws permit limited copying or reuse of copyrighted material in certain circumstances those circumstances ma...

Reviews: