background image

Projector Placement

17

a

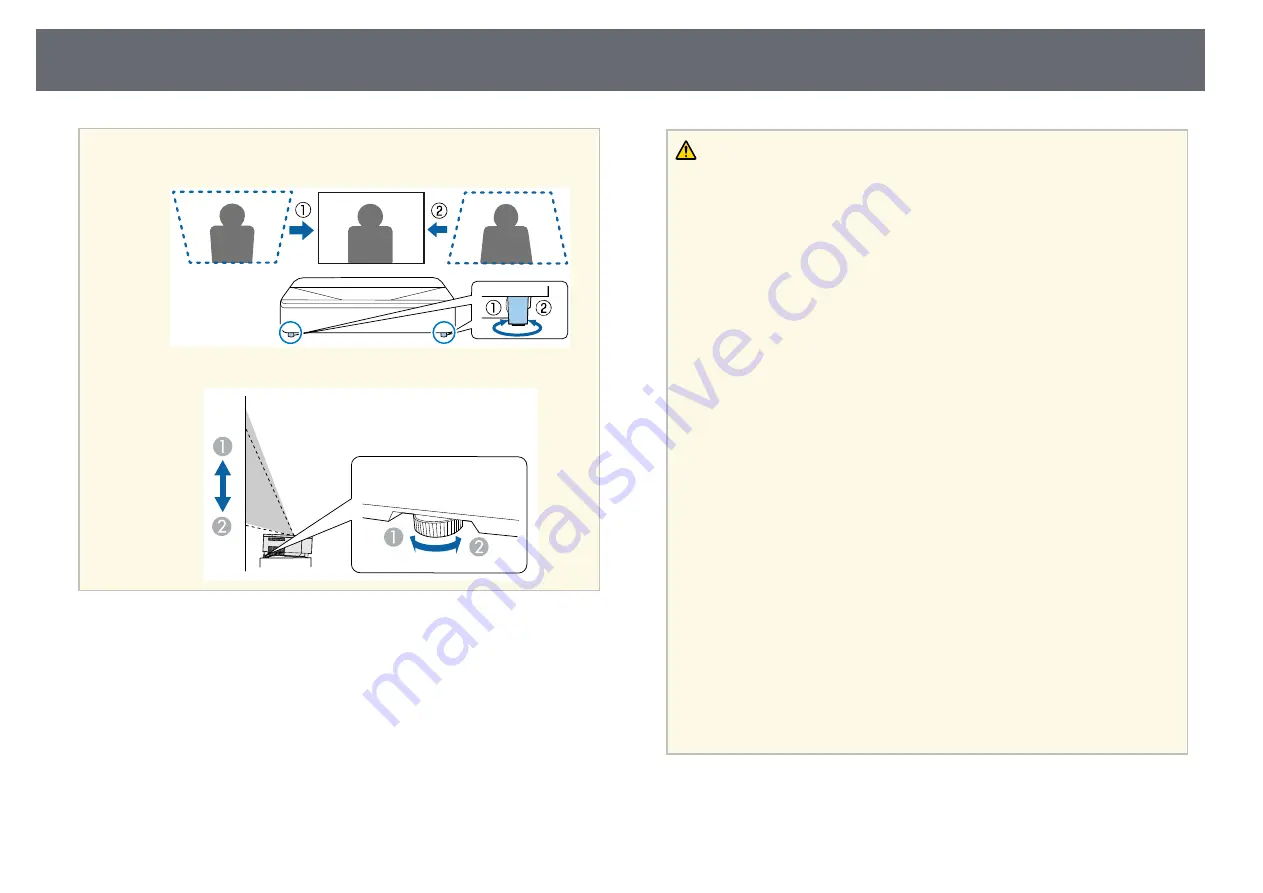
You can adjust distortion and the height of the projected image using

the front adjustable feet and rear adjustable foot.

Warning

• You must install a ceiling mount when suspending the projector from a ceiling.

If you do not install the projector correctly, it could fall and cause damage or

injury.

• A special method of installation is required when suspending the projector from

a ceiling. If you do not install the projector correctly, it could fall and cause

damage or injury.

• Do not use adhesives on the ceiling mount fixing points to prevent the screws

from loosening, or use lubricants, oils, or similar substances on the projector; the

projector case may crack causing it to fall from its ceiling mount. This could

cause serious injury to anyone under the ceiling mount and could damage the

projector.

• Failure to install the ceiling mount and projector may cause the projector to fall.

After installing the specific Epson mount that supports your projector, make

sure you secure the mount to all of the projector's ceiling mount fixing points.

Also, secure the projector and the mounts using the safety wire supplied with the

projector or an optional wire.

• Do not install the projector in a location subject to high levels of dust or

humidity, or in a location subject to smoke or steam. Otherwise, it could cause a

fire or electric shock to occur. The projector's case could also deteriorate and be

damaged causing the projector to fall from the mount.

Examples of environments that could cause the projector to fall due to case

deterioration

• Locations subject to excessive smoke or airborne oil particles, such as factories

or kitchens

• Locations containing volatile solvents or chemicals, such as factories or

laboratories

• Locations where the projector could be subjected to detergents or chemicals,

such as factories or kitchens

• Locations in which aroma oils are often used, such as relaxation rooms
• Near devices that produce excessive smoke, airborne oil particles, or foam at

events

• Locations near humidifiers

Summary of Contents for EH-LS800B

Page 1: ......

Page 2: ... Remote Control 30 Remote Control Operation 30 Setting Up Android TV on the Projector 32 Android TV Home Screen 33 Using Basic Projector Features 34 Turning On the Projector 35 Turning Off the Projector 37 Projection Modes 38 Changing the Projection Mode Using the Menus 38 Adjusting the Image Height 39 Focusing the Image Using the Focus Lever 40 Adjusting Image Color when Projecting on to a Wall 4...

Page 3: ...Feature Settings Settings Menu 81 Projector Information Display Information Menu 83 Projector Bluetooth Speaker Settings Bluetooth Speaker Mode Menu 84 Maintaining the Projector 85 Projector Maintenance 86 Cleaning the Projection Window 87 Cleaning the Obstacle Sensor and Motion Sensor 88 Cleaning the Projector Case 89 Air Filter and Vent Maintenance 90 Cleaning the Air Filter 90 Replacing the Air...

Page 4: ...Screens 110 Replacement Parts 110 Screen Size and Projection Distance 111 Supported Monitor Display Resolutions 113 Projector Specifications 114 Connector Specifications 114 External Dimensions 115 List of Safety Symbols and Instructions 116 Laser Safety Information 118 Laser Warning Labels 118 Glossary 120 Notices 121 FCC Compliance Statement 121 Indication of the manufacturer and the importer in...

Page 5: ...s Attention This label indicates procedures that may result in damage or injury if sufficient care is not taken This label indicates additional information that may be useful to know Indicates the buttons on the remote control or the projector Example button Menu Setting name Indicates projector menu and setting names Example Select the Image menu s Image Color This label indicates links to the re...

Page 6: ...ick or to view the lower level titles in that section To return to the previous page perform the following operation on your keyboard Windows Hold down Alt and then press Mac OS Hold down the command key and then press Printing only the pages you need You can extract and print only the pages you need Click Print in the File menu and then specify the pages you want to print in Pages in Pages to Pri...

Page 7: ... To specify pages that are not in series divide the pages with commas Example 5 10 15 ...

Page 8: ...Introduction to Your Projector See these sections to learn more about your projector g g Related Links Projector Parts and Functions p 9 ...

Page 9: ...ts the brightness of the surroundings and automatically adjusts the brightness of the screen Name Function C Air filter cover Open to access the air filter D Air filter cover latch Slide to remove the air filter cover E Air intake vent air filter Takes in air to cool the projector internally F Front cover Open to access the air filter cover G Remote receiver Receives signals from the remote contro...

Page 10: ... Warning Do not look into the projection window while projecting Do not place any objects or put your hand near the projection window It could cause burns fire or the object to warp because this area reaches a high temperature due to the concentrated projection light D Status indicator Indicates the projector s status E Power button Turns the projector on or off F Focus lever Adjusts the image foc...

Page 11: ...feet to correct image distortion Caution Remove all feet when you install the projector on the ceiling B Air intake vent air filter Takes in air to cool the projector internally C Wire clamp fixing point When you use the optional ceiling mount fix the carabiner here to attach the safety wire and prevent the projector from falling from the ceiling This point is marked with a on the projector D Air ...

Page 12: ...uch as a webcam microphone external HDD USB memory and receivers for microphones or game controllers Connects a commercially available RJ45 adapter to enable wired LAN connections a This port is not guaranteed to operate for all devices that support USB F HDMI3 Game port Connects a gaming device Suitable for enjoying games that require fast response times Compatible with HDCP 2 3 G HDMI1 port Inpu...

Page 13: ...e function is not supported C Apps button Displays a list of applications D Directional pad Selects menu items while displaying the projector s menu E Esc button Stops the current function Moves back to the previous menu level while displaying the projector s menu F Brightness buttons Adjusts the brightness of the projected image G Blank button Turns the video off temporarily to output sound only ...

Page 14: ...evices and more a Google Assistant is not available in certain languages and countries Availability of services varies by country and language Name Function R Source Search button Displays a list of available input sources for HDMI1 and HDMI2 S Remote control light emitting area Outputs remote control signals When the input source is set to HDMI3 Game these buttons are not available g g Related Li...

Page 15: ...ons to set up your projector g g Related Links Projector Placement p 16 Installing the Safety Wire p 21 Projector Connections p 24 Attaching and Removing the Side Cover p 29 Installing Batteries in the Remote Control p 30 Setting Up Android TV on the Projector p 32 ...

Page 16: ...us angles There is no vertical or horizontal limit to how the projector can be installed Note the following points when selecting a projector location To change the projected image size move the projector back and forth Place the projector on a sturdy level surface or install it using a compatible mount Leave plenty of space around and under the projector for ventilation and do not place it on top...

Page 17: ... installing the specific Epson mount that supports your projector make sure you secure the mount to all of the projector s ceiling mount fixing points Also secure the projector and the mounts using the safety wire supplied with the projector or an optional wire Do not install the projector in a location subject to high levels of dust or humidity or in a location subject to smoke or steam Otherwise...

Page 18: ...ocations subject to corrosive gas such as sulphuric gas from hot springs Otherwise corrosion could cause the projector to fall It could also cause the projector to malfunction Attention If you are using the projector at altitudes above 1 500 m set the High Altitude Mode setting to On in the projector s menu to ensure the projector s internal temperature is regulated properly Try not to setup the p...

Page 19: ...e with this projector Install the projector appropriately to prevent it from falling down Use M4 screws up to a depth of 9 mm to fix the projector s ceiling mount fixing points and the mounting hardware at four points Installation space Attention Be sure to leave the following amount of space around the projector so as not to block the air exhaust and intake vents A 2 3 cm B 20 cm C 10 cm ...

Page 20: ...side by side Attention If you are installing multiple projectors next to each other make sure hot air from the exhaust vent does not go into the air intake vent of another projector A 110 cm If you use a partition you can narrow the space between the projectors B 20 cm Partition ...

Page 21: ...d to remove the front adjustable feet and the rear adjustable foot from the projector Also make sure you have securely attached the ELPMB22 ceiling mount to the projector and have the following items that are included in the safety wire set Safety wire 1 Carabiner 2 Only one carabiner is used for the ELPMB22 Wire clamp 1 Attaching screw M4 10 mm 1 a For details on installing the ELPMB22 see the Ce...

Page 22: ...for the ELPMB30 ceiling mount to the projector and have the following items that are included in the safety wire set Safety wire 1 Carabiner 2 Only one carabiner is used for the ELPMB30 Wire clamp 1 Attaching screw M4 10 mm 1 a For details on installing the ELPMB30 see the ELPMB30 User s Guide a Attach the wire clamp to the carabiner and then use the screw to fix the wire clamp to the screw into t...

Page 23: ...Installing the Safety Wire 23 c Tighten the carabiner lock ...

Page 24: ...If your video source has an HDMI port you can connect it to the projector using an HDMI cable and send the image source s audio with the projected image Attention Do not turn on the video source before connecting it to the projector Doing so could damage the projector a If the port on the device you connect has an unusual shape use the cable supplied with the device or an optional cable to connect...

Page 25: ...may not operate correctly We recommend using a USB cable that is three meters or less If you use a USB hub the device may not operate correctly We recommend checking the operation in advance c Connect the other end to your device if necessary Connecting to External Audio Devices If your amplifier or speaker has an optical digital audio input port you can connect it to the projector using an optica...

Page 26: ...into two parts side cover A and side cover B This allows you to use just side cover A if necessary such as when you want to connect a streaming media player Connecting to an ARC Compatible AV System If your AV system or speakers such as a sound bar has an HDMI port you can connect them to the projector using an HDMI cable with Ethernet to output audio to these devices a Connect the HDMI cable to y...

Page 27: ...Support Specification for ARC audio supported formats You cannot output sound from the HDMI2 ARC port when the input source is set to HDMI3 Game g g Related Links Detailed Sound Settings p 58 Connecting to a Gaming Device If your gaming device has an HDMI port you can connect it to the projector s HDMI3 Game port using an HDMI cable and send the gaming device s audio with the projected image The p...

Page 28: ...Audio Out port only supports 3 pin headphones If you use any other headphones audio may not be output normally a Connect the stereo headphone s mini jack cable to the projector s Audio Out port Caution Do not start a playback at a high volume setting Sudden loud noises may cause hearing loss Always lower the volume before powering off so that you can power on and then gradually increase the volume...

Page 29: ...ly available cable tie through the cable holder and tie the cables together Caution Do not bundle the power cord to the other cables Otherwise a fire may occur c Replace the side cover a The side cover can be divided into two parts side cover A and side cover B This allows you to use just side cover A if necessary such as when you want to connect a streaming media player ...

Page 30: ...ulations c Insert the batteries with the and ends facing as shown Warning Check the positions of the and marks inside the battery holder to ensure the batteries are inserted the correct way If the batteries are not used correctly they could explode or leak causing a fire injury or damage to the product d Replace the battery cover and press it down until it clicks into place g g Related Links Remot...

Page 31: ... at the projector s receivers within the distance and angles listed here a The projector may not respond to commands if you use the remote control in conditions with bright fluorescent lights or in direct sunlight If you are not going to use the remote control for a long time remove the batteries ...

Page 32: ... the necessary settings d When the language selection screen is displayed select the language you want to use e When the Wi Fi setting screen is displayed select the wireless network you want to use and then follow the on screen instructions to make necessary settings An internet connection is required to view online content Make sure you can use the Wi Fi service The customer is responsible for a...

Page 33: ...lications and projector settings from the home screen Description A Displays the Settings menu You can select various settings such as Wi Fi setting language setting and Google Account information B Displays a list of available input sources C Displays the applications downloaded on the projector You can add applications to this list by selecting the icon D Displays the online content recommended ...

Page 34: ...p 41 Correcting Distortion in the Image p 42 Adjusting the Light Source Brightness Based on the Brightness of Your Surroundings p 44 Adjusting the Light Source Brightness Manually p 45 Adjusting Contrast Based on the Brightness of the Content p 46 Selecting an Image Source p 48 Image Aspect Ratio p 49 Color Mode p 51 Adjusting the Image Quality p 53 Controlling the Volume with the Volume Buttons p...

Page 35: ...The projector enters standby mode This indicates that the projector is receiving power but is not yet turned on c Press the power button on the projector or remote control to turn on the projector The status indicator flashes blue as the projector warms up Once the projector is warmed up the status indicator stops flashing and turns blue The first time you turn on the projector the remote control ...

Page 36: ...ck the light from the projector with a book or other objects If the light from the projector is blocked the area on which the light shines becomes hot which could cause it to melt burn or start a fire Also the lens may get hot due to the reflected light which could cause the projector to malfunction To stop projection turn off the projector a When using at an altitude of 1 500 m or more set High A...

Page 37: ...r time The operation performed by the power button depends on the setting made in Power Button Setting from the projector s Settings menu a Press the power button on the projector or remote control The light source turns off and the status indicator turns off b To transport or store the projector make sure the status indicator on the projector is off and then unplug the power cord g g Related Link...

Page 38: ...n g g Related Links Changing the Projection Mode Using the Menus p 38 Projector Setup and Installation Options p 18 Changing the Projection Mode Using the Menus You can change the projection mode to flip the image over top to bottom and or left to right using the projector menus a Turn on the projector and display an image b Press the button on the remote control a This button is not available whe...

Page 39: ...the angle of tilt the harder it becomes to focus Locate the projector so that it only needs to be tilted at a small angle a Turn on the projector and display an image b Rotate the rear feet to adjust the image height A Extend the rear foot B Retract the rear foot If the projected image is unevenly rectangular you need to adjust the image shape g g Related Links Correcting Distortion in the Image p...

Page 40: ...Image Using the Focus Lever 40 You can correct the focus using the focus lever a Turn on the projector and display an image b Remove the side cover c Move the focus lever to adjust the focus d Replace the side cover ...

Page 41: ...jector and display an image b Press the button on the remote control a This button is not available when the input source is set to HDMI3 Game Press the button on the remote control to return to the Android TV home screen and then perform the procedure c Select the Installation menu and press the Enter button d Select Adjust color and press the Enter button e Select the color that is closest to th...

Page 42: ...een The customer is responsible for any communication charges incurred when downloading the app a Turn on the projector and display an image b Press the button on the remote control a This button is not available when the input source is set to HDMI3 Game Press the button on the remote control to return to the Android TV home screen and then perform the procedure c Select the Installation menu and...

Page 43: ...Correcting Distortion in the Image 43 g g Related Links Projector Installation Settings Installation Menu p 80 ...

Page 44: ... varies relative to the manually set value This function may not work properly if you use the projector in conditions with bright fluorescent lights or in direct sunlight a Turn on the projector and display an image b Press the button on the remote control a This button is not available when the input source is set to HDMI3 Game Press the button on the remote control to return to the Android TV ho...

Page 45: ...not available under the following conditions When the light source brightness dims if the surrounding temperature gets too high When a problem has occurred a Turn on the projector and display an image b To decrease or increase the light output press the or button on the remote control A light output gauge is displayed on the screen ...

Page 46: ...on on the remote control a This button is not available when the input source is set to HDMI3 Game Press the button on the remote control to return to the Android TV home screen and then perform the procedure c Select the Picture menu and press the Enter button d Select Dynamic Contrast and press Enter e Select one of the following options and press Enter High Speed to adjust brightness as soon as...

Page 47: ...Adjusting Contrast Based on the Brightness of the Content 47 g g Related Links Image Quality Settings Picture Menu p 76 ...

Page 48: ...rol Next select the source you want to use from the screen displayed If you want to switch the image source to HDMI3 Game press the button on the remote control If you want to switch the image source to the Android TV home screen press the button on the remote control a When the input source is set to HDMI3 Game some buttons on the remote control are not available When no image signal is detected ...

Page 49: ...ks Changing the Image Aspect Ratio p 49 Available Image Aspect Ratios p 50 Changing the Image Aspect Ratio You can change the aspect ratio of the displayed image a Turn on the projector and display an image b Press the button on the remote control a This button is not available when the input source is set to HDMI3 Game Press the button on the remote control to return to the Android TV home screen...

Page 50: ... commercial purposes or for public viewing may infringe upon the rights of the copyright holder of that image based on copyright law Aspect mode Description Normal Displays images using the full projection area and maintains the aspect ratio of the image Full Displays images using the full size of the projection area but does not maintain the aspect ratio Zoom Displays images using the full width ...

Page 51: ...olor Mode using the remote control to optimize the image for your viewing environment a Turn on the projector and display an image b Press the button on the remote control a This button is not available when the input source is set to HDMI3 Game Press the button on the remote control to return to the Android TV home screen and then perform the procedure c Select the Picture menu and press the Ente...

Page 52: ...ronment and image types Color mode Description Dynamic This is the brightest mode Best for prioritizing brightness Vivid Best for enjoying content with bright colors Cinema Best for enjoying content such as movies Natural Reproduces natural colors This is the best option when you want to adjust the image color ...

Page 53: ...e Scene Adaptive Gamma setting a Turn on the projector and display an image b Press the button on the remote control a This button is not available when the input source is set to HDMI3 Game Press the button on the remote control to return to the Android TV home screen and then perform the procedure c Select the Picture menu and press the Enter button d Select Custom Settings and press Enter e Sel...

Page 54: ...l a Turn on the projector and switch to the image source you want to use b Press the button on the remote control a This button is not available when the input source is set to HDMI3 Game Press the button on the remote control to return to the Android TV home screen and then perform the procedure c Select the Picture menu and press the Enter button d Adjust each setting in the projector s Picture ...

Page 55: ...iate image frame between them a Frame Interpolation is available when the image source is anything except for HDMI3 Game a Turn on the projector and switch to the image source you want to use b Press the button on the remote control c Select the Picture menu and press the Enter button d Select Frame Interpolation and press Enter e Select the level of interpolation and press Enter f Press to exit t...

Page 56: ...e the volume press the or button on the remote control A volume gauge appears on the screen Caution Do not start a playback at a high volume setting Sudden loud noises may cause hearing loss Always lower the volume before powering off so that you can power on and then gradually increase the volume g g Related Links Projector Feature Settings Settings Menu p 81 ...

Page 57: ...tor s speaker a Turn on the projector and start a video b Press the button on the remote control a This button is not available when the input source is set to HDMI3 Game Press the button on the remote control to return to the Android TV home screen and then perform the procedure c Select the Sound menu and press the Enter button d Select Sound Mode and press Enter e Select your sound mode and pre...

Page 58: ...s depending on your listening environment Setting Description Virtual Surround Adjusts the strength of the surround effect This setting is saved for each Sound Mode Clear Voice Adjusts the voice so that it can be heard clearly This setting is saved for each Sound Mode Auto Loudness Even when playing at low volumes this automatically corrects the balance between high and low tones in the audio so t...

Page 59: ... an external audio device connected to the Optical Out port Optical Digital Audio Outputs higher quality sound to an external audio device connected to the Optical Out port Digital Audio supports the following audio codecs PCM 2 ch AC 3 up to 5 1 ch DTS up to 5 1 ch a If sound is not output correctly select PCM Setting Description Audio Output Latency Adjusts the audio latency If the audio is fast...

Page 60: ...Turning Off the Sound Temporarily Audio Mute 60 You can temporarily mute the sound a Press the button on the remote control to temporarily mute the sound b To turn the sound back on press again ...

Page 61: ... feature is useful when you want to use the projector as a speaker a Press the button on the remote control to temporarily stop projection b To turn the image back on press the button again a Any video action continues to run however so you cannot resume projection at the point that you stopped it ...

Page 62: ...ize or Position Flexible Picture p 63 Flipping the Image Horizontally Flexible Picture p 64 Blurring the Edges of the Image Flexible Picture p 65 Using the Projector as a Bluetooth Speaker p 66 Using Your Projector as Chromecast p 68 HDMI CEC Features p 69 Installing a Security Cable p 71 Updating Projector Firmware p 72 Initializing the Projector p 73 ...

Page 63: ...trol to display the Flexible Picture menu a You cannot use this button when displaying the Installation menu c Press the or button on the remote control to adjust the image size a You can reduce the image size to 30 d Use the directional pad to change the position of the image e Press to close the Flexible Picture menu a You can reset all settings in the Flexible Picture menu by pressing the butto...

Page 64: ...isplay the Flexible Picture menu a You cannot use this button when displaying the Installation menu c Press the button again to flip the projected image horizontally a You can reset the function by pressing the button again d Press to close the Flexible Picture menu a You can reset all settings in the Flexible Picture menu by pressing the button while displaying the Flexible Picture menu ...

Page 65: ...e button on the remote control to display the Flexible Picture menu a You cannot use this button when displaying the Installation menu c Press the button to blur the edges of the projected image a You can reset the function by pressing the button again d Press to close the Flexible Picture menu a You can reset all settings in the Flexible Picture menu by pressing the button while displaying the Fl...

Page 66: ...es displayed when pressing the button on the remote control When you want to enjoy the sound only from the projector you can temporarily turn off the projected image by pressing the button on the remote control To cancel a Bluetooth connection disconnect from the connected device e To exit Bluetooth Speaker Mode set it to Off a There is a slight delay in the audio output from any Bluetooth device ...

Page 67: ...ing on the standard and type of device Even when connecting within the specified communication distance connections can be lost due to the status of the signal The communication method for Bluetooth uses the same frequency 2 4 GHz as wireless LAN IEEE802 11b g n or microwave ovens Therefore if these devices are used at the same time radio wave interference may occur the audio may be interrupted or...

Page 68: ...wireless network as the projector b Open the Chromecast enabled app and press c Select your projector from the list of devices a By default the name of the projector is Projector To select another name or use a custom name press the button on the remote control The app connects and starts casting to the projector d To stop casting press in the app and choose the disconnect option ...

Page 69: ... properly even if they meet the HDMI CEC standard See the documentation supplied with the device for more information Use a cable that supports the HDMI standard a Press the button on the remote control a This button is not available when the input source is set to HDMI3 Game Press the button on the remote control to return to the Android TV home screen and then perform the procedure b Select the ...

Page 70: ...ARC compatible AV system set HDMI2 ARC to On f Press to exit the menus You can use the projector s remote control to control the linked device such as playback stop or adjust the volume g g Related Links Projector Feature Settings Settings Menu p 81 ...

Page 71: ...ecurity Cable 71 You can use the security slot on the projector to attach a Kensington Microsaver Security system as a theft deterrent a For more details on the Microsaver Security System see http www kensington com ...

Page 72: ...ions to update the firmware a Press the button on the remote control a This button is not available when the input source is set to HDMI3 Game Press the button on the remote control to return to the Android TV home screen and then perform the procedure b Select from the application list and press the Enter button c Follow the on screen instructions to update the firmware Caution Do not turn off th...

Page 73: ...ion such as installed applications Google Account login information and Projector Settings are deleted Write down the settings you do not want to lose before performing initialization a Press the button on the remote control b Select Device Preferences and select the reset menu c Follow the on screen instructions to start initializing the projector ...

Page 74: ...ted Links Using the Projector Settings p 75 Image Quality Settings Picture Menu p 76 Sound Quality Settings Sound Menu p 78 Projector Installation Settings Installation Menu p 80 Projector Feature Settings Settings Menu p 81 Projector Information Display Information Menu p 83 Projector Bluetooth Speaker Settings Bluetooth Speaker Mode Menu p 84 ...

Page 75: ... Game Press the button on the remote control to return to the Android TV home screen and then perform the procedure You see the Projector Settings on the screen b Use the directional pad to move through the menus listed on the screen c To change settings in the displayed menu press the Enter button d Use the directional pad to move through the settings e Change the settings using the buttons as ne...

Page 76: ...e Dynamic Vivid Cinema Natural Selects the color mode suitable for the contents you are projecting Color Temperature Varying levels available Sets the color temperature according to the color mode you selected Higher values tint the image blue and lower values tint the image red Noise Reduction Strong Standard Weak Off Reduces flickering in analog images Select the intensity of the Noise Reduction...

Page 77: ...t source is set to HDMI3 Game this setting is fixed to 2 Aspect Ratio Normal Full Zoom Sets the aspect ratio width to height ratio for the input source When the input source is set to HDMI3 Game this setting is fixed to Normal HDMI Video Range Auto Full Limited Sets the video range to match the setting of the device connected to the HDMI port When the input source is set to HDMI3 Game this setting...

Page 78: ...tion Virtual Surround High Low Off Adjusts the strength of the surround effect This setting is saved for each Sound Mode Clear Voice High Low Off Adjusts the voice so that it can be heard clearly This setting is saved for each Sound Mode Auto Loudness On Off Even when playing at low volumes this automatically corrects the balance between high and low tones in the audio so that they are not out of ...

Page 79: ...that is output from the projector s HDMI2 ARC port varies depending on the input source When the input source is HDMI audio is output up to 5 1 ch AC 3 or DTS When playing Android TV contents audio is output in 2 ch PCM Setting Options Description HDMI3 Game Speaker PCM Outputs sound in PCM format 2 ch to the projector s speakers Optical PCM Outputs sound in PCM format 2 ch to an external audio de...

Page 80: ...n Setting Assistant app Correct the position of the four corners of the projected image or fine tune point correction using a remote control Correct the top of the projected image so that it is straight by using a remote control correct the bottom of the projected image when the projector is installed on the ceiling Compensate the color of the projected image to match colored walls a When you use ...

Page 81: ...t source is set to HDMI3 Game this setting is not available High Altitude Mode On Off Regulates the projector s operating temperature at altitudes above 1 500 m HDMI CEC CEC Control Enables CEC Control features when an audio video device that meets the HDMI CEC standard is connected to the projector s HDMI port HDMI CEC Select On to control the connected audio video device using the projector s re...

Page 82: ...tdown Sets the operation performed by the projector when you press the power button Suspend Starts the projector quickly from standby mode Shutdown Minimizes power consumption in standby mode However it takes longer to start the projector than when in Suspend mode g g Related Links HDMI CEC Features p 69 ...

Page 83: ...statements and set whether or not to allow the acquisition of operation logs Information item Description License Agreement Displays the license agreement Privacy Statement Displays the privacy statement Projector Operation Log Information Sets whether or not to allow Epson to acquire projector operation logs ...

Page 84: ...ode Menu 84 You can use the projector s speaker to output audio from an external device connected by Bluetooth Options Description On Off Select On to use the projector as a Bluetooth speaker g g Related Links Using the Projector as a Bluetooth Speaker p 66 ...

Page 85: ...s in these sections to maintain your projector g g Related Links Projector Maintenance p 86 Cleaning the Projection Window p 87 Cleaning the Obstacle Sensor and Motion Sensor p 88 Cleaning the Projector Case p 89 Air Filter and Vent Maintenance p 90 ...

Page 86: ...ntilation The only parts you should replace are the air filter and remote control batteries If any other part needs replacing contact Epson or an authorized Epson servicer Warning Before cleaning any part of the projector turn it off and unplug the power cord Never open any cover on the projector except as specifically explained in this manual Dangerous electrical voltages in the projector can inj...

Page 87: ...ection window Warning Before cleaning the projection window turn off the projector and unplug the power cord Do not use any flammable gas sprays such as air dusters to blow off dust The high heat generated by the projector may cause a fire Attention Do not wipe the projection window right after you turn off the projector Doing so could damage the projection window Do not use any harsh materials to...

Page 88: ...To remove dust or smudges gently wipe the sensors with lens cleaning paper Warning Do not use a lens cleaner that contains flammable gas to clean the obstacle sensor and motion sensor The high heat generated by the projector may cause a fire Attention Do not use glass cleaner or any harsh materials to clean the sensors and do not subject the sensors to any impacts Damage to the surface of the sens...

Page 89: ... a soft dry lint free cloth To remove stubborn dirt use a soft cloth moistened with water and mild soap Do not spray liquid directly on the projector Attention Do not use wax alcohol benzene paint thinner or other chemicals to clean the projector case These can damage the case Do not use canned air or the gases may leave a flammable residue ...

Page 90: ...e is not performed your Epson projector will notify you when the temperature inside the projector has reached a high level Do not wait until this warning appears to maintain your projector filter as prolonged exposure to high temperatures may reduce the life of your projector g g Related Links Cleaning the Air Filter p 90 Replacing the Air Filter p 91 Cleaning the Air Intake Vents p 93 Cleaning th...

Page 91: ...tabs facing down as shown Attention Do not force the air filter cover to close with the tabs on the air filter facing up Doing so could damage the projector g Insert the air filter cover until it clicks into place h Replace the front cover Replacing the Air Filter You need to replace the air filter in the following situations After cleaning the air filter you see a message telling you to clean or ...

Page 92: ...of used air filters according to local regulations Filter frame Polypropylene Filter Polypropylene PET e Place the new air filter with the four tabs facing down as shown Attention Do not force the air filter cover to close with the tabs on the air filter facing up Doing so could damage the projector f Insert the air filter cover until it clicks into place g Replace the front cover ...

Page 93: ...he projector s air intake vents periodically or whenever you notice dust on the surface of the vents to prevent the projector from overheating due to blocked ventilation a Turn off the projector and unplug the power cord b Turn the projector upside down c Carefully remove the dust using a vacuum cleaner or a brush ...

Page 94: ... Projection Problems p 95 Projector Indicator Status p 96 Solving Projector Power On or Power Off Problems p 98 Solving Image Problems p 99 Solving Sound Problems p 103 Solving Remote Control Operation Problems p 105 Solving HDMI CEC Problems p 106 Solving Wi Fi Network Problems p 107 Solving Android TV Problems p 108 ...

Page 95: ...projector may indicate the problem The solutions in this manual can help you solve many problems If none of these solutions help contact Epson for technical support a After repairing the projector Epson may return the projector to you in its initial status Make sure you make a note of the account information of each online service before you contact your local dealer or the nearest Epson repair ce...

Page 96: ...n or replace the air filter If operating the projector at high altitude set the High Altitude Mode setting to On in the projector s menu s Settings High Altitude Mode If the problem persists unplug the projector and contact Epson for help Obstacle detection warning A beep sounds and the message Playback has been stopped for safety reasons Move away from the lens or remove any obstacles around the ...

Page 97: ...g it and contact Epson for help Obstacle detection error If there are no obstacles interfering with the projection window turn the projector off unplug it and contact Epson for help Internal projector error Turn the projector off unplug it and contact Epson for help g g Related Links Projector Feature Settings Settings Menu p 81 Cleaning the Air Filter p 90 Replacing the Air Filter p 91 Cleaning t...

Page 98: ... the Remote Control p 30 Solving Projector Shutdown Problems If the projector turns off unexpectedly try the following steps until the problem is solved a The projectors may have entered standby mode after the interval of time specified in Sleep Timer in the projector s Settings menu has passed Press the power button on the projector or remote control to wake the projector a After waking the proje...

Page 99: ...sure you have selected the appropriate EDID setting in the projector s Picture menu according to the standards supported by the video equipment image signals and HDMI cables d Check the status of your video source If you are projecting from a streaming media player make sure it is powered by the power supply USB cable on the projector Turn on the connected streaming media player or video source an...

Page 100: ...d a If you adjusted the size of the projected image press the button on the remote control to display the Flexible Picture menu and then press the button until the projected image is the right size g g Related Links Changing the Image Size or Position Flexible Picture p 63 Adjusting a Fuzzy or Blurry Image If the projected image is fuzzy or blurry try the following steps until the problem is solve...

Page 101: ...electronic interference noise or static try the following steps until the problem is solved a Check the cables connecting your video source to the projector They should be Separated from the power cord to prevent interference Securely connected at both ends Not connected to an extension cable b Adjust the Noise Reduction setting in the projector s Picture menu c If you adjusted the image shape usi...

Page 102: ...Aspect Ratio e Make sure you selected the correct HDMI Video Range HDR or EDID setting in the projector s Picture menu if available for your image source f When you are projecting your image onto a wall try different wall color types for the image and environment by selecting the Adjust color setting in the projector s Installation menu g Make sure all the cables are securely connected to the proj...

Page 103: ...dio device using an HDMI cable try the following solutions Make sure the HDMI cable is connected to the projector s HDMI2 ARC port Make sure the sound is output from the projector s speaker or Optical Out port Set HDMI CEC to On in the Settings menu s Settings HDMI CEC CEC Control Set HDMI2 ARC to On in the Settings menu s Settings HDMI CEC CEC Control Set Other Than HDMI3 Game to ARC Optical PCM ...

Page 104: ...or and change their positions to improve communication Make sure the connected Bluetooth audio device is within the specified communication distance Avoid using the projector near wireless networks microwave ovens 2 4 GHz cordless phones or other devices that use the 2 4 GHz frequency band These devices can interfere with the signal between the projector and the Bluetooth audio device g g Related ...

Page 105: ...de Release the button to wake the remote control up d Make sure you are operating the remote control within the reception angle and range of the projector e Check the status indicator to confirm that the projector is in normal operating status f Strong fluorescent lighting direct sunlight or infrared device signals may be interfering with the projector s remote receivers Dim the lights or move the...

Page 106: ...HDMI CEC CEC Control d Make sure all the cables are securely connected to the projector and your video equipment a Make sure you connect the HDMI cable to the projector s HDMI2 ARC port e Make sure the connected devices are turned on and in standby status See the documentation supplied with the device for more information f If you connect a new device or change the connection set the CEC function ...

Page 107: ...etwork connection problem b Check for obstacles between the Wi Fi router and the projector and change their positions to improve communication c You can check the network settings from the menu displayed when you press button on the remote control d If you initialize the projector you need to select the network settings again on the initial setup screen g g Related Links Initializing the Projector...

Page 108: ...Solving Android TV Problems 108 See the following page for issues regarding Android TV https support google com androidtv ...

Page 109: ...elated Links Optional Accessories and Replacement Parts p 110 Screen Size and Projection Distance p 111 Supported Monitor Display Resolutions p 113 Projector Specifications p 114 External Dimensions p 115 List of Safety Symbols and Instructions p 116 Laser Safety Information p 118 Glossary p 120 Notices p 121 ...

Page 110: ...se when installing the projector on a ceiling Safety Wire Set ELPWR01 Use when connecting the projector to the installation mount to prevent the projector from falling down Ceiling pipe 450 mm ELPFP13 Ceiling pipe 700 mm ELPFP14 Use when installing the projector on a high ceiling a Special expertise is required to suspend the projector from a ceiling Contact Epson for help External Devices Streami...

Page 111: ...de 80 177 100 27 8 2 3 10 8 110 4 90 199 112 31 6 6 12 9 124 9 100 221 125 35 3 9 8 14 9 139 4 16 9 screen size A B C D Wide 110 244 137 39 13 5 16 9 153 9 120 266 149 42 8 17 3 19 168 4 130 288 161 46 5 21 21 182 9 150 332 187 54 28 5 25 1 211 9 4 3 screen size A B C D Wide 66 134 101 28 1 2 6 11 111 6 70 142 107 29 9 4 4 12 118 7 80 163 122 34 5 9 14 5 136 4 90 183 137 39 1 13 6 17 154 1 100 203...

Page 112: ...Screen Size and Projection Distance 112 g g Related Links Changing the Image Size or Position Flexible Picture p 63 ...

Page 113: ...Supported Monitor Display Resolutions 113 See the Supplemental A V Support Specification for detailed information on compatible refresh rates and resolutions for each compatible video display format ...

Page 114: ...of 0 to 2 286 m 0 to 40 C Humidity of 20 to 80 No condensation Altitude of 2 287 to 3 048 m 0 to 35 C Humidity of 20 to 80 No condensation Storage temperature 10 to 60 C Humidity of 10 to 90 No condensation Mass Approx 12 3 kg Pixel shifting technology achieves 4K resolution on screen Approximate time until the light source brightness decreases to half of its original value Assuming the projector ...

Page 115: ...External Dimensions 115 A Center of the projection window The unit in these illustrations is mm ...

Page 116: ...ntify the positive and negative connections the polarity on a piece of equipment to which a d c power supply may be connected No Symbol mark Approved standards Description I The same as No 8 J IEC60417 No 5001B Battery general On battery powered equipment To identify a device for instance a cover for the battery compartment or the connector terminals K IEC60417 No 5002 Positioning of cell To ident...

Page 117: ...njury such as electric shock if the equipment is disassembled X IEC60417 No 5266 Standby partial standby To indicate that part of the equipment is in the ready status Y ISO3864 IEC60417 No 5057 Caution movable parts To indicate that you must keep away from movable parts according to protection standards Z IEC60417 No 6056 Caution Moving Fan Blades As a safety precaution stay away from the moving f...

Page 118: ...not disassemble the projector when disposing of it Dispose according to your local or national laws and regulations a The projector uses a laser as the light source The laser has the following characteristics Depending on the surroundings the brightness of the light source may decline The brightness declines a lot when the temperature gets too high The brightness of the light source declines the l...

Page 119: ...or Children must be accompanied by an adult Do not look into the lens during projection Also do not look into the lens using optical devices such as a magnifying glass or telescope This could cause visual impairment For North South America This projector is a Class 1 laser product that complies with the IEC EN60825 1 2014 international standard for lasers Follow these safety instructions when usin...

Page 120: ...oject images protected with updated or revised versions of HDCP encryption HDMI An abbreviation for High Definition Multimedia Interface HDMI is a standard aimed at digital consumer electronics and computers This is the standard by which HD images and multichannel audio signals are digitally transmitted By not compressing the digital signal the image can be transferred at the highest quality possi...

Page 121: ...rference and 2 this device must accept any interference received including interference that may cause undesired operation This equipment has been tested and found to comply with the limits for a Class B digital device pursuant to Part 15 of the FCC Rules These limits are designed to provide reasonable protection against harmful interference in a residential installation This equipment generates u...

Page 122: ...orporation in the United States and or other countries Google Google Play Android TV Chromecast built in and other marks are trademarks of Google LLC Google Assistant is not available in certain languages and countries Availability of services varies by country and language Manufactured under license from Dolby Laboratories Dolby Dolby Audio and the double D symbol are trademarks of Dolby Laborato...

Page 123: ...y with Seiko Epson Corporation s operating and maintenance instructions Seiko Epson Corporation shall not be liable against any damages or problems arising from the use of any options or any consumable products other than those designated as Original Epson Products or Epson Approved Products by Seiko Epson Corporation The contents of this guide may be changed or updated without further notice Illu...

Reviews: