background image

Options and Consumables

139

6

6

6

6

6

6

6

6

6

6

6

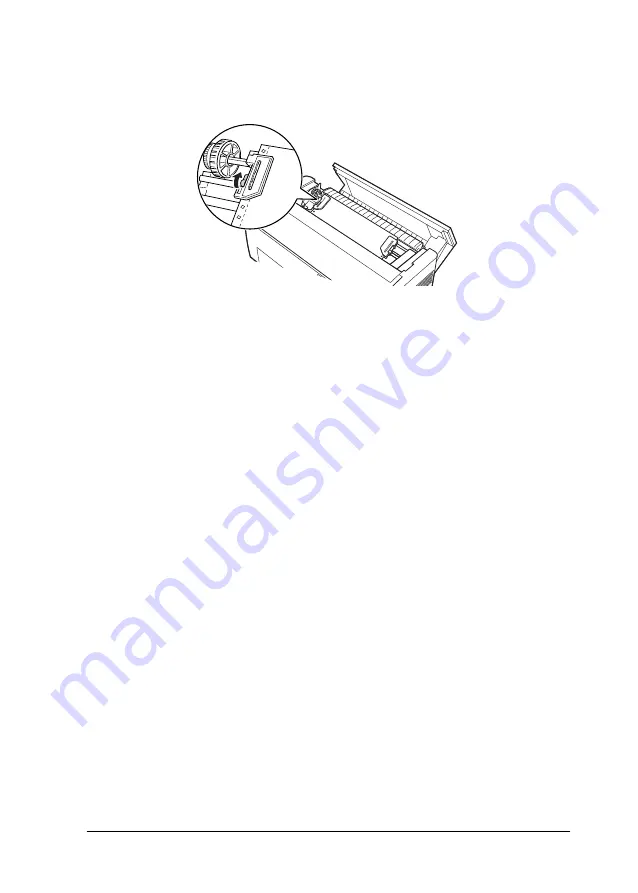
9. Adjust the two sprockets until the paper is straight and 

smooth, and then lock the sprockets into place.

c

Caution:

Be sure the sprockets are not too far apart. Your paper could 
jam if they pull the paper too tightly or tear the edges of the 
paper holes. To remove any excess tension in your paper, 
release the right sprocket and lock it again.

10. Adjust the top-of-form position, if necessary. See “Adjusting 

the top-of-form position” on page 29 for instructions.

11. Close the back cover. Press the 

LF/FF Load

 button to feed the 

paper out the back of the printer. Make sure the edge of the 
first sheet emerges below the paper separator.

Summary of Contents for C11C605001 - DFX 9000 B/W Dot-matrix Printer

Page 1: ...accident misuse or abuse of this product or unauthorized modifications repairs or alterations to this product or excluding the U S failure to strictly comply with Seiko Epson Corporation s operating and maintenance instructions Seiko Epson Corporation shall not be liable for any damages or problems arising from the useofanyoptionsorany consumable productsotherthanthose designated asOriginal Epson ...

Page 2: ...2 ...

Page 3: ...em 13 Positioning the paper supply 14 Supported paper types 15 Loading Paper Onto the Front Tractor 15 Loading Paper Onto the Rear Tractor 22 Adjusting the Paper Position 28 Adjusting the top of form position 29 Adjusting the printing position 31 Adjusting the label position 32 Tearing Off the Printed Pages 33 Using the Tear Off button 33 Adjusting the tear off position 34 Switching Between Front ...

Page 4: ...the Start menu 50 Changing the Printer Settings 53 Using EPSON Status Monitor 3 56 Setting up Status Monitor 3 57 Accessing Status Monitor 3 58 Setting Up Your Printer on a Network 59 Sharing the printer 59 Setting up your printer as a shared printer 60 Setting the clients 64 Installing the printer driver from the CD ROM 72 Canceling Printing 74 Uninstalling the Printer Software 75 Chapter 4 Contr...

Page 5: ...r Jams 123 Aligning Vertical Lines in Your Printout 123 Restoring the Printer s Default Settings 125 Where To Get Help 125 Chapter 6 Options and Consumables Ribbon Cartridge 127 Replacing the Ribbon Cartridge 127 Using the Pull Tractor 133 Installing the pull tractor 133 Using the pull tractor with the front tractor 136 Using the pull tractor with the rear tractor 140 Removing the pull tractor 142...

Page 6: ...ntrol panel 159 Appendix A Product Information Printer Parts 161 Printer Specifications 163 Mechanical 163 Electronic 164 Electrical 166 Environmental 166 Paper 167 Printable area 177 Command Lists 179 EPSON ESC P control codes 179 IBM PPDS emulation control codes 180 Standards and Approvals 181 Cleaning the Printer 182 Transporting the Printer 183 Index ...

Page 7: ...important information and useful tips on the operation of your printer Hot Parts Caution Symbol Important Safety Instructions Read all of these safety instructions before using the printer and follow all warnings and instructions marked on the printer itself K This symbol is placed on the print head to indicate that it may be hot Never touch this part just after the printer has been used Let it co...

Page 8: ... slots Use only the type of power source indicated on the printer s label If you are not sure of the power supply specifications in your area contact your local power company or consult your dealer Connect all equipment to properly grounded electrical outlets Avoid using outlets on the same circuit as photocopiers or air control systems that regularly switch on and off Do not use a damaged or fray...

Page 9: ... and refer servicing to qualified service personnel under the following conditions Adjust only those controls that are covered by the operating instructions If you use the printer in Germany observe the following To provide adequate short circuit protection and over current protection for this printer the building installation must be protected by a 16 amp circuit breaker Bei Anschluss des Drucker...

Page 10: ...lded When operating the printer Adjust only those controls that are covered in the user documentation Improper adjustment of other controls may result in damage requiring extensive repair by a qualified technician Whenever you turn off the printer wait at least five seconds before turning it back on otherwise you may damage it Do not turn off the printer while it is printing the self test Always p...

Page 11: ...head may be hot let it cool for a few minutes before touching it ENERGY STAR Compliance The International ENERGY STAR Office Equipment Program is a voluntary partnership with the computer and office equipment industry to promote the introduction of energy efficient personal computers monitors printers fax machines copiers scanners and multifunction devices in an effort to reduce air pollution caus...

Page 12: ...12 Safety Instructions ...

Page 13: ...nt on continuous paper from 76 2 mm 3 inches to 419 1 mm 16 5 inches wide Your printer senses the paper width automatically When using more than two types of paper load the paper you use most often onto the front tractor The front tractor which is easier to reach will be available for the paper you change more frequently Note Before using your paper check that it matches the specifications describ...

Page 14: ... your paper supply with the paper loaded in the tractor so the paper feeds smoothly into the printer Note When loading paper from the front be sure to place the paper lower than the table or stand supporting the printer Placing the paper on the same level as the printer or higher may cause a paper jam Make sure that your stack of printed pages does not interfere with the rear tractor s paper suppl...

Page 15: ...tractor Single sheet continuous paper Multi part continuous paper Labels on continuous paper Continuous forms with labels Overlapping multi part forms Loading Paper Onto the Front Tractor Follow these steps to load paper onto the front tractor 1 Open the printer s front cover by lifting up the bottom edge until it locks in place as shown below ...

Page 16: ...by pulling each lever down cCaution Do not try to pull on or remove the elastic cord from the tractor 3 Position the left sprocket so that the sprocket pins are to the left of the arrow mark on the scale Lock it into place by pushing up the sprocket lock lever sprocket lock lever arrow mark ...

Page 17: ...ximately match the width of your paper Do not lock it in place yet 5 Slide the two paper supports so that they are spaced evenly between the two sprockets Note To use paper that is less than four inches wide remove the paper supports by pulling them off the tractor paper supports ...

Page 18: ...he sprocket pins as shown below The side of the paper that you want to print on should be facing you Now close the sprocket covers Note When loading paper from the front be sure to place the paper lower than the table or stand supporting the printer Placing the paper on the same level as the printer or higher may cause a paper jam sprocket cover ...

Page 19: ...ck the sprocket in place by pushing up the sprocket lock lever After you lock the right sprocket it may still move slightly this is normal Note Be careful not to pull the paper too tightly when adjusting the right sprocket 9 Pull the printer s front cover out slightly and lower it until it is closed sprocket lock lever ...

Page 20: ...cking instructions that are provided with the printer for more details Turning on the printer while the print head cannot move may seriously damage the mechanism 10 Turn on the printer You hear the print head move to the left and Ready appears on the LCD Also either the front or rear tractor arrow on the Tractor Select indicator lights up depending on which tractor was selected when the printer wa...

Page 21: ...ow light is red press the Front Rear button to switch to the front tractor When the printer switches tractors it also loads the paper automatically The Tractor Select indicator changes to green The paper is now loaded to the top of form position If it looks like the printing will start too high or low on the page you can adjust the paper position See Adjusting the Paper Position on page 28 for ins...

Page 22: ...g Paper Onto the Rear Tractor Follow the steps below to load paper onto the rear tractor You do not need to remove the paper from the front tractor first 1 Open the printer s back cover 2 Open the flap at the bottom back flap ...

Page 23: ...eft sprockets by pulling each lever forward cCaution Do not try to pull on or remove the elastic cord from the tractor 4 Position the right sprocket so that the sprocket pins are to the right of the arrow mark on the scale Lock it in place by pushing the sprocket lock lever back sprocket lock lever arrow mark ...

Page 24: ...24 Paper Handling 5 Now slide the left sprocket to approximately match the width of your paper Do not lock it in place yet 6 Open both sprocket covers sprocket cover ...

Page 25: ... Make sure your paper has a clean straight edge With the side of the paper you want to print on facing down feed it through the opening 8 Fit the first few holes in the paper over the sprocket pins as shown below Then close the sprocket covers ...

Page 26: ...traight and has no wrinkles Push the sprocket lock lever back to lock the sprocket in place After you lock the left sprocket it may still move slightly this is normal Note Be careful not to pull the paper too tightly when adjusting the left sprocket 10 Close the back cover and flap sprocket lock lever ...

Page 27: ... depending on which tractor was selected when the printer was turned off last 12 Check the Tractor Select indicator to see which tractor is selected If the rear tractor arrow light is red press the LF FF Load button to load the paper If the front tractor arrow light is red press the Front Rear button to switch to the rear tractor When the printer switches tractors it also loads the paper automatic...

Page 28: ...s well as the printing position at any point on the page by using the Micro Feed and Top of Form buttons The printer then remembers the new top of form position When you use the optional pull tractor you can adjust the paper position as described below Note The printing position based on the top of form position is controlled by your software To change the print position adjust your software s pri...

Page 29: ...d off reset or initialized The printer remembers separate top of form positions for the front and rear tractors When you want to temporarily change the top of form position you adjust the position using the Micro Feed buttons without entering top of form mode The printer remembers the temporary top of form position until the next time you load paper switch tractors or turn off the printer You can ...

Page 30: ... 4 Use the Micro Feed buttons to feed the paper to the desired top of form position The A on the ribbon protector shows you where the bottom edge of your first line of text will print This position is based on the first printable line of text If your software inserts a top margin of five lines your text will actually print five lines below the top of form position 5 Press the Top of Form button ag...

Page 31: ...position until the next time you load paper switch tractors or turn off the printer To adjust the printing position or top of form position follow these steps 1 Start printing your document When you reach the text that you want to align at a particular spot on the page press the Pause button to stop printing 2 Use the Micro Feed buttons to adjust the position where you want your next line of text ...

Page 32: ... raise the print head to accommodate the greater thickness as it prints over the label First use SelecType to turn on the Forms w labels setting and to define the page length if necessary for the paper loaded on the front or rear tractor See page 84 for instructions Then use Default setting mode as described on page 96 to choose the desired position for these settings Label base position Label top...

Page 33: ...r use the tear off feature to reverse feed labels overlapping multi part forms or continuous forms with labels Using the Tear Off button Whether or not the printer is in tear off mode you can use the Tear Off button to advance continuous paper to the tear off position by following these steps 1 Make sure printing has finished Then press the Tear Off button The printer advances the paper to the tea...

Page 34: ... Turn on the printer and select the desired tractor 2 Open the paper separator cover the flap on the top part of the printer s top cover This exposes the printer s tear off edge 3 Press the Tear Off button to enter the tear off mode The Tear Off light comes on and the printer feeds the paper s perforation to the printer s tear off edge ...

Page 35: ...old down either Micro Feed button to feed the paper continuously Note You can reset the tear off position only when you are in tear off mode after you press the Tear Off button once and the Tear Off light is on The printer remembers the new tear off position even after the printer is turned off reset or initialized 5 Tear off the page using the tear off edge on the printer s top cover tear off edg...

Page 36: ...me steps to switch from the rear tractor to the front tractor cCaution Never switch between tractors if labels are already loaded in the printer First remove the labels by tearing off the fresh supply below the tractor and pressing LF FF Load to eject the remaining labels Before you start make sure the printer is turned on and that the front tractor is selected the front tractor arrow on the Tract...

Page 37: ...off the document or excess paper cCaution Always tear off the printed document and any excess paper before switching tractors Never feed more than one page backward through the printer 3 Press the Front Rear button to switch to the rear tractor The front loaded paper automatically feeds back to the standby position and the rear loaded paper advances to the top of form position ...

Page 38: ... loaded in the printer Remove the labels by tearing off the fresh supply below the tractor and pressing LF FF Load to eject the remaining labels Then load the new paper See Loading Paper Onto the Front Tractor on page 15 or Loading Paper Onto the Rear Tractor on page 22 for instructions 1 If you have a printed document still in the printer use the tear off feature to tear off the document or exces...

Page 39: ...e the rear loaded paper open the printer s back cover and flap 4 Open the sprocket covers and remove the paper from the tractor 5 Load the new paper See Loading Paper Onto the Rear Tractor on page 22 or Loading Paper Onto the Front Tractor on page 15 for instructions sprocket cover ...

Page 40: ...e information When you print on multi part forms and labels the positioning of your text on the page can be critical See Adjusting the Paper Position on page 28 for more information on aligning your text You should also check both your printer and your software page length settings before you load labels or forms If you are using multi part forms or labels you may want to use the optional pull tra...

Page 41: ...Onto the Rear Tractor on page 22 for instructions The DFX 9000 can print on multi part forms that vary in thickness such as forms with labels on them or forms that overlap slightly where they are glued together These forms are thicker in the label area and in the places where they overlap or are joined together as shown below Before you print on forms with labels use SelecType to make sure the For...

Page 42: ...printer Although you must never feed labels backward you can still use the automatic paper handling features if you follow these precautions Instead of using the Tear Off button to remove printed labels press the LF FF Load button until the last printed label is at the point where you can tear it off easily Before using the Front Rear button to switch tractors or change paper remove the entire sup...

Page 43: ...ter s capabilities Epson Status Monitor 3 allows you to monitor the status of your printer alerts you when errors occur and provides you with troubleshooting tips Status Monitor 3 is automatically installed when you install the printer driver Note Network printers cannot be monitored with EPSON Status Monitor 3 in Windows 95 Before proceeding make sure you have installed the printer driver on your...

Page 44: ... Windows applications on page 45 for more information When you access the printer driver from the Start menu the printer driver settings you make apply to all your applications See Accessing the printer driver from the Start menu on page 47 for more information See Changing the Printer Settings on page 53 to check and change printer driver settings Note While many Windows applications override the...

Page 45: ...ws application 1 Select Print Setup or Print from the File menu of your application software In the Print or Print Setup dialog box displayed make sure that your printer is selected in the Name drop down list 2 Click Printer Setup Properties or Options The button you click depends on your application and you may need to click a combination of these buttons ...

Page 46: ...aper menu and tabs for the Graphics and Device Options menus These menus contain the printer driver settings 3 To view a menu click the corresponding tab at the top of the window See Changing the Printer Settings on page 53 for information on how to change the settings ...

Page 47: ...tings on page 53 for information on how to change the settings Using the Printer Driver with Windows XP 2000 and Windows NT 4 0 You can access the printer driver from your Windows applications or from the Start menu When you access the printer driver from a Windows application any settings you make apply only to the application you are using See Accessing the printer driver from Windows applicatio...

Page 48: ...Follow these steps to access the printer driver from a Windows application 1 Select Print Setup or Print from the File menu of your application software In the Print or Print Setup dialog box displayed make sure that your printer is selected in the Name drop down list Note The examples in this section are from the Windows 2000 operating system They may vary in appearance from what actually appears...

Page 49: ...p Properties or Options The button you click depends on your application and you may need to click a combination of these buttons The Document Properties window appears and you see the Layout and Paper Quality menus These menus contain the printer driver settings ...

Page 50: ...s Accessing the printer driver from the Start menu Follow these steps to access the printer driver from the Start menu 1 For Windows 2000 or NT 4 0 click Start point to Settings and click Printers For Windows XP Professional click Start then click Printers and Faxes For Windows XP Home Edition click Start point to Control Panel and click Printers and Faxes ...

Page 51: ...in Windows NT 4 0 The screen displays the Default Document Properties window which contains the Layout and Paper Quality menus These menus display the printer driver settings Note The example screens are from the Windows 2000 operating system They may vary in appearance from what actually appears on your screen however the instructions are the same ...

Page 52: ...clicking the printer icon the Properties window appears which includes menus used to make the printer driver settings 3 To view a menu click the corresponding tab at the top of the window See Changing the Printer Settings on page 53 for information on how to change the settings ...

Page 53: ...it or Landscape Paper Source Select the paper source you want to use Resolution Graphics Resolution Select the printing resolution you want The higher the resolution you select the more detailed your printout will be however increasing the resolution slows printing Dithering You can leave this option set to Fine which is the default setting or select another dithering pattern depending on the kind...

Page 54: ...ndard When None is selected the printer uses bit map images instead of the device fonts For details on which fonts are included in each table see Electronic on page 164 Print Text as Graphics Select Off when the printer uses the device fonts and select On when the printer does not use the device fonts Metafile Spooling Select whether to use EMF spooling Paper Order Select whether to print from fro...

Page 55: ...0 1 For Windows 2000 or Windows NT 4 0 click Start point to Settings and click Printers For Windows XP Professional click Start and click Printers and Faxes For Windows XP Home Edition click Start and click Control Panel then click Printers and Faxes 2 Click the EPSON DFX 9000 ESC P icon 3 Select Server Properties from the file menu 4 Check the Create a New Form checkbox 5 Type a name for the form...

Page 56: ... Note If you install the driver using the Point and Print method Status Monitor 3 may not function properly If you want to use it reinstall the driver as described in the User s Guide Before using Status Monitor 3 be sure to read the README file on the printer software CD ROM This file contains the latest information on the utility Settings Explanations EPSON Status Monitor 3 You can access EPSON ...

Page 57: ... 3 3 3 3 Setting up Status Monitor 3 1 Open the Utility menu as described on page 44 Windows Me 98 and 95 or page 47 Windows XP 2000 and Windows NT 2 Click the Monitoring Preferences button The Monitoring Preferences dialog box appears ...

Page 58: ... see the following printer status window Select Notification Displays the error item check box On Off status Turn on this check box to display the selected error notification Select Shortcut Icon The selected icon is displayed on the taskbar The setting s example is shown on the right window By clicking the shortcut icon you can access the Monitoring Preferences dialog box easily Receive error not...

Page 59: ...with the printer server The clients share the printer via the printer server Your version of Windows and your access rights on the network determine which settings you need to make for the printer server and clients Setting the printer server For Windows Me 98 or 95 see page 60 For Windows XP 2000 or Windows NT 4 0 see page 62 Setting the clients For Windows Me 98 or 95 see page 65 For Windows XP ...

Page 60: ...twork system and they should be under the same network management beforehand The examples shown on the following pages may look different than the ones on your screen depending on the version of Windows you are using Setting up your printer as a shared printer With Windows Me 98 or 95 Follow these steps to set the printer server on Windows Me 98 or 95 1 Click Start point to Settings and click Cont...

Page 61: ...s 6 Double click the Printers icon on the control panel 7 Right click your printer icon and click Sharing in the menu that appears 8 Select Shared As type the name in the Share Name box and click OK Type a Comment and Password if needed Note Do not use spaces or hyphens for the share name or an error may occur When sharing the printer be sure to set Status Monitor 3 so that the shared printer can ...

Page 62: ...o set the printer server for Windows XP 2000 or NT 4 0 Note You must access Windows XP 2000 or NT 4 0 as the Administrator of the local machine 1 For a Windows 2000 or NT 4 0 printer server click Start point to Settings and click Printers For a Windows XP Professional printer server click Start then click Printers and Faxes For Windows XP Home Edition printer server click Start click Control panel...

Page 63: ...ard or If you understand the security risks but want to share printers without running the wizard click here Then follow the on screen instructions 3 For a Windows 2000 or Windows NT 4 0 printer server select Shared as for Windows 2000 or Shared for Windows NT 4 0 then type the name in the Share name box and click OK ...

Page 64: ...e clients This section describes how to install the printer driver on the client computers by accessing the shared printer on a network Note Make sure you have set up the printer server as described on page 60 Windows Me 98 or 95 or page 62 Windows XP 2000 or NT 4 0 This section describes how to access the shared printer on a standard network system using the server Microsoft workgroup If you cann...

Page 65: ...client from the CD ROM See the following sections for details With Windows Me 98 or 95 below With Windows XP or 2000 on page 67 With Windows NT 4 0 on page 70 With Windows Me 98 or 95 Follow these steps to set Windows Me 98 or 95 clients 1 Click Start point to Settings and click Printers 2 Double click the Add Printer icon then click Next 3 Select Network printer then click Next 4 Click Browse You...

Page 66: ...ehand you need to select the new printer driver or the current printer driver When the prompt to select the printer driver appears select the printer driver according to the message If the printer server is running Windows Me 98 or 95 go to the next step For other Windows versions go to Installing the printer driver from the CD ROM on page 72 7 Check the name of the shared printer and select wheth...

Page 67: ...click Printers For Windows XP Professional clients click Start and click Printers and Faxes For Windows XP Home Edition clients click Start click Control panel then click Printers and Faxes 2 For Windows 2000 double click the Add Printer icon then click Next For Windows XP click the Add a printer in the Printer Tasks menu 3 Select Network printer for Windows 2000 or A network printer or a printer ...

Page 68: ...o browse for a printer then click Next Note You can also type the shared printer s name or network path in the Name box such as the name of the computer that is locally connected to the shared printer the shared printer s name For Windows XP select Browse for a printer then click Next ...

Page 69: ...lient beforehand you need to select either the new printer driver or the current printer driver When the prompt to select the printer driver appears select the printer driver according to the message If the printer server is running Windows XP or 2000 go to the next step If the printer server is not running Windows XP or 2000 go to Installing the printer driver from the CD ROM on page 72 6 For Win...

Page 70: ...ws NT 4 0 Follow the steps below to set Windows NT 4 0 clients You must have Administrator rights check with your Network Administrator 1 Click Start point to Settings and click Printers 2 Double click the Add Printer icon 3 Select Network printer server then click Next ...

Page 71: ...ged by the computer or server that is connected to the shared printer Confirm the name of the shared printer by asking the administrator of the network If the printer driver is installed in the client beforehand you need to select the new printer driver or the current printer driver When the prompt to select the printer driver appears select the printer driver according to the message If the print...

Page 72: ...clients use the same OS you do not have to install the printer drivers from the CD ROM When installing on clients running Windows XP 2000 or NT 4 0 you must have the correct Administrator rights 1 Access the shared printer A prompt may appear Click OK and follow the on screen instructions to install the printer driver from the CD ROM 2 Insert the CD ROM When you see the EPSON Installation Program ...

Page 73: ...nue Anyway for Windows XP and continue installing The folder name depends on the version of Windows being used 3 Select the name of the printer and click OK Then follow the on screen instructions Client s Version Folder Name Windows 95 Language WIN95 Windows 98 Language WIN98 Windows Me Language WINME Windows XP 2000 Language WIN2000 Windows NT 4 0 Language WINNT40 ...

Page 74: ...printing documents select Purge Print Documents For Windows Me or 98 or Cancel All Documents For Windows XP 2000 or Windows NT 4 0 on the Printer menu When canceling a particular document select the document you want to cancel and choose Cancel Printing For Windows Me or 98 or Cancel For Windows XP 2000 or Windows NT 4 0 on the Document menu The print job is canceled You can also cancel printing f...

Page 75: ...first uninstall the current printer driver 1 Quit all applications 2 Click Start and select Control Panel or click Start Settings and then Control Panel 3 Double click the Add Remove Programs or Change or Remove Programs icon 4 Select EPSON Printer Software and click the Add Remove or Change Remove button click here then click here ...

Page 76: ... Yes in the displayed dialog box Note You can uninstall only the Monitored Printers utility of EPSON Status Monitor 3 When the utility is uninstalled you cannot change the setting of Monitored Printers from EPSON Status Monitor 3 7 If you want to uninstall EPSON Status Monitor 3 click Yes in the displayed dialog box 8 Follow the on screen instructions ...

Page 77: ...d to uninstall the USB device driver Note Uninstall the printer driver before uninstalling the USB device driver After you uninstall the USB device driver you cannot access any other Epson printers connected with a USB interface cable Follow these steps to uninstall the USB device driver 1 Follow steps 1 through 3 of Uninstalling the Printer Software on page 75 2 Select EPSON USB Printer Devices a...

Page 78: ...talled correctly EPSON USB Printer Devices may not appear Follow these steps to run the Epusbun exe file on the CD ROM 1 Insert the CD ROM in your computer s CD ROM drive 2 Access the CD ROM drive 3 Double click the Language WIN98 or Language WINME folder 4 Double click the Epusbun exe icon 3 Follow the on screen instructions See the User s Guide to reinstall a printer driver ...

Page 79: ...t indicator On when the front tractor is selected The light is green when paper is loaded or red when the tractor is out of paper b Rear Tractor Select indicator On when the rear tractor is selected The light is green when paper is loaded or red when the tractor is out of paper c d e f g h i j k l m a b ...

Page 80: ...ItemU button You can press the ItemU button to select the previous menu See Controlling Your Printer s Settings on page 84 for details e Reset When you press both the Font and Pitch buttons simultaneously the printer clears its buffer and restores its default settings f Pitch ItemD button Selects one of the pitch settings To select a pitch see Selecting a Font and Pitch on page 83 In SelecType or ...

Page 81: ... Top of Form buttons at the same time the printer enters or exits SelecType mode and you can set the various printer settings See Changing the settings in SelecType mode on page 94 for details i Top of Form SetD button Enters the top of form position mode and sets the new top of form position after it has been adjusted with the Micro Feed buttons In SelecType or Default setting mode the button wor...

Page 82: ...held down for a few seconds k Micro Feed buttons Adjust the paper position such as the top of form position and tear off position l Pause button Stops printing temporarily and resumes printing when pressed again Pause light On when the printer is paused Flashes when the print head overheats m Paper Out light On when the printer is out of paper Flashes when paper jams or the printer fails to eject ...

Page 83: ... the font you select 1 Make sure that the printer is not printing 2 Press the Font button The first available font is displayed on the LCD Press the Font button until the font you want to use is displayed The LCD returns to its original state in a few seconds and the font you selected is set 3 Press the Pitch button The first available pitch is displayed on the LCD Press the Pitch button until the...

Page 84: ...omputer when you installed the printer software Using SelecType The settings you can change in SelecType mode are shown in the following table and explained in detail after the table Setting Options default in bold Language English French German Italian Spanish Portuguese Print settings Press the SetD Top of Form button to print all current settings Page length for rear tractor 3 inches 3 5 inches...

Page 85: ... Serial data length 8 bit 7 bit Character table Standard version PC437 PC850 PC860 PC863 PC865 PC861 BRASCII Abicomp Roman8 ISO Latin 1 PC858 ISO 8859 15 Italic U S A Italic France Italic Germany Italic U K Italic Denmark 1 Italic Sweden Italic Italy Italic Spain 1 NLSP version PC437 PC850 PC860 PC863 PC865 PC861 BRASCII Abicomp Roman8 ISO Latin 1 PC858 ISO 8859 15 PC437 Greek PC853 PC855 PC852 PC...

Page 86: ...nu buttons Tear Off and Top of Form in SelecType mode Auto CR IBM PPDS 1 Off On IBM character table IBM PPDS 1 Table 2 Table 1 Buzzer Off On Low noise mode Off On Auto cut mode 2 Off On Auto cut back mode 2 Off On Overlappingmultipart forms Off On Continuous forms with labels Off On Skip over binding Off On Get IP address 3 Panel Auto PING IP address 4 000 000 000 000 to 255 255 255 255 Subnet mas...

Page 87: ... on one page and the first line printed on the next page Because most application program margin settings override margin settings from the control panel you should use this setting only if you cannot set your top and bottom margins using your application Line spacing You can select 1 6 inch or 1 8 inch for line spacing Left margin This setting allows you to set the margin in columns from the left...

Page 88: ...hen the printer receives data again it automatically moves the paper back to the top of form position and starts printing so you can use all of the next page When auto tear off is off and you are using continuous paper with the front or rear push tractor you need to move the perforation to the tear off position manually by pressing the Tear Off and Micro Feed buttons See Tearing Off the Printed Pa...

Page 89: ... When you select Auto the printer automatically selects the interface that is receiving data and uses that interface until the end of the print job The Auto setting allows you to share the printer among multiple computers without changing the interface mode If only one computer is connected to the printer you can select Parallel Serial USB or Optional depending on which interface your computer use...

Page 90: ...face Use this option to set the data transfer rate baud for the serial interface The baud rate is measured in bits per second bps See your computer manual and software documentation for the proper setting Serial parity This setting is available only when data is transferred via a serial interface The parity bit is added to data and detects errors on the data When this option is set to None the par...

Page 91: ... feed LF code or ESC J code is accompanied by a carriage return CR code so the printer moves the next printing position to the left margin When this setting is off you must send a CR code after the line feed code to move the printing position to the left margin IBM character table IBM PPDS This setting is available only in IBM PPDS emulation mode You can select Table 2 or Table 1 for the IBM chara...

Page 92: ... you set the cutting method through the printer driver s paper source setting it overrides Auto cut mode Auto cut back mode This function is available only when the optional perforation cutter C81570X is installed in the printer When you turn on this feature the printer automatically cuts each page at the perforation and feeds the paper to the top of form position while it is printing Overlapping ...

Page 93: ...the settings when this feature is set to Auto or Ping see the manual for the Print Server that you use IP address This setting is available only when the optional Print Server is installed and the Get IP address setting is set to Panel or Ping You can set the printer s IP address with this setting Subnet mask This setting is available only when the optional Print Server is installed You can set th...

Page 94: ...n until the LCD displays the language you want 4 Press the ItemD Pitch button to set the desired language Note The language you select is also used for other settings modes and test printouts such as Default setting mode and printing a Hex Dump 5 You see Print Settings on the LCD Press the SetD Top of Form button to print the current settings Button Basic function Tear Off and Top of Form Menu but...

Page 95: ...utton for a few seconds 8 After setting the selected parameter to the desired setting you can either continue to make changes to other parameters by pressing the ItemD or ItemU button or exit SelecType mode 9 When you finish making settings press and hold down the Menu buttons Tear Off and Top of Form 10 The LCD displays Save Setting If you want to save the settings select Yes by pressing the SetU...

Page 96: ...justs the platen gap for printing on label carrier base sheet Adjusts the platen gap for printing on labels affixed to label carrier Setting Options default in bold Label base position Paper left edge First dot Label top position the top edge of the label from the top of the page 0 to 4752 216 Enter a value in 1 216 inch increments for 0 to 22 inches Label length the length of the label from top t...

Page 97: ...de Button function Settings default in bold Pause Unlock Lock Micro Feed Unlock Lock Load Unlock Lock LF Unlock Lock FF Unlock Lock Top of Form Unlock Lock Tear Off Unlock Lock Font Unlock Lock Pitch Unlock Lock Front Rear Unlock Lock Menu Unlock Lock Reset Unlock Lock Button Function ItemU Font button Selects the previous menu parameter ItemD Pitch button Selects the next menu parameter SetU Tear...

Page 98: ...he language you selected in SelecType mode If you need a different language choose the one you want using SelecType mode See page 94 for details 3 Select one of the three main menus by pressing the SetU Tear Off or SetD Top of Form button Note You can scroll the menus by holding the SetU Tear Off or SetD Top of Form button for a few seconds 4 If you select Print Settings press the ItemD Pitch butt...

Page 99: ...er to exit Default setting mode and save the settings Locking the Control Panel Buttons You can restrict the use of buttons on the control panel using Lock out mode When Lock out mode is turned on only the Pause Load and Tear Off buttons work If you want to lock other buttons or leave the Pause Load or Tear Off buttons functional you can specify which buttons are locked during Lock out mode First ...

Page 100: ...e Font and Pitch buttons and then turn on the printer It beeps twice indicating that Lock out mode has been turned on To turn off Lock out mode repeat steps 1 and 2 The printer beeps once to tell you that Lock out mode has been turned off ...

Page 101: ...appears on the LCD panel or the printer beeps use the following table to diagnose and fix the problem If you cannot fix your printer problem using this table see Problems and Solutions on page 106 LCD message and panel light status Beep pattern Problem Solution Error Paper out O Paper Out O Pause No paper is loaded on the selected tractor Load paper in the printer or select a different tractor by ...

Page 102: ...ll the ribbon cartridge See page 127 for instructions Error Ribbon out O Pause Ribbon is not installed Install the ribbon cartridge and press the Pause button See page 127 for instructions Error Cover open O Pause The printer s top cover is open Close the cover Print head hot Please wait F Pause The print head is overheated Wait a few minutes printing resumes automatically once the print head cool...

Page 103: ...f test results are satisfactory the printer is working properly and the problem is probably caused by your printer driver settings application settings computer or interface cable Be sure to use a shielded interface cable If the self test does not print properly there is a problem with the printer See Problems and Solutions on page 106 for possible causes and solutions to the problem Follow these ...

Page 104: ...ily stop the self test press the Pause button To resume the test press the Pause button again 3 To end the self test press the Pause button to stop printing Tear off the page if necessary and then turn off the printer cCaution Do not turn off the printer while it is printing the self test Always press the Pause button to stop printing and then turn off the printer Printing a Hex Dump If you are an...

Page 105: ...print job to the printer Your printer prints all the codes it receives in hexadecimal format By comparing the characters printed in the right column with the printout of the hexadecimal codes you can check the codes the printer is receiving If characters are printable they appear in the right column as ASCII characters Nonprintable codes such as control codes are represented by dots 4 To turn off ...

Page 106: ...e 108 Printing position problems on page 110 Printing or printout quality problems on page 112 Network problems on page 118 You can also use the self test to determine whether the printer or the computer is causing the problem See Printing a Self Test on page 103 for instructions on printing a self test To pinpoint communication problems experienced users may want to use the printer s hex dump mod...

Page 107: ...ely and contact your dealer wWarning Do not reconnect the power cord to an electrical outlet that has the wrong voltage for your printer The printer does not work and the control panel lights are off even when you turn on the printer Cause What to do The power cord is not properly plugged into the electrical outlet or your printer Turn off the printer and make sure the power cord is firmly plugged...

Page 108: ...ow is lit on the Tractor Select indicator If the wrong tractor is selected be sure paper is loaded to the standby position on the tractor you want to use Then press the Front Rear button to switch to that tractor The printer may be out of paper Load paper onto the tractor The tractor arrow on the Tractor Select indicator should be green The printer does not feed continuous paper to the standby pos...

Page 109: ...tton to switch tractors You may be trying to switch tractors when labels are loaded in the printer Labels jam when they are fed backward so always remove any labels loaded in theprinterbeforeyouswitchtractors To remove labels loaded in the printer tear off the fresh supply below the tractor and press the LF FF Load button to eject the remaining labels When you switch between front and rear tractor...

Page 110: ...printer s SelecType mode See Changing the settings in SelecType mode on page 94 for details The top margin or top of form position setting is incorrect Check and adjust the margin or top of form position settings in your application software See the printable area specifications in Printable area on page 177 You can also adjust the top of form position using the buttons on the control panel Howeve...

Page 111: ...er from the Windows desktop or in your application before printing The paper size setting in your application or printer driver does not match the size of the paper you are using Check the paper size setting in your application or printer driver The printer s page length settings for the front or rear tractor do not match the size of the paper you are using Check the page length settings for the f...

Page 112: ...ombination of these devices Make sure that the printer works correctly when it is connected to your computer without these devices The printer driver is not installed correctly Check that the printer driver is installed properly If necessary reinstall the printer driver Paper is jammed or the ribbon or guard mechanism is stuck Turn the printer off open the printer cover and remove the jammed paper...

Page 113: ...he printer and computer See Electronic on page 164 and your computer documentation Your software is not properly set up for your printer Select your printer from the Windows desktop or in your application You may need to install or reinstall the printer software as described in theUser s Guide The printer makes noise but nothing prints or printing stops abruptly Cause What to do Theribbonhastoomuc...

Page 114: ...ts are missing in the printout Cause What to do The print head is damaged Stop printing and contact your dealer to have the print head replaced cCaution Never replace the print head yourself you may damage the printer Also other parts of the printer must be checked when the print head is replaced All the text is printed on the same line Cause What to do No line feed command is sent at the end of e...

Page 115: ... communicating correctly Make sure that you use the correct interface cable and that the communications protocol is correct See Electronic on page 164 and your computer documentation The wrong character table is selected in your software Select the correct character table using your software or SelecType mode The character table setting in your software overrides settings made in the SelecType mod...

Page 116: ...nal printing which is the printer s standard printing mode is out of alignment Use the printer s bidirectional adjustment mode to correct this problem See Aligning Vertical Lines in Your Printout on page 123 The perforation cutter is installed and the printer does not feed continuous paper properly Cause What to do The perforation cutter s connector is not plugged securely into the printer Turn of...

Page 117: ...te that if you select a different setting through the printer driver it overrides the Auto cut mode setting You didn t set the page length to match your paper Use SelecType to set the Page length for Rear tractor or Page length for Front tractor to match your paper Paper jams does not feed smoothly Cause What to do The perforation cutter is not correctly installed Remove the perforation cutter and...

Page 118: ...you can print a status sheet check the network settings otherwise set the interface mode of the printer s control panel to Auto See if print jobs from other computers are being printed through the network When ajob isprinted theprinteroryour computer may have a problem Check the connection between the printer and your computer as well as the printer driver settings and your computer settings When ...

Page 119: ...as been upgraded from Windows 95 to Windows XP Me 98 or 2000 For details about your computer contact your dealer Make sure that EPSON USB Printer Devices appears on the Device Manager menu for Windows Me and 98 only If you canceled the plug and play driver installation before the procedure was complete either the USB printer device driver or the printer driver may be incorrectly installed Follow t...

Page 120: ...lick the plus sign beside Other devices to view the installed devices If USB Printer appears under Other devices the USB printer device driver is not installed correctly If EPSON DFX 9000 appears the printer driver is not installed correctly If USB Printer or EPSON DFX 9000 does not appear under Other devices click Refresh or unplug the USB cable from the printer then plug it into the printer agai...

Page 121: ... DFX 9000 and click Remove Then click OK 5 When the following dialog box appears click OK Then click OK again to close the System Properties dialog box 6 Turn off the printer and restart your computer Then reinstall the drivers from the beginning following the instructions in the User s Guide ...

Page 122: ... to the computer s USB port For Windows Me or 98 try reinstalling the USB printer device driver and the printer software First uninstall EPSON Printer Software using the Add Remove or Change Remove Programs utility in the Control Panel then uninstall EPSON USB Printer Devices Next reinstall the software as described in the User s Guide If EPSON USB Printer Devices is not registered in the Add Remo...

Page 123: ...he Pause light is off Aligning Vertical Lines in Your Printout If you notice that the vertical lines in your printout are not properly aligned you can use the printer s bidirectional adjustment mode to correct this problem During bidirectional adjustment the printer prints three sheets of alignment patterns labeled High Speed Draft Draft and NLQ near letter quality As described below you select th...

Page 124: ... 3 As described in the instructions compare the alignment patterns and select the aligned pattern number with the best alignment by pressing the Font ItemU or Pitch ItemD button The LCD shows the pattern number that is selected at the time Press the SetD Top of Form button to fix the selected pattern number and print the next set of alignment patterns 4 Select the pattern with the best alignment f...

Page 125: ...rating properly and you cannot solve the problem using the troubleshooting information see the contact information below Epson provides technical assistance 24 hours a day through the electronic support services and automated telephone services listed below Service Access World Wide Web From the Internet you can reach Epson Support at http support epson com At this site you can download drivers an...

Page 126: ...he printer Proof of purchase such as a store receipt and date of purchase Computer configuration Description of the problem You can purchase ribbon cartridges paper and accessories from an Epson authorized reseller For product information and to find the nearest authorized reseller please call 800 GO EPSON 800 463 7766 or browse our catalog of products at www epson com select the product you are i...

Page 127: ...y ensure proper operation and long life of the print head and other printer parts Your printer uses the following ribbon cartridge Epson black ribbon cartridge S015384 Replacing the Ribbon Cartridge Follow the steps below to replace the ribbon cartridge wWarning If the printer has been used recently the print head may be hot Let it cool before attempting to replace the ribbon 1 Make sure the print...

Page 128: ...128 Options and Consumables 3 Open the top cover and slide the print head to the mark 4 Lift the ribbon guide off the print head as shown below ...

Page 129: ...ease it from the printer s mounting pins Remove the cartridge by lifting it up and away from you cCaution Make sure you don t pull on the flat white cable beneath the ribbon cartridge 6 Unpack the new ribbon cartridge Remove the plastic separator from the middle of the cartridge and discard it separator ...

Page 130: ...0 Options and Consumables 7 Holding the sides of the cartridge place the notch on each end onto the metal posts inside the printer Then tilt the cartridge down into the printer until it clicks into place ...

Page 131: ...Options and Consumables 131 6 6 6 6 6 6 6 6 6 6 6 8 Lift up the black plastic ribbon guide and slide it down behind the print head until it clicks into place Do not twist or crease the ribbon ...

Page 132: ...umables 9 Slide the print head back and forth to make sure it moves freely If not lift up the ribbon guide and try again 10 Turn the ribbon tightening knob to remove any slack 11 Close the top cover ribbon tightening knob ...

Page 133: ... rear built in tractor as described in this section Note When the pull tractor is installed the tear off feature is not available Installing the pull tractor To install the pull tractor you need a cross head screwdriver Note If you are going to be using the pull tractor with the built in rear tractor you should load paper onto the rear tractor before installing the pull tractor See Loading Paper O...

Page 134: ... and Consumables 2 Use a cross head screwdriver to remove the two screws securing the paper separator to the printer Then lift it off the printer 3 Close the paper separator cover and open the printer s back cover ...

Page 135: ... the pull tractor with its gears to the left fit the tractor s front notches over the mounting shaft of the printer 5 Then tilt the pull tractor back until its rear latches click into place over the printer s rear mounting pins 6 Close the printer s back cover ...

Page 136: ... tear off documents press the LF FF Load button to advance the paper to a point where it can be torn off To use the pull tractor with the front tractor follow these steps 1 Turn on the printer and open the back cover 2 Make sure paper is loaded on the front tractor to the top of form position If paper is already loaded on the tractor but it is in the standby position press the Front Rear or LF FF ...

Page 137: ...4 Release both sprocket lock levers on the pull tractor by pulling them toward you Then open both sprocket covers 5 Adjust the sprockets to match the width of your paper 6 Slide the two paper supports so they are spaced evenly between the two sprockets ...

Page 138: ...s If there is slack in the paper or if the holes in the paper do not align properly with the sprocket pins pull the paper slightly and use the pull tractor knob to adjust the position of the paper as shown below Slide the knob to the right first and then turn it as necessary cCaution Be sure the sprockets on the built in front tractor and the optional pull tractor are aligned 8 Close the sprocket ...

Page 139: ... pull the paper too tightly or tear the edges of the paper holes To remove any excess tension in your paper release the right sprocket and lock it again 10 Adjust the top of form position if necessary See Adjusting the top of form position on page 29 for instructions 11 Close the back cover Press the LF FF Load button to feed the paper out the back of the printer Make sure the edge of the first sh...

Page 140: ...ional distance to the pull tractor To tear off printed pages press the LF FF Load button to advance the paper to a point where it can be torn off The following steps explain how to load paper using the optional pull tractor already installed with the printer s built in rear tractor If you have not yet installed the pull tractor load paper onto the rear tractor and then install the pull tractor See...

Page 141: ...ollowing steps 3 through 10 of Loading Paper Onto the Rear Tractor on page 22 5 Then tilt the pull tractor back until the rear latches click into place over the printer s rear mounting pins 6 Turn on the printer and use the LF FF Load button to advance the paper to the pull tractor Now follow steps 4 through 11 of Using the pull tractor with the front tractor on page 136 ...

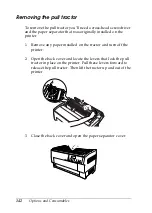
Page 142: ...ginally installed on the printer 1 Remove any paper installed on the tractor and turn off the printer 2 Open the back cover and locate the levers that lock the pull tractor in place on the printer Pull these levers forward to release the pull tractor Then lift the tractor up and out of the printer 3 Close the back cover and open the paper separator cover ...

Page 143: ...our paper The perforation cutter comes with the perforated paper output attachment and the perforated paper output tray See Attaching the perforated paper output attachment and output tray on page 148 to attach the perforated paper output attachment and the output tray cCaution When the perforation cutter is installed never cut labels overlapping multi part forms or continuous forms with labels Ma...

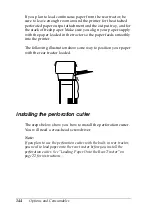
Page 144: ...ctor so the paper feeds smoothly into the printer The following illustration shows one way to position your paper with the rear tractor loaded Installing the perforation cutter The steps below show you how to install the perforation cutter You will need a cross head screwdriver Note If you plan to use the perforation cutter with the built in rear tractor you need to load paper onto the rear tracto...

Page 145: ... 6 6 1 Turn off the printer and open the paper separator cover 2 Use a cross head screwdriver to remove the two screws securing the paper separator to the printer Then lift off the paper separator Store the paper separator and screws for later use ...

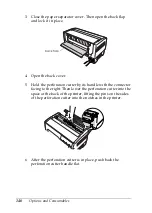
Page 146: ...the perforation cutter by its handle with the connector facing to the right Then lower the perforation cutter into the space at the back of the printer fitting the pins on the sides of the perforation cutter into the notches in the printer 6 After the perforation cutter is in place push back the perforation cutter handle flat back flap ...

Page 147: ...Options and Consumables 147 6 6 6 6 6 6 6 6 6 6 6 7 Plug the perforation cutter s connector securely into the connector inside the printer Then close the back cover 8 Close the back flap ...

Page 148: ...part forms on the output tray Note Stacked pages may flip over on the output tray Do not allow the printer to stack more than 200 sheets of paper or 100 multi part forms on the output tray Remove the output tray when you will be printing hundreds of pages and will not need to cut the printed pages To attach the perforated paper output attachment and the output tray follow these steps 1 Open the pa...

Page 149: ...e next section cCaution You cannot open the top cover while the perforated paper output attachment and the output tray is attached If you want to open the top cover you need to remove them first When you are ready to reload the paper onto the rear tractor first remove the perforation cutter See Removing the perforation cutter on page 152 for instructions second step 9 inches or less third step 10 ...

Page 150: ... to match your paper using your software or SelecType mode See Changing the settings in SelecType mode on page 94 for details Note The perforation cutter requires that the paper have perforations for best results the paper should be fan folded The last page may not be ejected completely If this happens gently pull it out of the printer The perforation cutter cannot cut the last 11 inches of contin...

Page 151: ...t last page only Tractor Rear Cut each page Set the Auto cut mode setting to On in SelecType mode See page 94 for instructions Select the printer s tear off mode as follows 1 Make sure printing has finished Open the paper separator cover You see the perforation cutter s tear off edge 2 Press the Tear Off button to enter tear off mode The printer feeds the paper s perforation to the perforation cut...

Page 152: ...15 or Loading Paper Onto the Rear Tractor on page 22 for instructions 3 Press the Front Rear button to switch to the other tractor The printer cuts off the printed document feeds the paper on the tractor backward to the standby position and then advances the paper on the other tractor to the loading position Removing the perforation cutter To remove the perforation cutter follow the steps below Th...

Page 153: ...s and Consumables 153 6 6 6 6 6 6 6 6 6 6 6 3 Remove the perforated paper output attachment and the output tray from the printer 4 Open the back cover Then unplug the paper cutter s connector from the printer ...

Page 154: ...mables 5 Grasp the handle on the perforation cutter and lift it up and out of the printer 6 Close the back cover and open the paper separator cover 7 Reattach the paper separator using the two screws that you removed before ...

Page 155: ...es are available worldwide The asterisk is a substitute for the last digit which varies by country If you are not sure whether you need an optional interface or would like to know more about interfaces contact your Epson dealer Number Name C82305 C82306 Serial interface C82307 C82308 32KB intelligent serial interface C82312 LocalTalk interface C82313 32KB IEEE 488 interface C82314 Coax interface C...

Page 156: ...thout the addition of any other circuitry or components Installing an interface card Follow the steps below to install an optional interface card Note If you install an optional interface card be sure to select the interface you use in SelecType mode See Changing the settings in SelecType mode on page 94 for details 1 Turn off both your printer and your computer Then remove all power and interface...

Page 157: ... the shield plate 5 Slide the interface card into the grooves in the interface slot Push it in firmly to make sure it connects to the printer s internal socket 6 Secure the interface card using the screws that came with it 7 Plug the connector cable into the interface card as shown 8 Plug the other end of the cable into your computer ...

Page 158: ...following baud rates 300 600 1200 2400 4800 9600 and 19200 bps bits per second To set the baud rate see the bit rate selection table in your interface card manual Handshake timing When the unused area for data in the input buffer drops to 256 bytes the printer outputs an X OFF code or sets the DTR flag to 1 MARK to indicate that it cannot receive data When the unused area increases to 512 bytes th...

Page 159: ... enter SelecType mode 3 Press the ItemU Font or ItemD Pitch button to select the Get IP address setting and set the setting to Panel using the SetU Tear Off or SetD Top of Form button 4 Press the ItemD Pitch button to select the IP byte 1 5 Change the number for the IP byte 1 using the SetU Tear Off or SetD Top of Form button 6 Press the ItemD Pitch button to select the next byte and change the nu...

Page 160: ...u buttons Tear Off and Top of Form 11 The LCD displays Save Setting If you want to save the settings select Yes by pressing the SetU Tear Off button If you do not want to save the settings select No by pressing the SetD Top of Form button 12 Turn off the printer ...

Page 161: ...nformation 161 A A A A A A A A A A A Appendix A Product Information Printer Parts front cover front tractor sprockets control panel front tractor paper supports power switch print head ribbon cartridge top cover ...

Page 162: ...162 Product Information rear tractor sprockets back cover back flap paper separator cover paper separator serial interface interface cover parallel interface USB interface optional interface ...

Page 163: ... using software commands Line spacing 1 6 inch or programmable in 1 432 inch increments Printable columns 136 columns at 10 cpi Resolution Maximum 240 144 dpi NLQ Paper feed methods Push tractor front rear Push and pull tractor front rear requires additional tractor Paper feed speed Continuous 381 mm second 15 inches second Intermittent 25 msec line at 1 6 inch line spacing Reliability Total print...

Page 164: ...015384 Ribbon life approx 15 million characters draft 10 cpi 14 dots character Acoustic noise Approx 58 dB A ISO 7779 pattern Interfaces Standard bidirectional 8 bit parallel with IEEE 1284 nibble mode support USB ver 1 1 RS 232C serial Slot for optional Type B interface card Buffer 128KB Fonts Bitmap fonts Bar code fonts EAN 13 EAN 8 Interleaved 2 of 5 UPC A UPC E Code 39 Code 128 POSTNET ...

Page 165: ...437 US Standard Europe PC 850 Multilingual PC 860 Portuguese PC 861 Icelandic PC 865 Nordic PC 863 Canadian French BRASCII Abicomp ISO Latin 1 Roman 8 PC 858 ISO 8859 15 PC 437 Greek PC 852 Eastern Europe PC 853 Turkish PC 855 Cyrillic PC 857 Turkish PC 866 Russian PC 869 Greek MAZOWIA Poland Code MJK CSFR ISO 8859 7 Latin Greek ISO Latin 1T Turkish Bulgaria Bulgarian PC 774 LST 1283 1993 Estonia ...

Page 166: ...nput voltage range 90 to 264 V Rated frequency range 50 to 60 Hz Input frequency range 49 5 to 60 5 Hz Rated current 4 8 A maximum 14 5 A Power consumption Approx 185 W ISO IEC 10561 letter pattern Approx 9 5 W in sleep mode Printer status Temperature Humidity without condensation Operating plain paper 5 to 35 C 41 to 95 F 10 to 80 RH Operating recycled paper envelope label or roll paper 15 to 25 ...

Page 167: ...ture 15 to 25 C 59 to 77 F Humidity 30 to 60 RH Do not load paper that is curled folded or crumpled Continuous paper Single sheets and multi part forms Use only continuous paper with less than 5 mm diameter punch holes The ratio of the cut uncut length at the perforation should be between 2 1 and 5 1 If the horizontal and vertical perforation cuts cross do not print in the area illustrated below A...

Page 168: ...ess The perforation between pages should not extend all the way to the edges of the paper Uncut length on the edges should be 1 mm or more When using pre printed paper the reflectance of the pre printed color should be 60 or less A 2 mm or less A paper edge B uncut part C cut part D 1 mm or more ...

Page 169: ...ct Information 169 A A A A A A A A A A A When using pre printed paper make sure the printing does not appear in the shaded area illustrated below A 12 mm B first dot C Shaded should not be pre printed D 5 mm ...

Page 170: ...aper and recycled paper with point gluing or paper stapling on both sides Rear entry Front entry Minimum Maximum Minimum Maximum Width mm inch 76 2 3 419 1 16 5 76 2 3 419 1 16 5 Length mm inch 76 2 3 558 8 22 76 2 3 558 8 22 Copies 1 original 6 copies 1 original 9 copies Thickness mm inch 0 12 0 0047 0 53 0 021 0 12 0 0047 0 79 0 031 Weight g m lb 41 11 56 15 41 11 56 15 Quality Carbonless or car...

Page 171: ...parts on the rear tractor Form sheets of continuous multi part forms should be securely joined together along the left and right edges by crimping or spot gluing See the illustration below for details spot gluing on both sides crimping on both sides A 25 4 mm 1 inch or less A 76 2 mm 3 inches or less B printing side ...

Page 172: ...rimping on opposing sides Do not use continuous multi part forms that are joined with metal staples one side crimping tape staples or bar gluing A 25 4 mm 1 inch or less B 76 2 mm 3 inches or less C printing side A bar gluing B metal stapling ...

Page 173: ...entirely covered with label material Rear entry Front entry Minimum Maximum Width of backing sheet mm inch 76 2 3 419 1 16 5 Length of backing sheet mm inch 76 2 3 558 8 22 Thickness of backing sheet mm inch 0 07 0 0028 0 09 0 0035 Total thickness mm inch 0 16 0 0063 0 19 0 0075 Label weight g m lb 64 17 Quality Plain paper or the same quality labels ...

Page 174: ...et B label sheet C label D There should be several uncut areas on each side E Corners should not be cut A backing sheet B label C 63 5 mm 2 5 inches or more D 23 8 mm 15 16 inch or more E 2 5 mm 0 1 inch or more Rear entry Front entry Minimum Maximum Minimum Maximum Width of backing sheet mm inch 76 2 3 419 1 16 5 76 2 3 419 1 16 5 Length of backing sheet mm inch 76 2 3 558 8 22 76 2 3 558 8 22 ...

Page 175: ... mm inch 0 065 0 0025 0 53 0 021 0 065 0 0025 0 79 0 031 A label B backing sheet C total thickness 0 53 mm 0 021 inch or less rear entry 0 79 mm 0 031 inch or less front entry A continuous paper B label paper Rear entry Front entry Minimum Maximum Minimum Maximum ...

Page 176: ...13 0 0051 0 53 0 021 0 13 0 0051 0 79 0 031 A 13 mm 0 51 inch or more B From the perforation to the bottom of the previous overlapping form 13 3 mm 0 52 inch or less C From the perforation to the top of the next overlapping form 3 3 mm 0 13 inch or more D From the perforation to the bottom edge of the glue point area 17 mm 0 67 inch or less E Total thickness including glue point dilation 0 53 mm 0...

Page 177: ...tional pull tractor is installed the left margin can be set to 18 mm 0 71 inch or more When loading paper with the front tractor set the Page length for front tractor setting to 6 inches or more Continuous paper A The minimum top and bottom margins above and below the perforation are 4 2 mm 0 17 inch B The minimum left and right margins are 13 mm 0 51 inch Labels A The minimum top margin is 2 2 mm...

Page 178: ...mum bottom margin for labels is 16 6 mm 0 65 inch E The minimum left and right margins for labels are 30 9 mm 1 22 inches F The minimum top and button margins for labels are 2 mm 0 08 inch G The minimum left and right margins for labels are 3 mm 0 12 inch Overlapping multi part forms A The minimum top margin is 26 3 mm 1 04 inch B The minimum bottom margin is 16 6 mm 0 65 inch C The minimum left a...

Page 179: ...d graphics General operation ESC ESC U ESC EM F B C A V Paper feeding FF LF ESC 0 ESC 1 ESC 2 ESC 3 ESC A CR Page format ESC C ESC C ESC C 0 ESC Q ESC l ESC c ESC N ESC O ESC U Print position motion ESC ESC ESC D HT ESC B VT ESC J Font selection ESC k ESC x ESC y ESC P ESC M ESC g ESC p ESC 4 ESC 5 ESC E ESC F ESC Font enhancement ESC W DC4 SO DC2 SI ESC w ESC G ESC H ESC T ESC S ESC Spacing ESC S...

Page 180: ... General operation NUL DC3 ESC j BEL CAN DC1 ESC Q ESC K ESC U ESC F Paper feeding FF LF ESC 5 ESC A ESC 0 ESC 1 ESC 2 ESC 3 CR ESC Page format ESC C ESC C0 ESC X ESC N ESC O ESC 4 Print position motion ESC d ESC R ESC D HT ESC B VT ESC J Font selection DC2 ESC P ESC ESC E ESC F ESC I ESC d ESC I Font enhancement DC4 SO ESC SO ESC W ESC SI ESC SI ESC G ESC H ESC T ESC S ESC ESC _ Spacing BS SP ...

Page 181: ... Character handling ESC 6 ESC 7 ESC T ESC ESC Bit image ESC K ESC L ESC Y ESC Z Bar code ESC f ESC p Download ESC draft mode only Safety UL60950 CSA C22 2 No 60950 EN 60950 EMC FCC part 15 subpart B class B CAN CSA CEI IEC CISPR22 Class B EN 55022 Class B EN 55024 EN 61000 3 2 EN 61000 3 3 ...

Page 182: ...er case 4 If the outer case is still dirty or dusty clean it with a soft clean clothdampenedwithmilddetergentdissolvedinwater Keep the printer cover and front cover closed to prevent water from getting inside the printer cCaution Never use alcohol or thinners to clean the printer these chemicals can damage the printer components as well as the case Be careful not to get water on the printer mechan...

Page 183: ...ot let it cool for a few minutes before touching it 1 Remove any paper loaded in the printer Make sure the printer is turned off 2 Unplug the power cord from the electrical outlet then disconnect the interface cable from the printer 3 Remove the ribbon cartridge If any options are installed remove them and pack them in their original boxes 4 Make sure the print head is not hot Then remove the ribb...

Page 184: ...184 Product Information ...

Page 185: ...ng printer 182 Clearing paper jams 123 Client computers 59 to 60 64 to 73 Contacting Epson 125 to 126 Continuous forms with labels 32 86 92 96 Continuous paper problems 108 to 109 Control panel buttons and lights 79 to 82 locking 97 99 to 100 Customer support 125 to 126 Custom paper size defining 55 D Default gateway 86 Default gateway setting 93 Default setting mode 96 to 99 Default settings chan...

Page 186: ...ting 85 87 LF FF Load button 82 Line spacing setting 84 87 Loading paper 13 to 42 Locking control panel 97 99 to 100 Lock out mode 97 99 to 100 Low noise mode 86 91 M Mechanical specifications 163 Menu buttons 81 Micro Feed buttons 82 Multi part forms printing on 40 to 42 N Network problems 118 setting up printer 59 to 73 O Optional interface slot 162 Options 116 to 117 127 to 160 Overlapping mult...

Page 187: ...107 printing position 110 to 111 print quality 112 to 116 solving 101 to 126 tear off position 111 USB 119 to 122 Pull tractor installing 133 to 135 removing 142 to 143 using 133 to 143 using with front tractor 136 to 139 using with rear tractor 140 to 141 R Rear tractor loading paper on 22 to 28 sprockets 162 with pull tractor 140 to 141 Remote Configuration Manager 84 Resetting default settings ...

Page 188: ...m position 28 to 31 110 Tractor switching 21 36 to 37 152 Tractor Select indicator 21 27 to 28 79 Tractor Select light 36 Transporting printer 183 Turning on printer 20 U Unidirectional printing 88 Uninstalling printer software 75 to 78 Status Monitor 3 76 USB device driver 77 to 78 USB device driver 77 to 78 interface 89 162 problems 119 to 122 W World Wide Web 125 Z Zero slash 85 89 ...

Reviews: