background image

52

Connecting to Computers, Cameras, and Other Equipment

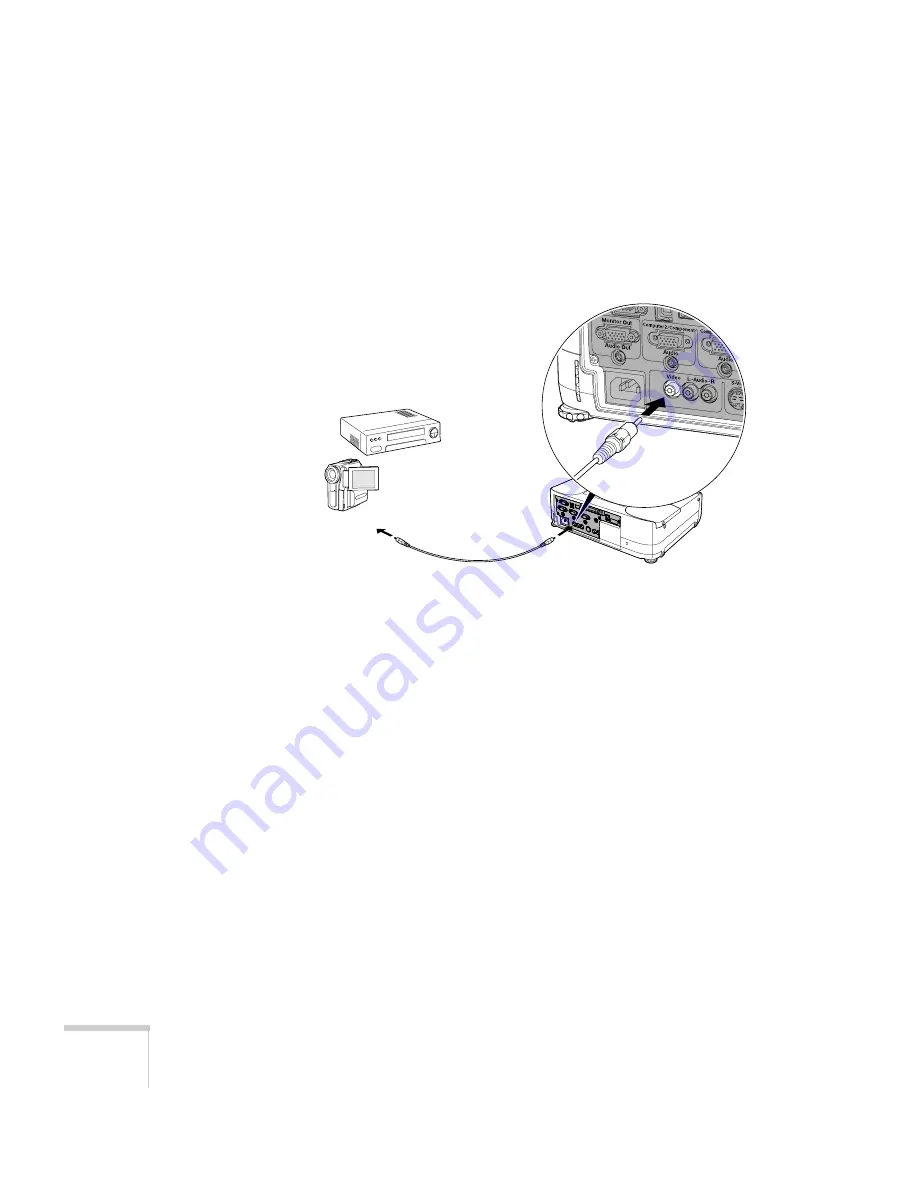
Connecting a Composite Video Source

1. Locate the RCA-style video cable provided with the projector. 

2. Connect the cable to the yellow video output connector on your 

player and the yellow 

Video

 connector on the projector:

3. If you want to play sound through the projector, see page 57 for 

instructions on connecting an audio cable.

4. If you don’t need to make any other connections, see page 18 or 

the 

Quick Setup

 sheet for instructions on turning on the projector 

and adjusting the image. Once the projector is turned on, select 
the image source: press the 

Search 

button on the remote control 

or press the 

Source Search 

button on the projector’s control 

panel repeatedly until the image appears. 

Summary of Contents for 835p - PowerLite XGA LCD Projector

Page 1: ...Epson PowerLite 835p Multimedia Projector User sGuide ...

Page 2: ... product Epson is not responsible for any use of this information as applied to other products Neither Seiko Epson Corporation nor its affiliates shall be liable to the purchaser of this product or third parties for damages losses costs or expenses incurred by purchaser or third parties as a result of accident misuse or abuse of this product or unauthorized modifications repairs or alterations to ...

Page 3: ... Projecting the Image 18 Turning On the Projector 18 Selecting the Image Source 20 Troubleshooting Display Problems 21 You Can t Project an Image 21 The Projector and Notebook Don t Display the Same Image 21 Adjusting the Image 24 Adjusting the Height of Your Image 24 Using Quick Setup 25 Focusing and Zooming Your Image 25 Adjusting the Image Shape 26 Correcting Computer Images 28 Shutting Down th...

Page 4: ...puter with the Remote Control 41 Highlighting Your Presentation 43 Using the Pointer Tool 43 Customizing the Pointer Tools 44 3 Connecting to Computers Cameras and Other Equipment 45 Connecting to a Computer 46 Connecting to the Computer Ports 47 Using the Macintosh Desktop Adapter 48 Connecting the Cable for Remote Mouse Control 49 Connecting an External Monitor 50 Connecting to Video Equipment 5...

Page 5: ... a Memory Card Digital Camera or External Drive 95 Inserting a Memory Card in the Projector 96 Removing a Memory Card 96 Creating a Slideshow on the Fly 97 Displaying the Slideshow 97 Controlling Your Slideshow 97 Changing Timing and Other Settings 98 Presenting Image Files From a Digital Camera 99 Presenting Image Files From an External Drive 100 Creating a Scenario 102 Converting a PowerPoint Fi...

Page 6: ...trolling Multiple Projectors 132 Setting the Projector ID 132 Changing the Remote Control ID 133 Customizing Projector Features 134 Remote Monitoring Setup Options 134 Miscellaneous Setup Options 134 Enabling Sleep Mode 134 Enabling Quick Setup Options 135 Automatically Running Quick Setup 136 7 Managing Projectors 137 Connecting and Configuring the Projector on a Network 138 Using EMP Monitor 139...

Page 7: ... the Projector 166 9 Solving Problems 167 Using On Screen Help 168 Checking Projector Status 169 What To Do When the Lights Flash 169 Viewing Lamp Usage and Other Information 171 Solving Problems with the Image or Sound 171 Solving EasyManagement Problems 177 Solving Problems with the Remote Control 181 Where To Get Help 181 Internet Support 181 Speak to a Support Representative 182 A Software Ins...

Page 8: ...rojection Lamp 190 Remote Control 190 Dimensions 190 Electrical 190 Environmental 190 Safety 191 Compatible Video Formats 191 D Notices 193 Important Safety Instructions 193 Remote Control Information 195 Declaration of Conformity 196 FCC Compliance Statement 197 Warranty 198 Index 201 ...

Page 9: ...g The projector also automatically focuses the projected image These features can all be set to automatically create the best image projection by pressing a single button Complete control Use the remote control to take charge of your presentation Freeze the action zoom in on part of the picture or display a picture in picture video Use the remote as a pointer or to draw on the screen You can even ...

Page 10: ...ation tips tricks and technology The site provides templates clip art and sound clips as well as Presenters Services to use on the road Even more resources and services are available if you register to join the Presenters Club and it s free Quick Setup sheet Gives you the instructions you need to get your projector up and running if you are connecting to a notebook PowerBook or iBook computer Star...

Page 11: ...e world For details see page 198 and the warranty brochure included in your Start Here kit In addition for customers who register their projector Epson offers free Extra CareSM Road Service In the unlikely event of an equipment failure you won t have to wait for your unit to be repaired Instead Epson will ship you a replacement unit anywhere in the United States or Canada usually via overnight del...

Page 12: ...dditional Components Depending on how you plan to use the projector you may need additional components To receive an S Video signal you ll need an S Video cable One may be provided with your video equipment or you can purchase one from Epson see page 13 To receive a component video signal from a VCR or other video device you ll need a component video cable You can purchase one from Epson see page ...

Page 13: ...re com U S sales or www epson ca Canadian sales Product Part number Replacement lamp V13H010L31 Air filter replacement set V13H134A07 ATA molded hardshell case Samsonite wheeled soft case ELPKS35 ELPKS52 Ceiling mount Suspension adapter False ceiling plate Security bracket cabling for gyro lock mounts Adjustable ceiling channel ELPMB36 ELPMBAPL ELPMBFCP ELPMBSEC ELPMBACC Kensington security lock E...

Page 14: ...14 Welcome ...

Page 15: ...deo equipment you need to follow some basic steps to display your image on the screen Follow the guidelines in this chapter for Positioning the projector Turning the projector on and selecting the image source Troubleshooting display problems Adjusting the image Turning off the projector ...

Page 16: ... size increases with distance but can vary depending on how you position the zoom ring and whether you ve adjusted the image with other settings Also keep these considerations in mind Place the projector on a sturdy level surface Make sure there is plenty of space for ventilation around and under the projector Do not set the projector on top of anything that could block the vents under the project...

Page 17: ...his causes the image to become keystone shaped but you can correct the distortion by pressing the Sync buttons on the projector See page 26 for detailed information about correcting the image shape For instructions on installing the projector in a permanent location such as a theater or conference room see page 187 note After positioning the projector you may want to connect a Kensington MicroSave...

Page 18: ...ed equipment you may have to select the image source manually see page 20 Follow these steps to turn on the projector 1 Remove the lens cap 2 Plug one end of the power cable into the projector and the other end into a grounded electrical outlet 3 Wait until the Power light remains orange note To shut down the projector see page 29 Shutting down the projector correctly prevents premature lamp failu...

Page 19: ...or is ready for use 5 If you ve connected a Windows based computer to the projector you may see a New Hardware Wizard screen saying your computer has found a plug and play monitor if so click Cancel 6 If you are prompted to enter a password see page 127 Turn on remote Power button Power button warning Never look into the lens when the lamp is on This can damage your eyes and is especially dangerou...

Page 20: ...een EasyMP and between equipment connected to the Computer Component ports Use the Video S Video button to switch between equipment connected to the Video and S Video ports The remote control has five Source buttons Use them to switch between devices connected to the ports identified on each button or select EasyMPTM to project wirelessly or from a memory card You can also press the Source Search ...

Page 21: ...utton If you re using a PC notebook press the function key on your keyboard that lets you display on an external monitor It may be labeled CRT LCD or have an icon such as You may have to hold down the Fn key while pressing it Allow a few seconds for the projector to sync up after changing the setting The Projector and Notebook Don t Display the Same Image If you re projecting from a notebook and y...

Page 22: ...ies by brand you may need to click a Monitor tab then make sure the external Monitor port is set as your primary display and or enabled See your computer s documentation or online help for details If you re using Macintosh OS X You may need to set up your system to display on the projector screen as well as the LCD screen Follow these steps 1 From the Apple menu select System Preferences then sele...

Page 23: ...ck Monitors or Monitors and Sound 2 Click the Arrange icon 3 Drag one monitor icon on top of the other If the Arrange option isn t available you may need to select one of the Simulscan resolution settings 1 Click the Monitor icon 2 Select a Simulscan resolution as shown Allow a few seconds for the projector to sync up after making the selection Click here Drag one monitor icon on top of the other ...

Page 24: ...e image and or sound see page 117 Adjusting the Height of Your Image If the image is too low on the screen you can use the front adjustable foot to raise it 1 Stand behind the projector Press the blue foot release lever up and lift the front of the projector 2 Once the image is positioned where you want it release the lever to lock the foot in position 3 If necessary you can fine tune the height o...

Page 25: ...ly focuses the image unless you have turned this feature off but you can also use the Focus buttons on the projector or remote to sharpen the image Use the Zoom buttons on the projector or remote to reduce or enlarge the image Press the W button on the projector or the top zoom button on the remote to increase the size and the T button on the projector or bottom zoom button on the remote to decrea...

Page 26: ... for the image to be corrected During this time a vertical keystone correction gauge appears on the screen If your image is still distorted you can correct it using either of these methods If the image has two parallel sides but is wider on one side top bottom left or right you can correct it using the Keystone buttons on the projector s control panel see page 27 or the projector s Keystone menu s...

Page 27: ...ng menu and press Enter From the Setting menu select Keystone and press Enter select H V Keystone and press Enter then select Horiz Vert Height and press Enter Select V Keystone for vertical keystone distortion or H Keystone for horizontal keystone distortion and press Enter Use the pointer button on the remote control to adjust the keystone setting as needed note The image will be slightly smalle...

Page 28: ...the projected image and the Auto button doesn t correct the problem hold down the Shift button on the projector s control panel while pressing either the Tracking or the Tracking button If the image appears fuzzy or flickers and the Auto button doesn t correct the problem hold down the Shift button while pressing either the Sync or Sync button on the projector note You must be projecting an image ...

Page 29: ... off press any other button 3 Press the PPower button again The projector lamp is turned off The Power light may flash orange for about 30 seconds as the projector cools down and then stays orange The exhaust fan shuts off If you want to turn the projector on again make sure the Power light is not flashing orange Then press the PPower button 4 If you extended the adjustable front foot press up on ...

Page 30: ...e power cord to turn it on You can also turn the power on to restart the projector immediately after turning it off Follow these steps to enable Direct Power ON 1 Press the Menu button on the remote control and select the Extended menu 2 Choose Operation and press Enter 3 Choose Direct Power ON and press Enter 4 Highlight ON and press Enter 5 Press Esc or Menu to exit With Direct Power ON enabled ...

Page 31: ...ht your presentation page 43 You can also use it to make automatic color corrections that let you project images onto any surface page 40 or as a wireless mouse when projecting from a computer page 41 This chapter covers Turning on and using the remote control Controlling the picture and sound Projecting images without a screen Operating your computer with the remote control Highlighting your pres...

Page 32: ...ps Point the remote control either at the front or back of the projector or at the screen Stand within 33 feet of the projector If you want to operate the projector from a greater distance a remote control cable set is available see page 13 When presenting in a darkened room press the light button to make the buttons on the remote light up temporarily Avoid using the remote under bright fluorescen...

Page 33: ...ibed below 1 Turn the remote control over 2 Press down on the ridges at one end of the battery cover as you slide the cover off 3 Install two AA batteries inserting the flat negative ends in first 4 Slide the cover back in place caution When replacing batteries take the following precautions Replace the batteries as soon as they run out If the batteries leak wipe away battery fluid with a soft clo...

Page 34: ...screen On the projector s control panel there are three Source buttons Press the Source Search button to automatically search for any image signals from connected devices press the Computer Component button to switch between EasyMP and equipment connected to the Computer Component ports or press the Video S Video button to switch between equipment connected to the Video and S Video ports On the re...

Page 35: ...oming signal or the signal is out of range the preview window for that source appears blank 2 Press one of the Source buttons on the remote control to switch to the desired source Press Enter to change the source and exit the screen or press Esc to exit the preview screen without switching sources Preview button note Movies are displayed as still images on the preview screen Computer Analog RGB Vi...

Page 36: ...or to adjust the shape 7 Repeat steps 5 and 6 as needed to adjust any remaining corners 8 When done press the Esc button on the remote control or projector s control panel to exit the menu system If Quick Corner remains selected in the Keystone menu the Quick Corner screen appears whenever you press the projector s keystone buttons You can then follow steps 5 through 8 above to correct the shape o...

Page 37: ... logo display on the screen whenever you press the A V Mute button see page 130 Stopping Action You can use the remote control to stop the action in your video or computer image To stop the action and keep the current image on the screen press the Freeze button The sound continues To restart it press the Freeze button again note If you ve connected a computer to one of the projector s Computer por...

Page 38: ...om equipment connected to the Computer port s you can open up a smaller picture in picture window on the screen This window can display video from equipment connected to either the Video or S Video port Setting Up the Picture in Picture Image Before starting make sure the computer or video equipment for your main image is connected to the Computer port s and the video equipment for the picture in ...

Page 39: ...press the Enter button your video continues playing on the screen 4 When you re finished using picture in picture press the PinP or pointer button again The window disappears Controlling the Volume To change the volume press the quieter or louder side of the Volume button If necessary you can adjust the tone using the projector s menu system See page 126 PinP button Video window note You can also ...

Page 40: ... remote control or the projector s control panel while projecting an image Wall Shot s status appears in the upper right corner of your screen Then you see a sequence of colors flash for a couple of seconds while the sensor measures the conditions of the projection surface and adjusts the image The projector stores the correction values obtained by the last Wall Shot measurements This is useful if...

Page 41: ...rner of your screen You see a sequence of colors flash for about five seconds as the projector adjusts the color correction values for the new projection surface Operating Your Computer with the Remote Control If you ve connected a computer to the projector with a USB cable as described on page 49 you can use the remote control in place of your computer s mouse This gives you more flexibility when...

Page 42: ...ce to left click or press it twice to double click Press the Esc button to right click To drag and drop hold down the Enter button for about one second until it lights Then use the pointer button to drag the object When it s where you want it press Enter to release it Use to move cursor Left click Right click ...

Page 43: ... and each one can be customized for a different look Using the Pointer Tool 1 To activate the pointer tool press the Pointer button on the remote control A pointer appears on the screen If you prefer to use a different style of pointer see page 44 to choose from three preset options 2 Use the pointer button on the remote control to position the pointer on the screen 3 When done using the pointer p...

Page 44: ...Pointer and press Enter You can select one of the following pointer shapes 2 Highlight Return and press Enter 3 To change the size of the pointer highlight Pointer Zoom and press Enter 4 Choose 100 or 200 and press Enter 5 Highlight Return and press Enter 6 To change the Pointer Speed setting highlight Pointer Speed and press Enter 7 Highlight High Speed Medium Speed or Low Speed and press Enter 8...

Page 45: ...quipment such as a VCR or DVD player You can also connect the projector to a digital camera video camera external speakers and or an external monitor Follow the instructions in this chapter on Connecting to a computer Connecting an external monitor Connecting video equipment Connecting to a digital camera or other USB device Playing sound through the projector ...

Page 46: ...e 49 connect a monitor to the projector so you can view your presentation close up as well as on screen not necessary if you re using a notebook see page 50 connect an audio cable to play computer audio see page 57 note If you connect a Windows based computer to the projector you may see a New Hardware Wizard saying your computer has found a plug and play monitor if so click Cancel note For newer ...

Page 47: ...puter Component ports and the other end to your computer s monitor port Then go to step 4 2 You can connect an optional stereo mini jack audio cable to play sound through the projector see page 57 an external monitor see page 50 or a USB cable to use the remote control as a mouse see page 49 3 When you ve finished making any connections see page 18 for instructions on turning on the projector and ...

Page 48: ...ter to connect the VGA cable to your computer This is available from Epson see page 13 1 To use the adapter remove its cover as shown and set its DIP switches according to the resolution you want to use such as 16 inch mode See your Macintosh documentation for instructions 2 Replace the cover and connect the adapter to the VGA cable Then plug the cable with the adapter into the video port on your ...

Page 49: ...ntosh OS X 10 2 x to 10 3 x or OS 8 6 to OS 9 x 1 Locate the USB cable that came with your projector 2 Connect the square end of the cable to the projector s USB port 3 Connect the flat end of the cable to any available USB port on your notebook or desktop computer 4 If necessary configure your computer to work with an external USB mouse See your computer documentation for details note For details...

Page 50: ...nal monitor connect it to the projector s Monitor Out port as shown Follow these guidelines to view images on the monitor The monitor displays the currently selected computer source Press the Preview button on the remote control if you want to display all the active sources at the same time see page 35 You can also view images on the monitor while the projector is in Standby mode if you ve set Net...

Page 51: ...ource on page 53 If your video player has a component video port three connectors labeled either Y Cb Cr or Y Pb Pr see Connecting a Component Video Source on page 54 If your video player has an RGB video port either a single connector for a VGA style monitor cable or three connectors labeled R G B see Connecting an RGB Video Source on page 55 After connecting video cables you may also want to Con...

Page 52: ...tor 3 If you want to play sound through the projector see page 57 for instructions on connecting an audio cable 4 If you don t need to make any other connections see page 18 or the Quick Setup sheet for instructions on turning on the projector and adjusting the image Once the projector is turned on select the image source press the Search button on the remote control or press the Source Search but...

Page 53: ...ctor on the projector 3 If you want to play sound through the projector see page 57 for instructions on connecting an audio cable 4 If you don t need to make any other connections see page 18 or the Quick Setup sheet for instructions on turning on the projector and adjusting the image Once the projector is turned on select the image source press the Search button on the remote control or press the...

Page 54: ...onnecting an audio cable 4 If you don t need to make any other connections see page 18 for instructions on turning on the projector and adjusting the image Once the projector is turned on select the image source press the Search button on the remote control or press the Source Search button on the projector s control panel repeatedly until the image appears note Be sure your video player is not an...

Page 55: ...ctions on connecting an audio cable 4 If you don t need to make any other connections see page 18 for instructions on turning on the projector and adjusting the image Once the projector is turned on select the image source press the Search button on the remote control or press the Source Search button on the projector s control panel repeatedly until the image appears note Be sure your video playe...

Page 56: ...lot 2 Connect the flat end of the USB cable to the USB Type A port on the projector as shown 3 Connect the square end of the cable to your camera or other device Removing the USB Cable If you re using CardPlayer to project your images close the program before you remove the USB cable from the projector 1 Position the cursor over the EJECT button in the upper right corner of the CardPlayer screen 2...

Page 57: ...ollow these steps 1 Locate the appropriate commercially available audio cable Which cable you use depends on how your equipment is connected If you have a computer connected to a Computer Component port use a stereo mini jack cable If you have video equipment connected to the Video or S Video port use an RCA style audio cable 2 Connect the audio cable to the jack corresponding to the connected vid...

Page 58: ...to use a commercially available audio cable with a stereo mini jack connector on one end and pin jacks on the other end For some speakers you may have to purchase a special cable or use an adapter 2 Connect the stereo mini jack end of the audio cable to the Audio Out port on the projector 3 Connect the other end s of the cable to your speakers The projector s internal speaker system is disabled wh...

Page 59: ...tically mirrored on the screen You ll find instructions in this chapter on Starting EasyMP Connecting to the projector in Ad Hoc computer to computer mode or Access Point infrastructure mode Using wireless security options Projecting wirelessly Using projector groups Removing the wireless 802 11g card Before starting make sure you ve installed EMP NS Connection as described on page 183 for each co...

Page 60: ... the remote control to select EasyMP as the source 3 Insert the Epson 802 11g card in the card slot with the label facing upward note Only the Epson 802 11g card is guaranteed to work Other brands may not be compatible caution Be careful to insert the card correctly and never force the card in doing so may damage it The black end of the card protrudes from the slot when the card is fully inserted ...

Page 61: ...d projector for the mode you want to use Ad Hoc mode also called computer to computer mode or Access Point mode also called infrastructure mode skip to Projecting Wirelessly on page 83 Otherwise continue with the next section note If you see a message asking you to insert a LAN or memory card check to make sure your 802 11g card is properly inserted Ad Hoc mode Access Point mode ...

Page 62: ...e computers with wireless network cards or adapters Follow the instructions below for the mode you want to use Using Ad Hoc Mode To use Ad Hoc computer to computer mode adjust your projector and wireless card or adapter settings as described in this section Configuring the Projector 1 Switch the projector to EasyMP mode and insert the Epson 802 11g card see page 60 You see this screen note Make su...

Page 63: ...r name text box then press Enter The outline of the text box turns yellow to indicate you are in input mode Press the pointer button up to select individual letters in alphabetical order or down to select letters in reverse order then press the pointer button to the right to move to the next character position When you re done typing the new name press Enter Easy connect mode note If you want to e...

Page 64: ...button to highlight it then press Enter Highlight the OK button again and press Enter to return to the main EasyMP Network Screen Now you re ready to set up your computer for wireless projecting Go to Configuring the Network Settings for Windows below or Setting Up Your Macintosh for Ad Hoc Mode on page 67 Configuring the Network Settings for Windows Before connecting to the projector you need to ...

Page 65: ...ess Network 65 You see a screen similar to this 2 Right click the Wireless Network Connection icon and select Properties You see a screen similar to this 3 Click the Configure button Right click and select Properties Click here ...

Page 66: ...the settings may be different than those listed here Set the Network Type to 802 11 Ad Hoc Set the SSID to match the name you assigned to the projector s ESSID Make sure Encryption is Disabled 6 Click the General tab and make sure that your wireless card or adapter is enabled 7 When you re done click OK to close the Properties dialog box Now you re ready to connect to the projector See Projecting ...

Page 67: ...ull down menu select System Preferences 2 Double click the Network icon You see the Network settings window 3 Make sure Location is set to Automatic 4 Select Network Port Configurations in the Show pull down menu 5 Under Port Configurations select AirPort 6 Click Apply Now Then close the window note If you don t need the other network port configurations disable them by deselecting their checkboxe...

Page 68: ...de To use Access Point infrastructure mode first adjust your projector and wireless access point or AirPort base station settings as described in this section Configuring the Projector 1 Switch the projector to EasyMP and insert the Epson 802 11g card see page 60 You see this screen 2 To select Config press the Enter button on the remote control 3 Highlight Basic under Wireless LAN and press Enter...

Page 69: ...s Enter The text box turns yellow to indicate you are in input mode Press the pointer button up to select individual letters in alphabetical order or down to select letters in reverse order then press the pointer button to the right to move to the next character position When you re done typing the new name press Enter Accesspoint mode note If you want to enter a blank space use the space characte...

Page 70: ...When prompted by NS Connection you can enter the keyword on your computer to connect see page 86 8 If your access point assigns IP addresses automatically turn on DHCP Otherwise turn off DHCP and enter the following information manually IP address Type in the IP address you want to assign to the projector It must be formatted like other addresses on the network the first two segments XXX XXX shoul...

Page 71: ...ady to set up your computer for wireless projecting Go to Configuring the Network Settings for Windows below or go to Setting Up Your Macintosh for Access Point Mode on page 77 If you need to use WEP WPA or LEAP security options see page 79 to set up the option that your network uses on the projector Configuring the Network Settings for Windows Before connecting to the projector you need to make s...

Page 72: ... see a screen similar to this 3 Click the Configure button note On some Windows systems you can right click My Network Places or Network Neighborhood on the desktop and select Properties Settings may vary depending on your wireless network adapter See the documentation for your adapter for more information Right click and select Properties Click here ...

Page 73: ...gs may be different than those listed here Set the Network Type to Infrastructure Set the SSID to match the name assigned to the access point which should also be the projector s ESSID Make sure Encryption is Disabled if you have not set up encryption on the projector 6 Click the General tab and make sure that your wireless card or adapter is enabled 7 When you re done click OK to close the wirele...

Page 74: ...nting Through a Wireless Network 8 Right click the Wireless Network Connection icon again and select Properties You see this screen 9 Select Internet Protocol and click the Properties button You see this screen ...

Page 75: ...nt must be unique Subnet mask For example 255 255 255 000 but this depends on how your network is set up Default gateway Enter the IP address that was assigned to the access point when it was set up 11 When you re done click OK 12 Click the Wireless Networks tab If you don t see this tab you may need to enable your wireless card or adapter by clicking Configure to access the device settings then f...

Page 76: ...ndows If you re entering IP addresses manually and need to find out the gateway IP address the IP address of your access point make sure the wireless connection to the access point is currently active as described in the previous section Then follow these steps 1 Access your wireless network Properties window For example in Windows XP you would click Start Control Panel Network and Internet Connec...

Page 77: ...Your AirPort software is automatically configured to allow your Macintosh to detect Access Point networks Typically you only need to select your AirPort network name from the AirPort status menu on the Macintosh menu bar If you re having problems connecting to the projector follow these steps 1 From the Apple pull down menu select System Preferences 2 Click the Network icon You see the Network set...

Page 78: ...elect Network Port Configurations then select AirPort note If you don t need the other network ports disable them by deselecting their checkboxes If more than one network port is enabled the projector software warns you to turn off AirPort when you first connect the projector Disregard this message Your AirPort network and base station names may be different To check or change your AirPort network...

Page 79: ...curity Options You can use the following security options when connecting to the projector wirelessly WEP encryption WPA security or LEAP authentication To set these security features up on your wireless network see your documentation or get help from your network administrator See the following sections to enable the security option on your projector Adding WEP Encryption on page 80 Adding WPA Se...

Page 80: ...s the pointer button to the right to move to the next character position When done typing your encryption key press Enter Check with your network administrator for directions on entering a key for your network and follow these general guidelines For 128 bit WEP encryption with hexadecimal input enter 26 characters from 0 to 9 and from A to F note Text input for WEP encryption varies with different...

Page 81: ...ext box turns yellow to indicate you are in input mode Press the pointer button up to select individual letters in alphabetical order or down to select letters in reverse order then press the pointer button to the right to move to the next character position When done typing the key press Enter 3 When you re done making settings highlight the OK button at the top of the screen and press Enter note...

Page 82: ...e typing the user name press Enter Highlight the Password text box and press Enter The box turns yellow to indicate you are in input mode Press the pointer button up to select individual letters in alphabetical order or down to select letters in reverse order then press the pointer button to the right to move to the next character position When done typing the password press Enter 3 When you re do...

Page 83: ...Connection you may see a dialog box asking you to select your network Select the IP address for your computer s network card and click OK note If you don t see your network adapter s IP address allow a minute for it to appear If your access point or AirPort base station uses DHCP Distribute IP addresses setting is enabled for AirPort sometimes it takes a minute for the server to pick up the IP add...

Page 84: ...connected to your computer If you don t see your projector check the following Make sure your wireless signal is strong enough to establish a connection If you have a Macintosh check the AirPort icon on the Macintosh menu bar For Windows see the documentation for your access point or computer network card Make sure you re trying to connect to the right network In Windows verify that you ve enabled...

Page 85: ...e sensitive Check the IP address for both your projector and your wireless card adapter access point or AirPort base station The first three segments of the IP address should be identical The last segment of the projector s IP address should be close but not identical to the last segment of the IP address for your wireless interface access point or base station Restart your computer and start NS C...

Page 86: ...ord before connecting you see a screen like this one Type in the four digit number displayed on the EasyMP Network screen and click OK 6 Once the connection is established you see your computer s image transmitted to the screen and a floating control bar on your computer desktop 7 If necessary you can drag the control bar out of the way on your screen 8 When you re done with your presentation clic...

Page 87: ...ection Lists projectors and specifies which ones are in use Lets you access the projector s menu system from an HTML browser window See page 149 for more information Lets you keep the projected image on screen even if the image on your computer changes Turns off the image and sound Lets you zoom in on a part of your image Lets you change the brightness contrast and color mode Lets you switch betwe...

Page 88: ... Sync buttons on the projector s control panel Contrast Increase or decrease image contrast Color Mode Lets you select from five preset modes to adjust the color and brightness for specific environments sRGB for computer displays the default when projecting from a computer with analog video Dynamic for presentations in bright rooms Presentation for presentations in dark rooms Theatre for optimizin...

Page 89: ...nt subnet Access Point mode only or connecting over different routers 1 Start NS Connection see page 83 You see this screen 2 Click the Extension button You see this screen note Depending on your network your projector and computer may connect over different routers even if they are in the same room Try this method if you are unable to connect automatically Click here Select this box ...

Page 90: ... 4 Click IP connection You see this screen 5 Enter the projector s IP address and click Search Click here Enter the IP address and click Search note You can add up to 16 projectors to the list If you add more NS Connection begins to delete projectors from the list starting with the first projector added ...

Page 91: ... Connect button If more than one projector is listed you can select additional projectors and connect to them at the same time 7 If you are prompted for a keyword enter the four digit number displayed on the EasyMP Network screen and click OK The computer s image is transmitted to the projector and appears on the screen See page 86 for details about using the floating control bar on your computer ...

Page 92: ... is already using it Access Point mode only follow these steps 1 Start NS Connection see page 83 You see this screen 2 Select the projector you want to use and click Connect You see this message 3 Click Yes to connect The other user is automatically disconnected and notified about the interruption Select projector ...

Page 93: ...ght to make sure it isn t flashing or on Then press the eject button The button pops out 3 Press the eject button again The wireless card partially ejects 4 Pull the card straight out Then press the eject button back in to prevent it from being damaged Click Disconnect caution Never remove the card while the card indicator light is green or when projecting wirelessly You may damage the card or los...

Page 94: ...94 Presenting Through a Wireless Network ...

Page 95: ...ollowing Inserting the memory card in the projector and removing it Creating a slideshow on the fly Presenting image files from a digital camera Presenting image files from an external drive Creating a scenario Transferring your scenario to a memory card Presenting scenarios Supported file formats note To create a scenario you need a memory card and a card reader on your computer Also make sure yo...

Page 96: ...ard is not in use the indicator light next to the card slot should be off 2 Press the eject button above the card slot The button pops out 3 Press the button again The memory card is released and you can remove it from the slot in the projector 4 To remove the card from the adapter pull it out as shown note If a digital camera is connected to the projector disconnect it before inserting the memory...

Page 97: ...ontrol to highlight the folder containing your images and press Enter 2 From the drop down menu use the pointer to select Play Slideshow and press Enter The images contained in the folder are presented as a slideshow Use the remote control to run the slideshow as described in the next section Controlling Your Slideshow While your slideshow is running use the remote control as follows Press Enter o...

Page 98: ...ng for your slides and change several other display settings 1 Select the folder containing the images for the slideshow settings you want to change and press Enter 2 From the drop down menu use the pointer to select Options and press Enter You see this screen 3 Use the pointer button to select from the following settings After making a selection press Enter to save the change Continuous Play Dete...

Page 99: ...ojector or remove the memory card Presenting Image Files From a Digital Camera This section explains how to project individual image files on your digital camera using EasyMP CardPlayer and a USB cable connection Before you begin make sure there is no memory card in the projector s card slot You cannot have the camera connected while a memory card is inserted neither the camera nor the card will f...

Page 100: ...the slideshow press the Esc button on the remote control then select Exit and press Enter Presenting Image Files From an External Drive This section explains how to project individual image or movie files from an external hard drive or flash memory drive using EasyMP and a USB connection Before you begin make sure there is no memory card in the projector s card slot You cannot have a drive connect...

Page 101: ...nd press Enter 6 Select Open Folder in the drop down menu When the folder opens you see another folder with your manufacturer s name 7 Position the cursor on the folder and press Enter 8 Select Open Folder You see your image files when the folder opens 9 Position the cursor on the image file you want to project and press Enter 10 Select View Image The image is projected on the screen If you want y...

Page 102: ... Follow these steps to convert a PowerPoint file to a scenario Once the scenario is created you can set up transitions as described on page 108 1 Make sure the EMP SlideMaker program is closed 2 Locate the PowerPoint file you want to use in My Computer or Windows Explorer 3 Drag the file icon on top of the EMP SlideMaker2 icon on your desktop 4 You see a message that some transitions are not suppo...

Page 103: ... scenario that you don t want to use right click those cells and select Inactivate 7 Choose Save from the File menu EMP SlideMaker 2 automatically names your scenario SCNnnnn sit where nnnn is an automatically assigned number It also creates a folder for it within your Program Files EMP SlideMaker2 folder However you can choose Save As from the File menu and enter a new scenario name and folder lo...

Page 104: ...s You ll need to set up your scenario file and folder build the scenario set up transitions and check the scenario Setting Up the Scenario File and Folder 1 Double click the EMP SlideMaker2 icon on your computer s desktop or click Start Programs or All Programs Epson Projector EMP SlideMaker2 You see the EMP SlideMaker 2 screen Folders window File window Scenario window File type selection box Thu...

Page 105: ...play an audio file during the scenario A selection screen appears letting you choose a WAV file After you select the file you want click the arrow button to the right of the option to play it The Background Color appears around images that don t fill the entire screen area Select a new color if desired Select the Image Quality for imported PowerPoint slides Higher quality images look better on the...

Page 106: ...to locate the files you want to include in your scenario PowerPoint JPEG bitmap and movie files appear as icons in the file window 2 Click the icon for each file that you want to preview The preview appears in the thumbnail preview window If you click a PowerPoint icon thumbnail images are generated for all the slides in the PowerPoint file If you click a movie file an illustration of a film strip...

Page 107: ... The cell background color varies according to the type of file in the cell 5 If you want you can make changes to the scenario To rearrange cells drag and drop them as necessary within the scenario window To delete a cell right click the cell and select Cut To check the animation for a slide click its cell A section appears at the bottom of the scenario window displaying each animation operation S...

Page 108: ...your slides to advance manually or automatically after a specified period of time You can also choose from a variety of transition effects between slides 1 Click the cell or cells for which you want to set up in the scenario window To select more than one cell hold down the Ctrl key while you click To select all the cells choose Select All from the Edit menu Selected cells turn yellow 2 Right clic...

Page 109: ... slides manually using the remote control 5 To add a transition effect such as a dissolve fade or wipe select one of the Animation Effects settings and choose a Direction setting if applicable 6 When you re finished setting up the transition for the selected cell or cells click OK 7 Click the Save button or choose Save from the File menu Continue with the steps in the next section when you re read...

Page 110: ...ck the file then click File Open to open the scenario 2 Click Scenario Option s Scenario Preview The Scenario Preview window displays If the scenario is set to advance automatically see page 109 it begins to play If it is set to advance each time you click the mouse click the play button to go through your slides one by one 3 Use the controls in the Scenario Preview window to pause stop rewind or ...

Page 111: ... review Click the file then click File Open to open the scenario 4 From the Scenario Option s menu choose Send Scenario You see a drive selection window 5 Choose the drive where your card is located and click OK 6 Click OK again to confirm Your scenario is transferred to the card CompactFlash Memory Stick SmartMedia Microdrive ATA flash does not require a PC card adapter note You have to save the ...

Page 112: ...nario to run automatically click Cancel Skip to step 11 to remove the card and insert it in the projector If you want it to run automatically click OK and continue with the following instructions You see the Edit Autorun window 8 To set a scenario to run automatically select it from the list on the left side of the screen and use the arrow button to move it to the list on the right Scenario set to...

Page 113: ...projector as described on page 96 The follow these steps to present your scenario 1 Turn on the projector if it s not already on If your scenario is set to autorun it will start as soon as the projector warms up If your scenario is not set to autorun you need to start it manually Continue with the following steps 2 Select EasyMP as the source by pressing the EasyMP button on the remote control You...

Page 114: ...in playing a movie Press Page up to display the previous slide or image or to replay a movie Press the appropriate side of the pointer button to rotate a slide or image on the screen To exit the scenario at any point press the Esc button Press the Enter button to confirm that you want to exit Editing Your Scenario on the Projector You can modify your scenario using EasyMP on the projector This let...

Page 115: ...iles A yellow line or I beam appears beside the slide Use the pointer button to move the I beam where you want to insert the slide and press Enter The slide moves to the new position 4 To hide a slide highlight the slide you want to hide and press Enter From the drop down menu select Show Hide If you change your mind and want to display the slide again repeat this step to make the slide visible 5 ...

Page 116: ...hat is included with the projector Graphics bmp Only 24 bit color files can be played gif Images with a resolution greater than 1024 768 cannot be projected jpg Projection is not possible for CMYK color formats progressive formats and images with a resolution in excess of 2560 1920 png Projection is not possible for images with a resolution in excess of 2560 1920 Movie mpg MPEG2 PS If the movie ex...

Page 117: ...atures This chapter covers the following information Using the menu system Adjusting the image quality Adjusting the image size shape and position Adjusting the color Adjusting the sound Using the projector security features Controlling multiple projectors Customizing projector features Enabling Quick Setup options ...

Page 118: ...gh the menu list When you ve highlighted the desired menu press the Enter button to select it 3 Once you ve selected the menu use the pointer button to scroll through the list of options Some of the options may be grayed out or unavailable depending on the selected source 4 After highlighting the option you want to adjust use the pointer button to change the setting In some cases you may have to p...

Page 119: ...in a specific menu or all the settings in all menus To restore the settings in a specific menu enter the menu whose settings you want to change select Reset and confirm as needed The example below shows how to reset the Settings menu To restore all the projector settings to their factory default values select the Reset menu highlight All Reset and press Enter Reset settings for current menu Reset ...

Page 120: ...desired option then adjust it as needed Color Mode Lets you quickly adjust the color and brightness for various environments Use either the remote control or the Color Mode setting in the Image menu You can save a different setting for each computer and or video source Select from these settings Dynamic For projecting movies or playing video games in vivid color in a bright room Presentation For p...

Page 121: ...on to changing the position of the projected image you can correct tracking and sync for computer images or change the aspect ratio to widescreen format for video images 1 Press the Menu button on the remote control and select the Signal menu You see a screen similar to the one below The settings will be different depending on the source you are projecting from note The Brightness setting changes ...

Page 122: ... cut off on one or more sides it may not be centered exactly Select this setting and use the pointer button to center it Preset Once you ve fine tuned the settings in the Signal menu for the computer you re using you can save them as a group using one of the ten Preset settings The next time you use the same computer simply press the Preset button on the remote control to recall your saved setting...

Page 123: ...e to make the best use of the display area If you press the Resize button on the projector or remote control the projector displays the image at the output resolution of the computer which makes the image larger or smaller depending on its resolution If the resolution of the image is the same as the projector s 1024 768 pressing Resize has no effect For video images pressing Resize switches the as...

Page 124: ...ctor Position in the Signal menu If the image is slightly cut off on one or more sides it may not be centered exactly Select this setting and use the pointer button to center it not available for digital RGB or RGB video images ...

Page 125: ...r playing video games in vivid color in a bright room Presentation For presentations in dark rooms Theatre For optimizing movie images with natural color in a dark room the default for video or S Video display Living Room For playing video games and watching TV in a bright room sRGB For standard sRGB computer displays the default when projecting from a computer with analog video Color Adjustment i...

Page 126: ...the Projector Security Features To prevent unauthorized use of the projector you can do the following Assign a password this can be disabled for a set period if you want to loan the projector to someone See page 127 Create an identifying user logo that is displayed at startup and or when the A V Mute button is pressed See page 130 Disable the projector s buttons this is useful for example if you r...

Page 127: ...isplay the password screen If an incorrect password is entered thirty times in succession the user must contact Epson to unlock the projector The default setting for the Password Protect function is OFF Follow these steps to turn password protection on 1 Press the Freeze button on the remote control for about five seconds You see this screen 2 Use the pointer button to set Power ON Protect to ON T...

Page 128: ... that you want the password feature disabled If you want the projector to request the password every time it is turned on set the timer to 0H The countdown for the elapsed time begins as soon as you close the Password Protect menu You can check the elapsed time in this menu next to Time elapsed 10 To enable your screen logo select User s Logo Protect and press Enter Select ON and press Enter When ...

Page 129: ...n succession you see the message The projector s operation will be locked Request code xxxxx and the projector switches to standby mode for approximately 5 minutes Write down the request code Then disconnect the projector s power cord from the electrical outlet reconnect it and turn the projector back on When you see the Password Protect Release screen again you can try to enter the correct passwo...

Page 130: ...r a computer or video source such as a DVD player or digital camera Then follow these steps to capture the image and transfer it to the projector 1 Press the Menu button on the remote control highlight the Extended menu and press Enter 2 Highlight User s Logo and press Enter 3 When you see a message asking whether you accept the present image as the user s logo select Yes and press Enter A selecti...

Page 131: ...Enter 3 Select the screen s on which you want your image to appear Highlight Display Background to display your image instead of a blank screen when there is no video signal coming from the currently selected source Then press Enter Highlight A V Mute to display your image when you press the A V Mute button Then press Enter 4 Select Logo and press Enter 5 When you re finished press Esc to exit Dis...

Page 132: ...t ID is 1 Follow these steps to change it 1 Press the Menu button on the remote control You see the projector s menu screen 2 Select the Extended menu and press Enter 3 Highlight Projector ID and press Enter 4 Choose an ID value for the projector and press Enter 5 When you re done press Esc to exit the menu system note By default the remote control s ID is set to zero which allows it to control an...

Page 133: ...n the remote control to select the ID of the projector you want to operate The ID button s light shuts off and the new ID is registered 3 Repeat steps 1 and 2 each time you want to switch projectors To check the remote control s current ID do the following 1 Press the ID button twice After a moment the button flashes 2 Count the number of flashes this number corresponds to the remote control s ID ...

Page 134: ...ed menu Select Front to project from the front of a screen and right side up Front Ceiling when the projector is mounted upside down from the ceiling Rear to project from behind onto a transparent screen or Rear Ceiling to project from behind onto a transparent screen when the projector is mounted upside down from the ceiling Language in the Extended menu Select from nine languages to be used for ...

Page 135: ...Select the Setting menu and press Enter Then highlight Quick Setup and press Enter 3 Select Quick Setup Options and press Enter 4 Adjust any of these options Highlight Auto Focus to automatically focus the projector Highlight Auto Quick Corner to automatically straighten the image if it is not rectangular Highlight Wall Shot to project on walls or surfaces that are not white 5 Press Enter then hig...

Page 136: ...tton on the remote control You see the projector s menu screen 2 Select the Setting menu and press Enter Then select Quick Setup and press Enter 3 Select Startup Options and press Enter 4 Select Quick Setup and press Enter 5 Press the Menu button to exit note Auomatic Quick Setup works only when the projector is set to Front projection See page 187 for more information ...

Page 137: ... to manage your projectors first install EMP Monitor as described on page 185 If you plan to create projector groups also install EMP NS Connection Then connect and configure each projector you want to monitor You can connect the projector wirelessly in Access Point mode as described on page 68 or over a wired network as described on page 138 This chapter covers the following information Connectin...

Page 138: ...mote control and press Enter Use the remote to highlight Basic under Wired LAN or Wireless LAN 4 If your network assigns addresses automatically turn on DHCP If your network does not assign addresses automatically turn off DHCP and enter the projector s IP Address Subnet Mask and Gateway Address as needed To enter numbers using the remote control press the Num button until it lights then use the n...

Page 139: ...oftware available for Windows only as described on page 185 The computer you re using to monitor the projector should already be connected to your network Opening and Closing EMP Monitor To start EMP Monitor click Start Programs or All Programs Epson Projector EMP Monitor If you ve added the program to the Startup programs folder then it may already be open If so click the icon in the system tray ...

Page 140: ...Click Register projector You see this screen 3 Click Auto detect to locate projectors currently operating on the network Or click Manual registration and enter the projector s network IP address Click here Click here note If Auto detect fails to find the projector your projector may not be connected or configured correctly for the network See page 138 to configure your projector for a wired networ...

Page 141: ...Select each projector you want to add by clicking its name then clicking the Add button When you re done click Close You see this screen with a list of all registered projectors 5 Click Close Click here note To delete a projector from the list highlight the projector name and click Delete ...

Page 142: ...m which source or port they are projecting an image and if a problem occurs For detailed status information select the projector and click View details note To monitor a projector when it s in standby mode plugged in but not turned on you must select Network ON as the Standby Mode setting in the projector s Extended menu see page 134 Remember that when Standby Mode is set to Network ON the exhaust...

Page 143: ...n Projecting no problems dark Turned off no problems green Projecting problems detected dark Turned off problems detected Network error for example not connected to the network or power cable disconnected You may also see this error if Network OFF is selected in Standby Mode see page 134 Video source icons Computer Component 1 Computer Component 2 S Video Video EasyMP ...

Page 144: ...icons Lamp replacement notification the lamp is nearing the end of its life see page 163 High speed cooling in progress the projector is getting too hot but continues to operate Overheating projection turned off automatically Lamp out or lamp cover open Fan error Sensor error Internal problem note To turn on a projector when it s in standby mode plugged in but not projecting you must have selected...

Page 145: ...emote control Control buttons Turns the projector on Turns the projector off Changes the video signal to the Computer Component 1 port Changes the video signal to the Computer Component 2 port Changes the video signal to the S Video port Changes the video signal to the Video port Switches the display to EasyMP note The projector must be plugged in projecting or in standby mode for you to be able t...

Page 146: ... button on the remote control to switch to EasyMP You see the following screen 4 Select Config in the lower right corner of the screen and press Enter on the remote control 5 When you see the screen below select Mail and press Enter Select Mail ...

Page 147: ...ter Enter the e mail address for the first computer that you want to receive e mail alerts You can enter a maximum of 53 single byte alphanumeric characters Use the pointer button on the remote control to enter letters Press the top of the button to scroll through capital letters and the bottom of the button to scroll through lowercase letters You will also see punctuation marks such as a period a...

Page 148: ...elp understanding e mail alerts see the next section Understanding the Notification Messages If a projector experiences a problem it sends an e mail message to each of the addresses you provided using EMP NetworkManager The message includes Epson Projector in the subject line The body of the message contains The name of the projector The projector s IP address A description of the problem The prob...

Page 149: ...itor in the browser window If you re not sure what address the projector is using turn it on and switch it to EasyMP Then choose Basic under Wired LAN or Wireless LAN and press Enter You see a screen like this which shows you the IP address 3 If you re connected over a wired network the projector s web screen opens in the browser window note You can t use your browser to monitor projectors if it i...

Page 150: ...ings correspond to those found in the projector s menu system for details see page 118 You cannot use the web browser to change these settings Pointer in the Setting menu User s Logo in the Extended menu All Reset or Lamp Hours Reset in the Reset menu 5 Use the controls at the bottom of the screen just as you would the corresponding remote control buttons choose a source stop the action control th...

Page 151: ...You can register up to 16 projectors as a group and all projectors must be part of your wireless network 1 Start NS Connection See page 83 2 Click the Extension button on the EMP NS Connection screen You see this screen 3 Select Use IP connect mode and Use Group List tip Use a static IP address when configuring a projector for the network if you plan to use it in a group If you use DHCP the projec...

Page 152: ...dvanced button You see this screen 5 Enter a name for the group in the Connection Group box Then enter the IP address of the projector you want to register in the IP address box note You cannot use the addresses 0 0 0 0 or 255 255 255 255 ...

Page 153: ... the projector list 7 Repeat steps 5 and 6 for each projector you want to add to the group 8 Click OK to save the projectors as a group When you see a confirmation message click Yes 9 Click Close to close the Advanced screen 10 Click OK to close the Extension screen then close NS Connection note To remove a projector from the group select it from the projector list and click Delete ...

Page 154: ...in a Group Follow these steps to connect to a projector in a group 1 Start NS Connection See page 83 2 Click the Extension button on the EMP NS Connection screen You see this screen 3 Select Use IP connect mode and Use Group List Select these two boxes ...

Page 155: ... and click OK 5 When you see the next screen click IP connection If the upper left button on the screen says IP connect mode rather than Automatic search mode skip this step You see this screen 6 Select the projector you want to connect to and click Connect Select the projector Then click Connect ...

Page 156: ... multiple users 1 Start NS Connection See page 83 2 Click the Extension button on the EMP NS Connection screen You see this screen 3 Select Use IP connect mode and Use Group List note You must export all of the groups in the Connection Group list You can t export individual groups Even if a projector is registered in a group you don t have to use the group to connect to it If your notebook is conf...

Page 157: ...6 Highlight the file name NSGroup ini and select Save to 7 Choose a location on the second computer and click Save To connect to the projector from the new computer follow the steps beginning on page 154 note If you haven t created any groups the Export button will be grayed out You must create at least one group before the Export button is active ...

Page 158: ...as a file to another computer on the wireless network 1 Start NS Connection See page 83 2 Then click the Extension button on the EMP NS Connection screen You see this screen 3 Select Use IP connect mode and Use Group List 4 Click the Advanced button You see this screen Select these two boxes ...

Page 159: ...t screen select the file you want to import and click Open The names of all of the groups in the file are added to the Connection Group list on the Advanced screen To connect to the projector from the new computer follow the steps beginning on page 154 ...

Page 160: ...160 Managing Projectors ...

Page 161: ...er or a qualified servicer This chapter covers the following Cleaning the lens Cleaning the projector case Cleaning the air filters and vents Replacing the lamp and air filters Transporting the projector warning Before you clean any part of the projector turn it off and unplug the power cord Never open any cover on the projector except the lamp cover Dangerous electrical voltages in the projector ...

Page 162: ...or stains moisten a soft cloth with water and a neutral detergent Then wipe the case Cleaning the Air Filters and Vents Clean the air filters and air intake vents after every 100 hours of use If they are not cleaned periodically they can become clogged with dust preventing proper ventilation This can cause overheating and damage the projector Follow these steps 1 Turn off the projector Wait for th...

Page 163: ...set to High default and 3000 hours if Brightness Control is set to Low It is time to replace the lamp when The projected image gets darker or starts to deteriorate The message Replace the lamp appears on the screen when the lamp comes on and the lamp warning light flashes orange To maintain projector brightness and image quality replace the lamp as soon as possible The lamp warning light flashes r...

Page 164: ...use 4 Turn the projector over and remove the air filters at the side and bottom of the projector 5 Insert the two new air filters They should click into place 6 Turn the projector back over 7 Loosen the screw holding the lamp cover in place you don t need to remove it Then remove the lamp cover warning Let the lamp cool fully before replacing it In the unlikely event that the lamp has broken small...

Page 165: ...Once the lamp is fully inserted tighten its screws and replace the cover then tighten the cover screw The projector won t come on if the lamp cover is loose 12 Reset the lamp timer as described in the next section Resetting the Lamp Timer After you replace the lamp you need to reset the lamp timer using the projector s menus 1 Press the Menu button on the remote control or on the projector s contr...

Page 166: ... many glass and precision parts Follow these guidelines to prevent damage When shipping the projector for repairs use the original packaging material if possible If you do not have the original packaging use equivalent materials placing plenty of cushioning around the projector When transporting the projector a long distance first place it in a hard shell shipping case then pack it in a firm box w...

Page 167: ...port for problems you can t solve yourself The following information is included Using the projector s on screen help system What to do when the projector s status lights flash Solving problems with the image or sound Solving problems with EasyManagement Solving problems with the remote control Contacting technical support ...

Page 168: ...change Follow these steps to get help 1 Press the blue Help button on the projector You see the Help Menu 2 Use the pointer button on the remote control or the arrow buttons on the projector to highlight menu items 3 Press the Enter button on the remote control or on the projector to select the menu item 4 To exit the help system press the Help button If none of the suggestions solve your problem ...

Page 169: ...e for a complete description of the projector s status lights Temperature light Lamp light Power light Status lights Light Status Description Orange The projector is in Sleep Mode You can unplug it or press the P Power button to turn it on Flashing green The projector is warming up Wait for the image to appear Green The projector is operating normally Flashing orange The projector is cooling down ...

Page 170: ...de do not attempt to service this product yourself Flashing orange It s time to replace the lamp See page 163 for instructions If you continue to use the lamp after the replacement warning there is an increased possibility that the lamp may break Flashing red The lamp may be burnt out First make sure the lamp cover is securely installed If that s not the problem let the lamp cool remove the lamp a...

Page 171: ...mage or Sound No image appears on the screen Check that the Power light is green not flashing and the lens cap is off The projector may be in Sleep Mode If the Power light is orange press the PPower button to turn the projector on If the power was switched off and then on again the projector may be cooling down Wait until the Power light stops flashing and remains orange then press the PPower butt...

Page 172: ... between the LCD screen and the projector or display on both at the same time Depending on your computer s video card you might need to use the Display utility in the Control Panel to make sure that both the LCD screen and external monitor port are enabled See your computer s documentation or online help for details If you re using Macintosh OS X 1 Open System Preferences 2 Click Displays 3 Make s...

Page 173: ...ion setting is correct on the Signal menu See Chapter 6 for more information Make sure your computer s resolution setting is correct Ideally it should be 1024 768 to match the projector s native resolution If this option isn t available select one of the other compatible video formats listed on page 191 Windows Right click the desktop select Properties click the Settings tab and select a different...

Page 174: ...s The image contains static or noise Make sure the correct input signal is selected in the Signal menu see Chapter 6 If you re using a computer cable longer than 6 feet or an extension cable the image quality may be reduced Keep your computer and video cables away from the power cord as much as possible to prevent interference The video signal may be split between the computer and the projector If...

Page 175: ...the previous section If you re projecting from a computer and displaying an image that contains a lot of fine detail you may notice vertical bands or some of the characters may look heavy or blurred Press the Auto button on the remote control to reset the projector s tracking and sync settings If further adjustment is needed you can fine tune the Tracking and Sync settings manually using the butto...

Page 176: ...e is not turned all the way down or muted Also make sure the cables are connected correctly as described in on page 57 If your presentation includes computer audio make sure the volume control on your computer is not turned all the way down or muted If you re using the audio cable make sure it is securely connected to both the projector and your computer s headphone jack or audio out jack Make sur...

Page 177: ...If you have to reinstall the card restart NS Connection or the program will not be able to detect the projector Restart your computer Make sure your projector and computer are configured correctly see page 62 Ad Hoc mode or page 68 Access Point mode Make sure that you have sufficient wireless signal strength above 50 percent On a Macintosh check the AirPort icon on the Macintosh menu bar In Window...

Page 178: ...ents of the IP address of your access point or base station The last segment of the projector s IP address should be close but not identical to the last segment of the IP address of the access point or base station If you re not using DHCP check your projector s Gateway address on the projector s Access Point mode advanced settings screen It should be identical to the IP address for your access po...

Page 179: ... with EasyMP appears distorted Because of their resolution some JPEG images cannot be displayed correctly Some JPEG files from digital cameras cannot be previewed Files with a high compression ratio may appear blurry In EMP SlideMaker 2 PowerPoint files don t appear in the file window EMP SlideMaker 2 does not support PowerPoint 95 Files created in this version of PowerPoint must be opened and res...

Page 180: ...puter s PCMCIA slot before you select Send Scenario from the Scenario Option s menu If this happens close and restart EMP SlideMaker 2 Make sure your card is inserted before you select Send Scenario You can t play your movies on the projector The projector only supports MPEG2 files It does not support MPEG1 files EasyMP is unable to see the image files on your camera or external drive Make sure yo...

Page 181: ...ight and 40 above or below Dim the room lights and turn off any fluorescent lights Make sure the projector is not in direct sunlight Strong lighting especially fluorescent lights may affect the projector s infrared receivers Also turn off any nearby equipment that emits infrared energy such as a radiant room heater Where To Get Help Epson provides the following technical support services Internet ...

Page 182: ...to 6 PM Pacific Time Monday through Friday Canada 905 709 3839 6 AM to 6 PM Pacific Time Monday through Friday Toll or long distance charges may apply Before you call for support please have the following information ready Product name Epson PowerLite 835p Product serial number located on the bottom of the projector Proof of purchase such as a store receipt and date of purchase Computer or video c...

Page 183: ...tware make sure your computer meets these requirements Microsoft Windows 98 Me 2000 or XP 802 11g or 802 11b network card or wireless adapter to use EMP NS Connection IBM compatible PC with at least a Pentium III 700 MHz processor At least 256MB of RAM At least 128MB of free hard disk space SVGA 800 600 or better display adapter and monitor XGA 1024 768 recommended note You can present over a wire...

Page 184: ... the following requirements Macintosh OS X 10 2 4 or later AirPort 802 11b or AirPort Extreme 802 11g wireless network interface Power Macintosh series iMac PowerBook or iBook series At least 256MB of RAM At least 128MB of free hard disk space SVGA 800 600 or better display adapter and monitor XGA 1024 768 recommended ...

Page 185: ...M in your computer s CD ROM or DVD drive You see this screen 2 Click Install then follow the on screen instructions to install your projector software If you see a message that the Epson GDI Monitor Driver has not passed Windows Logo testing click Continue Anyway 3 When installation is complete close the installation window ...

Page 186: ...rt the EasyMP software CD ROM in your drive 2 If necessary double click the Epson CD ROM icon to open its window 3 Double click the Installer for Mac OS X icon You see this screen 4 Click Install then follow the on screen instructions to install the software 5 When installation is complete close the installation window ...

Page 187: ... of the projector s Extended menu to flip the image upside down To project from the rear onto a semi transparent screen select Rear or Rear Ceiling see page 134 If you re mounting the projector on the ceiling and you place it above screen level you ll have to tilt the projector down to position the image on the screen This causes the image to lose its square shape Front projection Rear projection ...

Page 188: ... buttons on the projector s control panel If you place the projector so that the base of the lens is level with the bottom of the screen the image should be square and you won t have to adjust it If you place the lens lower than the bottom of the screen you ll have to tilt the projector upward if you want to fill the whole screen with the image ...

Page 189: ...rast ratio 600 1 Image size 30 to 300 inches 0 8 to 7 6 meters Projection distance 2 8 to 48 3 feet 0 9 to 14 7 meters Projection methods Front rear upside down ceiling mount Internal sound system 5 W monaural Optical aspect ratio 4 3 horizontal vertical Zoom ratio 1 1 6 Noise level 28 dB or 34 dB depends on the Brightness Control setting in the Setting menu Keystone correction Automatic vertical ...

Page 190: ...s 114 mm feet retracted Width 14 4 inches 365 mm Depth 11 0 inches 280 mm Weight 10 4 lb 4 7 kg Electrical Rated frequency 50 60 Hz AC Power supply 100 to 120 VAC 3 6 A 200 to 240 VAC 1 6 A Power consumption Operating 310 W Environmental Temperature Operating 41 to 95 F 5 to 35 C Storage 14 to 140 F 10 to 60 C Humidity non condensing Operating 20 to 80 RH Storage 10 to 90 Operating Altitude Up to ...

Page 191: ...rmats listed below To project images output from a computer the computer s video card must be set at a refresh rate vertical frequency that s compatible with the projector Some images are automatically resized to display in the projector s native format XGA The frequencies of some computers may not allow images to display correctly see your computer s documentation for details Mode Refresh Rate Hz...

Page 192: ... 85 1280 960 1280 960 1280 960 SXGA3 60 SXGA3 75 SXGA3 85 60 75 85 1280 1024 1280 1024 1280 1024 UXGA 60 UXGA 65 UXGA 70 UXGA 75 UXGA 80 UXGA 85 60 65 70 75 80 85 1600 1200 1600 1200 1600 1200 1600 1200 1600 1200 1600 1200 MAC13 MAC16 MAC19 MAC21 67 75 75 75 640 480 832 624 1024 768 1152 870 NTSC NTSC 4 43 PAL N PAL M PAL PAL 60 SECAM 60 60 50 50 60 60 50 HDTV 720p HDTV 1080i 60 60 1024 576 1024 5...

Page 193: ... outlet If you have a two prong outlet contact an electrician to replace it Do not hold the plug with wet hands Take the following precautions for the plug Failure to comply with these precautions could result in sparks or fire Do not insert the plug into an outlet with dust present Insert the plug firmly into the outlet Do not overload wall outlets extension cords or integral convenience receptac...

Page 194: ...lamp s in this product contain mercury Please consult your state and local regulations regarding disposal or recycling Do not put in the trash Unplug the projector during lightning storms or when it will not be used for extended periods Do not place the projector and or remote control on top of heat producing equipment or in a hot location If you use the projector in a country other than where you...

Page 195: ...light is too bright Certain types of fluorescent lighting are used A strong light source shines into the IR receiver Other equipment that emits infrared energy such as a radiant room heater is in the room These conditions commonly cause problems for most infrared controlled equipment Try the following The remote control s batteries may be low on power replace them Dim the ambient lighting and or t...

Page 196: ...ital device Each product marketed is identical to the representative unit tested and found to be compliant with the standards Records maintained continue to reflect the equipment being produced can be expected to be within the variation accepted due to quantity production and testing on a statistical basis as required by 47CFR 2 909 Operation is subject to the following two conditions 1 this devic...

Page 197: ...ing antenna Increase the separation between the equipment and receiver Connect the equipment into an outlet on a circuit different from that to which the receiver is connected Consult the dealer or an experienced radio TV technician for help WARNING The connection of a non shielded equipment interface cable to this equipment will invalidate the FCC Certification of this device and may cause interf...

Page 198: ...ment may be another model of like kind and quality Epson s liability for replacement of the covered product will not exceed the original retail selling price of the covered product Exchange or replacement products or parts assume the remaining warranty period of the product covered by this limited warranty However each replacement lamp carries the limited 90 day warranty stated above What This War...

Page 199: ...CA INC NOR ITS AFFILIATES SHALL BE LIABLE FOR ANY LOSS INCONVENIENCE OR DAMAGE INCLUDING DIRECT SPECIAL INCIDENTAL OR CONSEQUENTIAL DAMAGES RESULTING FROM THE USE OR INABILITY TO USE THE EPSON PRODUCT WHETHER RESULTING FROM BREACH OF WARRANTY OR ANY OTHER LEGAL THEORY In Canada warranties include both warranties and conditions Some jurisdictions do not allow limitations on how long an implied warr...

Page 200: ...200 Notices ...

Page 201: ...etting 105 128 Bands vertical 175 Batteries installing 33 Blackboard projecting on 40 to 41 Blank screen 21 to 23 Blurry image 174 to 175 bmp 116 Brightness 189 Brightness setting 121 Browser monitoring projectors with 149 to 150 C Cables included with projector 12 mouse 49 ordering 13 remote control cable set 13 S video 13 53 VGA to component 47 Camera see Digital camera Capturing image 130 to 13...

Page 202: ... to 186 starting 60 to 61 web browser monitoring projector with 149 to 150 Electrical specifications 190 E mail alerts 145 to 148 EMP Monitor installing software 185 problems 177 using 139 to 145 EMP NS Connection configuring projector for 68 to 82 creating password for 64 70 disconnecting 86 encrypting presentation 86 entering keyword 86 installing software 183 to 186 problems 177 to 179 projecti...

Page 203: ...Image menu 120 to 123 Importing projector groups 158 to 159 Infrastructure mode see Access Point mode Input signal selecting 20 34 to 35 52 53 55 Installing projector 187 to 188 Installing software 183 to 186 IP Connect Mode 89 to 91 J jpg 116 K Kensington anti theft device 13 17 Keystone correction 26 to 27 123 174 189 Keyword 64 70 86 L Lamp number of hours used 171 ordering 13 replacing 163 to ...

Page 204: ...e 21 171 to 173 Noise level 189 Notebook computer display problems 171 to 173 Numeric keypad using 63 128 O Operation Lock setting 131 Optical aspect ratio 189 Options for projector 13 P Password protection 127 to 129 remote access 64 70 request code 129 PC card 111 PCMCIA slot 111 Picture source selecting 20 34 to 35 52 to 53 55 Picture see Image P in P image 38 to 39 png 116 pNS Connection see E...

Page 205: ...cifications 189 to 191 transporting 166 troubleshooting 167 to 170 turning off 29 turning on 18 to 19 unpacking 12 viewing information about 171 PSK 81 Q Quick Corner 36 Quick Setup 135 to 136 R Raising image 24 Rear screen projection 134 187 to 188 Registration 11 Remote control A V Mute button 37 as wireless mouse 41 battery used 190 checking ID 133 connecting cable for mouse 49 correcting color...

Page 206: ... 121 to 123 sit presentation file type 116 Sleep Mode 19 134 169 171 SlideMaker see EMP SlideMaker Slides displaying on the fly 97 to 99 hiding 114 to 115 rearranging 114 to 115 SmartMedia cards 111 SNMP 137 138 Software installation 183 to 186 Sound adding to scenarios 105 adjusting 126 troubleshooting 176 Source selecting 20 34 to 35 viewing 171 Speaker specifications 189 Speakers connecting 58 ...

Page 207: ... 37 Turning off projector 29 U Unpacking projector 12 USB cable 12 49 User s Logo menu 130 to 131 V VCR connecting 51 to 55 Video cables 12 13 51 connecting video equipment 51 to 55 display settings viewing 171 formats supported 191 to 192 selecting source 20 34 to 35 52 53 Video Signal setting 123 Volume adjusting 126 W Wall Shot 40 to 41 Warning lights 169 to 170 Warranty 11 198 Web browser moni...

Page 208: ...208 Index ...

Page 209: ...ons A V buttons Control image and sound Help button Provides on screen help Preset button Retrieves saved settings for Video menu Preview button Displays active image sources Auto button Optimizes tracking sync resolution and position Source buttons Switch between equipment connected to projector ports Volume controls Control sound ID button Sets remote control ID code Pointer Mouse button Moves c...

Page 210: ...ons A V buttons Control image and sound Help button Provides on screen help Preset button Retrieves saved settings for Video menu Preview button Displays active image sources Auto button Optimizes tracking sync resolution and position Source buttons Switch between equipment connected to projector ports Volume controls Control sound ID button Sets remote control ID code Pointer Mouse button Moves c...

Reviews: