background image

13

RAK133_ENG / © Ensto 2019

6.  Pull electric cables through the conduits into the foundation approx. 1500mm measured 

from the top of the foundation.

7. 

Tighten the foundation to its place by filling the excess space outside the foundation with 

gravel. 

8. 

Set the final layer of gravel so that the top of the foundation will be in level with ground 

or the final paving material.

9.  Always place a cover plate on the foundation, if the Wallbox is installed in a separate ses-

sion than the foundation. 

10.  When you start the installation of the Wallbox, remove the cover plate.
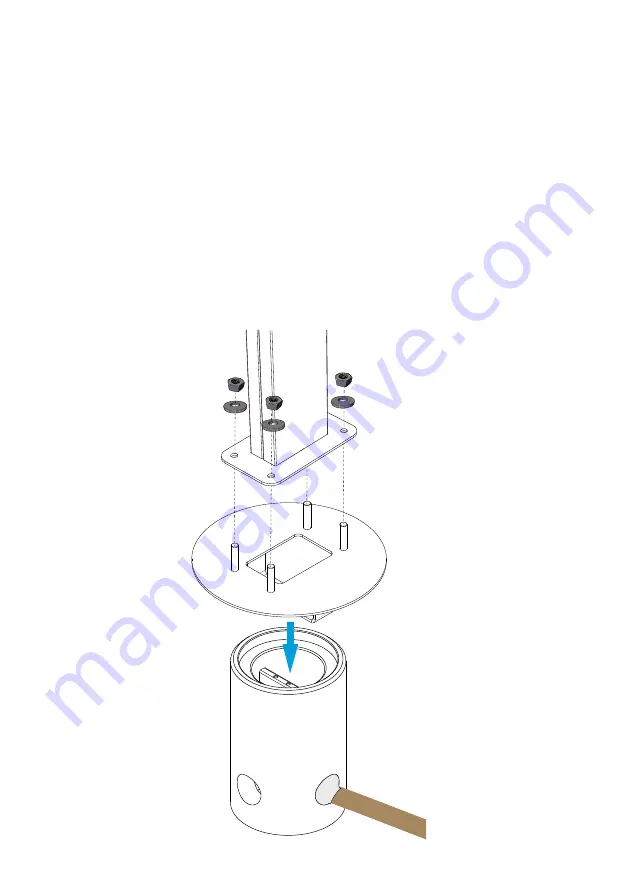
11.  Put the adapter element on the foundation. 
12.  Attach the adapter on the foundation attachment bar with bolts included in the delivery.
13.  Fit the mounting pole to the threaded bolts on the adapter. Secure with the nuts included 

in the delivery.  

14.  Pull the electric cables through the mounting pole. 
15.  Attach the Wallbox on the mounting pole. See instructions on page 14.

Summary of Contents for EVB203E Series

Page 1: ...ENG Ensto Wallbox EVB203E series RAK133_ENG 4 10 2019 Ensto 2019 Installation Instructions Operation Instructions...

Page 2: ...Pole 11 5 5 Ground Mounting on Unimi Concrete Foundation 12 5 6 Fixing Wallbox on Mounting Pole EVTL43 0E 14 6 Electrical Connections 15 6 1 Wiring Instructions 15 6 2 Power Supply 15 7 Commissioning...

Page 3: ...n device and a circuit breaker RCD MCB as well as with a MID approved energy meter Available features depend on the charger model 2 Safety Instructions The charger must be installed by a qualified per...

Page 4: ...ange KOT21715 Included in the delivery Note Cable glands are not included in the delivery Please order suitable cable glands separately according to the used supply cable sizes for example Ensto KTM c...

Page 5: ...5 RAK133_ENG Ensto 2019 EVTL43 0E Ground Floor mounting pole 200 250 150 4 x 1 4 100 781 5 4 x 9 5...

Page 6: ...6 RAK133_ENG Ensto 2019 EVTL44 00 Adapter for ground mounting 60 3 100 150 408 1 54 5 8 4 x M12 200 250...

Page 7: ...eeded for operating and maintenance Make sure that the mounting foundation is suitable and robust In order to ensure the optimal charging performance the charging station should not be exposed to dire...

Page 8: ...on the wall type 5 2 Wall Mounting with Wall Bracket Items needed Wall bracket EVTL40 00 1 pcs Screws 4 pcs Installation steps 3 Open the front cover lock and remove the front cover Note RFID LED modu...

Page 9: ...4 Place the Wallbox on the wall bracket 1 5 Attach the top of the Wallbox on the wall bracket using the screws included in the delivery 2 6 Secure the bottom of the Wallbox with the screws included i...

Page 10: ...es in place Fill the pit with concrete Let the concrete solidify make sure that the surface stays solid and level during the pro cess Installation steps 1 Make sure that the concrete surface is flat a...

Page 11: ...o the installa tion hole For more information please see the concrete foundation mounting instructions 4 Put cable and possible drain conduits in place 5 Lift the adapter EVTL44 00 into the concrete f...

Page 12: ...ur charging outlets Installation steps 1 Dig holes for cable conduits and the concrete foundation to necessary depths 2 Adjust the depth of the hole so that the top of the foundation will be in level...

Page 13: ...ial 9 Always place a cover plate on the foundation if the Wallbox is installed in a separate ses sion than the foundation 10 When you start the installation of the Wallbox remove the cover plate 11 Pu...

Page 14: ...ex tension box 3 Open the knock outs and insert the cable glands needed for electric cables on flange KOT21715 4 Pull the electric cables through the gable glands 5 Fix the Wallbox and flange KOT21715...

Page 15: ...the supply connectors 6 Close the extension box hatch 6 2 Power Supply The voltage and current ratings including cables and line protector dimensioning must com ply with national regulations System di...

Page 16: ...the Wallbox is going to be connected to some back office Online mode first make sure that the basic function ality is working before establishing communication 7 1 Connecting to Wallbox If you want t...

Page 17: ...e for charging The indicator light turns to stable blue Stop Charging with RFID Show the RFID tag to the RFID reading area When you stop the charging event the indicator light turns to waving green an...

Page 18: ...400VAC 50Hz Charging current nominal 3x32A 1x32A configurable between 6A 32A Charging power nominal Max 22kW per charging outlet Dynamic Load Management DLM Supply connections and terminals L1 L2 L3...

Page 19: ...Socket outlet Mode 3 Type 2 Charging status indication 3 color LED Green Ready Blue Charging Red Error Use access RFID ISO IEC 14443A ISO IEC 15693 Free access Mobile apps via 3rd party operators Curr...

Page 20: ...ng station with a hand to create vibration to en sure no bad contact connection exist wire or PCB Check tightness of the PE cable screw Power supply cables L1 L2 L3 N and PE are properly connected Ins...

Page 21: ...unctioning Create fail and charge with a RFID tag Red at bootup green at idle and blue while charging Available electricity at the sockets All the contacts L1 L2 L3 must be tested Use a Mode 3 tester...

Page 22: ...00 1 XST1102 1 XST1101 1 XST1100 1 XBU6000 XBU10201 8 1 XBU10200 8 1 XBU1100 8 1 4 1 XST9000 1 XBU03000 OUT L3 XBU8000 XBU8001 CT EX OUT 2 EX OUT 2 EX OUT 1 EX OUT 1 I2C Power I2C SDA I2C CLK I2C GND...

Page 23: ...ed with a Mode 3 lock release func tionality turn off the power from F0 and pull the charging cable out from the socket Option 2 Turn off the power Switch the Mode 3 lock manually into open position T...

Page 24: ...e n s t o c o m Ensto Finland Oy Ensio Miettisen katu 2 P O Box 77 FIN 06101 Porvoo Finland Tel 358 20 47 621 Customer service 358 200 29 007 ensto ensto com...

Reviews: