TB-6594
Page 9 of 12
© 2016 DESCO INDUSTRIES, INC.
Employee Owned
STATIC IP PROCEDURE
1. Share the MAC address of the SmartLog Pro™
with an IT administrator, so a static IP address
can be assigned to the unit. The MAC address
can be found on a label applied to the back of the
SmartLog Pro™.
2. Use an Ethernet cable to connect the SmartLog
Pro™ to your network. Power the SmartLog Pro.
3. The SmartLog Pro will communicate with the
network server and recieve the static IP address
assigned by the IT administrator. The IP address
can be located within the Admin Menu.
4. To access the Admin Menu, tap 0 then Enter on the
touchscreen keypad.
5. The SmartLog will prompt for the Admin ID. Tap 0
then Enter.
6. The SmartLog will prompt for the Admin PIN. Tap 0
then Enter.
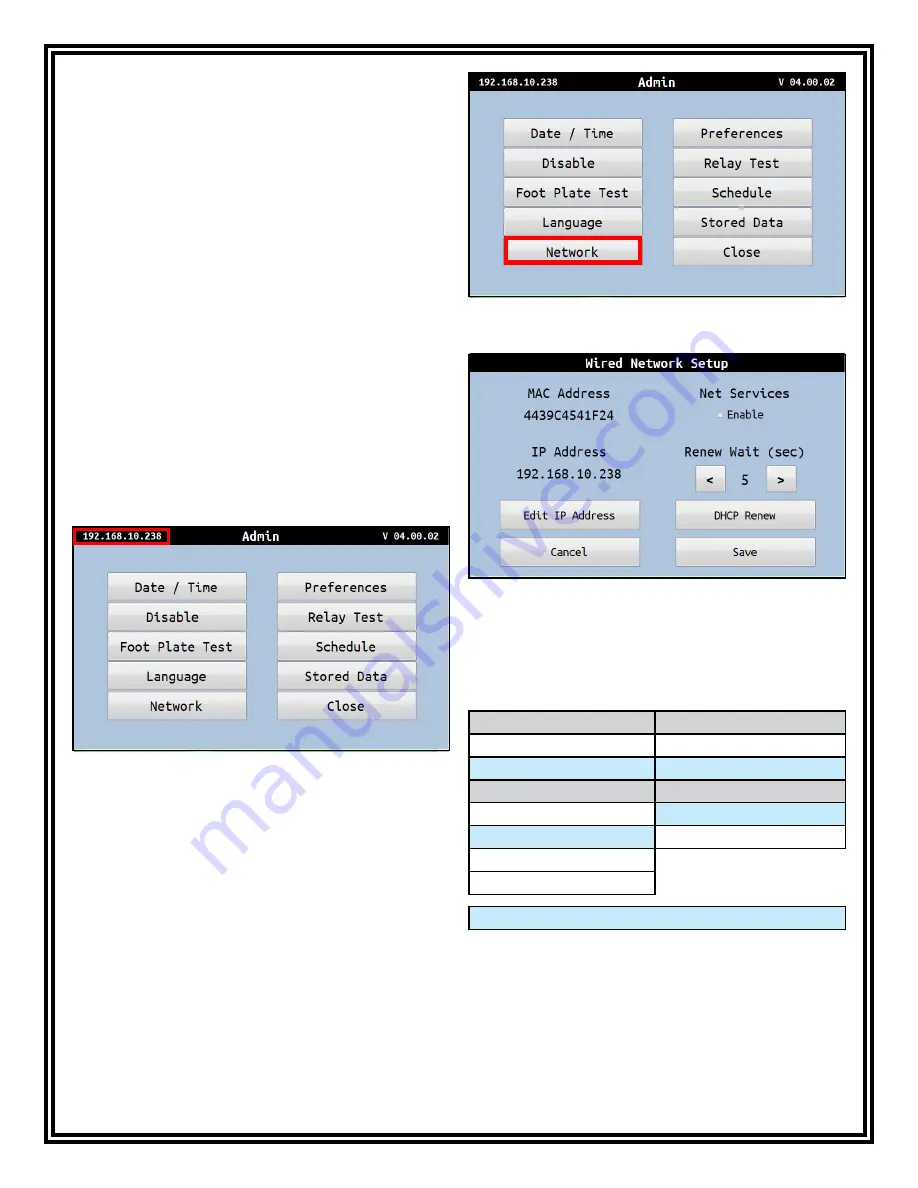
7. The Admin Menu will appear. The IP address
can be found in the top left corner. Take note
of this address as it will be required to establish
communication between the SmartLog Pro and the
TEAM5 Server Software.
Figure 13. Locating the IP address in the Admin Menu
Figure 14. Locating the Newtork button in the Admin
Menu
Figure 15. Wired Network Setup menu
8. Tap the Network button to access the Wired
Newtork Setup Menu. This menu will allow you to
view and edit any network settings if desired.
Test Limit Configuration
The following footwear and wrist strap resistance limits
are available in the SmartLog Pro™:
Footwear
Wrist Strap
LOW Limit Resistance
LOW Limit Resistance
100 Kilohms (1.0 x 10
5
)
100 Kilohms (1.0 x 10
5
)
750 Kilohms (7.5 x 10
5
)
750 Kilohms (7.5 x 10
5
)
HIGH Limit Resistance
HIGH Limit Resistance
10 Megohms (1.0 x 10
7
)
10 Megohms (1.0 x 10
7
)
35 Megohms (3.5 x 10
7
)
35 Megohms (3.5 x 10
7
)
100 Megohms (1.0 x 10
8
)
1 Gigohm (1.0 x 10
9
)**
Default Settings
**A dirty foot plate could result in a false pass when
the footwear limit is set to 1 Gigohm. Be sure to keep
the foot plate clean with 99% isopropyl alcohol when
using this setting. This setting is not suitable for relative
humidity greater than 50%.


