background image

-  -

 Intel G41 Series                                                                                            User's Manual 

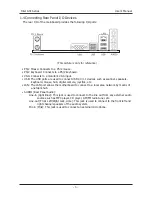
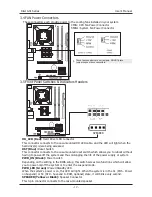
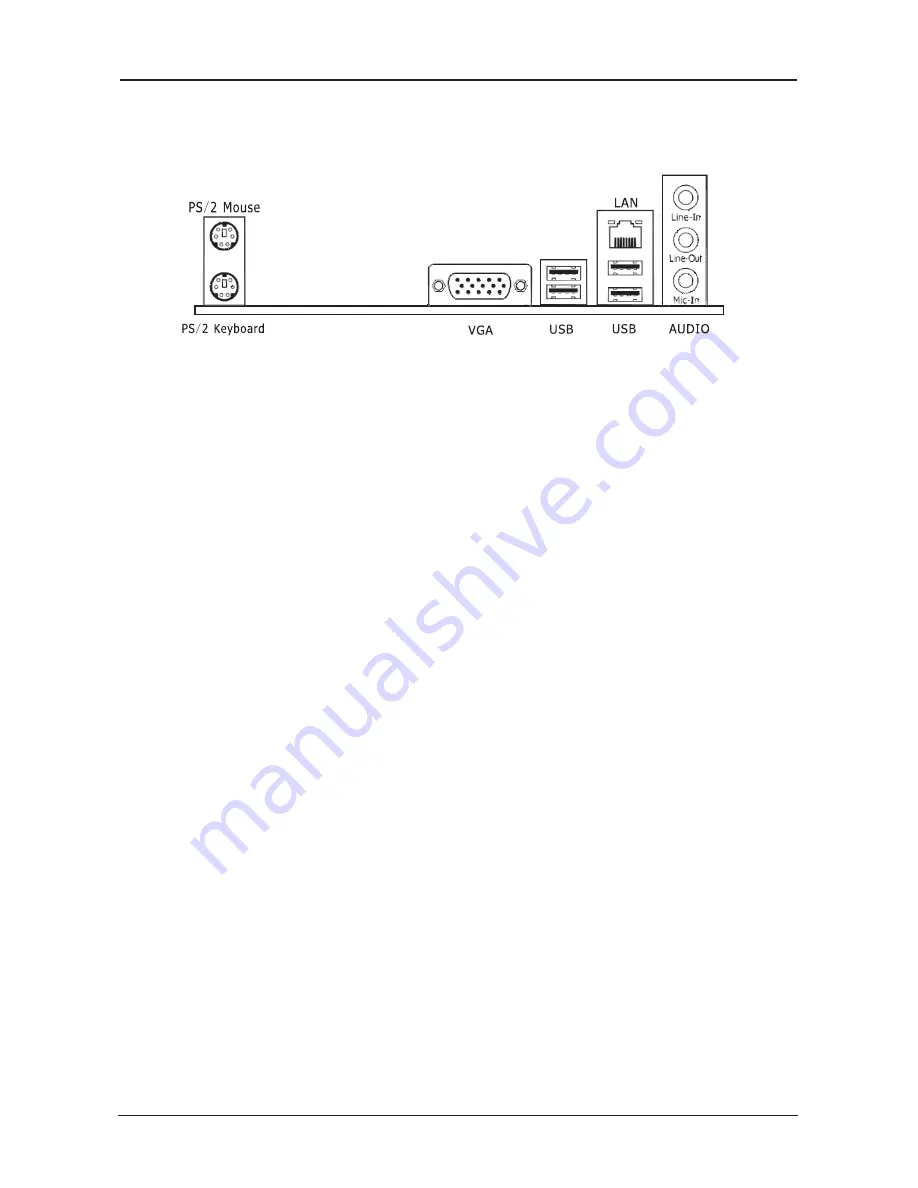
1.4 Connecting Rear Panel I/O Devices


The rear I/O of the mainboard provides the following I/O ports:


                                             (This picture is only for reference)  

   • PS/2 Mouse: Connects to a PS/2 mouse.

   • PS/2 Keyboard: Connects to a PS/2 keyboard.

   • VGA: Connects to a monitor's VGA input.

   • USB: The USB ports are used to connect USB 2.0/1.1 devices such as scanner, speakers, 

              keyboard, mouse, hub, digital camera, joystick, etc.
   

• LAN: The LAN port allows the motherboard to connect to a local area network by means of 

             a network hub.

   • AUDIO (Rear Panel Audio):

           Line-in (Light Blue): This jack is used to connect to the line out from any external audio 

                     sources such as MP3 player, CD player, AM/FM radio tuner, etc.

           Line-out (Front Left/Right Jack, Lime): This jack is used to connect to the front left and 

                     right channel speakers of the audio system.

           Mic-in (Pink): This jack is used to connect an external microphone.

Summary of Contents for EMX-IG41D3-Icafe

Page 1: ...User s Manual Socket LGA775 Processor Mainboard EMX IG41D3 Icafe V3 0 Rev 3 0 Feb 2011 Motherboard ...

Page 2: ...not guarantee the accuracy of the contents This manual is purely technical documentation without any hint or other meanings and we won t commit users misunderstanding of the typesetting error Our products are in continuous improvement and updating Therefore we retain the right that we won t give notice to the users in future Copyright All trademarks in this manual belong to their own registered co...

Page 3: ...Jumper Settings 11 3 2 CMOS Memory Clearing Header 11 3 3 Keyboard Power Function 11 3 4 FAN Power Connectors 12 3 5 Front Panel Switches Indicators Headers 12 3 6 Additional USB Port Headers 13 3 7 Front Panel Audio 13 3 8 S PDIF Output Connection Header Optional 14 3 9 Serial Port Header 14 3 10 ATX Power Input Connectors 15 Chapter 4 BIOS Setup Utility 16 4 1 About BIOS Setup 16 4 2 To Run BIOS...

Page 4: ...ith the following list of accessories if there is any broken or missing part please contact your dealer or the local distributor Rear I O Panel X 1 User Manual X 1 Driver Utility CD X 1 Serial ATA Power Cable X 1 Serial ATA Signal Cable X 1 The items listed above are for reference only and are subject to change without notice ...

Page 5: ... 1 x PS 2 Keyboard port 1 x VGA port 4 x USB 2 0 ports 1 x RJ45 LAN port 3 x Audio ports Line In Line Out MIC In Internal I O Connectors 1 x 24 pin ATX main power connector 1 x 4 pin ATX 12V power connector 1 x IDE connector for 2 PATA devices 2 x SATA 3Gb s connectors 1 x CPU fan header 1 x System fan header 1 x Front panel header 1 x Front panel audio header 1 x Speaker header 1 x S PDIF Out hea...

Page 6: ... Intel G41 Series User s Manual 1 3 Mainboard Layout This picture is only for reference JG41C12_D V1 0 VGA FUSB2 ...

Page 7: ...ces such as scanner speakers keyboard mouse hub digital camera joystick etc LAN The LAN port allows the motherboard to connect to a local area network by means of a network hub AUDIO Rear Panel Audio Line in Light Blue This jack is used to connect to the line out from any external audio sources such as MP3 player CD player AM FM radio tuner etc Line out Front Left Right Jack Lime This jack is used...

Page 8: ... If the holes line up and there are screw holes you can attach the board with studs If the holes line up and there are only slots you can only attach with spacers Take the tip of the spacers and insert them into the slots After doing this to all the slots you can slide the board into position aligned with slots After the board has been positioned check to make sure everything is OK before putting ...

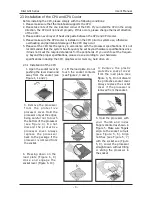
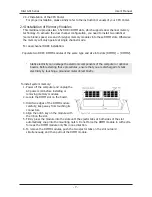
Page 9: ...ifications including the CPU graphics card memory hard drive etc 2 3 1 Installation of the CPU 1 Open the socket lever by pushing the lever down and away from the socket see Figure 1 1 and 2 2 Lift the load plate Do not touch the socket contacts see Figure 2 3 and 4 3 Remove the plastic protective socket cover from the load plate see Figure 3 5 Do not discard the protective socket cover Always rep...

Page 10: ...er off the computer and unplug the AC power cord before installing or removing memory modules 2 Locate the DIMM slot on the board 3 Hold two edges of the DIMM module carefully keep away from touching its connectors 4 Align the notch key on the module with the rib on the slot 5 Firmly press the module into the slots until the ejector tabs at both sides of the slot automatically snap into the mounti...

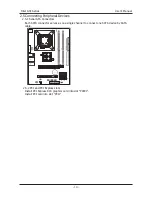
Page 11: ...ices 2 5 1 Serial ATA Connectors Each SATA connector serves as one single channel to connect one SATA device by SATA cable 2 5 2 PCI and PCI Express slots Install PCI Express X16 graphics card into slot PCIE1 Install PCI card into slot PCI1 JG41C12_D V1 0 VGA FUSB2 ...

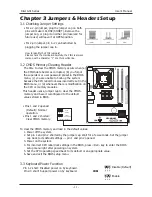
Page 12: ...r d whenever there is modification on the CPU or memory modules This header uses a jumper cap to clear the CMOS memory and have it reconfigured to the default values stored in BIOS Pins 1 and 2 opened Default Normal operation Pins 1 and 2 shorted Clear CMOS memory To clear the CMOS memory and load in the default values 1 Power off the system 2 Set pin 1 and pin 2 shorted by the jumper cap Wait for...

Page 13: ...witch which allows you to reboot without having to power off the system and thus prolonging the life of the power supply or system PWR_ON Black Power Switch Depending on the setting in the BIOS setup this switch serves two functions which will allow you to power on off the system or to enter the suspend mode PWR_LED Green Power Standby LED When the system s power is on this LED will light When the...

Page 14: ...e headers conform to USB 2 0 1 1 specification Each USB header can provide two USB ports via an optional USB bracket Pin No Header HD Audio Definition AC97 Audio Definition 1 PORT1L Microphone_Left Microphone 2 AGND Ground Ground 3 PORT1R Microphone_Right MIC Power 4 PRESENCE ACZ_DET N A 5 PORT2R Line2_Right Line out R 6 SENSE1_RETURN AuD_R_Return N A 7 SENSE_SEND FAUDIO_JD N A 8 No Pin N A N A 9 ...

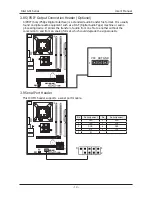
Page 15: ...d on digital audio equipment such as a DAT Digital Audio Tape machine or audio processing device It allows the transfer of audio from one file to another without the conversion to and from an analog format which could degrade the signal quality 3 1 VCC OUT GND 3 9 Serial Port Header This JCOM1 header supports a serial port module Pin Pin Assignment Pin Pin Assignment 1 DCD 2 RXD 3 TXD 4 DTR 5 GND ...

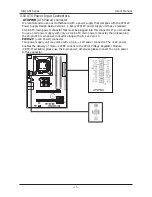
Page 16: ...nector that must be plugged into this connector If you would like to use an old power supply with only a 20 pin ATX main power connector then please plug the 20 pin ATX main power connector along with pin 1 and pin 13 PWR12V 12V Power connector Your power supply unit may come with a 4 pin 12V power connector The 12V power enables the delivery of more 12VDC current to the CPU s Voltage Regulator Mo...

Page 17: ...g special features on or off etc 3 Enhancing your computer s behavior For example speeding up performance by turning on shadowing or cache 4 2 To Run BIOS Setup First access BIOS setup menu by pressing F1 key after POST is complete before OS is loaded After the first BIOS be setupped or loaded default values and save the DEL key will be pressed if you will enter BIOS setup menu 4 3 About CMOS CMOS...

Page 18: ...illustrated in this manual are for your reference only and may not completely match with what you see on your screen Do not change the BIOS parameters unless you fully understand its function The menu bar on top of the screen has the following main items Main For changing the basic system configuration Advanced For changing the advanced system settings Boot For changing the system boot configurati...

Page 19: ... CMOS value from CMOS only for Option Page Setup Menu F7 Discard Changes F8 Load Failsafe Defaults F9 Load Optimal Defaults F10 Save configuration changes and exit setup 4 5 3 Main menu System time This item sets the time you specify usually the current time in the format of Hour Minute and Second System Information This menu gives you an overview of the general system specifications The BIOS auto...

Page 20: ...ve SATA IDE device Press Enter Key to enter the submenu BIOS SETUP UTILITY Main System Overview Select Screen Select Item F1 General Help F10 Save and Exit ESC Exit AMIBIOS Version 08 00 15 Build Date 10 14 08 BIOS ID EAG0A110 Processor Intel R Core TM 2 Duo CPU E4500 2 20GHz Speed 2213MHz Count 2 System Memory Size 478MB v02 61 C Copyright 1985 2006 American Megatrends Inc BIOS SETUP UTILITY Main...

Page 21: ...set to Disabled the data transfer from and to the device occurs one sector at a time PIO Mode Allows you to select the data transfer mode DMA Mode Selects the DMA mode S M A R T Set the Smart Monitoring Analysis and Reporting Technology 32Bit Data Transfer Enables or disables 32 bit data transfer Press Esc key to return to Main menu 4 5 4 Advanced setting BIOS SETUP UTILITY Main Advanced Boot Secu...

Page 22: ...Core Multi Processing When disabled disable one execution core of each CPU die PECI When enabled enables PECI interface Intel R SpeedStep tm tech When set to Disabld the CPU runs at its default speed When set to Enabled the CPU speed is controlled by the operating system BIOS SETUP UTILITY Advanced Configure advanced CPU settings Module Version 3F 0E Control CPU Ratio Select Screen Select Item Cha...

Page 23: ...BLE Do not allow remapping of memory Select Screen Select Item Change Option F1 General Help F10 Save and Exit ESC Exit WARNING Setting wrong values in below sections may cause system to malfunction Memory Remap Feature Enabled PCI MMIO Allocation 4GB To 3072MB Memory Hole Disabled Initate Graphic Adapter IGD IGD Graphics Mode Select Enabled 32MB IGD GTT Graphics memory size No VT mode 2MB PEG Por...

Page 24: ...ontroller has two modes of operation IDE mode no AHCI no RAID AHCI mode AHCI enabled no RAID Configure SATA Channels Set the sequence of SATA channel Optional Before PATA Behind PATA BIOS SETUP UTILITY Advanced Onboard Device Configuration Allows BIOS to Enable or Disable Floppy Controller Select Screen Select Item Change Option F1 General Help F10 Save and Exit ESC Exit OnBoard Floppy Serial Port...

Page 25: ...Version 2 24 3 13 4 USB Devices Enabled None Legacy USB Support USB 2 0 Controller Mode BIOS EHCI Hand Off Enabled FullSpeed Enabled v02 61 C Copyright 1985 2006 American Megatrends Inc Legacy USB Support Enabled or Disabled Legacy USB option and Auto option disables legacy support if no USB devices are connected USB 2 0 Controller Mode Allow you to selects the HiSpeed 480Mbps or FullSpeed 12Mbps ...

Page 26: ...SA devices Engineer mode Options Disabled Mid Grade High Grade PCIPnP The PCIPnP menu items allow you to change the advanced settings for PCI PnP devices BIOS SETUP UTILITY Advanced Advanced PCI PnP Settings Clear NVRAM during System Boot Select Screen Select Item Change Option F1 General Help F10 Save and Exit ESC Exit WARNING Setting wrong values in below sections may cause system to malfunction...

Page 27: ... set to Enabled the system displays the message Press DEL to run Setup during POST Interrupt 19 Capture Allows option ROMs to trap interrupt 19 Press Esc key to return to Boot menu BIOS SETUP UTILITY Main Advanced Boot Security Power JUSTw00t Exit Boot Settings Configure Settings during System Boot Select Screen Select Item Enter Go to Sub Screen F1 General Help F10 Save and Exit ESC Exit Boot Set...

Page 28: ...isk drives Removable Drives Click Enter key to enter its submenu it will be display specifies the boot device priority sequence from available removable drives BIOS SETUP UTILITY Boot Boot Device Priorty Specifies the boot sequence from the available devices A device enclosed in parenthesis has been disabled in the corresponding type menu Select Screen Select Item Change Option F1 General Help F10...

Page 29: ...the system But by doing this you will have to reset all previously set options Boot Sector Virus Protection Uses this option may prevent the change hard disk boot sector district table thus prevents the infection computer virus BIOS SETUP UTILITY Main Advanced Boot Security Power JUSTw00t Exit Security Settings Install or Change the password Select Screen Select Item Enter Change F1 General Help F...

Page 30: ...the Advanced Programmable Interrupt Controller APIC When set to Enabled the ACPI APIC table pointer is included in the RSDT pointer list Optional Enabled Desabled High Performance Event Timer The item allows enable or disable HPET Optional Enabled Desabled Press Esc key to return to Power menu ACPI Configuration options Click Press Enter key to enter its submenu BIOS SETUP UTILITY Main Advanced Bo...

Page 31: ...t to Enable the items RTC Alarm Date Days RTC Alarm Time will become user0configurable with set values PCI Express Wakeup Selects disabled Enabled for PCI Express to wakeup PCI Card Wakeup Selects disabled Enabled for PCI card to wakeup AC Power Fail Determines the state of the system after the return of power from an AC power loss Optional Off On Former Sts Off The system stays off upon the retur...

Page 32: ...de Setting setup as Thermal Cruise Mode is activated Optional 0 255 CPUFAN0 Stop Value CPUFAN Stop Value This item only when CPUFAN0 Mode Setting setup as Thermal Cruise Mode is activated Optional 0 255 CPUFAN0 StopTime Value CPUFAN StopTime Value This item only when CPUFAN0 Mode Setting setup as Thermal Cruise Mode is activated Optional 0 255 CPUFAN0 TargetSpeed Value CPUFAN Target Speed Value Th...

Page 33: ... allows you to select the PCIE Spread Spectrum function DRAM Boot Frequency Display currently memory boot frequency BIOS SETUP UTILITY Main Advanced Boot Security Power JUSTw00t Exit Over Voltage and Clock Settings Allows BIOS to Select ClockGenerator Mode in Linear or Table Select Screen Select Item Change Option F1 General Help F10 Save and Exit ESC Exit CPU Boot Frequency 2 21GHz 200x11 0 CPU A...

Page 34: ... When this item is disabled the DRAM timing parameters are set according to the DRAM SPD Serial Presence Detect When enabled you can manually set the DRAM timing parameters through the DRAM sub items DRAM Boot Timing 1 Display currently DRAM Timing 1 configuration CPU Voltage Control Allows you to adjust the CPU voltage Normal sets the CPU voltage as required DIMM Voltage Control Allows you to set...

Page 35: ...hanges and exit setup Ok Cancel Ok BIOS SETUP UTILITY Main Advanced Boot Security Power JUSTw00t Exit Exit Options Exit system setup after saving the changes F10 key can be used for this operation Select Screen Select Item Enter Go to Sub Screen F1 General Help F10 Save and Exit ESC Exit Save Changes and Exit Discard Changes and Exit Discard Changes Load Optimal Defaults Load Failsafe Defaults v02...

Page 36: ... and Exit Discard Changes Load Optimal Defaults Load Failsafe Defaults v02 61 C Copyright 1985 2006 American Megatrends Inc Discard changes and exit setup Ok Cancel Ok BIOS SETUP UTILITY Main Advanced Boot Security Power JUSTw00t Exit Exit Options Discards changes done so far to any of the setup questions F7 key can be used for this operation Select Screen Select Item Enter Go to Sub Screen F1 Gen...

Page 37: ...option opens a dialog box that let you install optimized defaults for all appropriate items in the Setup Utility Select OK and then Enter to install the defaults select Cancel and then Enter to not install the defaults The optimized defaults place demand on the system that may be greater than the performance level of the components such as the CPU and the memory You can cause fatal errors or insta...

Page 38: ...as below If the menu does not appear double click My Computer double click CD ROM drive or click Start click Run type X AUTORUN EXE assuming X is your CD ROM drive This picture is only for reference From the Main MENU you may make 4 selections 1 Mainboard Driver installation Utility Click to enter the driver installation menu 2 Useful Software Utility Click to enter the utilities installation menu...

Page 39: ...ow This picture is only for reference From the Drivers MENU you may make 4 selections 1 INTEL Chipset Installation Utility 2 INTEL Chipset VGA Graphics Driver 3 Onboard LAN Driver 4 Realtek HD Audio Driver Back INTEL Chipset Installation Utility INTEL Chipset VGA Graphics Driver Onboard LAN Driver Realtek HD Audio Driver Exit ...

Reviews: