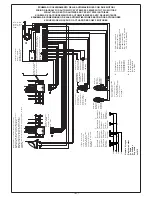
Elvox ES Series Instruction Manual Download Page 23

- 23 -

I

GB

MAINTENANCE

.  To guarantee the product performance professionaly qualified  person-

nel must carry out the maintenance in the time pre-established by the
installer, the producer and the legislation in force.

.  Services concerning the installation, the maintenance, repair work and

cleaning must be proved by proper documentation. Such documenta-
tion must be kept by the user, at complete disposal of the qualified
personnel in charge.

.  Before carrying out the maintenance or cleaning disconnect the

appliance from the mains unplugging the power cord  or switching off
the installation, and disconnect the back-up battery. In case the instal-
lation must be powered during the check up of the operation, it is advi-
sed to control and disable any control device (radio controls, keypads
etc.), with the exception of the device used by the maintenance per-
sonnel.

Routine 

maintenance

Each of the following operations must be carried out when required, in
any case, they are compulsory every year.

Gate:

Lubricate with oil the gate sliding wheel and the skids of the upper guide.
Check the rack mounting and its cleaning from dirt and scaling. Clean the
sliding rail. 

Automatic gate system:

Check the security devices operation (photocells, switch trim etc.)
Check the state of the battery  with a battery tester, even if the charge LED
signals, in case of  mains failure, the state of the battery  (see control unit
instructions); in case of replacement use an original battery and recycle
the old battery in line with the standards in force (by specialised person-
nel).

N.B. In any case replace the battery every 2 years.

Extraordinary maintenance

Extraordinary maintenance cannot be forseen. Anyhow, if particular
repair works should be carried out on mechanical parts it is advised to
remove the actuator to allow repair works by authorized personnel.

DISMANTLING - DISPOSAL

When it is decided to discontinue use of either the actuator or the entire
automatic system, it is recommended that is removed and, where possi-
ble, recycled in line with the relevant standards.

INFORMATION FOR THE USER

-   Read the instruction and the enclosed documents carefully.
-   The product must only be used for the purposes for which it was desi-

gned. Any other use is incorrect and hence dangerous.

-  The information in this leaflet and enclosed documentation may be

modified without previuos notice. There are supplied only as reference
for the application of the product.

-  In case of failure and/or malfunctioning, switch the unit off.  Do not

attempt to repair it yourself. Use only professionally qualified person-
nel. Any repair work must be carried out by an authorised service cen-
tre.

-  Yearly control as far as the automation general operation and the safety

devices are concerned should be made only by qualified personnel.

-  In case of mains failure, the back-up battery ensures the automatic

gate system operation for a limited period of time. When there is no
battery or the same is flat, release the motor manually (open the cover
by using the personalized key, see Fig. 2A, 2B, 2C, on pag. 6, turn the
release lever 180° clockwise, Fig. 3, pag. 7; once the motor has been
released close the cover again).
Once the supply voltage has been re-established, the electronic circuit
board will provide to re-load the back-up  battery.

SAFETY WARNINGS

1. Keep out of the gate operating range whilst it is in movement: wait until

the gate is completely open or closed.

2. Operate the gate only when it is completely visible and without obsta-

bles.

3. Do not allow children or animals to play o stop on the operating range

and to use the remote control or control device.

4. Do not oppose the gate movement, because it might cause dangerous

situations.

5. Do not touch the actuator with wet hands and/or feet.

MANUTENZIONE

·

Per garantire l'efficienza del prodotto è indispensabile che personale
professionalmente competente effettui la manutenzione nei tempi
prestabiliti dall'installatore, dal produttore e della legislazione vigente.

·

Gli interventi di installazione, manutenzione, riparazione e pulizia
devono essere documentati. Tale documentazione deve essere conser-
vata dall'utilizzatore, a disposizione del personale competente prepos-
to.

·

Prima di effettuare una qualsiasi operazione di pulizia o di manuten-
zione disinserire l'apparecchiatura dalla rete staccando la spina, o
spegnendo l'interruttore dell'impianto, e scollegare la batteria tam-
pone. Nel caso che l'alimentazione dovesse essere presente per veri-
fiche di funzionamento, si raccomanda di controllare o disabilitare ogni
dispositivo di comando (radiocomandi, pulsantiere ecc.) ad eccezione
del dispositivo usato dall' addetto alla manutenzione.

Manutenzione ordinaria 

Ciascuna delle seguenti operazioni deve essere fatta quando se ne avver-
te la necessità e obbligatoriamente ogni anno.

Cancello:

Lubrificare (con oliatore) le ruote di scorrimento del cancello e i pattini
della guida superiore. Verificare il fissaggio della cremagliera e la sua puli-
zia da sporcizia e incostrazioni. Pulire la rotaia di scorrimento.

Impianto di Automazione:

Verifica funzionamento dispositivi di sicurezza (fotocellule, coste di sicu-
rezza ecc…).
Verificare lo stato di carica della batteria con un multimetro (tester) anche
se il lampeggiante segnala, in caso di mancanza di corrente, lo stato dela
batteria (vedi istruzioni centralina), in caso di sostituzione utilizzare una
batteria originale e ricliclare l'altra secondo la normativa vigente (a cura di
personale specializzato).

N.B. Cambiare la batteria, in ogni caso, ogni 2 anni.

Manutenzione straordinaria

Non sono preventivabili operazioni di manutenzione straordinaria.
Tuttavia se dovessero rendersi necessari interventi su parti meccaniche si
raccomanda di rimuovere l'attuatore per  consentire la riparazione da
parte del personale autorizzato.

ROTTAMAZIONE - SMALTIMENTO

Allorché si decida di non usare più l'attuatore  o l'intera automazione, si
consiglia di riciclare per quando possibile e in accordo con le normative
in materia.

INFORMAZIONI ALL'UTILIZZATORE

-

Leggere attentamente l'istruzioni e la documentazione allegata.

-

Il prodotto dovrà essere destinato all'uso per il quale è stato espres-
samente concepito, ogni altro utilizzo è da considerarsi improprio e
quindi pericoloso.

-

L'informazioni contenute nel presente documento e nella documen-
tazione allegata, possono essere oggetto di modifiche senza alcun
preavviso. Sono infatti fornite a titolo indicativo per l'applicazione del
prodotto.

-

In caso di guasto e/o cattivo funzionamento dell'automazione, disin-
serire l'apparecchio dalla rete spegnendo l'interruttore dell'impianto e
rivolgersi solo a personale professionalmente qualificato oppure al
centro di assistenza autorizzato. Evitare qualsiasi tentativo di
riparazione e d'intervento diretto. 

-

Si raccomanda di far effettuare un controllo annuale del funzionamen-
to generale dell'automazione e dei dispositivi di sicurezza da person-
ale qualificato.

-

In caso di mancata alimentazione di rete, la batteria tampone garan-
tisce per un periodo limitato il funzionamento dell'automazione. In
caso  di batteria scarica o mancante, sbloccare manualmente il
motore, (aprire il coperchio, utilizzando la chiave personalizzata, vedi
Fig. 2A, 2B, 2C, pag. 6, ruotare la leva dello sblocco di 180° in senso
antiorario, Fig. 3, pag. 7, sbloccato il motore richiudere il coperchio).
Una volta ristabilita l'alimentazione la scheda elettronica provvederà a
ricaricare la batteria tampone.     

AVVERTENZE DI SICUREZZA

1. Non entrare nel raggio d'azione della automazione mentre esse è in

movimento, attendere fino alla completa conclusione della manovra.

2. Azionare l'automazione solo quando essa è completamente visibile e

priva di qualsiasi impedimento.

3. Non permettere a bambini o ad animali di giocare o sostare in

prossimità del raggio d'azione. Non permettere ai bambini di giocare
con i comandi di apertura o con il radiocomando.

4. Non opporsi al moto dell'automazione poichè può causare situazione

di pericolo.

5. Non toccare l'apparecchio con mani bagnate e/o piedi bagnati.

Summary of Contents for ES Series

Page 1: ... prodotto è conforme alla direttive europee 2004 108 CE 2006 95 CE 2006 42 CE R TTE 99 05 CE 89 106 CE The product is conform to the european directives 2004 108 CE 2006 95 CE 2006 42 CE R TTE 99 05 CE 89 106 CE Le produit est conforme à la norme européenne 2004 108 CE 2006 95 CE 2006 42 CE R TTE 99 05 CE 89 106 CE Das Produkt entspricht den europäischen Richtlinien 2004 108 CE 2006 95 CE 2006 42 ...

Page 2: ...rsatzteile verwenden Der Installateur muß alle Informationen in Bezug auf den Betrieb die Wartung und den Gebrauch von den einzelnen Komponenten und dem System in seine Totalität austatten Le seguenti informazioni di sicurezza sono parti integranti ed essenziali del prodotto e devono essere consegnate all utilizzatore Leggerle atten tamente in quanto forniscono importanti indicazioni riguardanti l...

Page 3: ...desconectar el aparato de la red sacando el enchufe o apagando el interruptor de la instalación Para la reparación o sustitución de las par tes dañadas tendrán que utilizarse exclusivamente repuestos originales El instalador debe proveer todas las informaciones relativas al funcio namiento a la manutención y al uso de las partes individuales y del sistema en su totalidad CARATTERISTICHE GENERALI G...

Page 4: ...sizionare il motoriduttore rispettando le misure indicate nella Fig 3 Per ancoraggio al suolo del motoriduttore si può utilizare la contropiastra Art ZX16 oppure utilizzare tasselli di fissaggio M8x120mm Fig 2 Fixação do Motorredutor 1 Retirar a tampa Fig 1A e inserir a chave Fig 1B Retirar o bloqueio do trinco 2 Retirar a tampa premindo levemente nos dois lados Fig 1C 3 Posicionar o motoredutor r...

Page 5: ...en E INSTALACIÓN MECÁNICA Antes de proceder al montaje hay que verificar que 1 las ruedas de la reja deben ser montadas de manera que puedan dar estabilidad a la reja misma en buen estado y eficientes 2 el carril sea libre derecho y limpio en todo su largo con batidas de bloqueo obligato rias sea en apertura que en cierre 3 la guía superior debe tener el eje perpendi cular al carril los patines de...

Page 6: ...system Automatisme Torantriebe Automatización Automatização serie ES 62mm ZE03 ZE08 98mm ZE07 Muratura della piastra a Piegare le 3 zanche Fig 4 b Posizionare la contropiastra in modo che la zanca centrale sia verso il pignone del motoriduttore quindi verso la cremagliera Fig 5 particolare A c Inserire le due viti M8x30 in dotazione nei fori quadrati della piastra e fissarle tramite i dadi in modo...

Page 7: ...erhindern dass der Antrieb angestautem oder abfließendem Regenwasser ausgesetzt ist sollte die Sohle einige Zentimeter höher als das Bodenprofil angelegt werden Die Punkte c und d ausführen Pag 6 Die Gegenplatte mit vier Fundamentdübeln M8x120 mm nicht im Lieferumfang enthalten Abb 5 Detail D befestigen Die Schrauben mit den Unterlegscheiben festziehen Die Dübel lassen eine Höhenregulierung der Pl...

Page 8: ...Release the motor pulling rightward the mechanic release lever Fig 7 4 Lean the rack on the pinion so that its end once it has been fixed coincide with the end oth the door Fig 8 Mark the holes position 5 Make the gate run all its length repea ting the procedure in order to find the fixing or soldering points 6 To use the rack in nylon type ZE03 Fig 9A bore the door with a 5 25mm drill and fix the...

Page 9: ...ed at the end of the adjustment procedure 2 mm obtenus après le réglage Nach der Regelung werden 2 mm erreicht 2 mm obtenidos al final de la regulación 2 mm obtidos no final da regulação E P D Einbau der mechanischen Anschläge In Übereinstimmung mit den Öffnungs und Schließpositionen der Torflügel mussen mecha nische Anschläge angebracht werden welche die Torbewegung sowohl beim Öffnen Abb 10 als ...

Page 10: ...ively and efficiently 6 Affix easily legible signs which indicate clearly the presence of an automatic gate F ELECTRICAL INSTALLATION INSTALLAZIONE ELETTRICA INSTALLATION ELECTRIQUE D Jede Einrichtung muß ordnungsgemäß installiert werden indem die beigefügten Anweisungen befolgt und vor allem die Installation durch Fachpersonal für Elvox Torantriebe ausgeführt wird wobei die in jedem Land geltende...

Page 11: ...r und ausgeschalteter automatischer Schließung Das Blinken bei geöffnetem Tor weist auf die Auslösung einer Sicherheitsvorkehrung Lichtschranken pneumatische Kontaktleiste usw hin d h auf eine Gefahrensituation für Personen Nutztiere oder Gegenstände innerhalb des Aktionsradius der Automation F D SCHEDA ELETTRONICA SERIE ZC Regolazione della scheda elettronica di comando La scheda elettronica è st...

Page 12: ...guridad el embrague electrónico antia plastamiento está gestionado por el microprocesador con 4 umbrales de sen sibilidad y puede bloquear el movimiento incluso en caso de arrastre no detectado por los sistemas de seguridad fotocélulas costa neumática etc Dos microinterruptores permiten regular el tiempo de deceleración y de fre nado El receptor de radio y los mandos a distancia son de dos canales...

Page 13: ...Op D Cl D 1 OFF OFF Minimum 2 34 4 7 2 OFF ON Medium minimum 4 7 9 4 3 ON OFF Medium maximum 9 4 18 8 4 ON ON Maximum 18 8 37 5 Dip 5 and 6 4 level deceleration start referred to totally open position memorised by the encoder Dip no Dip function When ON When OFF 7 Automatic closing Automatic closing enabled Automatic closing disenabled 8 Step function Accepts only the Open Normal function as per b...

Page 14: ...mando Abre Funcionamento Passo a Passo até à abertura total durante o normal como condominial fecho com um novo comando colocação do inverte o sentido da marcha Dip 10 9 Pré Com impulso de Abertura Com impulso desencravamento a folha M1 fecha durante 1 5 Seg da abertura para que o trinco desencaixe executa o e depois efectuar a abertura comando Na fase de fechadura a tensão na segunda porta depois...

Page 15: ...euchtet und aktiviert bleibt Bornes para un indicador luminoso de 12V c c max 2W indicante reja abierta Terminais para um sinalizador luminoso intermitente de 12V c c para sinalizar que o portão está aberto Morsetti per il lampeggiante o per la luce di cortesia a 14V c c max 5W Terminals for the 14V D C max 5 W flashing light or courtesy light supply Bornes pour l alimentation du clignotant et pou...

Page 16: ...op input N C photocell active during opening inhibits the movement immediately When the safety contact is reset the gate conti nues to open Bornes entrée STOP partiel N F photocellule active en ouverture bloque immédiatement la course du portail et ne reprend le mouvement d ouverture qu au rétablissement du contact de sécurité Photozellenruehkontakteingang sobald diese Sicherheitsvorrinchtng bei s...

Page 17: ...ceso 2 I led verdi posizionati sopra alla morsettiera nella parte inferiore destra della scheda indi cano gli ingressi N C normalmente chiuso come fotocellule fotocellula in apertura Stop e devono quindi essere accesi 3 I led rossi posizionati sopra alla morsettiera nella parte inferiore destra della scheda indicano gli ingressi normalmente aperti e devono essere spenti Si accendono solo nel momen...

Page 18: ...m Schließen des Tors einen Plastikstopfen mit einer Stärke von 2 3 cm auf den Anschlag des Tors einzusetzen um zu vermeiden daß der Torflügel beim Schließen auf die Feststellvorrichtung prallt siehe Abb 10 Seite 8 Falls es sich um ein schweres Tor handelt muss seine Bewegung während der Programmierung von Hand begleitet werden ohne hierbei die Lichtschranke zu unter brechen GEHTÜR Zur Steuerung de...

Page 19: ...IONE DEL RADIOCOMANDO Attenzione Le schede Art ZC24 e ZC25 sono senza ricevitore radio Il ricevitore si trova all in terno del lampeggiante o antenna serie EL Per memorizzare il codice radio bisogna prima col legare il lampeggiante o antenna Fig 14 Schema di collegamento per lampeggianti serie EL con ricevente a 3 conduttori e scheda di comando art ZC24 e art ZC25 Collegamenti scheda ricevente Mor...

Page 20: ...secondes tous les codes mémorisés s effacent le lampe clignotante reste allumée Lampe fixe pendant 2 secon des F relâcher le bouton mettre JMP1 sur OFF Fig 20 et remettre les interrupteurs DIP de la carte électronique sur leurs positions précédentes Après avoir effectué ces opérations pour mémoris er les nouveaux codes radio disposer les contacts de l interrupteur DIP de la commande radio de la fa...

Page 21: ...gnostic des pannes les plus fréquentes Inconvénients possibles Causes Remèdes L automatisme ne marche Alimentation électrique Contrôler l interrupteur pas absente Fusibles d alimentation Remplacer les fusibles grillés grillés par des fusibles d une valeur équivalente Commandes inefficaces Contrôler les radiocom mandes et les sélecteurs Batterie défectueuse Contrôler l état de la batterie avec le c...

Page 22: ...uoso Sustituir la tarjeta del encoder R311 La cancela se mueve a Instalación incorrecta de la Respetar el espacio de golpes cremallera 2 mm entre el piñón y la cremallera P Tabela com as avarias mais frequentes Inconvenientes Causas Soluções A automatização Ausência de alimentação Verificar o interruptor não funciona da rede Fusíveis da alimentação Substituir os fusíveis queimados queimados por ou...

Page 23: ...biliti dall installatore dal produttore e della legislazione vigente Gli interventi di installazione manutenzione riparazione e pulizia devono essere documentati Tale documentazione deve essere conser vata dall utilizzatore a disposizione del personale competente prepos to Prima di effettuare una qualsiasi operazione di pulizia o di manuten zione disinserire l apparecchiatura dalla rete staccando ...

Page 24: ...rayon d action du mécanisme Ne pas permettre aux enfants de jouer avec les commandes d ouverture ou avec le radiocommande 4 Ne pas s opposer au movement du mécanisme automatique car il peut causer des situations dangereuses 5 Ne pas toucher l appareil avec les mains et ou les pieds mouillés WARTUNG Um die Wirksamkeit des Produkts zu gewährleisten muß die Wartung von Fachpersonnel in die von dem In...

Page 25: ... tocar no aparelho com as mãos e ou os pés molhados P E MANUTENCIÓN Para garantizar la eficiencia del producto es indispensable que perso nal profesionalmente competente efectúe la manutención en los tiem pos preestablecidos por el instalador por el productor y por la legisla ción en vigor Las intervenciones concernientes instalación manutención repara ción y limpieza deben ser documentadas Esta d...

Page 26: ...arge maximale Maximum Last Carga máxima Carga máxima 10A 250V Rete Mains Réseau Netz Red Rede 230V Scheda elettronica Electronic card Carte électronique Elektronischkarte Ficha electrónica Ficha electrónica Art ZC25 Selettore a chiave Key selector Selecteur à clé Schlüsselschalter Selector a llave Selector a chave Art EDE4 Tra smit ten te Transmitter Émetteur Sender Transmisor Transmissor Una copp...

Page 27: ...e Transformer Transformateur Transformator Transformador Transformador B Batteria Battery Batterie Batterie Batería Batería Art ZBA1 C Spia cancello aperto Open gate indicator Indicateur de portail ouvert Offen Gitter Anzeiger Indicador reja abierta Indicador de cancela aberta 12V c c D C max 2W Una coppia di fotocellule Pair of photocells Couple de photocellules 1 Photozellenpaar Uma pareja de fo...

Page 28: ...OR TIMBRE DO INSTALADOR FECHA DE LA INSTALACIÓN DATA DA INSTALAÇÃO ARTICOLO MATRICOLA ARTICLE REGISTRATION NUMBER COLLAUDATORE INSPECTOR ARTICLE NUMÉRO MATRICULE ARTIKEL REGISTRIERNUMMER TESTEUR PRÜFER ARTÍCULO NUMERO DE ARTÍCULO ARTIGO NUMERO DE ARTIGO ENSAYADOR VERIFICADOR CERTIFICATO DI GARANZIA AUTOMAZIONI Allegare al prodotto in caso di riparazione in garanzia AUTOMATION GUARANTEE CERTIFICATE...

Reviews: