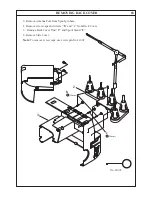


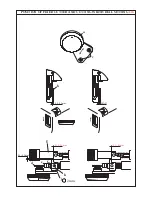

CLEARANCE AND TIMING OF UPPER LOOPER TO LOWER LOOPER 10
e
2.5mm
2mm
b
c
d
a
f
0.05~0.2mm
1.0~1.5mm
A
B
1. Remove: Mains lead - Sewing foot.
2. Check adjustments:
- Height and orientation of needle bar (see page 5).
- Height - clearance - angular position of lower looper (see page 6 ).
- Timing of lower looper (see page 8a & 8b).
- Angular position of upper looper (see page 9).
3. Remove machine base.
4. Make sure that there is no axial play, neither on the lower looper shaft
"a"
, the upper
looper shaft
"b"
, nor on the 2 pivoting axles
"c"
and
"d"
.
5. Clearance: Loosen screw
"e"
slightly and adjust upper looper to lower looper to obtain a
clearance of
0.05 to 0.2mm
between them when they pass each other; see detailed drawing
"A"
.
6. Tighten screw
"e"
securely and recheck clearance.
7. Timing: Adjust timing of upper looper so that its point passes
1.0 to 1.5mm
below the
hump of lower looper; see detailed drawing
"B"
. If necessary, loosen both screws of upper
looper eccentric
"f"
(Eccentric
"4"
in page 3), then, by means of one screw, hold eccentric
"f"
and turn slightly handwheel, either forward to advance or backward to retard, upper
looper in relation to lower looper.
8. Tighten both screws of eccentric
"f"
.
9. Refit machine base.
Summary of Contents for 745 -
Page 1: ...745 845 SERVICE MANUAL 2 2 5 5 1 3 5 NA 6 0 B 1 2 1 T P T P...
Page 18: ...a HEIGHT AND ALIGNMENT OF CLOTH PRESSER BAR 4a 5 b c 4 7mm...
Page 24: ...TIMING OF LOWER LOOPER 8a A B C D b a 5 2mm R1 Fig 1 Fig 2 Fig 3...
Page 51: ...ANNEX SETTING POSITIONS OF SL DF DIALS b c f d g e 2 1 C B A...
Page 61: ...M E M O...


