THE ADJUSTMENT OF THE CHAIN LOOPER
TENSION DIAL
G
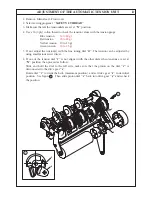
1. Remove: Mains lead - Front cover
2. Open Front Flap.
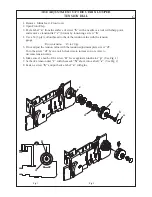
3. Peel a label
"a"
from the surface of screw
"b"
with a needle or a tool with sharp point
and remove a tension dial
"c"
(brown) by loosening a screw
"b"
.
4. Use a 50 (3 ply) cotton thread to check the tension value with the tension
gauge.
Brown tension : 15 to 20 gr.
5. If not, adjust the tension value with the tension adjustment plate screw
"d"
.
Turn the screw
"d"
by one notch clockwise to increase or in reverse to
decrease tension value.
6. Make sure if a notch of the screw
"d"
faces against an indicator
"p"
. (See Fig. 1)
7. Set back a tension dial
"c"
with the mark
"N"
above into a shaft
"e"
. (See Fig. 2)
8. Fasten a screw
"b"
and put back a label
"a"
with glue.
Fig.1
Fig.2
a
b
c
d
d
p
e
Summary of Contents for 745 -
Page 1: ...745 845 SERVICE MANUAL 2 2 5 5 1 3 5 NA 6 0 B 1 2 1 T P T P...
Page 18: ...a HEIGHT AND ALIGNMENT OF CLOTH PRESSER BAR 4a 5 b c 4 7mm...
Page 24: ...TIMING OF LOWER LOOPER 8a A B C D b a 5 2mm R1 Fig 1 Fig 2 Fig 3...
Page 51: ...ANNEX SETTING POSITIONS OF SL DF DIALS b c f d g e 2 1 C B A...
Page 61: ...M E M O...


