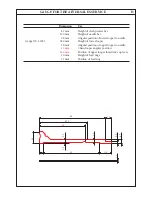


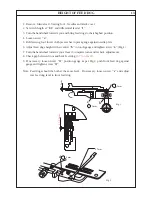


TIMING OF LOWER LOOPER
8b
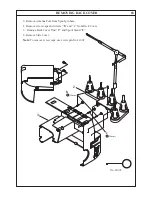
1. Remove: Mains lead - Sewing foot.
2. Make sure that there is no axial play on lower looper shaft
"a"
.
3. Insert a new needle (
Nm 90
) in
"R1"
and check height and orientation of needle bar (page
5), height and angular position of lower looper (page 6).
4. Remove needle plate and machine base.
5. Bring needle bar to its lowest position and check whether lower looper starts its left to right
motion simultaneusly with up motion of needle bar.
(Fig.2)
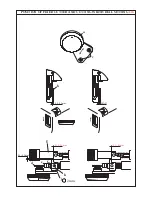
- Turn the handwheel towards you and bring point of looper from left - to - right against the
left side of the overlock needle
"R1"
. Observe the vertical distance between point of
looper and upper edge of needle eye.
- Turn the handwheel towards you and bring point of looper from right - to - left against the
left side of the overlock needle
"R1"
. The distances between point of looper and upper
edge of needle eye must be identical as per sketch
"A"
.
6. If necessary, loosen both screws
"b"
of lower looper eccentric. By means of one screw,
hold eccentric carefully.
(Fig.1)
If, in relation to the upper edge of the needle eye, the point of the lower looper is higher in
the left - to - right motion than in the right - to - left motion, see sketch
"B"
, turn
handwheel very slightly towards you or in reverse. If the result is opposed, see sketch
"C"
.
7. Tighten both screws
"b"
of eccentric.
8. Check timing of upper looper to lower looper (see page 10).
9. Refit machine base and needle plate.
Note:
For an easy check of the lower looper timing, check and make sure that height of needle bar,
height of lower looper and angular position of lower looper are correctly set.
Turn the handwheel towards you, bring eye of lower looper from left to right behind the eye
of needle
"R1"
. If not, adjust timing stroke with eccentric
"5"
(see page 3 position of
eccentrics and
"D"
in page 8a-
Fig.3
).
F.Y.I. Eccentric
"5"
is used for both chain and lower looper stroke. When checking this
adjustment make sure that you also check adjustment of chain looper stroke
(see page 11).
Summary of Contents for 745 -
Page 1: ...745 845 SERVICE MANUAL 2 2 5 5 1 3 5 NA 6 0 B 1 2 1 T P T P...
Page 18: ...a HEIGHT AND ALIGNMENT OF CLOTH PRESSER BAR 4a 5 b c 4 7mm...
Page 24: ...TIMING OF LOWER LOOPER 8a A B C D b a 5 2mm R1 Fig 1 Fig 2 Fig 3...
Page 51: ...ANNEX SETTING POSITIONS OF SL DF DIALS b c f d g e 2 1 C B A...
Page 61: ...M E M O...


