background image

Editing

39

Editing

'

Select Confirm or Cancel  by pressing 
◄,►

 button and Press Enter button on 

your remote control.

(

Select OK to execute it or Return to go 
back t the Title edit menu when you are 
asked again by showing up OSD.

d. Split Title : You can split a title into 2 titles. 

%

Choose the point you want to split on 
by pressing Enter button after selecting 
Confirm by pressing ◄,► button while 
watching the title by pressing Play, ◄◄ , 
►►

  and Pause button.

&

You shall go back to the title list 
automatically and find the split title in 
the list.

•  It may not be working if the title is too short.

NOTE

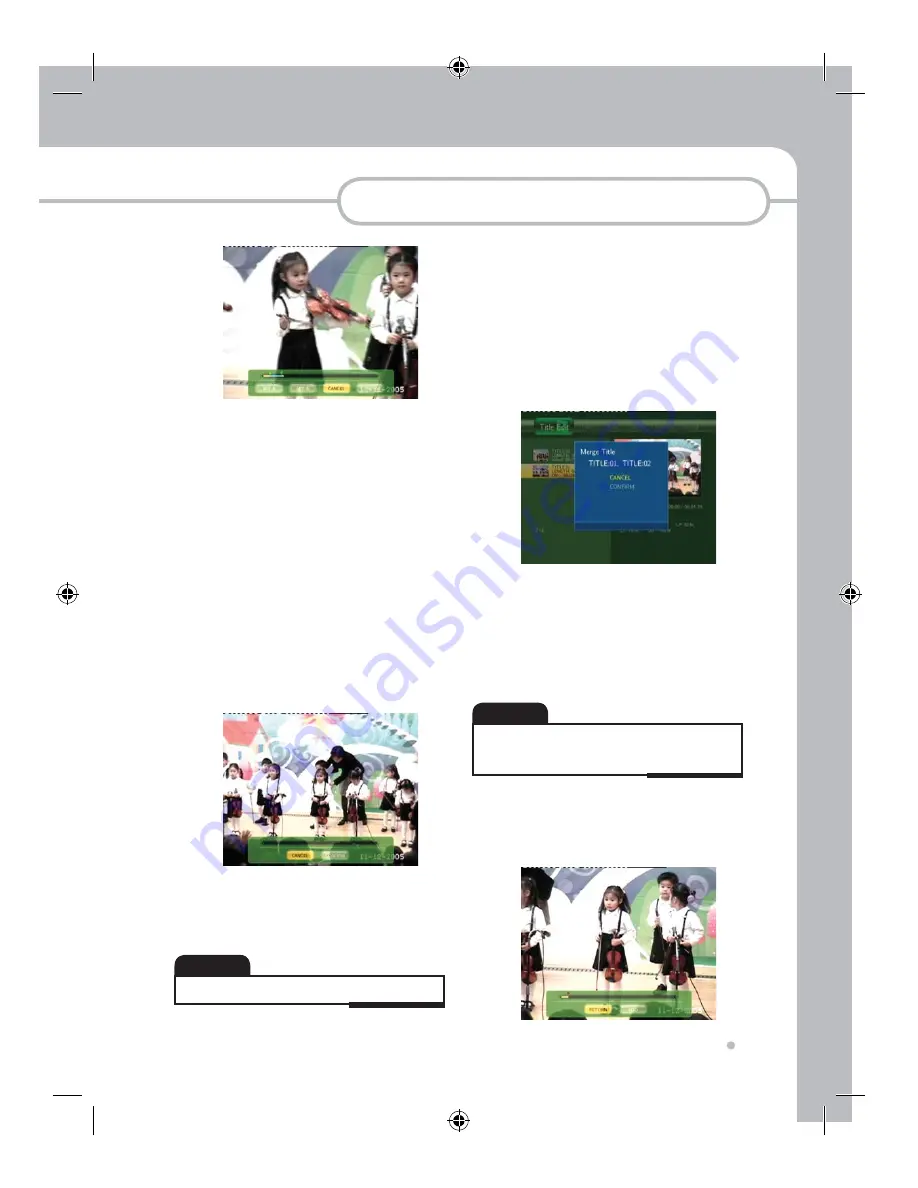
e. Title Merge : You can merge a titles with 

next title.

%

Select the title in the list under Title Edit 
you want to merge with the next title 
and press Enter button to show up Title 
Edit menu.

&

Press Enter button on Merge Title.

'

Select Confirm or Cancel  by pressing 
▲,▼ 

button and Press Enter button on 

your remote control.

(

You can see an merged title.

•  Please locate the 2 titles consecutively by using Sorting 

function if you want to merge the 2 titles that is not 
located consecutively.

NOTE

f. Add Chapter Mark : You can add the 

chapter mark in the title in order to move 
quickly by using 

◄◄

 ,►►

 button during 

Playback

Summary of Contents for HMR-350H

Page 1: ...HMR 350H HD MEDIARECORDER PLAYER www elliondigital com USER S MANUAL P N 63020013800...

Page 2: ...e interference by one or more of the following measures Reorient or relocate the receiving antenna Increase the separation between the equipment and receiver Connect the equipment into an outlet on a...

Page 3: ...has two blades and a third grounding prong The wide blade or the third prong is provided for your safety When the provided plug does not fit into your oulet consult an electrician for replacement of t...

Page 4: ...ng Set Up Menu Video 51 Record 53 Time Shift Time Shift 44 Playback AV File Playback 46 Recorded Title Playback 49 Advanced Playback 50 Additional Information F W upgrading 55 Specification 56 Trouble...

Page 5: ...atteries from equipment that isn t going to be used for a month or more When disposing of used batteries please comply with governmental regulations or environmental public instruction s rules that ap...

Page 6: ...file copy into it Please copy the files by computer if you want NTFS only in your USB storage In this case Recording or Timeshift are not available NOTE 2 2 NTFS NT File System You can playback the c...

Page 7: ...nt 5 Arrow button To move 6 REC LED 4 Guide To display Guide Menu 3 IR receiving part To receive IR signal from remote control 7 Stand by Power On To Switch HMR Power On or into Stand by mode 1 Power...

Page 8: ...onnect to Component Video Input of TV 14 VIDEO OUT To Connect to Composite Video Input of TV 13 VIDEO IN To Connect to Composite Output of AV device such as Set Top Box or VCR 6 HDMI OUT To Connect to...

Page 9: ...Digital Amplifier 9 Power S W Mechanical Power Switch to supply power to HMR or to cut it off 2 DV In Digital Input jack IEEE1394 for Digital Camcorder 1 2 3 4 5 6 7 8 9 10 11 14 13 12 15 16 16 AUDIO...

Page 10: ...o channel ARROW To select an item of menu DV To go to DV input mode for Digital Camcorder CM SKIP To jump to 30 seconds forward C D DISPLAY To view the information on current working status To make it...

Page 11: ...w the still picture To view the next video frame by each time pressing PLAY To view the selected titles and files REC To start recording To select one touch recording step by pressing additionally REP...

Page 12: ...tem It toggles NTSC PAL NTSC Progressive Scan 480P PAL Progressive Scan 576P 720P 1080i NTSC U TV HMR To select TV signal or HMR signal when they are connected with Scart Cable It works only they are...

Page 13: ...Component Video and 2ch Audio 1 2 Scart Rear Euro Scart Verion Most of HDMI TV do not support interlaced signal 576i 480i which is default video output setting in this unit Please press TV system butt...

Page 14: ...Connection Connection 14 2 Connection to AV Input with AV device Satelite Digital Terestrial or Cable Set Top box VCR etc 2 1 Scart Input 2 2 AV Input Composite Video and 2ch Audio...

Page 15: ...er 3 1 Coaxial Audio Out 3 2 Optical Audio Out 4 Connection to Computer Please connect HMR to USB 2 0 port in order to get the high speed Upto 480Mbps file transfer HMR shall work only USB 1 1 speed i...

Page 16: ...LAN Please refer to Network explanation in Using the SET UP Menu Network Section NOTE 5 Connection to USB external HDD or USB Memory 2 port You can also connect the Digital TV USB Dongle and Wireless...

Page 17: ...Connection 17 Connection 7 Connection for Power Adaptor...

Page 18: ...2ch Audio 1 2 Component out Rear Standard Version Most of HDMI TV do not support interlaced signal 576i 480i which is default video output setting in this unit Please press TV system button on remote...

Page 19: ...ion 2 Connection to AV Input with AV device Satelite Digital Terestrial or Cable Set Top box VCR etc 2 1 AV Input Composite Video and 2ch Audio 3 Connection to Digital Amplifier 3 1 Coaxial Audio Out...

Page 20: ...o get the high speed Upto 480Mbps file transfer HMR shall work only USB 1 1 speed if it is connected to USB 1 1 port in your computer NOTE 5 Connection to USB external HDD or USB Memory 2 port You can...

Page 21: ...Connection 21 Connection 6 Connection with LAN 7 Connection for Power Adaptor Please refer to Network explanation in Using the SET UP Menu Network Section NOTE...

Page 22: ...it down after unscrewing it only if there is screw fastened 3 Take out the HDD bracket by pressing the push point and pulling the handle out after uncrewing the handle only if there is screw fastened...

Page 23: ...oor case 5 Push the HDD into the bracket and connect power cable and Data cable 7 Screw the Door Case and the unit if necessory When you disconnect the cables in order to change HDD please disconnect...

Page 24: ...Multimedia partition 2 2 Press button and select Next by pressing Enter or OK button on the front Key Selected HDD space for Time Shift buffer can only be used for Time Shift and can not be used any o...

Page 25: ...Key Format is completed Please do not format again by computer HMR will consider it as an new HDD if it is connected again NOTE 3 Selection of Multimedia Disc Space 3 1 Press in order to select each...

Page 26: ...ect DHCP IP Auto or Fix IP Manual according to your IP status by pressing button and press Enter to execute it If you select DHCP IP Auto The IP address will be set according to DHCP in your network S...

Page 27: ...in the device connected in HMR 2 REC List Select it If you want to play and edit your recorded titles 3 File Copy Select it If you want to make file copy from various source to various target connect...

Page 28: ...t to the drive with NTFS partition or please split the file to the limited size with utility program such as MPEGtoHDTV in accessory CD 6 1 Select OK by pressing button and press Enter button to execu...

Page 29: ...HDD and NET by pressing Enter button 4 Cursor will go to the right Destination table 5 Press in order to select the target form USB HDD and RECYCLE by pressing Enter Button Please make sure first tha...

Page 30: ...s in order to select the destination directory you want to copy to and Press button to execute the copy 10 Select OK to execute or No to cancel The file system of destination should be FAT32 Copy is n...

Page 31: ...to record into USB connected storage The default recording quality is SP Standard Play It can be changed in Set Up Menu Record section Recording Mode Average Bitrates Video Resolution PAL Resolution...

Page 32: ...ress STOP button to stop your recording If Set Up Box Terrestrial Satellite or cable is connected to AV input of HMR you can record the TV program In this case you should use Channel up and down butto...

Page 33: ...ecording Standard version Each source is showing on the top right corner of TV Screen 4 Press REC button to start your recording 5 Press PAUSE button if you want to stop the recording for a short whil...

Page 34: ...remote control or OK button on front key 7 Go to Video In mode in you are recording by pressing source button on your remote control 8 Press Stop button on your remote control to stop the recording 1...

Page 35: ...y time shift from TV direclty It is only available with TV which has AV output function through Scart and Scart version of this unit Please check if your TV is supporting it first 1 GototheSetupMenuan...

Page 36: ...n on Front Key 1 5 Select OK you want to delete by pressing button and press Enter button on Remote Control or OK button on Front Key 1 6 Select Return you do not want to delete by pressing button and...

Page 37: ...titles based on Title Number Recording Time Title name and playback 3 4 Press Enter key on your remote control then the following sorting OSD will show up 3 5 Press button to select the condition you...

Page 38: ...turn You go back without editing the title b Set Thumbnail You can change the thumbnail picture of the title Press Play and button on remote control to find the frame of picture you want to use as thu...

Page 39: ...nd find the split title in the list It may not be working if the title is too short NOTE e Title Merge You can merge a titles with next title Select the title in the list under Title Edit you want to...

Page 40: ...can find the chapter mark is being deleted Select RETURN by pressing button and press Enter button to go back to the Title list h Copy to FAT32 Partition Select the title in the list under Title Edit...

Page 41: ...s by pressing button and recorded Title list will show up 5 4 Press Enter key on your remote control and the following OSD will show up 5 5 The following edit menu OSD will show up File name shall be...

Page 42: ...t the AV files in installed HDD in HMR USB external HDD and USB Memory Please make sure file system of USB storage is FAT32 If it is NTFS system please edit it by computer 1 Press Guide button on Remo...

Page 43: ...change the file name 7 3 Delete You can delete the file Select Rename by pressing button and press Enter to execute it Virtual keyboard will show up Select the letter and number by pressing and enter...

Page 44: ...shift function Time Shift 1 Press Guide button on Remote Control or on front key 2 Select Video In by pressing button and press Enter button on Remote Control or OK button on Front Key 3 Press Source...

Page 45: ...r to stop the Timeshift 8 Permanent Timeshift You can set the Permanent Timeshift On in the Set Up Menu Please refer to explanation in this manual set up menu record section In this case Timeshift wil...

Page 46: ...he required files are located from USB HDD and NET by pressing button Press the Enter button on your remote control or OK button on front key 5 Select the directory where the required files are locate...

Page 47: ...ow picture 7 4 Select the folder you shared in the computer and enjoy the AV files 7 5 Transcode Server You may enjoy some of AV files through LAN playback which this unit do not support directly such...

Page 48: ...skip it without typing anything also Net Password Enter and then type you password if registered You can skip it without typing anything also Specific File Server IP Type the IP address as your compu...

Page 49: ...GTH 00 00 03 Title Length is 0 hour 0 minutes 3 seconds Video 1 Recording Source is Video 1 05 30 2007 Recorded date is May 30 2007 22 35 26 Recorded Time is 10 35 26 PM It is not played back yet afte...

Page 50: ...6x 1x N A Forward Scan Fast forward 1 5x 2x 4x 8x 16x 32x 1x 1 5x 2x 4x 8x 16x 32x 1x 2x 4x 8x 16x 1x N A CM Skip Jump forward to 30 seconds 30 seconds N A N A Instant Relay Jump backward to 10 second...

Page 51: ...Pan Scan chops the sides off widescreen material to make it fit to the 4 3 screen so even though the picture looks larger on the screen you are actually seeing less of the movie screen 2 TV input Sca...

Page 52: ...eo signal after changing it please press TV System button on remote control until you get the right video signal NOTE 4 1 Component Please change it if you connects HMR to TV with Component Cable Y Cb...

Page 53: ...ding title from Off 15 minutes 20 minutes 30 minutes 3 Permanent Time Shift You can select Permanent Time Shift off and on Please refer to Time Shift Section in this manual 4 Recording Device You can...

Page 54: ...ram or firewall is blocking the network access from this unit You may face the instant stop and freezing of AV contents while they are being playback through LAN due to network speed LAN cable hub cap...

Page 55: ...cally after upgrading F W 4 While pressing Guide button on Front panel Turn the Power On of HMR by Mechanical S W You can stop pressing Guide button after the upgrading OSD appears 2 Copy the F W upgr...

Page 56: ...MPEG II Decoding Playback Video MPEG2 HD ts tp DivX HD avi Xvid HD avi MPEG1 2 dat mpg vob ifo DivX avi Xvid avi DV25 Digital Camcorder WMV9 MKV H 264 Audio Dolby Digital AC3 WMA AAC OGG WAV Picture...

Page 57: ...HDMI Issue Some of TV do not support the NTSC 480i PAL 576i through HDMI input In this case you can not see the Video signal correctly because the default Video out setting of HMR is PAL 576i or NTSC...

Page 58: ...file format correctly from Movie Music or Photo You can change it only in Root directory so that you should change it after going to root directory by using button Please check the cables Power or Dat...

Page 59: ......

Reviews: