M1XSLZW Instruction Manual
Page 6
Each Z-Wave Light in a network must have a unique Node ID from a pool of 128 Nodes allowed. Adding a Z-Wave light to M1
involves mapping (assigning) its Node ID to a corresponding M1 Light Device number location. See Table 3. NOTE: Leave
BLANK any M1 Light Device location that corresponds to a Z-Wave Node ID that is NOT a light. Below are instructions for
programming M1 Lighting using ElkRP > Automation > Lighting.
3.1
Setup the Z-Wave network FIRST. [Page 3] All Z-Wave devices and controllers MUST be Associated and Updated.
3.2
Make a list of each Z-Wave device, its Node ID, location, and type (light, thermostat, lock, controller, etc.)
3.3
Verify that the M1XSLZW is connected to the VRC0P-1LW (vizia rf+3).
3.4
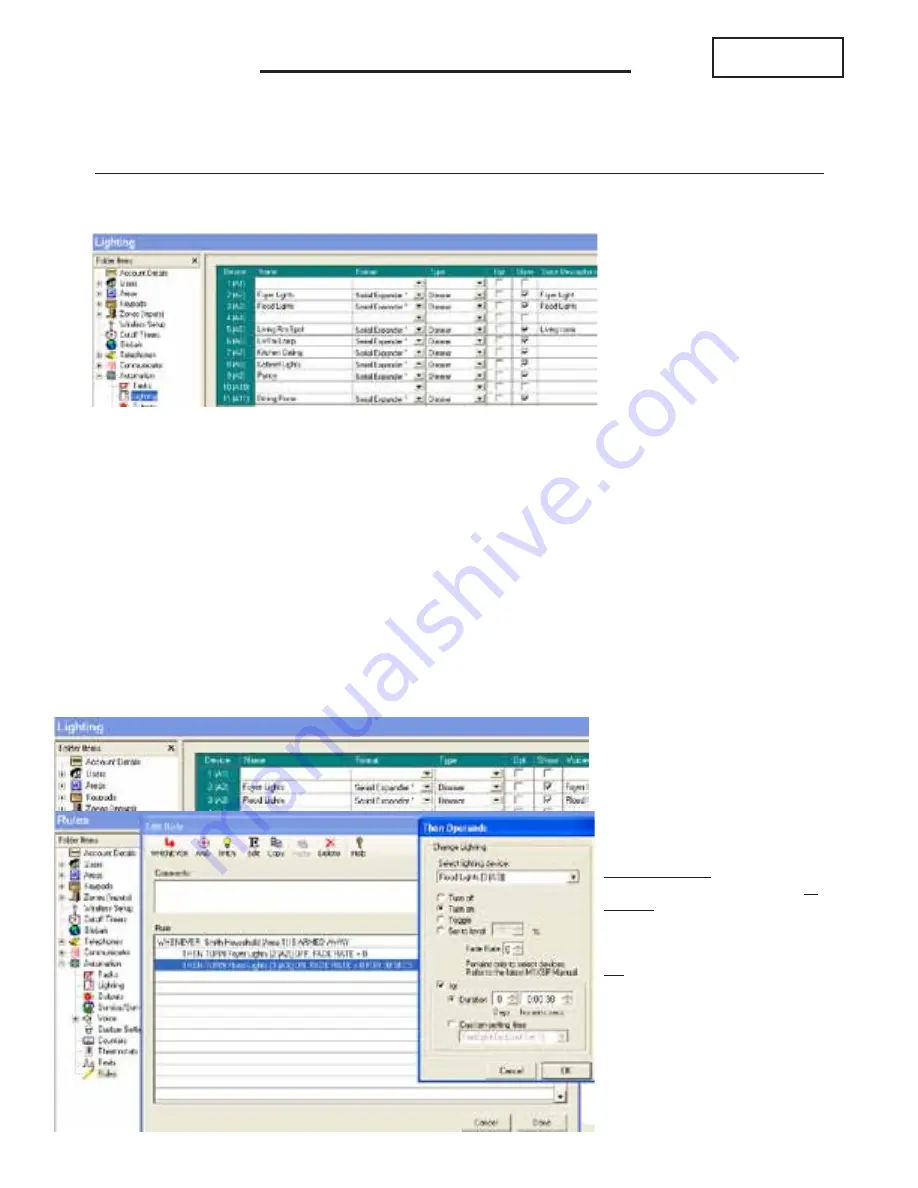
Select the first Z-Wave Light Node ID and corresponding M1 Light Device number location. See Table 3.
3.5
Program a Name (up to 15 characters) describing the location or name of the light.
3.6
Set the Format to "Serial Expander". This will be the same for all Z-Wave Lights.
3.7
Set the Type according to the Z-Wave device. (On/Off Switch, Dimmer, or Appliance)
3.8
DO NOT put a check mark in the Opt. location.
3.9
Put a check mark in the Show box IF the light needs to be displayed on touchscreens or keypads.
3.10
Voice Description is optional. Up to 6 words may be used to provide a spoken description for each light.
Controlling Z-Wave Lights using ElkRP Rules
3.11
Select
ElkRP > Automation > Rules.
3.12
Click
New
to start a new Rule. E.G. Turn OFF several Z-Wave Lights when the System is Armed Away.
3.13
Click
WHENEVER >
Security/Alarms > Is Armed > Armed Away
. A pop-up box appears to pick the Area (partition). Use
the drop down to pick the area or Click OK to accept "Area 1".
3.14
Click
THEN > Control Lighting > Individual
. A new box will appear.
3.15
In the Select lighting device box scroll and select one of the Lights. E.G. Foyer [2 (A2)].
3.16
Click
Turn Off
followed by
OK
. The screen should resemble the first two lines in the illustration below.
3.17
Repeat for additional lights and then click
DONE
to complete the Rule.
3.18
Make sure that ElkRP is connected and on-line with the M1 Control, then click
Send to Control
.
Skip to Step 5 if not
adding Lights
STEP 3 - Adding Z-Wave Lights to M1
The Rule shown controls 2 lights when
the System is Armed Away.
Then Operands
- Lights may be
Turned Off, Turned On, or Toggled
(flip/flop). The "Set to Level" only
appears on lights that are type=
dimmer. Range is 1 to 99%.
Fade (ramp) Rate - Range is 0 to 7
with the following fade rate times in
seconds: 0=immediate, 1=2, 2=4,
3=8, 4=16, 5=32, 6=46, and 7=60.
Not all Lights support fade rate.
For - Checking this box allows a time
delay for On or Off. Duration is: Days,
Hrs, Min, Sec, or may be a Custom
Setting selection.
In this rule the Foyer is turned Off.
The Flood light is turned On for
30 seconds meaning it will turn off
automatically 30 seconds after arming
and leaving the home.
NOTE: All Z-Wave devices are
assigned Node IDs, but ONLY
those that are lighting types
should be entered in the M1
Light Device locations. Leave
empty (blank) any location that
corresponds to a Node ID that is
NOT a light device.


