© EA Elektro-Automatik in 2022, this information is subject to change without notice
85
06230820_manual_psi_10000_3u_15kw_en_01
3.10.15.8
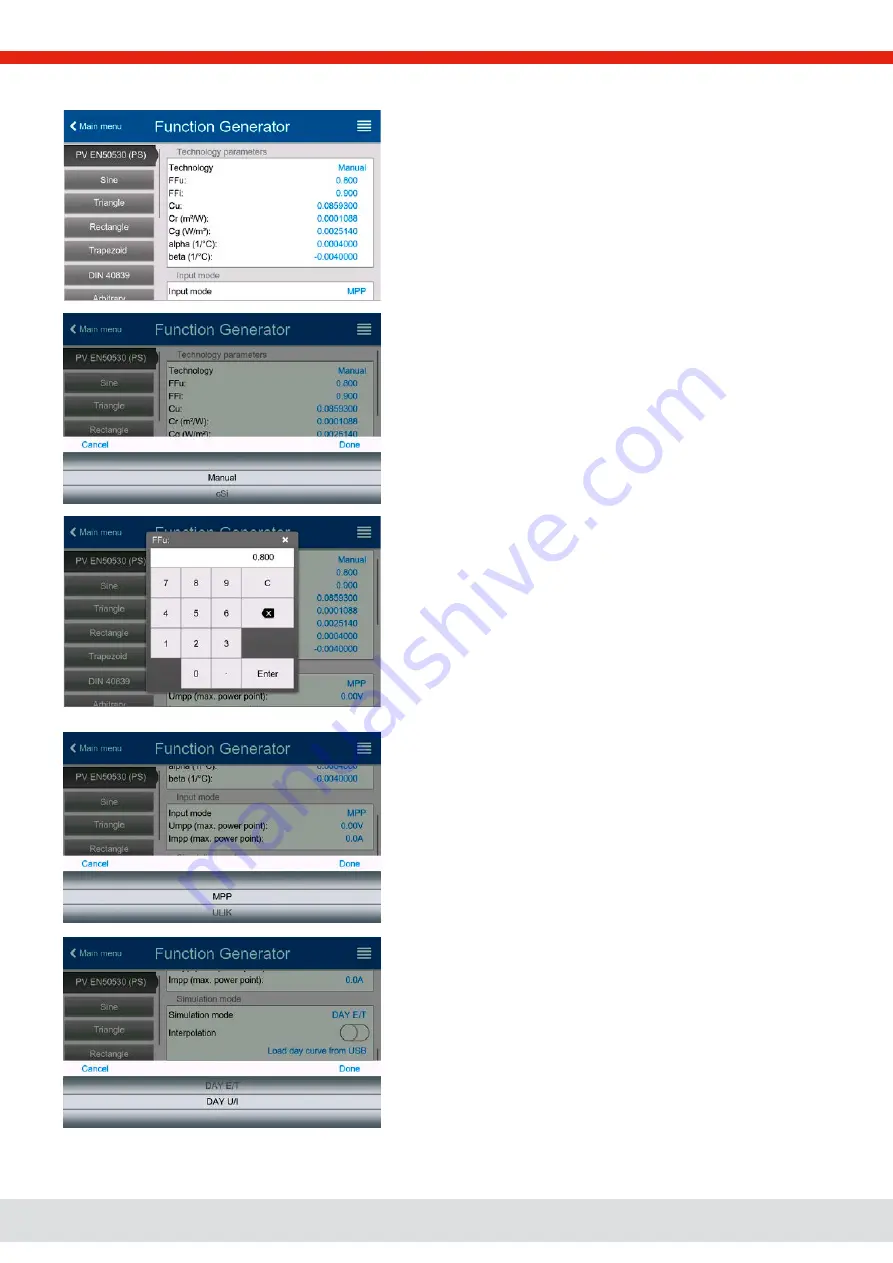
Configuration step by step
Starting point
In menu
Function Generator
find the PV functions. Select here group
PV EN50530 (PS)
.
Step 1: Technology selection
The extended PV function requires to select the panel technology of the
solar panel which is going to be simulated. In case
cSI
or
Thin Film
don’t
match your requirements or you are not sure about their technology
parameters, select
Manual
.
When selecting
Thin film
or
cSI
the configuration continues with
Step 2
.
Step 1-1: Adjust technology parameters
If technology
Manual
was selected in the previous screen, all displayed
technology parameters can be adjusted by tapping on them and en-
tering the desired value. It’s recommended to adjust these values very
carefully, because wrong settings can result in a PV curve which doesn’t
work as expected.
When resetting the device, these values are reset to defaults which are
the same as with technology
cSI
. Also see the overview in
3.10.15.3. It
means they don’t necessarily have to be adjusted. If any of the other
technologies was selected, this screen would be skipped and these
parameters set to the defined values.
Step 2: Input mode and solar panel base parameters
Selecting the input mode between
MPP
and
ULIK
determines what pair
of parameters has to be set in the configuration and also later in the
simulation. When setting pair Uoc/Isc, the other two pair is calculated
with factors and automatically set.
The open circuit voltage (
Uoc
) and the short-circuit current (
Isc
) are
upper limits which are usually read from the data sheet of a solar panel
and entered here for the simulation. Two parameters each are connected
via the fill factors:
U
MPP
= U
OC
× FFu / I
MPP
= I
SC
× FFi
Step 3: Select simulation mode
For a description of the available simulation modes see
When selecting
E/T
or
U/I
the configuration continues with
Step 4
,
otherwise an additional step is required


