


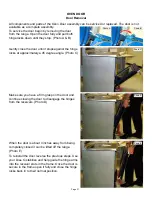


Page 38
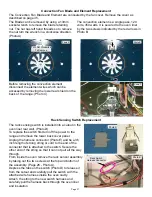
Each light assembly houses a replaceable 40 watt
bulb behind the clear lens.
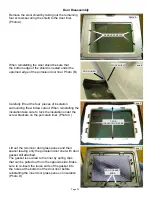
To remove the lens use a thin bladed screwdriver or
putty knife to gently pry the lens out. Take care not to
damage the finish of the oven wall. (Photo A)
With the lens removed the bulb can be accessed.
Remove the bulb by pulling it out of the porcelain
base in the direction shown by the arrow in photo B.
Use only the correct replacement bulb.
Please note:
do not allow your fingers to touch the
new bulb when replacing. This will shorten the life
of the new bulb. Use a paper towel to cover the new
bulbwhen installing.
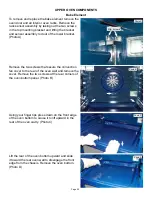
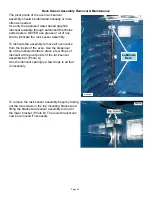
If the socket or harness are defective the complete
assembly with attached harness, bulb and lens must
be replaced. The light assembly is installed from the
inside of the oven cavity.
Halogen Oven Lights
Pull Bulb To
Remove
Photo B
Photo A
Toward Oven
Center
Photo C
When removing the old assembly it is recommended
to tie a string to the end of the harness plug as the
assembly is being removed. This string can then
be used to fish the wire harness of the replacement
assembly through the oven cavity liner and inner
shield.
Always orient the assembly with the wire harness
towards the center of the oven. (Photo C)
Summary of Contents for CEI30EF5GB
Page 11: ...Page 11 Wiring Diagram Electric Wave Touch Models with Lower Oven ...
Page 12: ...Page 12 Schematic Diagram Electric WaveTouch Models with Lower Oven ...
Page 13: ...Page 13 Wiring Diagram Electric IQ Touch Models with Warming Drawer ...
Page 14: ...Page 14 Schematic Diagram Electric IQ Touch Models with Warming Drawer ...
Page 46: ...Page 46 ...
Page 47: ...Page 47 NOTES ...


