


38
DISPLAY
a.
Displays the time (0-60 min range). If the timer is set, the display will count down the
time, starting from the set value. If the timer is not set, the elapsed time of appliance
operation will be displayed. Press the (F) button again to switch the appliance on
without resetting the displayed time.
b.
Temperature display (from 20°C to 120°C). The display always shows the current
temperature in the mixing container, even if no temperature has been programmed.
c.
Speed display from 01 to 12.
Press the (F) button and hold it for 2 s to reset the settings.
OPERATION
Before first use, thoroughly wash all parts of the appliance that will be in contact with
food. (see the Cleaning and Maintenance section)
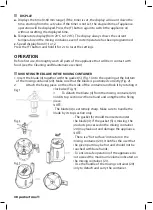
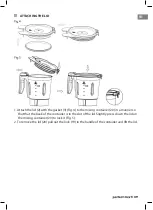
MOUNTING THE BLADE IN THE MIXING CONTAINER
1. Insert the blade (4) together with the gasket (5) (Fig. 1) into the opening at the bottom
of the mixing container (20). Make sure that the blade is positioned correctly (Fig. 2).
2.
Attach the fixing piece on the other side of the container and lock it by rotating it
clockwise (Fig. 3).
3.
To detach the blade (4) from the mixing container (20)
hold its top section with one hand and untigthen the fixing
piece.
NOTE.
- The blade (4) is extremely sharp. Make sure to handle the
blade by its top section only.
- The gasket (5) should be inserted under
the blade (4). If the gasket (5) is missing, the
products processed in the mixing container
(20) may leak out and damage the appliance.
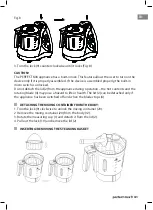
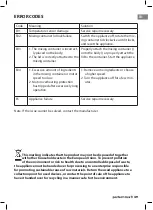
NOTE.
- There is a “hot surface” indicator on the
mixing container (20). It notifies the user that
the given part may be hot and should not be
touched with bare hands.
- To ensure safe operation of the appliance do
not exceed the maximum volume indicated on
the mixing container (2 l).
- Use the handle of the mixing container (20)
only to detach and carry the container.
Summary of Contents for perfect mix MFC2000
Page 2: ......
Page 7: ...7 PL...
Page 8: ...8 1 2 3 4 5 6 7 8 9 10 11 12 13 14 15 16 17 18 20 19 21...
Page 10: ...10 A C D F G H I E B a c b...
Page 29: ...29 PL a...
Page 34: ...34 1 2 3 4 5 6 7 8 9 10 11 12 13 14 15 16 17 18 20 19 21...
Page 36: ...36 A C D F G H I E B a c b...
Page 55: ......


