G
ETTING
STARTED
R
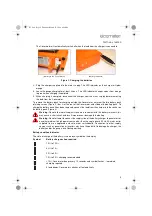
The Covermeter will automatically switch off when the lead from the charger is connected.
Figure 3. Charging the batteries
3. Plug the charger supplied into the mains supply. The LED indicator on the charger will glow
orange.
4. Leave the gauge charging for at least 4 hours. The LED indicator changes colour from orange
to green when charging is complete.
5. When charging is complete, disconnect the charger from the mains supply before removing
the lead from the Covermeter.
To remove the battery pack for charging outside the Covermeter, unscrew the two battery pack
retaining screws (Figure 2, item 3) at the rear of the Covermeter and slide out the battery pack. To
charge the battery once it has been removed, connect the lead from the charger into the socket on
the battery pack (Figure 3).
Warning:
Do not allow metallic objects to come into contact with the battery terminals; this
may cause a short circuit and result in permanent damage to the battery.
Warning:
Do not attempt to connect the supply side of the battery charger to generators or
any other medium to high power source other than the single phase 50 Hz AC mains outlet
supplied from an approved and safe mains switchboard. Connection to other supply
sources such as generators or inverters may have the potential to damage the charger, the
battery and/or the gauge, invalidating warranty.
Battery condition indicator
The state of charge of the battery is shown by a symbol on the display:
Symbol
Battery charge/action required
70% to 100%
40% to 70%
20% to 40%
10% to 20%, charging recommended
<10%, Covermeter beeps every 10 seconds and symbol flashes - immediate
charging required
5 loud beeps, Covermeter switches off automatically
(battery in the Covermeter)
(battery removed)
331.book Page 5 Thursday, March 12, 2009 9:46 PM


