background image

EKO INSTRUMENTS CO., LTD. VIP Checker HC-121 Instruction Manual V2 

Pg. 12 

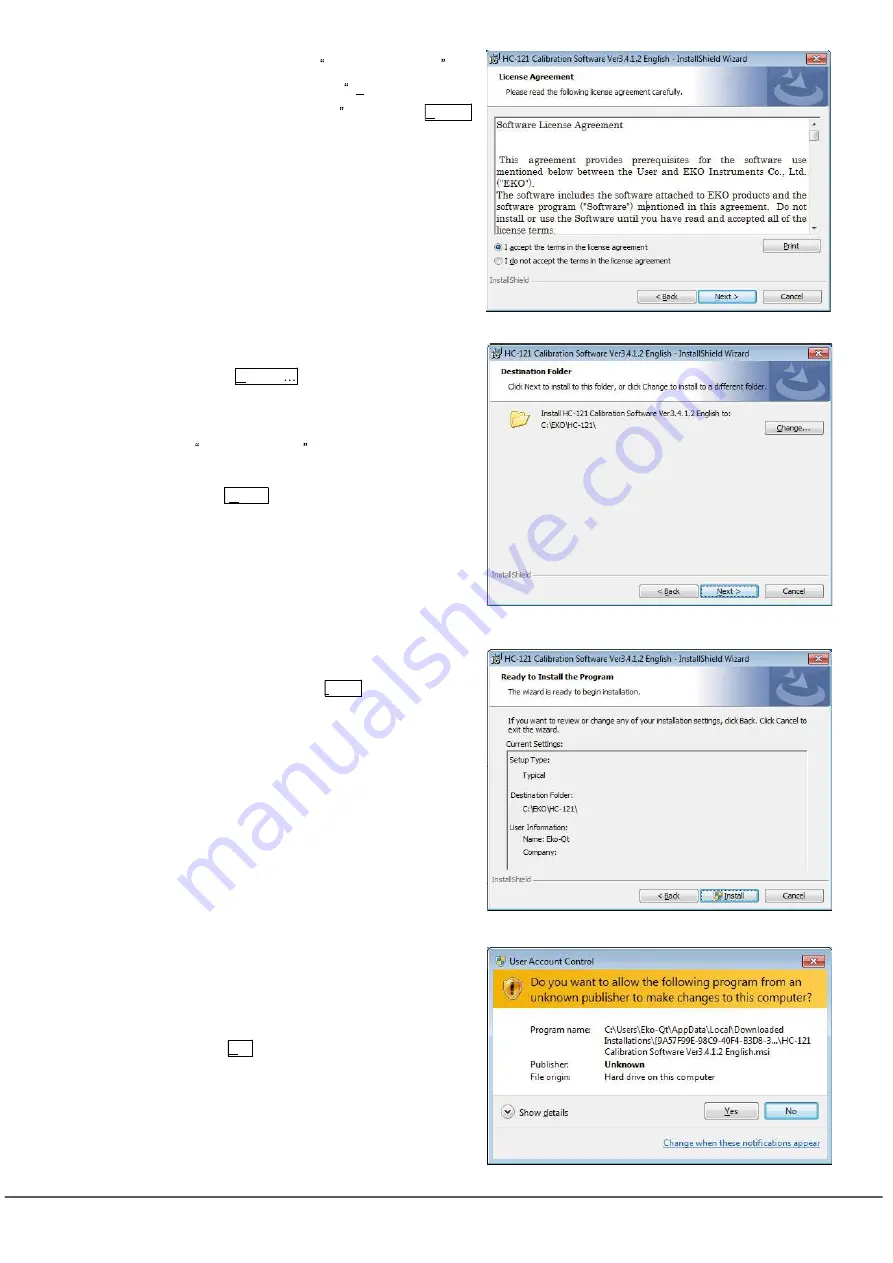
b.  Thoroughly read the  License Agreement  and 

click the radio button for  I accept the terms in 

the  license  agreement   then  click  Next  > 

button to continue. 


c.  Select an installation folder.    To select a folder, 

click  Change   button  and  specify  the 

installation folder.    If a folder is not selected, it 

automatically 

creates 

folder 

C:¥EKO¥HC-121   and  the  software  is 

installed under this folder.     

Click Next > button to continue. 


d.  Confirm  the  installation  folder;  if  the  selected 

folder is correct, click Install button. 


e.  In  the  case  of  installing  the  software  on  a 

computer with Windows Vista or newer for OS, 

the  display  will  once  get  dark  then  warning 

message  for  user  account  control  appears.   

Click Yes button. 


Figure 6-5. Installation Wizard:    Warning Message 

Figure 6-4. Installation Wizard:    Folder Confirmation 

Figure 6-2. Installation Wizard:    License Agreement 

Figure 6-3. Installation Wizard:    Select Folder 

Summary of Contents for VIP Checker HC-121

Page 1: ...INSTRUCTION MANUAL HC 121 VIP Checker...

Page 2: ...4 2 Package Contents 6 5 Getting Started 7 5 1 Parts Name and Descriptions 7 5 2 Setup Electrostatic and Noise Countermeasure 9 5 3 Connecting Instruments 10 6 Software 11 6 1 Installation and Uninsta...

Page 3: ...70 3050117 Fax 31 0 70 3840607 North America Region www eko usa com info eko usa com EKO INSTRUMENTS USA Inc 111 North Market Street Suite 300 San Jose CA 95113 USA Tel 1 408 977 7751 Fax 1 408 977 77...

Page 4: ...on points Disposing of this product correctly will help save valuable resources and prevent any potential negative effects on human health and the environment which could otherwise arise from inapprop...

Page 5: ...play units and barcode reader handle with care If any strong impacts are given to these instruments the instruments are easily scratched or indented which may affect on measurements Do not use Barcode...

Page 6: ...5 Sensor Head Connection VIP is a high performance insulator however if any vacuum leakage occurs it will lose its performance HC 121 is developed to check the VIP vacuum leakage and the VIP are evalu...

Page 7: ...mediately Table 4 1 Package Contents Standard Items Qty Remarks Measuring Unit 1 With power supply cable RS 232C cable Display Unit 5 Sensor Units 5 sets 5 sets of Weight and Sensor Head Barcode Reade...

Page 8: ...emperature of VIP surface which is heated with heater and inside the sensor which is insulated with thermal resistance material To compare the output value and the thermal conductivity calibration nee...

Page 9: ...a connector and with RS 232C cable to the computer Sensor disconnection detector function is integrated and it checks the sensor disconnection by installing the attached software on the computer Each...

Page 10: ...he operation table and the floor around it and make sure to connect to ground Figure 5 3 Conductive mats Anti properly worn or used by the operator Figure 5 3 Anti electrostatic charge suite Wrist Str...

Page 11: ...nect Measurement Unit and Display Units Plug in the connector for Display Units to the connector on back of Measurement Unit in order of the numbers indicated 4 Connect the Display Units and the Senso...

Page 12: ...lope and intercept which will be set as the calibration value for each Sensor Unit Measurement Software displays the measurement results from the Sensor Units and the test statuses of each Sensor Unit...

Page 13: ...tes a folder C EKO HC 121 and the software is installed under this folder Click Next button to continue d Confirm the installation folder if the selected folder is correct click Install button e In th...

Page 14: ...stallation is completed shortcut icons appear on the desktop 2 Software Uninstallation There are following 2 ways to uninstall the software 1 Uninstalling from Programs and Features Go to Control Pane...

Page 15: ...n for selecting COM port The COM ports that are unavailable will be shown in gray and cannot be selected Also when a COM port is already in use it will also be shown in gray and cannot be used This is...

Page 16: ...n the output and thermal conductivity prior to the calibration The points on calibration curve which will be the reference value for evaluating the OK Good and NG Not Good VIP can be determined from t...

Page 17: ...When VIP sample with wide range cannot be prepared it is possible to measure very narrow range by selecting the linear approximation In such case there are some values goes off the calibration curve s...

Page 18: ...and 3 and register the barcode numbers serial numbers Click the Set c the window Registration dialog is displayed for barcode numbers Enter the serial numbers in an order from the lower thermal conduc...

Page 19: ...keyboard Each corresponds to Sample 1 Sample 2 and Sample 3 b Click the No 1 F1 No 2 F2 and No 3 F3 buttons on the software window using mouse c Read the barcode on the VIP with Barcode Reader The reg...

Page 20: ...the Heatsink and push the start button Start button stops blinking and 7 When the cooling time is over the start button lights up Wait for more than 5 minutes then repeat the steps 2 6 If the sample...

Page 21: ...rement results are lost Always click Save button to save with an appropriate file name as often as possible In case the computer shuts down due to some malfunction the save data can be retrieved See s...

Page 22: ...nsuming task If you wish to terminate the calibration the measurement results acquired so far can be saved and later restart the calibration by retrieving the data To save the measurement results clic...

Page 23: ...value in thermal conductivity Clicking the Update button will display the and near value for each channel are displayed in voltage Setup the time in the following manner 1 Standby Time Standard 20sec...

Page 24: ...setup contents in a parameter file extension tcd This parameter file will be called to measure in this Measurement Software If a parameter file is already created the parameter file can be read and m...

Page 25: ...n the Sensors and Display Unites Figure 6 32 Display in Disconnected Status If there are any disconnected Figure 6 31 Display Contents of Measurement Software Setup Information entered on Setup Window...

Page 26: ...Main window Click the Load button to select the calibration file tcd created in the Calibration Software then click OK window is closed If the calibration file is not selected it will not go forward...

Page 27: ...tandard 10sec Cannot be changed Items which require changing setup each time 1 Thermal conductivity Conversion Factor This is the value of the slope and intersection of a straight line when the relati...

Page 28: ...or on that channel If the lamp does not light even after checking the connection it is considered to be broken 2 Start the Measurement Software TCDac ure 6 33 Initial Window At this time the Start but...

Page 29: ...pressed for the channels to be measured a random character counter value are used as serial number of the VIP When the same channel is used the number increases by 1 inclement The operation is easier...

Page 30: ...s and the display changes to below Place the Sensor Unit on the center of the VIP which is flat After 30 seconds buzzer will sound and Start button starts blinking then the measurement is completed Th...

Page 31: ...Sensor Unit on heatsink Evaluate the VIP Finished Evaluation Result Indicated OK nNG NG When the start button is blinking place the Sensor Unit on the heatsink and press the start button the process w...

Page 32: ...thermocouple The relationships between the temperature differences and the thermal conductivity vary significantly by the condition of all sorts of parameters such as the VIP material surfacing materi...

Page 33: ...ong impact Especially when placing the Sensor on the Heatsink make sure not to hit the Sensor on a corner of the Heatsink Indents and or scratches on the Sensor surface may result in malfunction Pay a...

Page 34: ...be connected properly Check the cable and Display Unit cables are connected in correct way Connect the units in the order described in the section 5 3 Connection Measured value is less than 1mW mK Us...

Page 35: ...e equipment high electro magnetic and electrostatic Table 9 2 Each Unit Specifications Characteristics Details HC 120 Measurement Unit Sensor Input Differential Thermocouple Thermopile type Output in...

Page 36: ...rements or cooling Push the button once to light off OK Lamp Lights up when inspection pass Green NG Lamp Lights up when inspection fail Red Sensor Heat sink Aluminum heatsink Cable 12 pin Shield Cabl...

Page 37: ...ction Software Function Calibration Software TCCal_V34xx exe This is software to calibrate the 5 sensors Prepare 3 types of samples that thermal conductivities are known each Ok nNG NG in thermal cond...

Page 38: ...o 9 9999 Coefficient A Slope value of thermal conductivity conversion formula 99 99 to 99 99 Coefficient B Intercept value of thermal conductivity conversion formula 000 000 to 999 999 R 2 Determinati...

Page 39: ...LTD VIP Checker HC 121 Instruction Manual V2 Pg 38 Start Switch OK NG Lamps Sensor Unit Heat Sink Figure 9 2 Display Unit Dimension Figure 9 1 Measurement Unit Dimension 9 4 Dimensions 1 Measurement U...

Page 40: ...code Reader MS 5145 RS Honeywell With set of power supply adapter and RS 232C cable for barcode reader RS 232C Extension Cable for Barcode Reader 4m Dsub9pin Female Dsub9pin Male AC Cable Correspondin...

Page 41: ...munication specification for HC 121 at the time of shipment however in case the barcode reader fails to read the barcode for some reason it may be due to this initial setting is lost In such case the...

Page 42: ...EKO INSTRUMENTS CO LTD VIP Checker HC 121 Instruction Manual V2 Pg 41...

Page 43: ...EKO INSTRUMENTS CO LTD VIP Checker HC 121 Instruction Manual V2 Pg 42...

Page 44: ...eko co jp EKO North America 111 North Market Street Suite 300 San Jose CA 95113 USA P 1 408 977 7751 F 1 408 977 7741 info eko usa com www eko usa com EKO Europe Middle East Africa South America Lulof...

Reviews: