background image


60

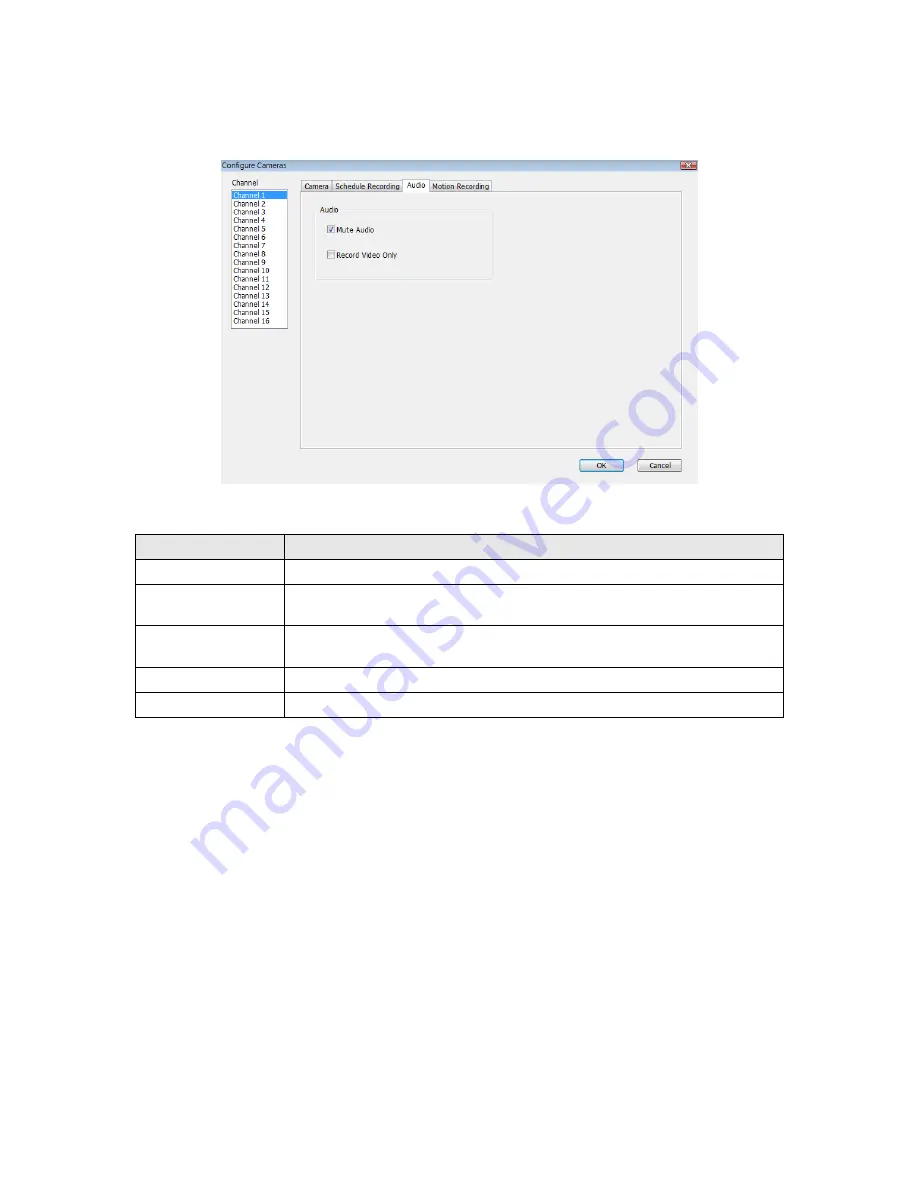
3-3-1-3 Audio 

 
For cameras that support audio, you can use this tab to decide if you wish to hear the audio captured by 
selected camera. 


Here are the descriptions of all setting items: 
 

Item 

Description 

Channel 

Select the channel number you wish to set. 

Mute Audio 

Check this box and the IP camera surveillance software will not play the audio 
captured by this camera. 

Record Video Only 

Check this box and the IP camera surveillance software will not record the 
audio captured by this camera. 

OK 

Save settings in this tab. 

Cancel 

Discard all settings in this tab. 


Summary of Contents for IC-7000PT V2

Page 1: ...1...

Page 2: ...and storage the images and sound into hard disk as a record We won t know when the situation we want will happen therefore we need to keep the product work everytime If the product got into standby o...

Page 3: ...2 1 Preset Points 22 2 2 2 Guard Tour 23 2 3 3 Multi Camera Display 24 2 3 Network Settings 27 2 3 1 LAN 27 2 3 2 WLAN 29 2 3 3 Dynamic DNS 31 2 3 4 UPnP 33 2 3 5 Login Free 34 2 3 6 RTSP 34 2 4 Moti...

Page 4: ...re cameras 56 3 3 1 1 Camera tab 56 3 3 1 2 Schedule Recording 57 3 3 1 3 Audio 59 3 3 1 4 Motion Record 60 3 3 2 General Settings 62 3 3 2 1 General tab 61 3 3 2 2 E Mail Setting tab 62 3 3 2 3 Secur...

Page 5: ...time in the contents hereof without obligation to notify any person of such revision or changes The product you have purchased and the setup screen may appear slightly different from those shown in th...

Page 6: ...rm to the telephone network the telephone company may discontinue your service temporarily If possible they will notify you in advance But if advance notice isn t practical you will be notified as soo...

Page 7: ...operated in accordance with provided instructions and a minimum 20 cm spacing must be provided between computer mounted antenna and person s body excluding extremities of hands wrist and feet during...

Page 8: ...U Countries Intended for Use The ETSI version of this device is intended for home and office use in Austria Belgium Denmark Finland France Germany Greece Ireland Italy Luxembourg Bulgaria Cyprus Czech...

Page 9: ...amera also supports wireless network that is you can link to this camera wirelessly You only have to provide this IP camera with 12V power by the power adapter that comes with the product package and...

Page 10: ...tion WEP WPA WPA2 Supports DHCP and PPPoE protocol you can also assign a fixed IP address to the camera also Supports Dynamic DNS used to allocate the IP camera s Internet address when the ISP you re...

Page 11: ...r status Audio LED Indicates Audio status LAN LED Indicates LAN activity ACT LED Indicates Data activity WLAN LED Indicates Wireless LAN activity Focus Ring Adjusts focus Front View Focus Ring Microph...

Page 12: ...mory card for image video storage WPS Button click the bottom on IP Cam and click it on the AP you want to connect for wireless Audio Connector Connects to external speaker for audio output Ethernet C...

Page 13: ...13 Reset Button Press the button with pen nib and hold for 5 seconds to reset the camera settings to factory default value Side View Reset Button...

Page 14: ...14 Tripod Connector Connects to tripod to secure the camera when the camera is not put on a horizontal surface Bottom View Tripod Connector...

Page 15: ...ing for WPS connection from AP and flash speed is once a second Flash Transferring data via wireless LAN Audio Off Audio function is disabled Volume 0 On Audio function is enabled Flash Two way audio...

Page 16: ...if anything s missing Connect the Ethernet cable to your local area network and connect the other end to the LAN jack of this IP camera NOTE You can skip this step if you plan to use wireless LAN onl...

Page 17: ...at the back of this IP camera 4 Place the camera at a secure place and point the camera to the place you wish to monitor If you wish to hang the camera on the ceiling or wall please use the tripod con...

Page 18: ...18 5 Launch Internet Explorer on your computer and following the instructions given in next section to set the IP camera...

Page 19: ...Camera Settings The first menu after you logged onto web management interface is Camera and this is the only menu you can see the real time image from camera You can always back to this menu by clicki...

Page 20: ...here s anything moving at the place where camera points to you can select a lower image quality to get a higher image refresh rate Video Type Select the video encoding type Available options are MJPEG...

Page 21: ...at the right of Snapshot button and you ll be prompted to select a new directory Recording Press this button to record the displaying image as a video file in AVI format and you can play the video fi...

Page 22: ...n of labeled text not shown on image on the image to move the camera to the direction You may need to set the Pan Tilt speed to a slower setting so you can move the camera in a more accurate manner 3...

Page 23: ...will be given below Item Description Add Add a new set of guard tour see instructions below Edit Edit a selected guard tour The parameters for an existing guard tour will be recalled and you can modif...

Page 24: ...ons Select preset points from dropdown menu here then click Add to list to add this position to this guard tour When you click Add to list you ll be prompted to set these parameters View Time Define t...

Page 25: ...on from Network menu of each camera and then you can log onto the web management interface of any camera and select one type of multi camera display You can select one type of multi camera display a O...

Page 26: ...s and port will be displayed at the top of camera s view When IP and port information is displayed on the top of camera s view indicates the camera is configured You can also click the image to point...

Page 27: ...ort etc then click Add new IPCam button to connect to this IP camera and display it s view in camera view If you don t want to add the camera now click Close button and the popup window will be closed...

Page 28: ...DNS and activate UPnP function You can access this menu by clicking LAN on the top of web management interface After you selected Network network setting menu will appear There are 5 sub menus availa...

Page 29: ...eld is optional AV Control Port Specify the port number of video transfer here If you have firewall on your network you need to allow computers on Internet to access this port number of the IP address...

Page 30: ...ou don t have any wireless access point but your computer has wireless network card Set to Infrastructure when you have wireless access point and you have computers with wired network connection Avail...

Page 31: ...e able to connect it Channel Select the radio channel you wish to use here When network type is Infrastructure the radio channel is auto selected according to the channel that wireless access point us...

Page 32: ...of how to apply a new account can be found on dyndns org s website The descriptions of every setting in this menu will be given below Item Description Enable DDNS Select Enable to activate Dynamic DNS...

Page 33: ...there The descriptions of every setting in this menu will be given below Item Description Enable UPnP Select Enable to activate UPnP function of this IP camera select Disable to disable it Click Appl...

Page 34: ...ck Apply to save settings then other users can access the image by this filename with jpg extension with the camera s IP address as prefix For example if your camera s IP address is 192 168 2 1 and th...

Page 35: ...ort This option allows you to enter RTSP port The default value of RTSP port is 554 Please make sure the RTSP port applied on the RTSP player shall be same as the RTSP port applied on the IP cam RTSP...

Page 36: ...d image and take a snapshot or video recording when motion is detected So you can use this camera to keep the safety of the belongings you have To use motion detection click the following link from th...

Page 37: ...e duration is based on the settings of Resolution Video Type and Frame Rate For example if the Resolution is 640x480 MPEG4 and Frame Rate is 15fps the available options of are 1 2 and 3 second Sending...

Page 38: ...detect minor changes in the image and drag the slide to the left to decrease sensitivity camera will only detect major changes in the image Refresh In case the objects of the image captured by the ca...

Page 39: ...s Email address NOTE Some mail server would reject to deliver the Email from unknown sender it s recommended to input your own Email address here or any other actual one SMTP Authentication Some SMTP...

Page 40: ...r s root directory Please ask FTP server s administrator to know which folder you should use Certain user name may have restrictions and therefore can not place the file in the directory not owned by...

Page 41: ...This option allows the IP cam to delete the oldest saved files when the capacity of the SD card is full for saving the latest recorded image File Name Prefix Specify the filename prefix the texts whi...

Page 42: ...he name of this IP Camera here This can be used to identify your camera on the network when you have more than one IP camera in the same network Default name begins with IC plus the last 6 characters...

Page 43: ...format is YYYY MM DD HH MM SS Time is in 24 hour format You can click Synchronize to PC time to use the time of the computer you re using Example 24 th August 2007 2007 08 24 and PM 9 24 30 21 24 30...

Page 44: ...THE IP ADDRESS OF THE CAMERA WILL RESET TO DEFAULT VALUE 192 168 1 61 Reset to Factory Defaults Clear all settings in the camera Please think again before you do this and then click this button to re...

Page 45: ...45 2 5 4 Status This menu provides all information about this IP camera like firmware version system uptime date time and network information...

Page 46: ...Camera they will see the following message informing that they don t have permission to do that This camera supports up to 16 users After you selected Account you ll be prompted to input user account...

Page 47: ...he privilege temporarily and set to Yes for this user when you want to give the privilege back Update Update the account s user name and password You can input the user name and password for this acco...

Page 48: ...lected System Info a sub menu will appear There are 4 sub menus available here Please click the SD card setting you wish to set then refer to instructions given below 2 7 1 Status Here shows the remai...

Page 49: ...ubject Input the title of space alarm E mail SMTP Server Input the SMTP server address you wish to use to send E mail Sender E Mail Address Input the sender E mail address of the space alarm E mail SM...

Page 50: ...50 2 7 3 File Management You can use this menu to manage the files stored on SD card...

Page 51: ...e is installed you can use your IP camera to safeguard your property Please follow the following instructions to install the surveillance software 1 Double click the setup file located in xxx folder i...

Page 52: ...k launch icon for you click all items you need here than click Next to continue 4 Here lists all options you chose in previous steps if everything s correct click Install to start installing procedure...

Page 53: ...en you see this window it means the software installing procedure is complete Please click Finish to finish the procedure IP camera surveillance software will start after you click Finish button if yo...

Page 54: ...l be displayed here Language Select a language from this dropdown menu to change display language Display layout Change camera image display layout Click a layout icon to change camera display layout...

Page 55: ...There are 8 directions in PTZ control ring If the camera you connect support PTZ you can use PTZ control ring to change the direction that camera points to This function is only available for support...

Page 56: ...a s you wish to connect Please click System configure button and a popup menu will appear Please select Configure Cameras to configure cameras Note If you re prompted by a windows security alert which...

Page 57: ...last scan Name Input the name of camera here Default value is the first 6 bytes of camera s MAC address you can change the name of camera so you can remember the camera s location of purpose easily Mo...

Page 58: ...s and if everything s correct you ll see the camera s image in IP camera surveillance software s main menu 3 3 1 2 Schedule Recording In this tab you can setup scheduled video recording so you can rec...

Page 59: ...schedule Delete Delete a selected schedule item New Weekly Schedules Click this button and a new window will appear You can define recording schedule that will be executed at the specified time of ce...

Page 60: ...items Item Description Channel Select the channel number you wish to set Mute Audio Check this box and the IP camera surveillance software will not play the audio captured by this camera Record Video...

Page 61: ...the time duration that camera will record when a motion has been detected from dropdown menu in seconds Invoke alarm when motion is triggered Send an alarm when a motion has been detected by the camer...

Page 62: ...to pick a directory in your hard disk Free Recording Space Displays remaining storage space Max Video File Size Defines the maximum file size of every video file When the size of file exceeds this val...

Page 63: ...items Item Description E Mail Subject Specify the subject of sending email Recipient E Mail Address Here lists all email addresses you set New Click this button and you ll be prompted to input the em...

Page 64: ...t know if your SMTP server requires authentication please refer to the setting of your email software or ask your ISP network administrator SMTP Account Input the SMTP account username of your SMTP se...

Page 65: ...mera surveillance software To set password please use Security tab in General Options menu Here are the descriptions of all setting items Item Description Enable Requires password authentication when...

Page 66: ...66 3 3 2 4 About This tab shows the version number of the IP camera surveillance software you re using...

Page 67: ...of camera and camera arrangement you can click the icon that presents a specific kind of layout and the video displaying area will change accordingly Layout style 1 1 Camera only Displays the video of...

Page 68: ...ras Layout style 5 9 Cameras Displays the video of up to 9 cameras Layout style 6 10 Cameras Displays the video of up to 10 cameras Layout style 7 13 Cameras Displays the video of up to 13 cameras Lay...

Page 69: ...creen modes If you want to use all available spaces on your monitor to display surveillance image you can click Full Screen button to switch display mode to full screen mode To exit full screen mode p...

Page 70: ...en all configured cameras Click Scan button once to activate scan function scan icon will become blue click again to stop scanning scan icon will become white NOTE If a camera is configured but discon...

Page 71: ...ize of a certain object to see its detail Please select a camera in video displaying area by clicking on its image then click button to see more objects that fall in the scope of camera s view or clic...

Page 72: ...ints to to see different places that fall in the scope of camera s view Please select a camera in video displaying area by clicking on its image and then click the directions you wish the camera to mo...

Page 73: ...Recording You can start video recording of selected camera manually by clicking Start Recording button When recording starts you ll see a message displayed in message displaying box like 1 1 10 00 00...

Page 74: ...rch all videos file that falls in a specific period of time and Motion Search search all videos recorded by motion detection function and falls in a specific period of time Please define the start and...

Page 75: ...MPEG4 System Hardware LAN Connector One RJ 45 port to connect to 10 100Mbps Ethernet Wireless IEEE 802 11b g n Wireless Model Only LED Indicator LAN LED Green WLAN LED Green Power LED Green Video Gree...

Page 76: ...refreshes very slow a Try a higher frame rate setting if it s not 30 b Try a lower resolution c If you re connecting this camera from Internet it could be caused by a slow Internet connection and it s...

Page 77: ...button d Please check log if FTP upload or Email sending is failed it will be logged and this may give you some clue on how to solve the problem e Change the threshold to a more sensitive setting I he...

Page 78: ...78...

Reviews: