background image

19

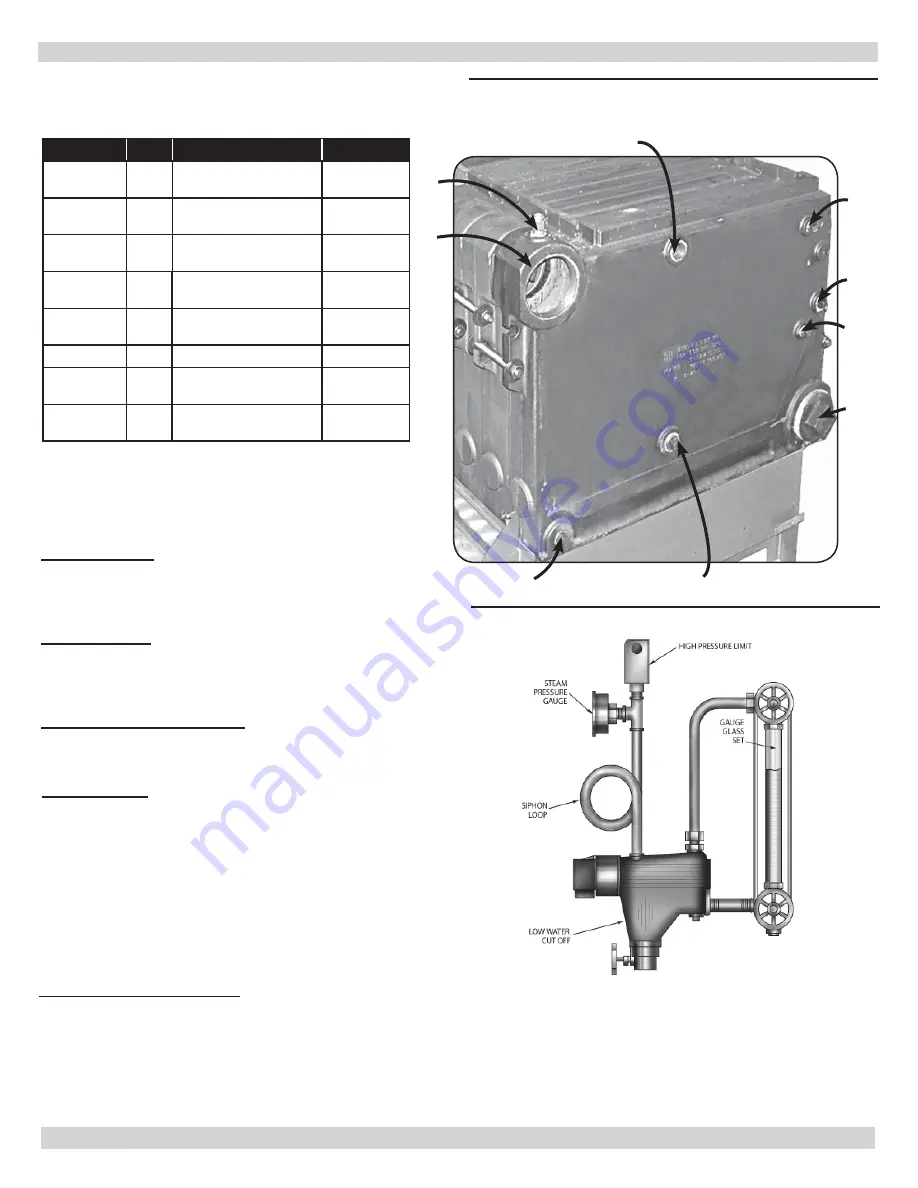
Illustration shows the end section and the various tap-

pings provided.  Tappings are the same in both right 
and left end sections.


OPENING

SIZE

STEAM

WATER

A

4”

Supply and Return

Supply and 

Return

B

½”

Primary LWCO and 

Gauge Glass Set

Plugged

C

¾”

Drain, Left End

Drain, Left 

End

C

¾”

Drain, Right End

Drain, Right 

End

D

½”

Plugged

Limit Con-

trol

E

1”

Accessories

Accessories

*F

1”

Safety Valve

Safety Relief 

Valve

G

¾”

Plugged or Electronic 

(Probe Type) LWCO

Plugged

*If opening F is to be used for something other than 

the Safety Valve or Safety Relief Valve, or the Safety/

Relief valve is larger than 1”, the Safety/Relief Valve 

must be installed in the Header Piping as near the 

boiler as possible

A

B

A

B

C

D

E

F

G

BOILER TRIM

Following controls are supplied as standard equipment.  

Details of their function and operation will be found in 

section on Controls and Adjustments.

WATER TRIM

1. Water temperature high limit control

2. Combination temperature - pressure gauge

3. Safety relief valve (30 psi)

WATER TRIM ASSEMBLY

Locate water trim controls per chart and illustration 
above.

STEAM TRIM

1. 

Low Water Cut-Off (mounted externally) with blow-off 

valve

2. 

High Pressure Limit Control

3. 

Pressure Gauge

4. 

Water Gauge Glass Set

5. 

Siphon Loop

6. 

Safety Valve (15 psi..)

NOTE: 

No shutoff of any description shall be placed between 

the pressure relief valve and the boiler, or on discharge 

pipes between such safety valves and the atmosphere. 

Installation of the pressure relief valve shall conform 

to the requirements of the ANSI/ASME Boiler and 
Pressure Vessel Code, Section IV.

STEAM TRIM ASSEMBLY

Assemble Steam Trim, Low Water Cut-Off, High 

Pressure Limit Control, Pressure Gauge, Water Gauge 

Glass Set and Siphon Loop, as shown in Figures 

30.  See Illustration and Chart above for location of 

controls.

Figure #30

WATER LEVEL 

29” TO FLOOR

TAPPINGS

Figure 29

Figure 30

Summary of Contents for PENNCO 41J Series

Page 1: ...rcial Steam Boiler INSTALLATION OPERATION MAINTENANCE MANUAL An ISO 9001 2008 Certified Company P N 240009242 Rev B 06 2013 Manufactured by ECR International Inc 2201 Dwyer Avenue Utica NY 13501 web site www ecrinternational com ...

Page 2: ... 25 Operation and Service 27 Functions Operation Trial Pilot Ignition 27 Main Burner Operation System Troubleshooting 27 Component Spark Ignition Check 27 Startup Checkout Start system 28 Pilot Flame Adjustment Check Burner Input 28 Pilot System Troubleshooting Table 29 Checking Adjusting 30 Cleaning And Maintenance 31 KEEP THIS MANUAL NEAR BOILER RETAIN FOR FUTURE REFERENCE CAST IRON HOT WATER OR...

Page 3: ... 300 400 500 233 310 388 729 971 1213 175 233 291 1 1 1 8 x20 10 x20 12 x20 8 10 12 6 96 9 25 11 58 77 5 18 9 37 8 0 10 0 50 77 5 25 2 50 4 0 27 0 86 77 5 31 5 63 0 0 40 1 20 600 700 800 900 1000 465 543 620 698 775 1454 1696 1938 2183 2421 349 407 465 524 581 2 1 1 2 1 1 2 12 x20 12 x20 14 x20 14 x20 14 x20 12 12 14 14 14 13 88 16 21 18 51 20 84 23 13 77 5 37 8 75 6 0 50 1 70 77 5 44 1 88 2 0 70 ...

Page 4: ...ure to follow these instructions could result in death or serious injury 6 Never install boiler on carpeting CODES GOVERNING INSTALLATION Installation must conform to the requirements of the authority having jurisdiction or in the absence of such requirements to the National Fuel Gas Code ANSI Z223 1 NFPA54 Where required by the authority having jurisdiction the installation must conform to the st...

Page 5: ...ugh to allow the largest boiler parts to enter or permit replacement of any other appliance in the same room Installing contractor must provide ventilated foundation for boiler when installing Over a room Over electrical wiring or cables of any kind If concrete floor is green or water is channeled under concrete floor Minimum Vent Pipe Clearance If the vent pipe must go through a crawl space doubl...

Page 6: ...475 950 2000 4 500 2000 500 1000 2100 5 525 2100 525 1050 2200 5 550 2200 550 1100 2300 5 575 2300 575 1150 2400 5 600 2400 600 1200 2500 5 625 2500 625 1250 2600 6 650 2600 650 1300 2700 6 675 2700 675 1350 2800 6 700 2800 700 1400 2900 6 725 2900 725 1450 3000 6 750 3000 750 1500 Unconfined area A space whose volume is not less than 50 cubic feet per 1000 Btu per hour of all appliances installed...

Page 7: ...to convey makeup air from outdoors and shall have same cross sectional area of openings to which they are connected 4 When air for combustion and ventilation is from inside buildings confined space shall be provided with two permanent openings one starting 12 inches from top and one 12 inches from bottom of enclosed space Each opening shall have minimum free area of 1 square inch per one thousand ...

Page 8: ...lose proximity of boiler and chimney On all boilers vertical risers must be at least as large as vent openings on draft hood Boiler manufacturer makes no specific recommendations regarding application of draft inducers that may be used with this boiler If draft inducer is used it is up to installing contractor and draft inducer manufacturer to determine proper application VENTILATION AND COMBUSTIO...

Page 9: ...nt diameters sized to match flue outlets minimum vertical rise of 4 feet above draft hood must be maintained for proper operation Refer to Chart 1 for typical chimney sizes Requirements for this type of system are an adequately sized chimney adequate combustion air and outlet end of horizontal run must be no more than 6 feet from chimney with no more than one 90 elbow in this run as shown For inst...

Page 10: ...perly vents when tested as outlined above return doors windows exhaust fans fireplace dampers and any other gas burning appliance to their previous conditions of use 7 Any improper operation of the common venting system should be corrected so the installation conforms with the National Fuel Gas Code ANSI Z223 1 NFPA 54 When resizing any portion of the common venting system the common venting syste...

Page 11: ... 110 117 123 130 136 3665 3876 4087 4298 4509 74 78 1 4 82 1 2 86 3 4 91 72 76 1 4 80 1 2 84 3 4 89 11 1 2 9 3 8 11 1 2 11 1 2 13 5 8 17 14 7 8 17 19 1 8 21 1 4 17 19 1 8 19 1 8 21 1 4 21 1 4 17 21 1 4 21 1 4 21 1 4 21 1 4 11 1 2 13 5 8 13 5 8 13 5 8 13 5 8 2100 2200 2300 2400 2500 110 115 120 125 130 143 149 156 162 169 4720 4931 5142 5353 5564 95 1 4 99 1 2 103 3 4 108 112 1 4 93 1 4 97 1 2 101 ...

Page 12: ...ed before assembling sections Figure 7B Important After bases are assembled check to be sure they are level Section Assembly The sections may be started from either the left or right end of the base Place the end section on the base with the center line of the section directly over the joint of the base end closure With boilers having two or more bases as you progress be sure the parting line cent...

Page 13: ...ont top and back Putty should also be applied where the sections join the base Figure 12 Place necessary plugs and control wells in correct locations Plug all other tappings leaving air vent in top of one of end sections and connect water Fill boiler with water until it runs out the air vent Hydrostatically test boiler in accordance with applicable codes Check for leaks before continuing with asse...

Page 14: ...ront Front J Jacket acket P Panel anel Installed Installed Front Front J Jacket acket P Panel anel Installing Boiler Jacket Panels NOTE Jacket assembly must start at the left side of boiler 1 Attach lower jacket end panel left to two Z bars on base end closures through two slotted holes on bottom of jacket end panel Use 2 10 x screws Figure 14 2 Attach middle jacket end panel left to lower jacket ...

Page 15: ...wer jacket end panel right to middle jacket end panel with lower behind middle and lining up holes Use 5 10 x screws Attach lower jacket end panel to two Z bars on base end closures through two slotted holes on bottom of jacket end panel Use 2 10 x screws Figure 21B 10 Position top of rear jacket panel s to draft hood baffle flange and secure with 2 10 x screws Secure bottom of rear jacket panel s...

Page 16: ...ATION ASSEMBLY Figure 22 Figure 21B NOTE The attachment of the control access jacket panels can wait until the controls have been mounted to the top front intermediate jacket panels Figure 24 Figure 23 boiler base Each boiler base also includes data plate indicating required gas type firing rate and gas pressure for that base These plates are located on Jacket Top Front Panels Boilers also have ra...

Page 17: ...racket and 2 along lower edge of bracket Figure 26A Remove cover 2 screws from J box then remove knockout left or right side Connect plug of harness from transformer to plug on j box Figure 26B 4 Orient harness of control panel assembly so correct female plug is toward j box and will connect to j box harness Figure 27A Secure harness to control panel with zip ties and 10 x screws Figure 27A Connec...

Page 18: ...18 Figure 27A INSTALLATION ASSEMBLY Control Mounting And Installation Figure 27A Figure 29A Figure 27B Figure 28 Figure 29B ...

Page 19: ...ound in section on Controls and Adjustments WATER TRIM 1 Water temperature high limit control 2 Combination temperature pressure gauge 3 Safety relief valve 30 psi WATER TRIM ASSEMBLY Locate water trim controls per chart and illustration above STEAM TRIM 1 Low Water Cut Off mounted externally with blow off valve 2 High Pressure Limit Control 3 Pressure Gauge 4 Water Gauge Glass Set 5 Siphon Loop 6...

Page 20: ...llation has a preferred piping arrangement according to the requirements of the particular system and choice of arrangements and sizes of headers should be decided upon by the installer s heating engineer or with standard engineering practice When using only one supply and one return connection return must be connected at opposite end of boiler from flow connection on all boilers 600 000 Btu hr in...

Page 21: ...WATER BOILERS SERIES W BOILER TAPPINGS ARE AVAILABLE FOR ALL CONNECTIONS SHOWN WITH EXCEPTION OF NO 764 WHICH MOUNTS IN PIPING McDONNELL LOW WATER CUT OFF McDONNELL FEEDER CUT OFF COMBINATION Water supply pressure must exceed relief valve setting by at least 20 psi For boilers with 75 to 100 psi relief valve setting BOILER SIZE USE ALL SIZES No 150 For all boilers up to 50 psi relief valve setting...

Page 22: ...turn Header should be equal to total area of Return Mains or larger Steam cross headers must be piped with swing joints or be equipped with slip joint connector in order to prevent expansion and contraction of steam header from damaging boiler Each installation has preferred piping arrangement according to requirements of particular system and choice of arrangements and sizes of Headers should be ...

Page 23: ...ividual manual shutoff valve during any pressure testing of gas supply piping system at test pressures equal to or less than 1 2 psig 3 5 kPa Chart 4 Minimum Gas Supply Pressure Models 5 0 inches w c 300 500 600 1000 1300 1500 2000 2100 2500 2600 3000 Models 5 3 inches w c 400 700 800 900 1100 1200 1400 1600 1700 1800 1900 2200 2300 2400 2700 2800 2900 All Models Maximum Gas Supply Pressure 13 5 i...

Page 24: ...ignite Make certain thermostat s turns off boiler when room temperature reaches selected setting and starts boiler operating when room temperature falls few degrees Finally set thermostat for desired temperature Special conditions in building and location of thermostat will govern this setting STAGE FIRING MULTIPLE BASE BOILERS Stage Firing Multiple Base Boilers Multiple base hot water boilers are...

Page 25: ...25 LOW VOLTAGE WIRING WIRING DIAGRAMS Commercial Boiler 1 2 3 Base ...

Page 26: ...26 LOW VOLTAGE WIRING WIRING DIAGRAMS Commercial Boiler 4 5 6 Base ...

Page 27: ...trol module performs the following basic functions 1 Opens and closes the first pilot operator of the gas valve 2 Provides a spark for igniting pilot burner 3 Senses the pilot burner flame 4 Shuts off the spark after pilot flame is lit 5 Opens and closes the second main operator These functions occur in two stages trial for pilot ignition and main burner operation as described below Trial For Pilo...

Page 28: ...will turn on and pilot gas valve will open at once Pilot burner s should ignite after gas reaches the pilot burner s B Spark ignition should cut off when pilot flame is established C Main gas valve should open and main burners should ignite after gas reaches the burner ports NOTE Light off may not be satisfactory until the gas input and combustion air have been adjusted DANGER Fire Hazard Do not u...

Page 29: ... for 24 Vac across PV MV PV terminals on module If voltage is okay replace gas control if not replace module NOTE If the control goes into lockout reset system Spark Stops When Pilot Lit Check continuity of ignition cable and ground wire Clean flame rod Check electrical connections between flame rod and module Check for cracked ceramic flame rod insulator Check that pilot flame covers flame rod an...

Page 30: ... s and burner flames after reassembly Outer Mantle Outer Cone Burner Manifold High Limit Control While boiler is operating set high limit control below boiler water temperature and main burners should shut off Return control to normal setting and main burners should start again Pressure Relief Valve You must have pressure relief valve on the boiler The Relief Valve on water boilers is set at 30 ps...

Page 31: ...lbs A Turn off the burners B Open the bottom drain valve permitting all the water to drain from boiler 5 After the boiler has cooled fill and flush out several times 6 Fill to proper water level and ready for normal service NOTE Use of soda or any alkali vinegar or any acid is not recommended for cleaning heating boilers because it is difficult to completely remove them and injury may occur after ...

Page 32: ...PENNCO BOILERS 2201 Dwyer Avenue Utica NY 13501 web site www ecrinternational com ...

Reviews: