background image

Version 1.06.1 du 29/07/2016      

     Réf :  CD MA User Manual Imago EN 1.06.docx 

Page 9 sur 20 


5.1.2 “Normal” Interface   


Page 1 :  


Application : 

This function allows you to choose your application, the following 

choices are available: (

cow 

 horse 

 sheep 

 sow 

 lama 

dog 

 cat

).  

Press 

Load

 to confirm your choice. 


Preset :

 This function allows you to access the factory presets of the machine 

(the factory presets are highlighted in yellow colour ; you can’t delete them)


or save/load your own presets for your different applications. 
 

Protocol  : 

When  you  press  the  protocol  key,  you  have  access  to  all  the 

measurements  and  tables  available  corresponding  to  the  chosen 
application. Each animal has its own specific tables. 
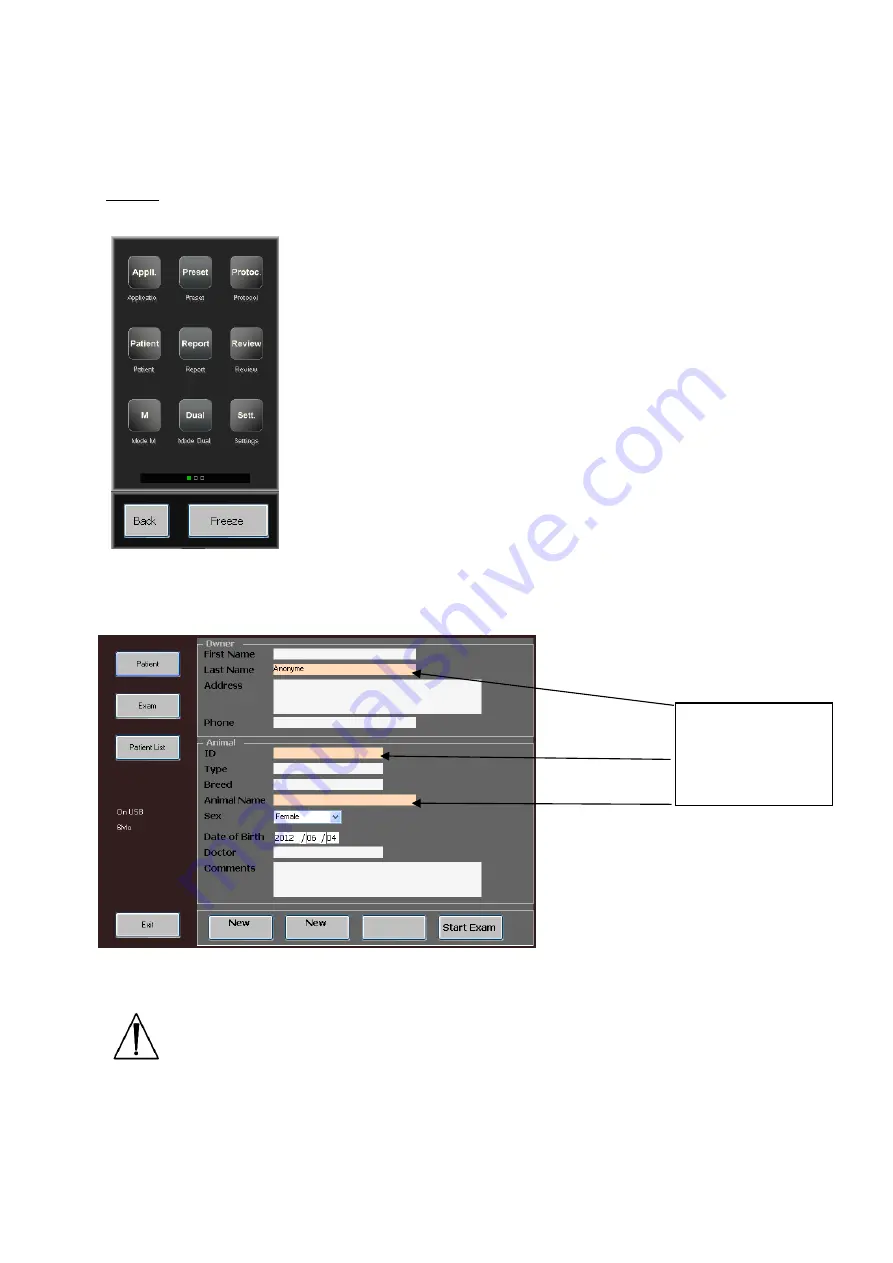


Patient : 

The patient key allows you to record patient data, save animal date, and scroll the patient list; this menu will allow 

you to start an exam on a patient. 


 Warning : do not forget to click on 

End of exam

 after finishing. If not, the patient file will be erased when turning off. 

Report : 

the report key allows the user to view the report while an exam is in progress. If the user is in free scanning mode 

(no exam in progress) the report key remains inactive. Can be exported thought USB, in 

Review

.  

Review : 

This key allows you to access the images and the video clips that the user has previously recorded. The review mode 

will access the USB drive directly if connected. If no USB is connected the review mode will access the internal memory of the 
device.  
 

Compulsory fields : 

Last Name, ID, 
Animal Name (pink 
colour) 

Summary of Contents for Imago

Page 1: ...Version 1 06 1 du 29 07 2016 R f CD MA User Manual Imago EN 1 06 docx Page 1 sur 20 User Manual Version 1 06 1 Imago reference 90 1945 User Manual reference 70 2607...

Page 2: ...GETTING STARTED 5 4 1 CONNECTION AND DISCONNECTION OF PROBES 5 4 2 STARTING OF THE DEVICE 5 5 PRESENTATION OF THE DEVICE 6 5 1 KEYBOARD DESCRIPTION 6 5 1 1 Simplified Interface 6 5 1 2 Normal Interfac...

Page 3: ...trap that will go around behind the neck 1 body strap elastic that will go around the body Please here are the following steps to follow 1 Open the 3 plastic connecting parts of the peripherals on the...

Page 4: ...ical probe 5 MHz this rectal probe is used for gynaecology and also abdominal small parts 3 1 2 Handling of probes Warning The probe is fragile and requires proper handling care and cleaning Transduce...

Page 5: ...Take the connector out of the device and store the probe in an appropriate place protected from shocks Warning Before disconnecting the active probe make sure to freeze the image When starting the dev...

Page 6: ...part SETTINGS SYSTEM activate or not Right Handed Warning do not use any metal parts even pens or motions that could scratch or damage the touch screen 5 1 1 Simplified Interface When we start the dev...

Page 7: ...g the unit on 3 pages are available you always start on page 2 below center as default setting When image is frozen 2 pages available Simply slip your finger right to left or left to right in order to...

Page 8: ...ee below P1 P2 P3 allows to access easily to pre registered Presets either factory or user s ones Settings access to user s set up Review to vizualise images and clips saved Distance to make measureme...

Page 9: ...ach animal has its own specific tables Patient The patient key allows you to record patient data save animal date and scroll the patient list this menu will allow you to start an exam on a patient War...

Page 10: ...nd the number of scrolls to Refresh Tools AUTOSELECT AutoSelect Frequency and Focus If activated the Focus will move automatically according to depth DISTANCE If In Sequence is activated a new distanc...

Page 11: ...Handed Left Handed System change the date or time format About software version and manufacture date Factory activate or deactivate the factory mode only for ECM Auto Freeze in standard mode Never is...

Page 12: ...s from the Protocol Items list will be included in the user protocol by clicking on the corresponding box Protocol name can be modified by typing the new name in the text field located in the lower le...

Page 13: ...e picture Distance It is possible to make measurements between two points on the screen without having to freeze the picture Press Distance and position the cursor with the touchpad Press Valid to sta...

Page 14: ...tations Allows you to write annotations on a frozen picture or choose an annotation that you have previously recorded in the settings menu Settings Preset the machine to your own convenience and have...

Page 15: ...equence this key allows the user to play the cineloop image by image forward this key allows the user to play the cineloop image by image remind List allows to return to the videos list Review mode Ba...

Page 16: ...very Preset P1 P2 P3 Preset Factory or your own regulations that you have beforehand registered Once marked Presets to click SAVE then to throw the simplified mode by ticking on SIMPLIFY Attention the...

Page 17: ...ser Manual Imago EN 1 06 docx Page 17 sur 20 6 Connection of peripherals The Imago equipment can be connected to several peripherals like TURN ON OFF CHARGE LED BATTERY POWER SUPPLY COMPOSITE VIDEO US...

Page 18: ...onents of the device Check the list of specified agents carefully In order to ensure proper cleaning and disinfection please follow the following procedure WARNING Do not use alcohol or other strong c...

Page 19: ...ttery this must be stored with a charge of between 15 and 50 and a temperature 30 C 86 F The device is designed to be operated with a relative humidity range from 10 to 95 including condensation The d...

Page 20: ...06 1 du 29 07 2016 R f CD MA User Manual Imago EN 1 06 docx Page 20 sur 20 Manufacturer s address Distributor s address ECM Echo Control Medical 126 bd de la R publique F 16000 Angoul me Tel 33 5 45...

Reviews: